Page 274 of 436
DS4_en_Chap09_info-pratiques_ed03-2015
Attach the trailer to the towball.
Attach the cable on the trailer to the security
ring located on the carrier.
Lower the trailer harness socket carrier by
pulling down on the ring visible below the
b u m p e r.
Remove the protective cover from the socket
and connect the trailer wiring harness.
Removing the towball
Disconnect the trailer harness from the socket
on the carrier.
Detach the cable on the trailer from the security
ring on the carrier.
Unhook the trailer from the towball.
Return the trailer harness connector carrier to
the folded position.Insert the key into the lock.
Turn the key anti-clockwise to unlock the
towball fixing mechanism.
Page 281 of 436

279
DS4_en_Chap10_verifications_ed03-2015
Fuel tankCapacity of the tank: approximately 60 litres.
Low fuel level
When the low fuel level in the
tank is reached, this warning lamp
comes on in the instrument panel,
accompanied by an audible warning
Refuelling
F Press control A until the automatic opening of the fuel flap is heard.
T
his control remains active for a few
minutes after switching off the ignition. If
necessary, switch the ignition on again to
reactivate it.
F
T
ake care to select the pump that delivers
the correct fuel for your vehicle.
With Stop & Start, never refuel with the
system in STOP mode; you must switch
off the ignition with the key, or the
START/STOP button if your vehicle has
Keyless Entry and Starting.
Additions of fuel must be of at least 5 litres to
be registered by the fuel gauge.
Opening the filler cap may result in an inrush of
air. This vacuum is entirely normal and results
from the sealing of the fuel system.
and the display of an alert message. When it
first comes on, around 6 litres of fuel remain
in the tank.
Until sufficient fuel has been added, every
time the ignition is switched on, this warning
lamp appears, accompanied by an audible
signal and an alert message. When driving,
this audible signal and the display of this
alert message are repeated with increasing
frequency, as the level drops towards 0
.
You must refuel as soon as possible to avoid
running out.
If you run out of fuel (Diesel), refer to the
corresponding section.
Checks
Page 304 of 436

Never store bottles of AdBlue® in your
vehicle.
Recommendations on storage
AdBlue® freezes at about -11°C and
deteriorates above 25°C. It is recommended
that bottles be stored in a cool area and
protected from direct sunlight.
Under these conditions, the additive can be
kept for at least a year.
If the additive has frozen, it can be used once it
has completely thawed out. Before topping-up, ensure that the vehicle is
parked on a flat and level sur face.
In wintry conditions, ensure that the
temperature of the vehicle is above -11°C.
Otherwise the AdBlue
® may be frozen and
so cannot be poured into its tank. Park your
vehicle in a warmer area for a few hours to
allow the top-up to be carried out.
Procedure
F Switch off the ignition and remove the key, or if your vehicle has one, press the
START/STOP button to switch off the
engine. F
R
aise the boot floor for access to the
AdBlue
® tank. S
ecure the boot floor by attaching its cord
to the hook on the parcel shelf support.
F
U
nclip the black plastic blanking plug using
its tab.
F
I
nsert your fingers into the aperture and
turn the blue cap a 6
th of a turn anti-
clockwise.
F
C
arefully lift off the cap, without dropping it.
Page 305 of 436

303
DS4_en_Chap10_verifications_ed03-2015
Never dispose of AdBlue® additive
bottles in the household waste. Place
them in a special container provided
this purpose or take them to your
dealer.
Important: if your vehicle's
AdBlue
® tank is completely empty -
w
hich is confirmed by the alert displays
and the impossibility of starting the
engine - you must add at least 3.8 litres
(so two 1.89 litre bottles). If any additive is split or splashed, wash
immediately with cold water or wipe
with a damp cloth.
If the additive has crystallised, clean it
off using a sponge and hot water.
Important:
in the event of a top-
up after a breakdown because of
a lack of additive , you must wait
around 5 minutes before switching
on the ignition, without opening the
driver's door, locking the vehicle,
introducing the key into the ignition
switch, or introducing the key of the
"Keyless Entr y and Star ting" system
into the passenger compartment .
Switch on the ignition, then, after
10 seconds, start the engine.
F
O
btain a bottle of AdBlue
®. After first
checking the use-by date, read carefully
the instructions on use on the label before
pouring the contents of the bottle into your
vehicle's AdBlue
® tank. F
A
fter emptying the bottle, wipe away any
spillage around the tank filler using a damp
cloth.
F
R
efit the blue cap to the tank and turn it a
6
th of a turn clockwise, to its stop.
F
R
efit the black plastic blanking plug,
clipping it in on the flap.
F
D
etach the cord from the parcel shelf
support and lower the boot floor.
Checks
Page 349 of 436

1
1
20
5
4
2
7
347
DS4_en_Chap12c_SMEGplus_ed03-2015
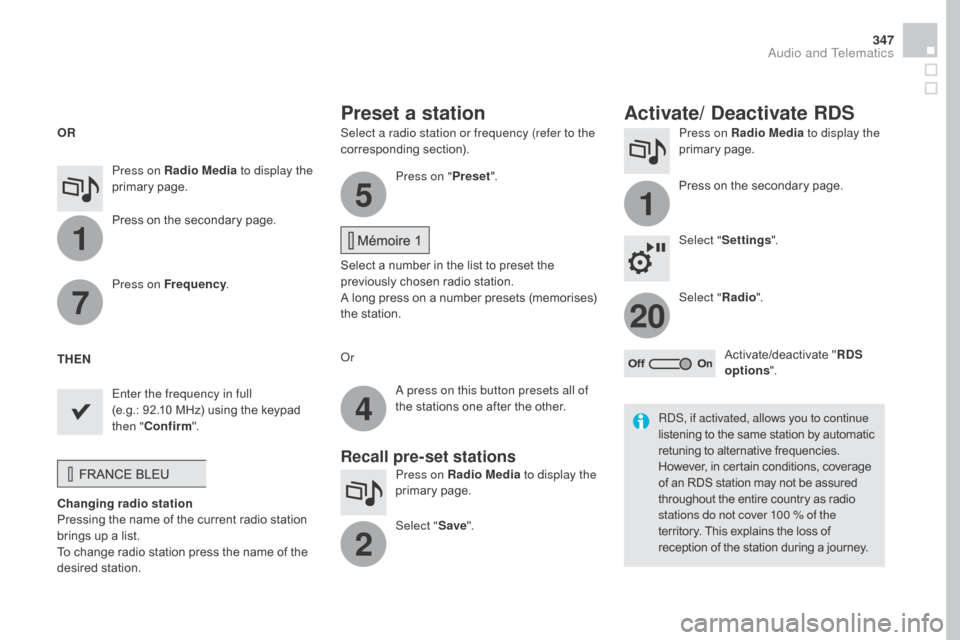
Select a radio station or frequency (refer to the
corresponding section).Press on Radio Media
to display the
primary page.
Press on the secondary page.
Select " Settings ".
Select " Radio".
Activate/deactivate " R
dS
opt
ions".
Press on Radio Media
to display the
primary page.
Press on the secondary page. Press on "
Preset".
Select a number in the list to preset the
previously chosen radio station.
A long press on a number presets (memorises)
the station.
Press on Frequency
.
Enter the frequency in full
(e.g.: 92.10 MHz) using the keypad
then " Confirm ".
Changing radio station
Pressing the name of the current radio station
brings up a list.
To change radio station press the name of the
desired station. Or
Press on Radio Media to display the
primary page.
Select " Save".
Preset a station Activate/ de activate RdS
OR
THEN
A press on this button presets all of
the stations one after the other.
Recall pre-set stations
RDS, if activated, allows you to continue
listening to the same station by automatic
retuning to alternative frequencies.
However, in certain conditions, coverage
of an RDS station may not be assured
throughout the entire country as radio
stations do not cover 100 % of the
territory. This explains the loss of
reception of the station during a journey.
Audio and Telematics
Page 375 of 436
373
DS4_en_Chap12c_SMEGplus_ed03-2015
Level 1Level 2 Level 3 Comments
Connected services
Apple
® Carplay®
Telephone Favourites
The "Telephone" function is placed automatically
in "Siri" voice mode.
Press on "Display contacts" for access to the
telephone menus.
Calls
Contacts
Keypad
Messages
Music Lists
Press on "Music" to browse and select the tracks
on your smartphone.
Press on "Playing" for access to the track
currently playing.
Artists
Tr a c k s
Albums
Other...
Plan
de
stinationsPress on "Destinations" to search for an address
by "Siri" voice command or by using the keypad.
The GPS function is through the telephone's 3G,
4G or Wi-Fi internet connection.
Messages
d
isplay messagesThe "Messages" function is place automatically
in "Siri" voice mode to speak the message and
the addressee.
Press on "Display messages" for access to the
messages.
Playing Access to the track currently playing.
Audio and Telematics
Page 382 of 436

1
19
20
22
DS4_en_Chap12c_SMEGplus_ed03-2015
Managing paired
telephones
This function allows the connection or
disconnection of a peripheral device as
well as the deletion of a pairing.Using the telephone is not
recommended while driving.
Park the vehicle.
Make the call using the steering
mounted controls.
Press on Telephone
to display the
primary page.
Press on the secondary page.
Select " Bluetooth " to display the list
of paired peripheral devices.
Select the peripheral in the list. Select "Search for devices "
Or "Connect /
d
i
sconnect" to start or
end the Bluetooth connection with
the selected device.
Or "
de
lete" to delete the pairing.
Receiving a call
An incoming call is announced by a ring and a
superimposed display in the screen.
Make a short press on the steering
mounted TEL button to accept an
incoming call.
Make a long press
on the steering mounted TEL button
to reject the call.
Or Select "End call".
Making a call
Calling a new number
Press on Telephone to display the
primary page.
Enter the phone number using the
digital keypad.
Press " Call" to start the call.
Calling a contact
Press on Telephone to display the
primary page.
Or make a long press
on the steering mounted TEL button.
Page 406 of 436

DS4_en_Chap12d_RD5_ed03-2015
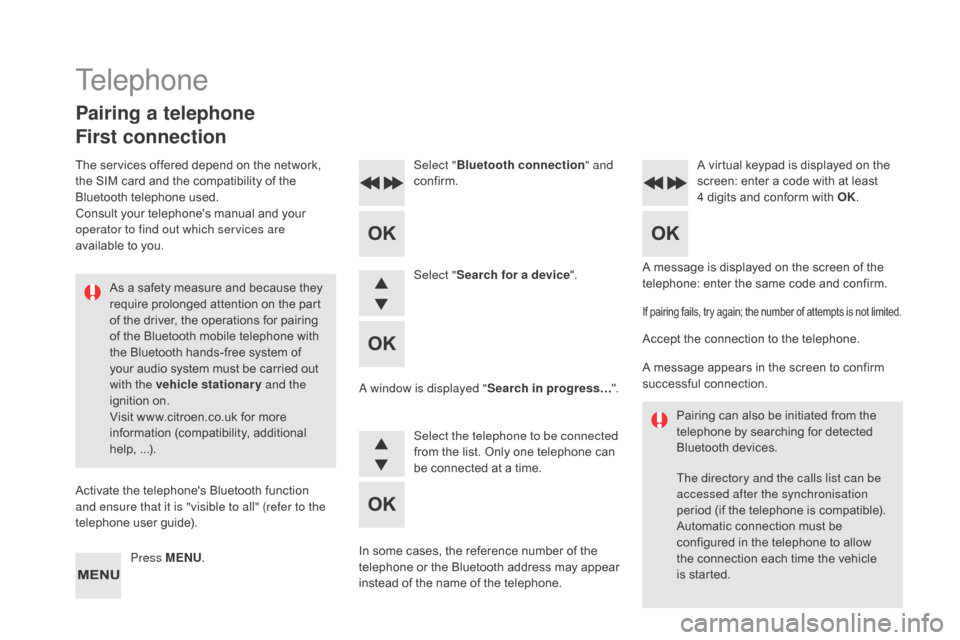
A message is displayed on the screen of the
telephone: enter the same code and confirm.
Select "
Bluetooth connection " and
confirm. A virtual keypad is displayed on the
screen: enter a code with at least
4 digits and conform with OK.
Select " Search for a device".
Select the telephone to be connected
from the list. Only one telephone can
be connected at a time.
A window is displayed "
Search in progress…".
In some cases, the reference number of the
telephone or the Bluetooth address may appear
instead of the name of the telephone.
If pairing fails, try again; the number of attempts is not limited.
Accept the connection to the telephone.
A message appears in the screen to confirm
successful connection. Pairing can also be initiated from the
telephone by searching for detected
Bluetooth devices.
The directory and the calls list can be
accessed after the synchronisation
period (if the telephone is compatible).
Automatic connection must be
configured in the telephone to allow
the connection each time the vehicle
is started.
Press MENU
.
Telephone
Pairing a telephone
First connection
The services offered depend on the network,
the SIM card and the compatibility of the
Bluetooth telephone used.
Consult your telephone's manual and your
operator to find out which services are
available to you.
As a safety measure and because they
require prolonged attention on the part
of the driver, the operations for pairing
of the Bluetooth mobile telephone with
the Bluetooth hands-free system of
your audio system must be carried out
with the vehicle stationary and the
ignition on.
Visit www.citroen.co.uk for more
information (compatibility, additional
help, ...).
Activate the telephone's Bluetooth function
and ensure that it is "visible to all" (refer to the
telephone user guide).