Page 46 of 436

DS4_en_Chap01_controle-de-marche_ed03-2015
With the audio system switched on, this
menu allows you to activate or deactivate the
functions associated with use of the radio
(RDS, DAB / FM auto tracking, RadioText
(TXT) display) or to choose the media play
mode (Normal, Random, Random all, Repeat).
For more information on the "Multimedia"
application, refer to the "Audio and telematics"
section.
"Multimedia" menu "Trip computer" menu
This menu allows you to view information on
the status of the vehicle.
Warning log
This summarises the status and warning
messages for systems (active, not active or
faulty), displaying them in succession in the
multifunction screen.
F
P
ress the "MENU" button for access to the
main menu.
F
P
ress the arrows, then the "OK" button to
select the " Trip computer " menu.
F
I
n the " Trip computer " menu, select the
" Warning log" line and confirm.
"Telephone" menu
With the audio system switched on, this menu
allows you to make a call or view the various
telephone directories.
For more information on the "Telephone"
application, refer to the "Audio and telematics"
section.
"Bluetooth
connection" menu
Wit the audio system on, this menu allows a
Bluetooth device (telephone, media player)
to be connected or disconnected and the
connection mode to be defined (hands-free,
playing audio files).
For more information on the "Bluetooth
connection" application, refer to the "Audio and
telematics" section.
Page 67 of 436

65
DS4_en_Chap02_ouvertures_ed03-2015
In the event of a malfunction with the remote
control, you can no longer unlock, lock or
locate your vehicle.
F
F
irst of all, use the key in the lock to unlock
or lock your vehicle.
F
T
hen, reinitialise the remote control.
Fault with the remote
control
Reinitialisation
F Switch off the ignition and remove the ignition key.
F
P
ress the closed padlock immediately for a
few seconds.
F
T
urn the key to position 2 (Ignition on) .
F
S
witch off the ignition and remove the key
from the ignition switch.
The remote control is fully operational again.
Changing the battery
Battery ref.: CR2032/3 volts. F
U
nclip the cover using a small screwdriver
at the two cutouts.
F L ift off the cover.
F
R
emove the flat battery from its location.
F
F
it the new battery into its location
observing the original direction of fitment.
F
C
lip the cover onto the casing.
If the battery is flat, you are informed
by illumination of this warning lamp,
an audible signal and a message in
the screen.
If the problem persists, contact a
CITROËN dealer as soon as possible.
Access
Page 83 of 436

81
DS4_en_Chap02_ouvertures_ed03-2015
Doors
Opening
From outside
F After unlocking the vehicle or with the electronic key of the Keyless Entry and
Starting system in the recognition zone,
pull the door handle.
From inside
F Pull the interior control lever of a front door; this unlocks the vehicle completely.
Closing
When a door is not closed correctly:
-
w
ith the engine running or the
vehicle moving (speed below
6 mph (10 km/h)), this warning
lamp comes on, accompanied
by an alert message for a few
seconds.
-
w
ith the vehicle moving (speed above
6
mph (10 km/h)), in addition to the warning
lamp and alert message, there is an
audible signal for a few seconds.
When the selective unlocking is
activated, the first press of the remote
control unlocking button permits
unlocking of the driver's door only. With the selective unlocking activated:
-
o
pening the the driver's door
unlocks the driver's door only (if the
vehicle has not already been
completely unlocked),
-
o
pening one of the passenger
doors unlocks the rest of the
vehicle.
Access
Page 84 of 436

DS4_en_Chap02_ouvertures_ed03-2015
Boot
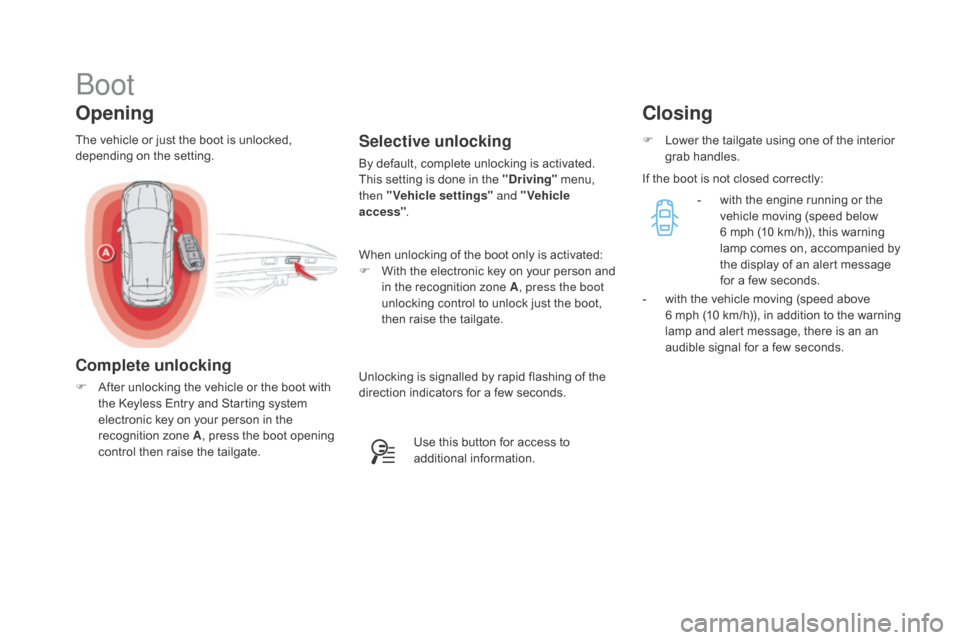
The vehicle or just the boot is unlocked,
depending on the setting.Selective unlocking
By default, complete unlocking is activated.
This setting is done in the "driving" menu,
then "Vehicle settings" and "Vehicle
access" .
When unlocking of the boot only is activated:
F
W
ith the electronic key on your person and
in the recognition zone A , press the boot
unlocking control to unlock just the boot,
then raise the tailgate.
Use this button for access to
additional information. F
L
ower the tailgate using one of the interior
grab handles.
Closing
Opening
Complete unlocking
F After unlocking the vehicle or the boot with
the Keyless Entry and Starting system
electronic key on your person in the
recognition zone A , press the boot opening
control then raise the tailgate. If the boot is not closed correctly:
-
w
ith the engine running or the
vehicle moving (speed below
6 mph (10 km/h)), this warning
lamp comes on, accompanied by
the display of an alert message
for a few seconds.
-
w
ith the vehicle moving (speed above
6 mph (10 km/h)), in addition to the warning
lamp and alert message, there is an an
audible signal for a few seconds.
Unlocking is signalled by rapid flashing of the
direction indicators for a few seconds.
Page 91 of 436
89
DS4_en_Chap03_confort_ed03-2015
Manual lumbar adjustment
F Turn the knob to obtain the desired level of lumbar support.
Electric lumbar adjustment
F Press the front or rear of the control to obtain the desired lumbar support. This function provides a back massage; it only
operates when the engine is running.
F
P
ress the switch to activate the function.
The warning lamp on the switch comes on and
the massage function is activated for a period
of 60
minutes. During this time, massage is
per formed in 6 cycles of 10 minutes each cycle
(6
minutes of massage followed by 4 minutes
break).
After an hour, the function is automatically
deactivated. The warning lamp in the switch
goes off.
deactivation
You can deactivate the massage function at
any time by pressing the switch. The movement
in progress continues until the initial non-
massage position is reached.
Massage function
Comfort
Page 107 of 436

105
DS4_en_Chap03_confort_ed03-2015
Front demist - defrost
These markings on the control panel indicate the control positions for rapid demisting or
defrosting of the windscreen and side windows.
With manual air
conditioning
F Put the temperature, air flow and distribution controls to the dedicated
marked position.
F
P
ut the air intake control to the "Exterior air
intake" position
(
indicator lamp on the control off).
F
S
witch on the air conditioning by pressing
the "A /C " button; the warning lamp in the
button comes on.
With digital dual-zone air
conditioning
With Stop & Start, when the demisting,
air conditioning and air flow functions
are activated, STOP mode is not
available.
Automatic visibility programme
F Select this programme to demist or defrost the windscreen and side windows as
quickly as possible.
The system automatically manages the air
conditioning, air flow and air intake, and
provides optimum distribution towards the
windscreen and side windows.
F
T
o stop the programme, press either the
"visibility" button again or "AUTO" , the
warning lamp on the button goes off and
the warning lamp on the "AUTO" button
comes on.
The system starts again with the values in
use before it was overridden by the visibility
programme. With Stop & Start, when demisting has
been activated, the STOP mode is not
available.
Comfort
Page 119 of 436

11 7
DS4_en_Chap04_amenagement_ed03-2015
230 V / 50 Hz power socket
Connect only one device at a time to
the socket (no extension or multi-way
connector).
Connect only devices with class II
insulation (shown on the device).
As a safety measure, when electrical
consumption is high and when
required by the vehicle's electrical
system (particular weather conditions,
electrical overload...), the power supply
to the socket will be cut off; the green
warning lamp goes off.
A 230 V / 50 Hz socket (maximum power:
120
W) is fitted to the centre console.
To use the socket:
F
l
ift the front armrest cover for access to its
compartment,
F
c
heck that the warning lamp is on green,
F
c
onnect your multimedia or other electrical
device (telephone charger, laptop
computer, CD-DVD player, baby food
warmer...).
This socket works with the engine running, as
well as in STOP mode on Stop & Start.
In the event of a fault with the socket, the green
warning lamp flashes.
Have it checked by a CITROËN dealer or a
qualified workshop.
Fittings
Page 126 of 436
DS4_en_Chap04_amenagement_ed03-2015
Use
F Extract the torch from its location pulling it upwards.
F
P
ress the switch, located on the back, to
switch the torch on or off.
F
U
nfold the support, located on the back, to
set down and raise the torch; for example,
when changing a wheel.
Storing
F Put the torch back in place in its location starting with the lower part.
I
f you have forgotten to switch off the torch,
this switches it off automatically.
Storage box
F Raise the boot carpet for access to the storage box.
This has areas for the storage of a box of spare
bulbs, a first aid kit, two warning triangles...
It also contains the vehicle tools, the temporary
puncture repair kit...
If the torch is not engaged correctly, it
may not charge and may not come on
when the boot is opened.