2016 CITROEN DS3 CABRIO DAG heating
[x] Cancel search: heatingPage 26 of 458

DS3_en_Chap01_controle-de-marche_ed01-2015
Warning/indicator lampis on Cause Action / Observations
di
esel engine
pre-heating fixed.
The
key is at position 2 (ignition on) in
t
he ignition switch.Wait
until the warning lamp goes off before starting.
The
period of illumination of the warning lamp is
d
etermined by the climatic conditions (up to about
t
hirty seconds in extreme climatic conditions).
If
the engine does not start, switch the ignition off and
t
hen on, wait until the warning lamp goes off again,
t
hen start the engine.
Parking brake fixed. The
parking brake is applied or not
p
roperly
r
eleased.Release
the parking brake to switch off the warning
l
amp, keeping your foot on the brake pedal.
Observe
the safety recommendations.
For
more information on the parking brake, refer to the
c
orresponding
s
ection.
Stop & Star t fixed. When
the vehicle stops (red lights,
t
raffic jams, ...) the Stop & Start system
h
as put the engine into STOP mode.The
warning lamp goes off and the engine restarts
a
utomatically in START mode, as soon as you want to
m
ove off.
flashes for a few
seconds,
then goes
o
f f.STOP
mode is temporarily
u
navailable.
or
START
mode is invoked
au
tomatically.For
more information on special cases with STOP
m
ode and START mode, refer to the "Stop & Start"
s
ection.
Page 75 of 458

73
DS3_en_Chap03_confort_ed01-2015
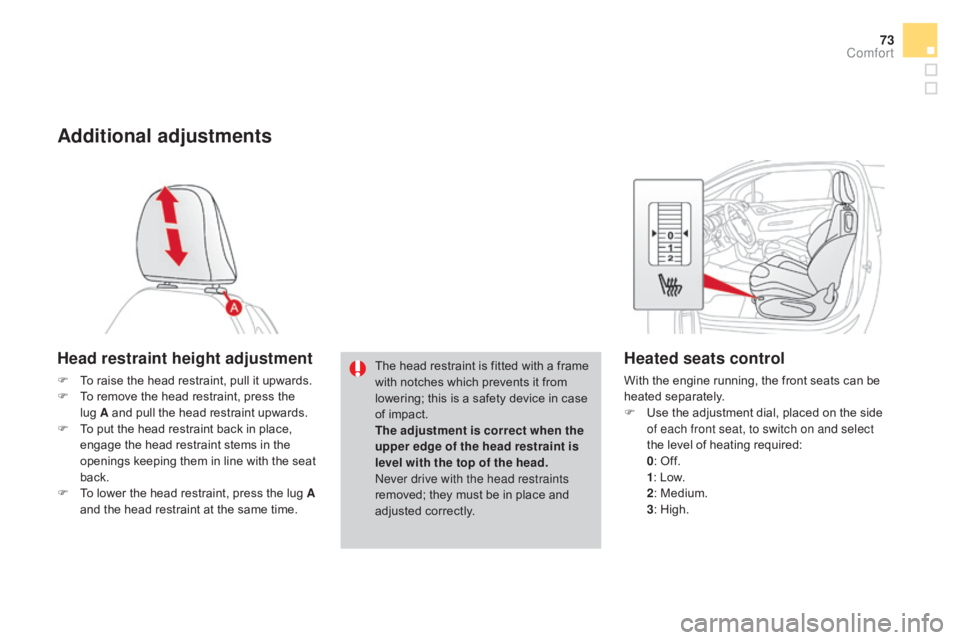
Additional adjustments
Head restraint height adjustment
F To raise the head restraint, pull it upwards.
F T o remove the head restraint, press the
l
ug A and pull the head restraint upwards.
F
T
o put the head restraint back in place,
e
ngage the head restraint stems in the
o
penings keeping them in line with the seat
b
ack.
F
T
o lower the head restraint, press the lug A
and
the head restraint at the same time.The
head restraint is fitted with a frame w
ith notches which prevents it from
l
owering; this is a safety device in case
o
f impact.
The adjustment is correct when the
upper edge of the head restraint is
level with the top of the head.
Never drive with the head restraints
removed;
they must be in place and
adj
usted
c
orrectly.
Heated seats control
With the engine running, the front seats can be heated s eparately.
F
U
se the adjustment dial, placed on the side
o
f each front seat, to switch on and select
the
level of heating required:
0:
Off.
1:
Low.
2:
Medium.
3:
High.
Comfort
Page 83 of 458

81
DS3_en_Chap03_confort_ed01-2015
Ventilation
Air intake
The air circulating in the passenger compartment is filtered and originates either from the outside via t
he grille located at the base of the windscreen or
f
rom the inside in air recirculation mode.
Air treatment
The incoming air follows various routes depending on the controls selected by the
d
river:
-
d
irect arrival in the passenger
c
ompartment (air intake),
-
p
assage through a heating circuit (heating),
-
p
assage through a cooling circuit (air
c
onditioning).
The
temperature control enables you to obtain
t
he level of comfort required by mixing the air of
t
he various circuits.
The air distribution control enables you to
diffuse
the air in the passenger compartment
c
ombining several air vents.
The air flow control enables you to increase or
reduce
the speed of the ventilation blower.
Control panel
The controls of this system are grouped together on control panel A on the centre
console.
Depending on the model, the
f
unctions offered are:
-
t
he level of comfort required,
-
a
ir flow,
-
a
ir distribution,
-
d
emisting-defrosting,
-
m
anual or digital air conditioning controls.
Air distribution
1. Windscreen demisting-defrosting v ents.
2. F ront side window demisting-defrosting
ve
nts.
3.
S
ide adjustable air vents.
4.
C
entral adjustable air vents.
5.
A
ir outlets to the front footwells.
6.
A
ir outlets to the rear footwells.
Comfort
Page 85 of 458

83
DS3_en_Chap03_confort_ed01-2015
Heating / Ventilation
Manual control panelElectric control panel
Manual air conditioning
Manual control panel Electric control panel
Comfort
Page 86 of 458

DS3_en_Chap03_confort_ed01-2015
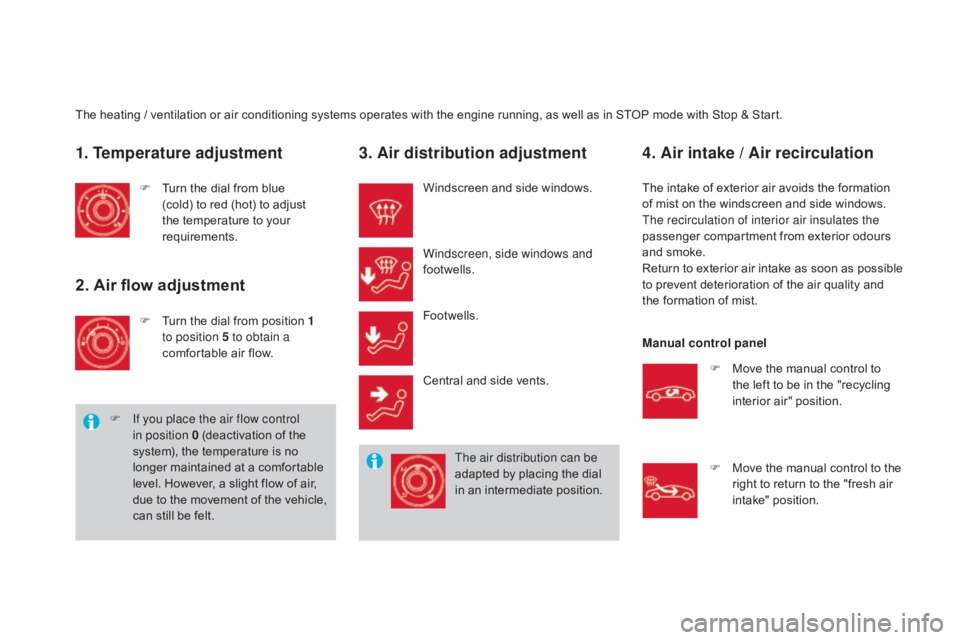
The heating / ventilation or air conditioning systems operates with the engine running, as well as in STOP mode with Stop & Start.
1. Temperature adjustment
F Turn the dial from blue (
cold) to red (hot) to adjust
t
he temperature to your
r
equirements.
2. Air flow adjustment
F Turn the dial from position 1
to position 5 to obtain a
comfortable
air flow.
F
I
f you place the air flow control
in position 0
(deactivation of the
s
ystem), the temperature is no
l
onger maintained at a comfortable
l
evel. However, a slight flow of air,
d
ue
t
o
t
he
m
ovement
o
f
t
he
v
ehicle,
c
an still be felt.
3. Air distribution adjustment
Windscreen and side windows.
W indscreen, side windows and
footwells.
Footwells.
Central
and side vents.
The air distribution can be
adapted
by placing the dial
i
n an intermediate position.
4. Air intake / Air recirculation
The intake of exterior air avoids the formation of mist on the windscreen and side windows.
The recirculation of interior air insulates the
passenger
compartment from exterior odours
a
nd smoke.
Return
to exterior air intake as soon as possible
t
o prevent deterioration of the air quality and
t
he formation of mist.
Manual control panel F
M
ove the manual control to
t
he left to be in the "recycling
i
nterior air" position.
F
M
ove the manual control to the
r
ight to return to the "fresh air
i
ntake" position.
Page 89 of 458

87
DS3_en_Chap03_confort_ed01-2015
It is possible to adjust one or more functions manually while leaving the other functions in
a
utomatic mode.
The "AUTO"
symbol switches off.
To
return to automatic mode, press the "AUTO"
button.
Manual override
4. Air conditioning on/off
For maximum cooling or heating of the c abin, it is possible to go beyond the
m
inimum 14 or maximum 28 values.
F
P
ress the blue button 2 until "LO"
is displayed or the red button 2
until
"HI"
is displayed. Press this button to switch off the air
conditioning.
Stopping
the air conditioning may cause
s
ome problems (humidity, misting).
5. Air intake / Air recirculation
Press this button for recirculation of
the
interior air. The air recirculation
s
ymbol
5
is displayed.
Avoid
prolonged recirculation of
i
nterior air (risk of condensation or
d
eterioration of the air quality).
Switching
to
manual
mode
may
not
be
s
uitable
(temperature,
humidity,
odour,
c
ondensation)
and
does
not
provide
o
ptimum
c
omfort. Automatic
operation
of
the
air
conditioning
is
r
esumed
when
the
button
is
pressed
again.
The
symbol
"A /C "
is
displayed. Air
recirculation enables the passenger
c
ompartment to be isolated from exterior
o
dours
and smoke.
Press
this
button again or press the "AUTO"
button
to
resume automatic management of
t
he
intake
of air. The air recirculation symbol 5
goes
off.
Comfort
Page 91 of 458

89
DS3_en_Chap03_confort_ed01-2015
Front demist - defrost
With the heating /
ventilation system
F Put the temperature and air flow controls to t
he dedicated marked position.
F
P
ut the air intake control to the "Exterior air
i
ntake" position
(
manual control to the right or electric
c
ontrol with indicator lamp off).
F
P
ut the air distribution control to the
"Windscreen"
p
osition.
These
markings on the control panel indicate the control positions for rapid demisting or
d
efrosting of the windscreen and side windows.
With the manual air
conditioning system
F Put
the temperature and air flow controls to t
he dedicated marked position.
F
P
ut the air intake control to the "Exterior air
i
ntake" position
(
manual control to the right or electric
c
ontrol with indicator lamp off).
F
P
ut the air distribution control to the
"Windscreen"
p
osition.
F
S
witch on the air conditioning by pressing
t
he "A /C "
button; the associated green
w
arning lamp comes on.
With
Stop & Start, when the demisting,
a
ir conditioning and air flow functions
a
re activated, STOP mode is not
a
vailable.
Comfort
Page 92 of 458

DS3_en_Chap03_confort_ed01-2015
Rear screen demist - defrost
The control button is located on the heating or air conditioning system control panel.
Switching on
The rear screen demisting/defrosting can only operate when the engine is running.
F
P
ress this button to demist /defrost the
r
ear screen and (depending on version)
t
he door mirrors. The indicator lamp
a
ssociated with the button comes on.
Switching off
The demisting/defrosting switches off automatically to prevent an excessive
c
onsumption of current.
F
I
t is possible to stop the demisting/
defrosting
operation before it is switched
o
ff automatically by pressing the button
a
gain. The indicator lamp associated with
t
he button switches off. Switch
off the demisting/defrosting
o
f the rear screen and door mirrors
a
s soon as appropriate, as reducing e
lectrical power consumption results in r
educed f uel c onsumption.
If the engine is switched off before the d
emisting/defrosting is switched off a
utomatically,
d
emisting/defrosting
w
ill
r
esume next time the engine is switched on.
Scented air
freshener
This diffuses a fragrance in the passenger compartment, by means of the adjustment dial
a
nd the various fragrance cartridges available.
This
dial is located on the dashboard.
It
allows you to adjust the intensity of diffusion
o
f the fragrance.
F
T
urn the dial to the right to permit diffusion
o
f the fragrance.
F
T
urn the dial to the left to stop diffusion of
the
f
ragrance.
Adjustment dial
Leave the central vents open.
T he intensity of diffusion of the
fragrance
may depend on the
v
entilation or air conditioning settings.