2016 Citroen C3 PICASSO change time
[x] Cancel search: change timePage 10 of 292

8
Eco-driving
Optimise the use of your gearbox
With a manual gearbox, move off gently and change up without waiting.
During acceleration change up early.
With an automatic or electronic gearbox, give preference to automatic
mode and avoid pressing the accelerator pedal heavily or suddenly.
The gear shift indicator invites you engage the most suitable gear: as
soon as the indication is displayed in the instrument panel, follow it
straight away.
For vehicles fitted with an electronic or automatic gearbox, this indicator
appears only in manual mode.
Drive smoothly
Maintain a safe distance between vehicles, use engine braking rather
than the brake pedal, and press the accelerator progressively. These
practices contribute towards a reduction in fuel consumption and CO
2
emissions and also helps reduce the background traffic noise.
Control the use of your electrical
equipment
Before moving off, if the passenger compartment is too warm, ventilate it
by opening the windows and air vents before using the air conditioning.
Above 30 mph (50 km/h), close the windows and leave the air vents
open.
Remember to make use of equipment that can help keep the
temperature in the passenger compartment down (sunroof and window
blinds...).
Switch off the air conditioning, unless it has automatic regulation, as
soon as the desired temperature is attained.
Switch off the demisting and defrosting controls, if not automatic.
Switch off the heated seat as soon as possible.
Switch off the headlamps and front foglamps when the level of light
does not require their use.
Avoid running the engine before moving off, particularly in winter; your
vehicle will warm up much faster while driving.
As a passenger, if you avoid connecting your multimedia devices
(film, music, video game...), you will contribute towards limiting the
consumption of electrical energy, and so of fuel.
Disconnect your portable devices before leaving the vehicle.
Eco-driving is a range of everyday practices that allow the motorist to optimise their fuel consumption and CO
2 emissions.
If your vehicle has cruise control, make use of the system at speeds
above 25 mph (40 km/h) when the traffic is flowing well.
Eco-driving
Page 28 of 292
26
C3Picasso_en_Chap01_controle-de-marche_ed01-2015
Distance recordersLighting dimmer
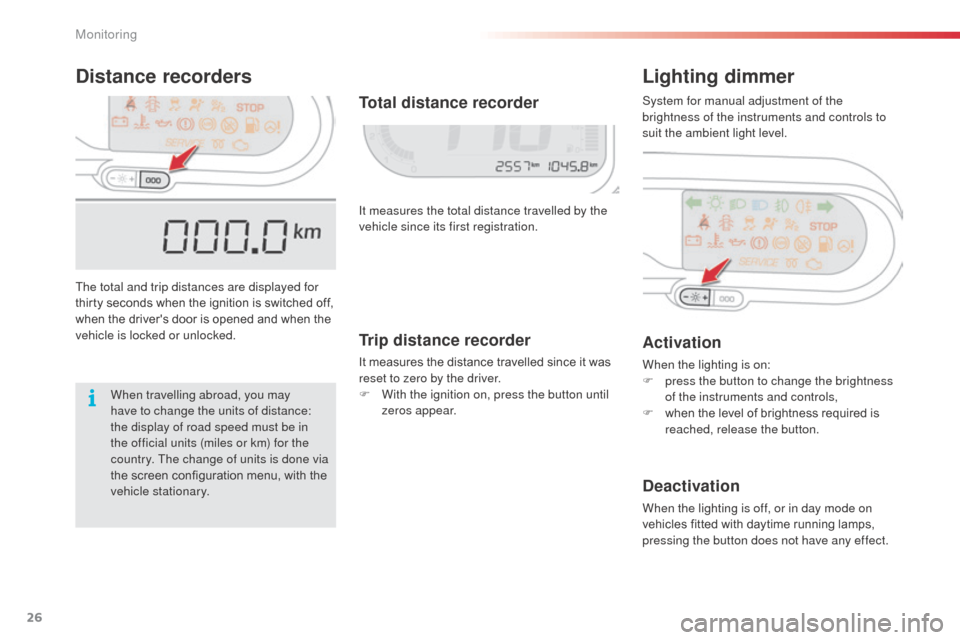
The total and trip distances are displayed for
thirty seconds when the ignition is switched off,
when the driver's door is opened and when the
vehicle is locked or unlocked.It measures the total distance travelled by the
vehicle since its first registration.
Activation
When the lighting is on:
F
p ress the button to change the brightness
of the instruments and controls,
F
w
hen the level of brightness required is
reached, release the button.
Deactivation
When the lighting is off, or in day mode on
vehicles fitted with daytime running lamps,
pressing the button does not have any effect.
Total distance recorder
When travelling abroad, you may
have to change the units of distance:
the display of road speed must be in
the official units (miles or km) for the
country. The change of units is done via
the screen configuration menu, with the
vehicle stationary. System for manual adjustment of the
brightness of the instruments and controls to
suit the ambient light level.
Trip distance recorder
It measures the distance travelled since it was
reset to zero by the driver.
F
W
ith the ignition on, press the button until
zeros appear.
Monitoring
Page 31 of 292
29
C3Picasso_en_Chap02_ecran-multifonction_ed01-2015
Monochrome screen A
Controls
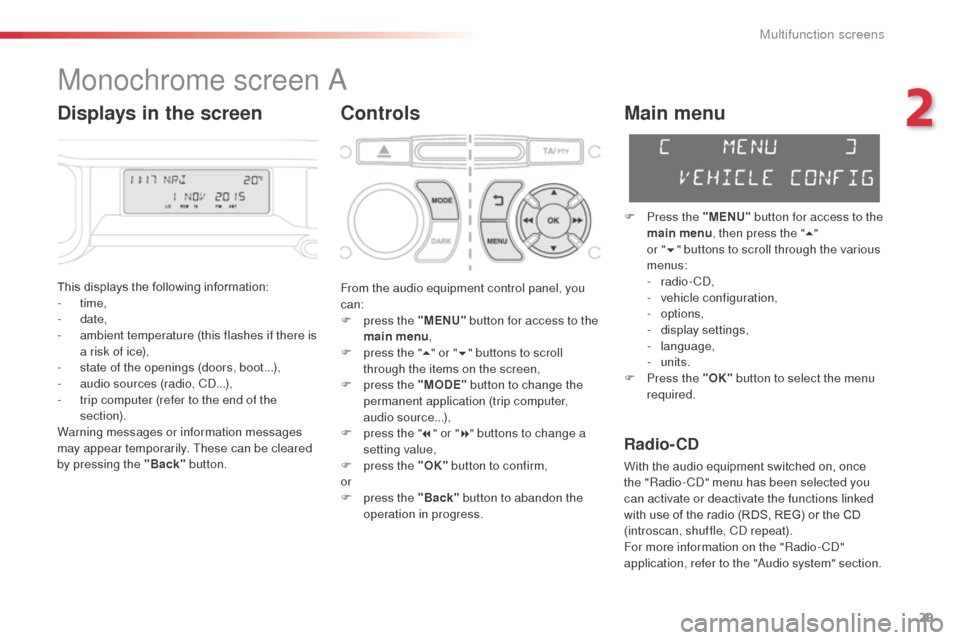
This displays the following information:
- time,
-
date,
-
a
mbient temperature (this flashes if there is
a risk of ice),
-
s
tate of the openings (doors, boot...),
-
a
udio sources (radio, CD...),
-
t
rip computer (refer to the end of the
section).
Warning messages or information messages
may appear temporarily. These can be cleared
by pressing the "Back" button.
Main menu
F Press the "MENU" button for access to the
main menu , then press the " 5"
or
"6 " buttons to scroll through the various
menus:
-
radio - CD,
-
v
ehicle configuration,
-
options,
-
d
isplay settings,
-
language,
-
units.
F
P
ress the "OK" button to select the menu
required.
From the audio equipment control panel, you
can:
F
p
ress the "MENU" button for access to the
main menu ,
F
p
ress the " 5" or " 6" buttons to scroll
through the items on the screen,
F
p
ress the "MODE" button to change the
permanent application (trip computer,
audio source...),
F
p
ress the " 7" or " 8" buttons to change a
setting value,
F
p
ress the "OK" button to confirm,
or
F
p
ress the "Back" button to abandon the
operation in progress.
Radio- CD
With the audio equipment switched on, once
the "Radio- CD" menu has been selected you
can activate or deactivate the functions linked
with use of the radio (RDS, REG) or the CD
(introscan, shuffle, CD repeat).
For more information on the "Radio-CD"
application, refer to the "Audio system" section.
Displays in the screen
2
Multifunction screens
Page 32 of 292
30
C3Picasso_en_Chap02_ecran-multifonction_ed01-2015
Display adjust
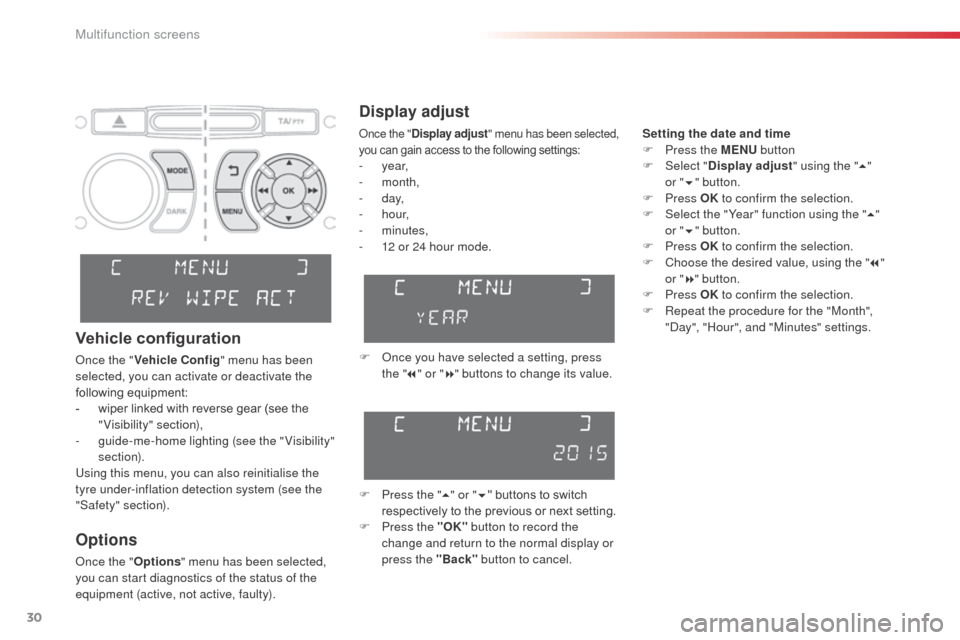
Setting the date and time
F P ress the MENU button
F
Sel
ect "Display adjust " using the "5"
or
"6 "
button.
F
Press OK to confirm the selection.
F
S
elect the "Year" function using the " 5"
or
"6 " button.
F
Press OK to confirm the selection.
F
C
hoose the desired value, using the " 7"
or
"8 " button.
F
Press OK to confirm the selection.
F
R
epeat the procedure for the "Month",
"Day", "Hour", and "Minutes" settings.
F
O
nce you have selected a setting, press
the " 7" or " 8" buttons to change its value.
F
P
ress the " 5" or " 6" buttons to switch
respectively to the previous or next setting.
F
P
ress the "OK" button to record the
change and return to the normal display or
press the "Back" button to cancel.
Options
Once the "Options" menu has been selected,
you can start diagnostics of the status of the
equipment (active, not active, faulty).
Vehicle configuration
Once the " Vehicle Config" menu has been
selected, you can activate or deactivate the
following equipment:
-
w
iper linked with reverse gear (see the
"Visibility" section),
-
g
uide-me-home lighting (see the " Visibility"
section).
Using this menu, you can also reinitialise the
tyre under-inflation detection system (see the
"Safety" section).
Once the " Display adjust " menu has been selected,
you can gain access to the following settings:
- year,
- month,
-
d ay,
-
h o u r,
-
minutes,
-
1
2 or 24 hour mode.
Multifunction screens
Page 35 of 292
33
C3Picasso_en_Chap02_ecran-multifonction_ed01-2015
Options
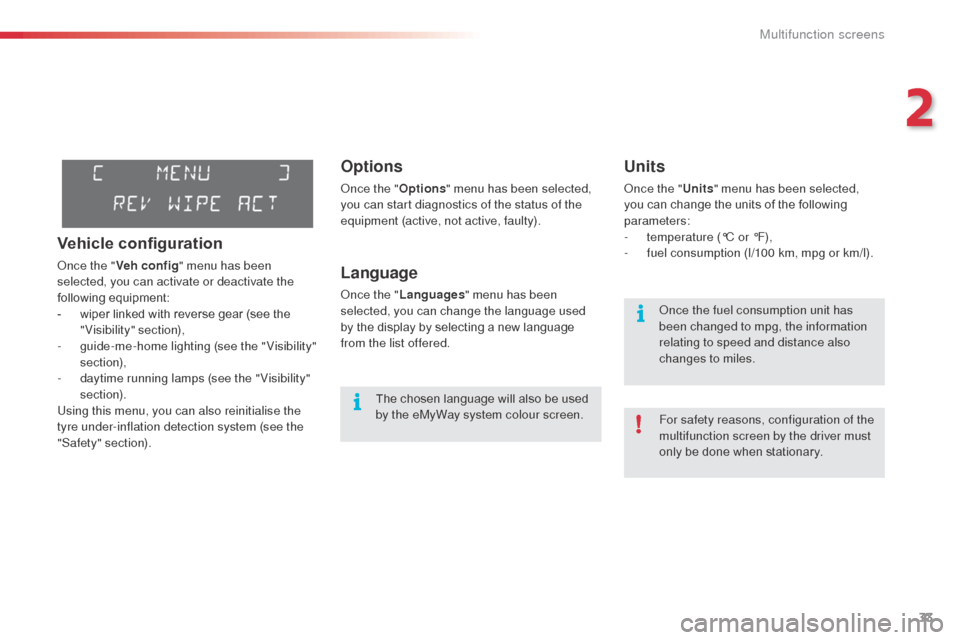
Once the "Options" menu has been selected,
you can start diagnostics of the status of the
equipment (active, not active, faulty).
Language
Once the " Languages " menu has been
selected, you can change the language used
by the display by selecting a new language
from the list offered.
Units
Once the " Units" menu has been selected,
you can change the units of the following
parameters:
-
t
emperature (°C or °F),
-
f
uel consumption (l/100 km, mpg or km/l).
The chosen language will also be used
by the eMyWay system colour screen. For safety reasons, configuration of the
multifunction screen by the driver must
only be done when stationary. Once the fuel consumption unit has
been changed to mpg, the information
relating to speed and distance also
changes to miles.
Vehicle configuration
Once the "Veh conf ig " menu has been
selected, you can activate or deactivate the
following equipment:
-
w
iper linked with reverse gear (see the
"Visibility" section),
-
g
uide-me-home lighting (see the " Visibility"
section),
-
d
aytime running lamps (see the " Visibility"
section).
Using this menu, you can also reinitialise the
tyre under-inflation detection system (see the
"Safety" section).
2
Multifunction screens
Page 38 of 292
36
C3Picasso_en_Chap02_ecran-multifonction_ed01-2015
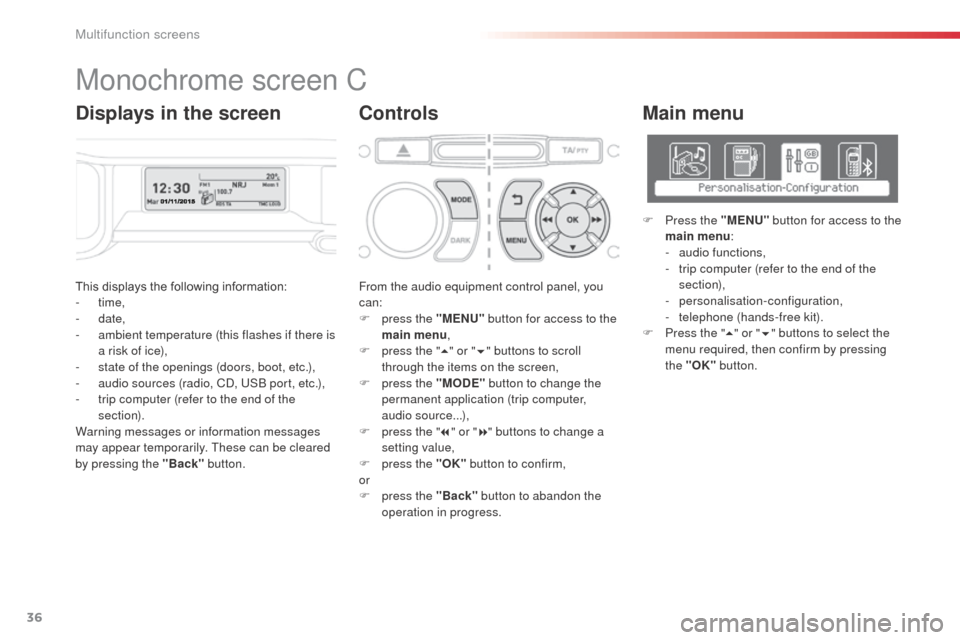
This displays the following information:
- time,
-
date,
-
a
mbient temperature (this flashes if there is
a risk of ice),
-
s
tate of the openings (doors, boot, etc.),
-
a
udio sources (radio, CD, USB port, etc.),
-
t
rip computer (refer to the end of the
section).
Warning messages or information messages
may appear temporarily. These can be cleared
by pressing the "Back" button. From the audio equipment control panel, you
can:
F
p
ress the "MENU" button for access to the
main menu ,
F
p
ress the "5" or " 6" buttons to scroll
through the items on the screen,
F
p
ress the "MODE" button to change the
permanent application (trip computer,
audio source...),
F
p
ress the "7" or " 8" buttons to change a
setting value,
F
p
ress the "OK" button to confirm,
or
F
p
ress the "Back" button to abandon the
operation in progress.
Main menu
F Press the "MENU" button for access to the
main menu :
-
a
udio functions,
-
t
rip computer (refer to the end of the
section),
-
personalisation-configuration,
-
t
elephone (hands-free kit).
F
P
ress the " 5" or " 6" buttons to select the
menu required, then confirm by pressing
the "OK" button.
Monochrome screen C
ControlsDisplays in the screen
Multifunction screens
Page 41 of 292
39
C3Picasso_en_Chap02_ecran-multifonction_ed01-2015
Choice of language
Once this menu has been selected, you can
change the language used by the display, by
choosing a new language from the list offered.
Telephone menu
With the Audio system on and this menu
selected, you can configure your Bluetooth
hands-free system (pairing), view the various
telephone directories (calls log, services...) and
manage your calls (call, hang up, double call,
secret mode...).
For more information on the "Telephone"
application, refer to the Audio system part in
the "Audio and telematics" section.
As a safety measure, configuration of
the multifunction screen by the driver
must only be done when stationary.Display configuration
Once this menu has been selected, you can
gain access to the following settings:
-
b
rightness-video setting,
-
d
ate and time setting,
-
s
election of the units.Once the fuel consumption unit has
been changed to mpg, the information
relating to speed and distance also
changes to miles.
Adjust the date and time
F
Sel
ect the " Date and time adjustment "
function using the " 5" or " 6" button.
F
P
ress the "OK" button to confirm the
selection.
F
A
djust the settings one by one using
the
"7 " or " 8" button then confirm with
the
"OK" button.
F
T
hen select the "OK" box in the screen
and then confirm.
2
Multifunction screens
Page 53 of 292

51
C3Picasso_en_Chap03_confort_ed01-2015
Scented air freshenerSystem permitting the diffusion of a fragrance in the passenger compartment in accordance with
your requirements, by means of the adjustment dial and the various fragrance cartridges available.
Fitting the cartridge
F Remove the cartridge from the sealing case.
F
I
nstall the cartridge (flower at top right).
F
P
ress the dial and turn it a quarter of a turn
clockwise.
This dial is located on the dashboard.
It allows you to adjust the intensity of diffusion
of the fragrance.
F
T
urn the dial to the right to permit diffusion
of the fragrance.
F
T
urn the dial to the left to stop diffusion of
the fragrance.
Fragrance cartridge
Removing the cartridge
F Press the dial and turn it a quarter of a turn anti-clockwise.
F
R
emove the cartridge.
F
R
efit its sealing case.
As a safety precaution, do not carry
out any action on the cartridge while
driving.
Do not dismantle the cartridges.
Do not attempt to refill the fragrance
diffuser or the cartridges.
Avoid all contact with the skin and eyes.
Keep out of reach of children and
animals. Do not discard the original cartridge as
this serves as a plug when no fragrance
cartridge is in use.
In order to preserve the service life of
the cartridge, turn the dial to the left
when you no longer wish to diffuse the
fragrance in the passenger compartment.
Leave the central vents open.
The intensity of diffusion of the
fragrance may depend on the
ventilation or air conditioning settings.
Adjustment dial
This cartridge can be removed easily.
You can change it at any time and store it in the
sealed case which keeps it closed once it has
been opened.
You can obtain different fragrance cartridges
from a CITROËN dealer or a qualified
workshop.
3
Comfort