Page 246 of 727
off. The heated steering wheel can shut off early or may
not turn on when the steering wheel is already warm.
The heated steering wheel control button is located on
the center of the instrument panel below the climate
controls.
•Push the heated steering wheel button
once to turn
the heating element ON.
• Push the heated steering wheel buttona second
time to turn the heating element OFF.
NOTE: The engine must be running for the heated
steering wheel to operate.
Vehicles Equipped With Remote Start
On models that are equipped with remote start, the
heated steering wheel can be programed to come on during a remote start. Refer to “Electronic Vehicle Infor-
mation Center (EVIC)” in “Understanding Your Instru-
ment Panel” for further information.
WARNING!
•
Persons who are unable to feel pain to the skin
because of advanced age, chronic illness, diabetes,
spinal cord injury, medication, alcohol use, exhaus-
tion, or other physical conditions must exercise
care when using the steering wheel heater. It may
cause burns even at low temperatures, especially if
used for long periods.
• Do not place anything on the steering wheel that
insulates against heat, such as a blanket or steering
wheel covers of any type and material. This may
cause the steering wheel heater to overheat.
244 UNDERSTANDING THE FEATURES OF YOUR VEHICLE
Page 284 of 727
The outlet in the rear quarter panel near the liftgate and
the upper outlet in the instrument panel are both con-
trolled by the ignition switch. Each of these outlets can
support 160 Watts (13 Amps). Do not exceed 160 Watts
(13 Amps) for each of these outlets.
The power outlets include tethered caps, labeled with a
key or battery symbol indicating the power source. The
power outlet, located on the lower instrument panel, is
powered directly from the battery. Items plugged into
this power outlet may discharge the battery and/or
prevent the engine from starting.
Power Outlet Fuses
1 — M7 Fuse 20 A Yellow Power Outlet Center Seat (Opt) or with
Console Rear
2 — M6 Fuse 20 A Yellow Cigar Lighter Instrument Panel or with
Console Front
3 — M36 Fuse 20 A Yellow Power Outlet Instrument Panel or
with Console Center
282 UNDERSTANDING THE FEATURES OF YOUR VEHICLE
Page 285 of 727
WARNING!
To avoid serious injury or death:
•Only devices designed for use in this type of outlet
should be inserted into any 12 Volt outlet.
• Do not touch with wet hands.
• Close the lid when not in use and while driving the
vehicle.
• If this outlet is mishandled, it may cause an electric
shock and failure.
CAUTION!
• Many accessories that can be plugged in draw
power from the vehicle’s battery, even when not in
use (i.e., cellular phones, etc.). Eventually, if
plugged in long enough, the vehicle’s battery will
discharge sufficiently to degrade battery life and/or
prevent the engine from starting.
(Continued)
CAUTION! (Continued)
•Accessories that draw higher power (i.e., coolers,
vacuum cleaners, lights, etc.), will degrade the
battery even more quickly. Only use these intermit-
tently and with greater caution.
• After the use of high power draw accessories, or
long periods of the vehicle not being started (with
accessories still plugged in), the vehicle must be
driven a sufficient length of time to allow the
alternator to recharge the vehicle’s battery.
• Power outlets are designed for accessory plugs
only. Do not hang any type of accessory or acces-
sory bracket from the plug. Improper use of the
power outlet can cause damage.
3
UNDERSTANDING THE FEATURES OF YOUR VEHICLE 283
Page 305 of 727
NOTE:The front cupholder light ring and pass through
lighting is controlled by a dimming switch located on the
instrument panel, refer to “Lights” in “Understanding
The Features Of Your Vehicle” for further information.
Located in the back of the Super Console is a storage
drawer and cupholders for the rear passengers.REAR WINDOW FEATURES
Rear Window Defroster
The rear window defroster button is located on
the climate control (Mode) knob. Push this button
to turn on the rear window defroster and the heated
outside mirrors (if equipped). An indicator in the button
will illuminate when the rear window defroster is on. The
rear window defroster automatically turns off after ap-
proximately 10 minutes. For an additional five minutes of
operation, push the button a second time.
NOTE:
• You can turn off the heated mirror feature at anytime
by pushing the rear window defroster switch a second
time.
• To prevent excessive battery drain, use the rear win-
dow defroster only when the engine is operating.
Rear Drawer Storage
3
UNDERSTANDING THE FEATURES OF YOUR VEHICLE 303
Page 322 of 727
1. Tachometer•This gauge measures engine revolutions per minute
(RPM x 1000). Before the pointer reaches the red area,
ease up on the accelerator to prevent engine damage.
2. Odometer Display/Electronic Vehicle Information Center (EVIC) — If Equipped
Odometer Display / Trip Odometer Display The odom-
eter display shows the total distance the vehicle has been
driven.
U.S. Federal regulations require that upon transfer of
vehicle ownership, the seller certify to the purchaser the
correct mileage that the vehicle has been driven. If your
odometer needs to be repaired or serviced, the repair
technician should leave the odometer reading the same
as it was before the repair or service. If s/he cannot do so,
then the odometer must be set at zero, and a sticker must
be placed in the door jamb stating what the mileage was
before the repair or service. It is a good idea for you to make a record of the odometer reading before the repair/
service, so that you can be sure that it is properly reset, or
that the door jamb sticker is accurate if the odometer
must be reset at zero.
This also displays Trip A and Trip B, DTE, MPG or
L/100km, OAT (Outside Air Temperature) information to
Base Cluster, use STEP and RESET button (on steering
wheel) to access or reset the display.
Message Display Area
When the appropriate conditions exist, the following
odometer messages will display:
door
............................. Door Ajar
gATE .......................... Liftgate Ajar
LoW tirE ....................LowTirePr essure
320 UNDERSTANDING YOUR INSTRUMENT PANEL
Page 324 of 727

CHAngE OIL
Your vehicle is equipped with an engine oil change
indicator system. The odometer display will toggle be-
tweenCHAngE andOilfor approximately 12 seconds,
after a single chime has sounded, to indicate the next
scheduled oil change interval. The engine oil change
indicator system is duty cycle-based, which means the
engine oil change interval may fluctuate dependent upon
your personal driving style.
Unless reset, this message will continue to display each
time you turn the ignition switch to the ON/RUN
position. To reset the oil change indicator system (after
performing the scheduled maintenance), perform the
following steps.
1. Turn the ignition switch to the ON/RUN position (do
not start the engine).
2. Fully push the accelerator pedal, slowly, three times
within 10 seconds. 3. Turn the ignition switch to the OFF position.
NOTE:
If the indicator message illuminates when you
start the engine, the oil change indicator system did not
reset. If necessary, repeat these steps.
Electronic Vehicle Information Center (EVIC) — If
Equipped
The Electronic Vehicle Information Center (EVIC) fea-
tures a driver-interactive display that is located in the
instrument cluster. Refer to “Electronic Vehicle Informa-
tion Center (EVIC)” in this section for further informa-
tion.
3. Speedometer
•Indicates vehicle speed.
4. Fuel Gauge •The pointer shows the level of fuel in the fuel tank
when the ignition switch is in the ON/RUN position
322 UNDERSTANDING YOUR INSTRUMENT PANEL
Page 325 of 727
The fuel pump symbol points to the side of the
vehicle where the fuel door is located.
5. Temperature Gauge •The temperature gauge shows engine coolant tem-
perature. Any reading within the normal range indi-
cates that the engine cooling system is operating
satisfactorily.
• The gauge pointer will likely indicate a higher tem-
perature when driving in hot weather or up moun-
tain grades. It should not be allowed to exceed the
upper limits of the normal operating range.
CAUTION!
Driving with a hot engine cooling system could
damage your vehicle. If the temperature gauge reads
(Continued)
CAUTION! (Continued)
“H” pull over and stop the vehicle. Idle the vehicle
with the air conditioner turned off until the pointer
drops back into the normal range. If the pointer
remains on the “H” and you hear continuous chimes,
turn the engine off immediately and call an autho-
rized dealer for service.
WARNING!
A hot engine cooling system is dangerous. You or
others could be badly burned by steam or boiling
coolant. You may want to call an authorized dealer
for service if your vehicle overheats. If you decide to
look under the hood yourself, see “Maintaining Your
Vehicle”. Follow the warnings under the Cooling
System Pressure Cap paragraph.
4
UNDERSTANDING YOUR INSTRUMENT PANEL 323
Page 327 of 727
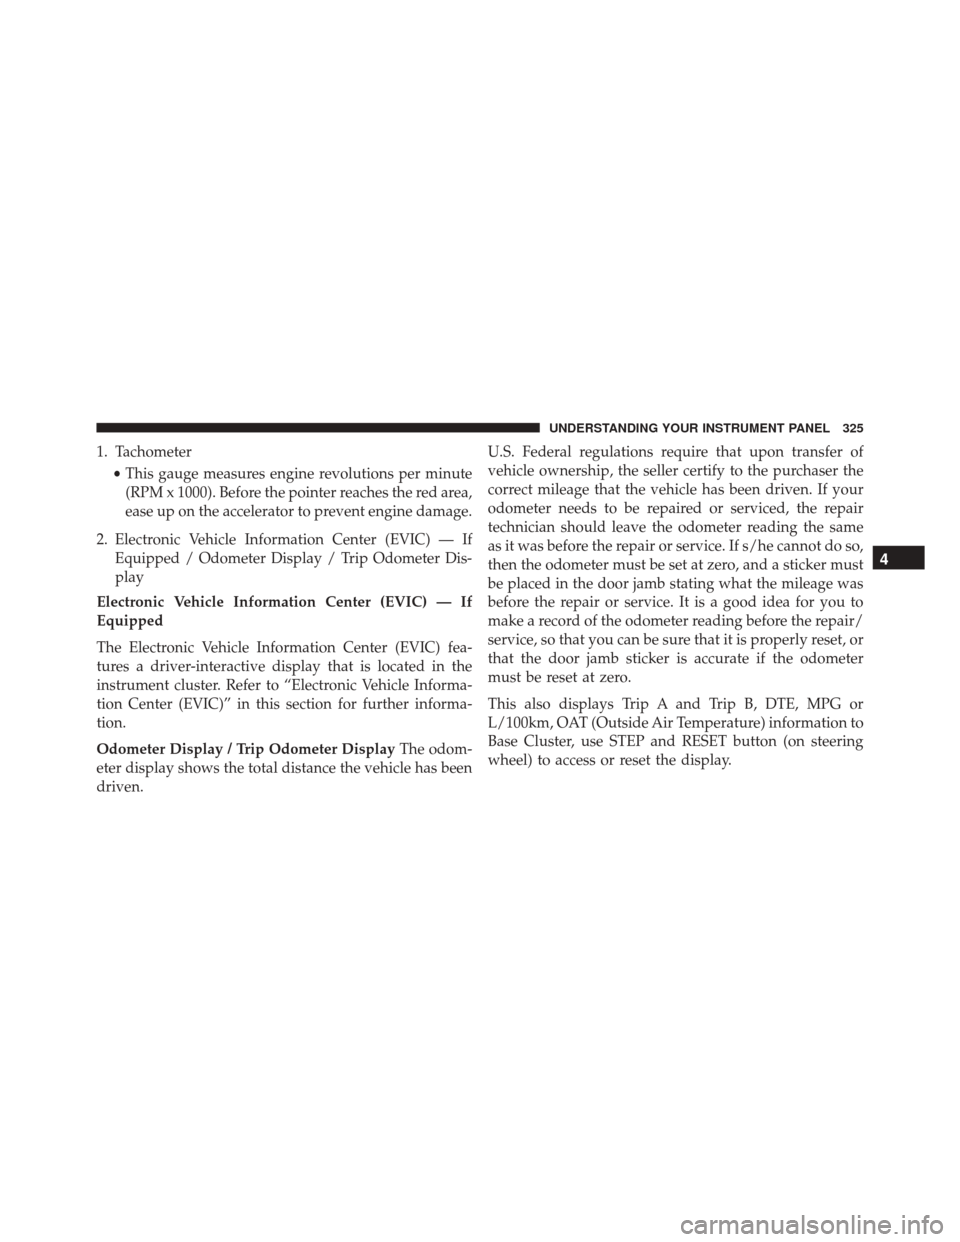
1. Tachometer•This gauge measures engine revolutions per minute
(RPM x 1000). Before the pointer reaches the red area,
ease up on the accelerator to prevent engine damage.
2. Electronic Vehicle Information Center (EVIC) — If Equipped / Odometer Display / Trip Odometer Dis-
play
Electronic Vehicle Information Center (EVIC) — If
Equipped
The Electronic Vehicle Information Center (EVIC) fea-
tures a driver-interactive display that is located in the
instrument cluster. Refer to “Electronic Vehicle Informa-
tion Center (EVIC)” in this section for further informa-
tion.
Odometer Display / Trip Odometer Display The odom-
eter display shows the total distance the vehicle has been
driven. U.S. Federal regulations require that upon transfer of
vehicle ownership, the seller certify to the purchaser the
correct mileage that the vehicle has been driven. If your
odometer needs to be repaired or serviced, the repair
technician should leave the odometer reading the same
as it was before the repair or service. If s/he cannot do so,
then the odometer must be set at zero, and a sticker must
be placed in the door jamb stating what the mileage was
before the repair or service. It is a good idea for you to
make a record of the odometer reading before the repair/
service, so that you can be sure that it is properly reset, or
that the door jamb sticker is accurate if the odometer
must be reset at zero.
This also displays Trip A and Trip B, DTE, MPG or
L/100km, OAT (Outside Air Temperature) information to
Base Cluster, use STEP and RESET button (on steering
wheel) to access or reset the display.
4
UNDERSTANDING YOUR INSTRUMENT PANEL 325