2016 CHEVROLET SUBURBAN remove seats
[x] Cancel search: remove seatsPage 41 of 453

Chevrolet Tahoe/Suburban Owner Manual (GMNA-Localizing-U.S./Canada/
Mexico-9159366) - 2016 - crc - 5/19/15
40 Keys, Doors, and Windows
Keyless Liftgate Opening
Press the touch pad on the
underside of the liftgate handle to
open the liftgate when all doors are
unlocked, or when the transmitter is
within 1 m (3 ft).
Keyless Liftglass Opening
Press the exterior liftglass button to
open the liftglass when all doors are
unlocked, or when the transmitter is
within 1 m (3 ft).
SeeLiftgate 047.
Keyed Access
To access a vehicle with a dead
transmitter battery, see Door Locks
0 44.
Programming Transmitters to
the Vehicle
Only RKE transmitters programmed
to the vehicle will work. If a
transmitter is lost or stolen, a
replacement can be purchased and
programmed through your dealer.
The vehicle can be reprogrammed
so that lost or stolen transmitters no longer work. Each vehicle can have
up to eight transmitters matched
to it.
Programming with a Recognized
Transmitter (Keyless Access
Vehicles Only)
A new transmitter can be
programmed to the vehicle when
there is one recognized transmitter.
To program, the vehicle must be off
and all transmitters, both currently
recognized and new, must be
with you.
1. Remove the key from the recognized transmitter.
2. Place the recognized transmitter(s) in the cupholder
or on the passenger seat.
3. Insert the vehicle key into the key lock cylinder on the driver
door handle. Then turn the key
counterclockwise, to the unlock
position, five times within
10 seconds.
The Driver Information Center
(DIC) displays READY FOR
REMOTE#2, 3, 4, ETC.
4. Place the new transmitter inthe transmitter pocket/insert.
Open the center console
storage area and the storage
tray. The transmitter pocket/
insert is in front of the storage
area next to the center console
storage area between the
driver and front passenger
seats.
5. Press the ENGINE START/ STOP button. When the
transmitter is learned, the DIC
display will show that it is ready
to program the next transmitter.
Page 42 of 453

Chevrolet Tahoe/Suburban Owner Manual (GMNA-Localizing-U.S./Canada/
Mexico-9159366) - 2016 - crc - 5/19/15
Keys, Doors, and Windows 41
6. Remove the transmitter fromthe transmitter pocket and
press
KorQon the
transmitter.
To program additional
transmitters, repeat Steps 4–6.
When all additional transmitters
are programmed, press and
hold the ENGINE START/
STOP button for approximately
12 seconds to exit
programming mode.
7. Return the key back into the transmitter.
Programming without a
Recognized Transmitter (Keyless
Access Vehicles Only)
If there are no currently recognized
transmitters available, follow this
procedure to program up to eight
transmitters. This feature is not
available in Canada. This procedure
will take approximately 30 minutes
to complete. The vehicle must be off
and all transmitters to be
programmed must be with you. 1. Remove the vehicle key from the transmitter. 2. Insert the vehicle key into the
key lock cylinder on the driver
door handle; then turn the key
counterclockwise, to the unlock
position, five times within
10 seconds.
The Driver Information Center
(DIC) displays REMOTE
LEARN PENDING,
PLEASE WAIT.
3. Wait for 10 minutes until the DIC displays PRESS ENGINE
START BUTTON TO LEARN,
then press the ENGINE
START/STOP button.
The DIC display will again
show REMOTE LEARN
PENDING, PLEASE WAIT.
4. Repeat Step 3 two additional times. After the third time all
previously known transmitters
will no longer work with the
vehicle. Remaining transmitters
can be relearned during the
next steps.
The DIC display should now
show READY FOR REMOTE
# 1.
5. Place the new transmitter in
the transmitter pocket/insert.
Open the center console
storage area and the storage
tray. The transmitter pocket/
insert is in front of the storage
area next to the center console
storage area between the
driver and front passenger
seats.
6. Press the ENGINE START/ STOP button. When the
transmitter is learned, the DIC
display will show that it is ready
to program the next transmitter.
Page 44 of 453

Chevrolet Tahoe/Suburban Owner Manual (GMNA-Localizing-U.S./Canada/
Mexico-9159366) - 2016 - crc - 5/19/15
Keys, Doors, and Windows 43
1. With the key removed, insert aflat, thin object in the center of
the transmitter to separate and
remove the back cover.
2. Lift the battery with a flat
object.
3. Remove the battery.
4. Insert the new battery, positive side toward the back cover.
Replace with a CR2032 or
equivalent battery.
5. Push together the transmitter.
Remote Vehicle Start
If equipped with the remote start
feature, the climate control system
will come on when the vehicle is
started remotely depending on the
outside temperature.
The rear defog and heated and
cooled seats, if equipped, may also
come on. See Heated and Cooled
Front Seats 070 and Vehicle
Personalization 0173.
Laws in some communities may
restrict the use of remote starters.
Check local regulations for any
requirements on remote starting of
vehicles.
Do not use remote start if the
vehicle is low on fuel.
The vehicle cannot be remote
started if:
. The key is in the ignition (Key
Access) or the transmitter is in
the vehicle (Keyless Access).
. The hood is not closed.
. There is an emission control
system malfunction and the
malfunction indicator lamp is on. The engine will turn off during a
remote vehicle start if:
.
The coolant temperature gets
too high.
. The oil pressure gets low.
The RKE transmitter range may be
reduced while the vehicle is running.
Other conditions can affect the
performance of the transmitter. See
Remote Keyless Entry (RKE)
System 035 orVehicle
Personalization 0173.
Starting the Engine Using Remote
Start
1. Press and release
Q.
2. Immediately press and hold
/
until the turn signal lamps flash
or for at least four seconds.
When the vehicle starts, the
parking lamps will turn on. The
doors will be locked and the
climate control system may
come on.
Page 70 of 453
Chevrolet Tahoe/Suburban Owner Manual (GMNA-Localizing-U.S./Canada/
Mexico-9159366) - 2016 - crc - 5/19/15
Seats and Restraints 69
2. Adjust the driver seat, outsidemirrors, power tilt and
telescopic steering column (if
equipped), and adjustable
pedals (if equipped).
3. Press and release SET. A beep will sound.
4. Immediately press and hold 1 until two beeps sound.
5. Repeat steps 1–4 for a second driver using 2.
To store exit positions and easy exit
features to the
B(Exit) button,
repeat steps 1–4 using
Bto store
your positions for getting out of the
vehicle.
Manually Recalling Memory
Positions
Press and hold 1, 2, or
B(Exit) to
manually recall the previously
stored memory positions. Releasing
1, 2, or
Bbefore the stored
positions are reached stops the
recall. If something has blocked the driver
seat, power tilt and telescoping
steering column, and/or adjustable
pedals while recalling a memory
position, the recall may stop.
Remove the obstruction; then press
and hold the appropriate manual
control for the memory item that is
not recalling for two seconds. Try
recalling the memory position again
by pressing the appropriate memory
button. If the memory position is still
not recalling, see your dealer for
service.
Automatically Recalling Memory
Positions (Auto Memory Recall)
If programmed on in the vehicle
personalization menu, the Auto
(Automatic) Memory Recall feature
automatically recalls the current
driver
’s previously stored 1 or 2
position when the ignition is
changed from off to ON/RUN or
ACC/ACCESSORY.
See “Auto Memory Recall” under
“Comfort and Convenience” in
Vehicle Personalization 0173. To stop recall movement, press one
of the memory, power mirror,
or power seat controls; press the
power tilt and telescoping steering
column control (if equipped); or
press the adjustable pedal control (if
equipped).
Easy Exit Recall
If programmed on in the vehicle
personalization menu, the easy exit
feature automatically recalls the
previously stored
Bpositions when
leaving the vehicle. See Vehicle
Personalization 0173.
Easy exit recall automatically
activates when one of the following
occurs:
. The vehicle is turned off and the
driver door is opened within a
short time.
. The vehicle is turned off with the
driver door open.
To stop recall movement, press one
of the memory, driver seat, outside
mirror, or power tilt and telescoping
steering column controls.
Page 71 of 453
Chevrolet Tahoe/Suburban Owner Manual (GMNA-Localizing-U.S./Canada/
Mexico-9159366) - 2016 - crc - 5/19/15
70 Seats and Restraints
RKE transmitters are not labeled
with a number. If your memory seat
position is stored to 1 or 2, but this
position is not automatically
recalling, then change the stored
position or switch RKE transmitters
with the other driver.
Obstructions
If something has blocked the driver
seat, power tilt and telescoping
steering column, and/or adjustable
pedals (if equipped) while recalling
the exit position, the recall may
stop. Remove the obstruction; then
press and hold the appropriate
manual control for the exit feature
not recalling for two seconds. Try
recalling the memory position again
by opening the driver door and
pressing
Kon the RKE transmitter.
If the exit position is still not
recalling, see your dealer for
service.
Heated and Cooled Front
Seats
If equipped, the vehicle may have
heated or heated and cooled seats.
{Warning
If you cannot feel temperature
change or pain to the skin, the
seat heater may cause burns. To
reduce the risk of burns, people
with such a condition should use
care when using the seat heater,
especially for long periods of
time. Do not place anything on
the seat that insulates against
heat, such as a blanket, cushion,
cover, or similar item. This may
cause the seat heater to
overheat. An overheated seat
heater may cause a burn or may
damage the seat.
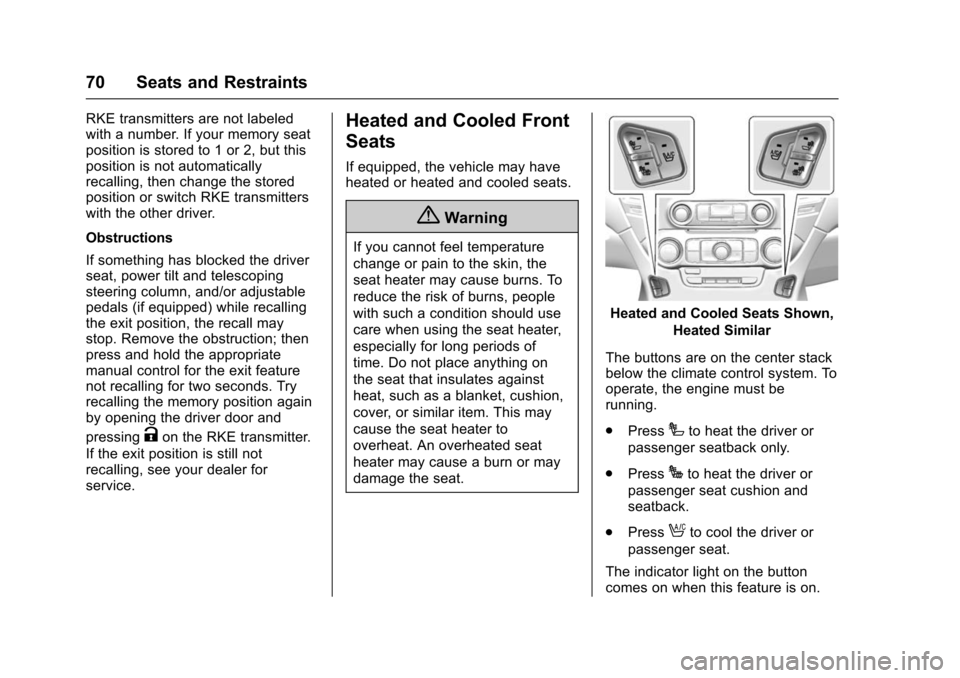
Heated and Cooled Seats Shown,
Heated Similar
The buttons are on the center stack
below the climate control system. To
operate, the engine must be
running.
. Press
Ito heat the driver or
passenger seatback only.
. Press
Jto heat the driver or
passenger seat cushion and
seatback.
. Press
Ato cool the driver or
passenger seat.
The indicator light on the button
comes on when this feature is on.
Page 87 of 453
Chevrolet Tahoe/Suburban Owner Manual (GMNA-Localizing-U.S./Canada/
Mexico-9159366) - 2016 - crc - 5/19/15
86 Seats and Restraints
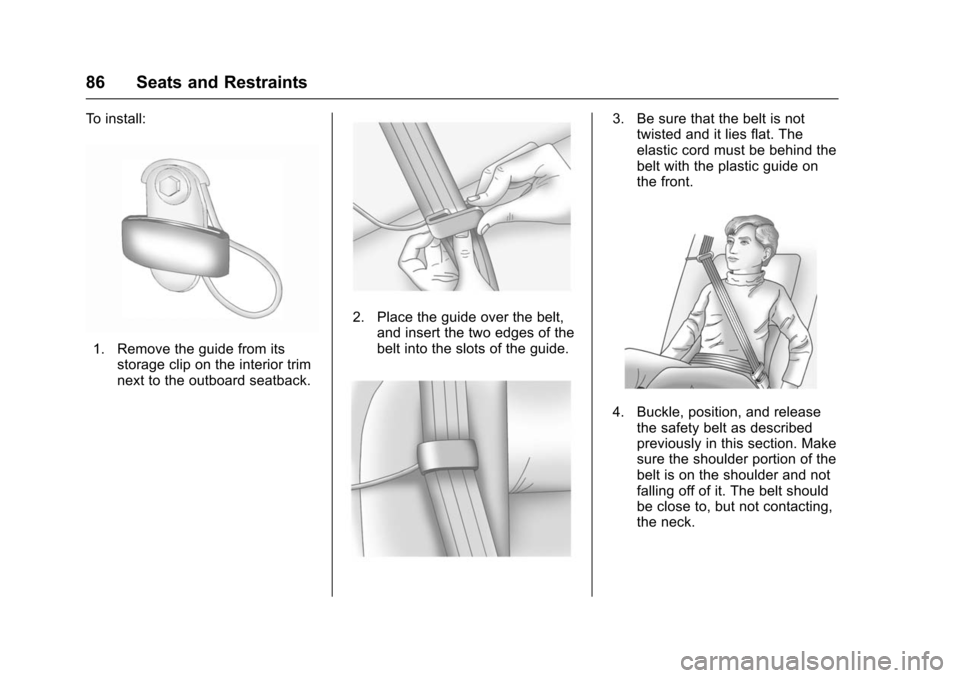
To install:
1. Remove the guide from itsstorage clip on the interior trim
next to the outboard seatback.
2. Place the guide over the belt,and insert the two edges of the
belt into the slots of the guide.
3. Be sure that the belt is nottwisted and it lies flat. The
elastic cord must be behind the
belt with the plastic guide on
the front.
4. Buckle, position, and release
the safety belt as described
previously in this section. Make
sure the shoulder portion of the
belt is on the shoulder and not
falling off of it. The belt should
be close to, but not contacting,
the neck.
Page 88 of 453
Chevrolet Tahoe/Suburban Owner Manual (GMNA-Localizing-U.S./Canada/
Mexico-9159366) - 2016 - crc - 5/19/15
Seats and Restraints 87
To remove and store the comfort
guide, squeeze the belt edges
together so that the safety belt can
be removed from the guide. Slide
the guide onto its storage clip.
Third Row Seating Positions
Comfort guides are available
through your dealer for third row
seating positions. Instructions are
included with the guides.
Safety Belt Use During
Pregnancy
Safety belts work for everyone,
including pregnant women. Like all
occupants, they are more likely to
be seriously injured if they do not
wear safety belts.
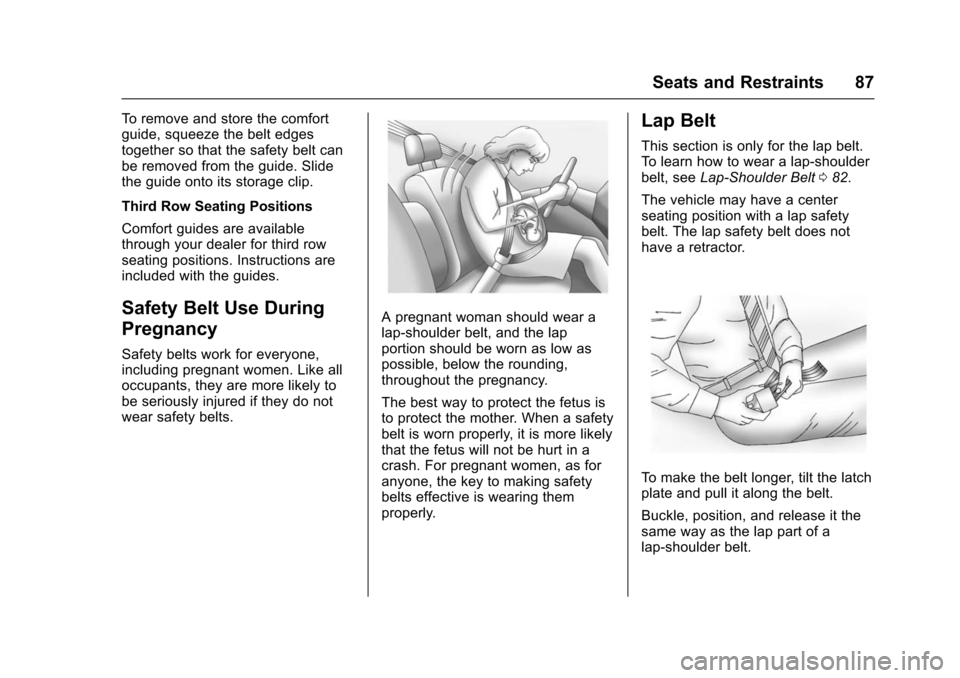
A pregnant woman should wear a
lap-shoulder belt, and the lap
portion should be worn as low as
possible, below the rounding,
throughout the pregnancy.
The best way to protect the fetus is
to protect the mother. When a safety
belt is worn properly, it is more likely
that the fetus will not be hurt in a
crash. For pregnant women, as for
anyone, the key to making safety
belts effective is wearing them
properly.
Lap Belt
This section is only for the lap belt.
To learn how to wear a lap-shoulder
belt, seeLap-Shoulder Belt 082.
The vehicle may have a center
seating position with a lap safety
belt. The lap safety belt does not
have a retractor.
To make the belt longer, tilt the latch
plate and pull it along the belt.
Buckle, position, and release it the
same way as the lap part of a
lap-shoulder belt.
Page 99 of 453
Chevrolet Tahoe/Suburban Owner Manual (GMNA-Localizing-U.S./Canada/
Mexico-9159366) - 2016 - crc - 5/19/15
98 Seats and Restraints
2. Remove the child restraint fromthe vehicle.
3. Remove any additional items from the seat such as blankets,
cushions, seat covers, seat
heaters, or seat massagers.
4. Reinstall the child restraint following the directions
provided by the child restraint
manufacturer and refer to
Securing Child Restraints
(Center Front Seat) 0117 or
Securing Child Restraints
(Rear Seat) 0117 orSecuring
Child Restraints (Front
Passenger Seat) 0119.
Make sure the safety belt
retractor is locked by pulling
the shoulder belt all the way
out of the retractor when
installing the child restraint,
even if the child restraint is
equipped with a safety belt
lock-off. When the retractor
lock is set, the belt can be
tightened but not pulled out of
the retractor. 5. If, after reinstalling the child
restraint and restarting the
vehicle, the on indicator is still
lit, turn the vehicle off. Then
slightly recline the vehicle
seatback and adjust the seat
cushion, if adjustable, to make
sure that the vehicle seatback
is not pushing the child
restraint into the seat cushion.
Also make sure the child
restraint is not trapped under
the vehicle head restraint.
If this happens, adjust the head
restraint. See Head Restraints
0 64.
6. Restart the vehicle.
The passenger sensing system may
or may not turn off the airbag for a
child in a child restraint depending
upon the child’s size. It is better to
secure the child restraint in a
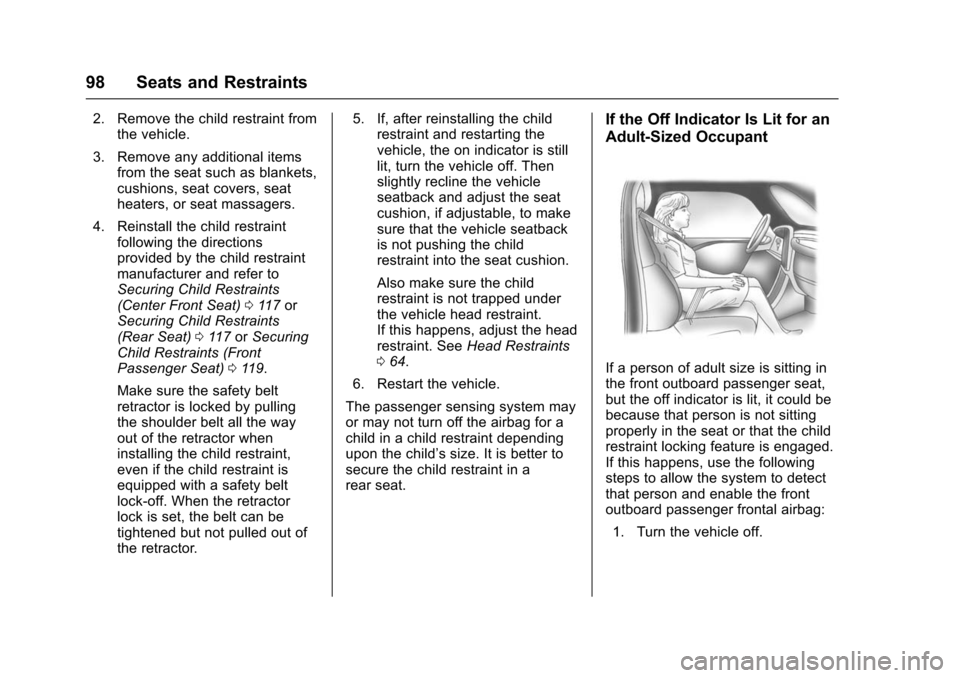
rear seat.If the Off Indicator Is Lit for an
Adult-Sized Occupant
If a person of adult size is sitting in
the front outboard passenger seat,
but the off indicator is lit, it could be
because that person is not sitting
properly in the seat or that the child
restraint locking feature is engaged.
If this happens, use the following
steps to allow the system to detect
that person and enable the front
outboard passenger frontal airbag: 1. Turn the vehicle off.