2016 CHEVROLET SONIC door lock
[x] Cancel search: door lockPage 197 of 353
Chevrolet Sonic Owner Manual (GMNA-Localizing-U.S/Canada-9085902) -
2016 - CRC - 5/27/15
196 Driving and Operating
If torque lock does occur, you may
need to have another vehicle push
yours a little uphill to take some of
the pressure from the parking pawl
in the transmission, so you can pull
the shift lever out of P (Park).
Shifting out of Park
(Automatic Transmission)
This vehicle is equipped with a shift
lock control. The shift lock control is
designed to:
.Prevent ignition key removal
unless the shift lever is in
P (Park) with the shift lever
button fully released.
. Prevent movement of the shift
lever out of P (Park) unless the
ignition is in ON/RUN and the
brake pedal is applied.
The shift lock control is always
functional except in the case of an
uncharged or low voltage (less than
9-volt) battery. If the vehicle has an uncharged
battery or a battery with low voltage,
try charging or jump starting the
battery. See
Jump Starting - North
America 0287.
To shift out of P (Park):
1. Apply the brake pedal.
2. Turn the ignition to ON/RUN.
3. Press the shift lever button.
4. Move the shift lever to the desired position.
If still unable to shift out of P (Park): 1. Fully release the shift lever button.
2. Hold the brake pedal down and press the shift lever button
again.
3. Move the shift lever to the desired position.
If you still cannot move the shift
lever from P (Park), consult your
dealer or a professional towing
service.
The doors may lock when shifting
from P (Park). See Automatic Door
Locks 032.
Parking
If the vehicle has a manual
transmission, before getting out of
the vehicle, move the shift lever into
R (Reverse) if parking on a downhill
slope. On a level surface or an
uphill slope, use 1 (First) gear.
Firmly apply the parking brake. Turn
the wheels toward the curb for a
downhill slope, or away from the
curb for an uphill slope. Once the
shift lever has been placed into gear
with the clutch pedal pressed in,
turn the ignition key to LOCK/OFF,
remove the key, and release the
clutch.
Parking over Things
That Burn
{Warning
Things that can burn could touch
hot exhaust parts under the
vehicle and ignite. Do not park
over papers, leaves, dry grass,
or other things that can burn.
Page 278 of 353
Chevrolet Sonic Owner Manual (GMNA-Localizing-U.S/Canada-9085902) -
2016 - CRC - 5/27/15
Vehicle Care 277
5. Slide the base of the tiresealant canister (3) into the slot
on the top of the compressor
(6) to hold it upright.
Make sure the tire valve stem
is positioned close to the
ground so the hose will
reach it.
6. Remove the valve stem cap from the flat tire by turning it
counterclockwise.7. Attach the sealant/air hose (2)
to the tire valve stem by turning
it clockwise until tight.
8. Plug the power plug (9) into the accessory power outlet in the
vehicle. Unplug all items from
other accessory power outlets.
See Power Outlets 094.
If the vehicle has an accessory
power outlet, do not use the
cigarette lighter.
If the vehicle only has a
cigarette lighter, use the
cigarette lighter.
Do not pinch the power plug
cord in the door or window. 9. Start the vehicle. The vehicle
must be running while using
the air compressor.
10. Press the on/off button (5) to turn the tire sealant and
compressor kit on.
The compressor will inject
sealant and air into the tire.
The pressure gauge (8) will
initially show a high pressure
while the compressor pushes
the sealant into the tire. Once
the sealant is completely
dispersed into the tire, the
pressure will quickly drop and
start to rise again as the tire
inflates with air only.
11. Inflate the tire to the recommended inflation
pressure using the pressure
gauge (8). The recommended
inflation pressure can be found
on the Tire and Loading
Information label. See Tire
Pressure 0261.
The pressure gauge (8) may
read higher than the actual tire
pressure while the compressor
Page 281 of 353
Chevrolet Sonic Owner Manual (GMNA-Localizing-U.S/Canada-9085902) -
2016 - CRC - 5/27/15
280 Vehicle Care
1. Remove the compressor fromits storage location. See
Storing the Tire Sealant and
Compressor Kit 0281.
2. Remove the air only hose (10) and the power plug (9) from the
bottom of the compressor.
3. Place the compressor on the ground near the flat tire.
Make sure the tire valve stem
is positioned close to the
ground so the hose will
reach it.
4. Remove the valve stem cap from the flat tire by turning it
counterclockwise.
5. Attach the air only hose (10) to the tire valve stem by turning it
clockwise until tight.
6. Plug the power plug (9) into the accessory power outlet in the
vehicle. Unplug all items from
other accessory power outlets.
See Power Outlets 094.
If the vehicle has an accessory
power outlet, do not use the
cigarette lighter. If the vehicle only has a
cigarette lighter, use the
cigarette lighter.
Do not pinch the power plug
cord in the door or window.
7. Start the vehicle. The vehicle must be running while using
the air compressor.
8. Press the on/off button (5) to turn the tire sealant and
compressor kit on.
The compressor will inflate the
tire with air only.
9. Inflate the tire to the recommended inflation
pressure using the pressure
gauge (8). The recommended
inflation pressure can be found
on the Tire and Loading
Information label. See Tire
Pressure 0261.
The pressure gauge (8) may
read higher than the actual tire
pressure while the compressor
is on. Turn the compressor off
to get an accurate pressure reading. The compressor may
be turned on/off until the
correct pressure is reached.
Caution
If the recommended pressure
cannot be reached after
approximately 25 minutes, the
vehicle should not be driven
farther. The tire is too severely
damaged and the tire sealant and
compressor kit cannot inflate the
tire. Remove the power plug from
the accessory power outlet and
unscrew the inflating hose from
the tire valve. See
Roadside
Assistance Program 0322.
10. Press the on/off button (5) to turn the tire sealant and
compressor kit off.
Be careful while handling the
compressor as it could be
warm after usage.
11. Unplug the power plug (9) from the accessory power outlet in
the vehicle.
Page 297 of 353
Chevrolet Sonic Owner Manual (GMNA-Localizing-U.S/Canada-9085902) -
2016 - CRC - 5/27/15
296 Vehicle Care
Caution (Continued)
brushes. Damage could occur
and the repairs would not be
covered by the vehicle warranty.
Brake System
Visually inspect brake lines and
hoses for proper hook-up, binding,
leaks, cracks, chafing, etc. Inspect
disc brake pads for wear and rotors
for surface condition. Inspect drum
brake linings/shoes for wear or
cracks. Inspect other brake parts,
including drums, wheel cylinders,
calipers, parking brake, master
cylinder, brake fluid reservoir,
vacuum pipes, electric vacuum
pump including bracket, and vent
hose, if equipped.
Steering, Suspension, and
Chassis Components
Visually inspect steering,
suspension, and chassis
components for damaged, loose,
or missing parts or signs of wear at
least once a year.Inspect power steering for proper
hook-up, binding, leaks, cracks,
chafing, etc.
Visually check constant velocity joint
boots and axle seals for leaks.
Body Component Lubrication
Lubricate all key lock cylinders,
hood hinges, liftgate hinges, and the
steel fuel door hinges, unless the
components are plastic. Applying
silicone grease on weatherstrips
with a clean cloth will make them
last longer, seal better, and not stick
or squeak.
Underbody Maintenance
At least twice a year, spring and fall,
use plain water to flush any
corrosive materials from the
underbody. Take care to thoroughly
clean any areas where mud and
other debris can collect.
Do not directly power wash the
transfer case and/or front/rear axle
output seals. High pressure water
can overcome the seals and
contaminate the fluid. Contaminated
fluid will decrease the life of the
transfer case and/or axles and
should be replaced.
Sheet Metal Damage
If the vehicle is damaged and
requires sheet metal repair or
replacement, make sure the body
repair shop applies anti-corrosion
material to parts repaired or
replaced to restore corrosion
protection.
Original manufacturer replacement
parts will provide the corrosion
protection while maintaining the
vehicle warranty.
Finish Damage
Quickly repair minor chips and
scratches with touch-up materials
available from your dealer to avoid
corrosion. Larger areas of finish
damage can be corrected in your
dealer's body and paint shop.
Chemical Paint Spotting
Airborne pollutants can fall upon
and attack painted vehicle surfaces
causing blotchy, ring-shaped
discolorations, and small, irregular
Page 312 of 353
Chevrolet Sonic Owner Manual (GMNA-Localizing-U.S/Canada-9085902) -
2016 - CRC - 5/27/15
Service and Maintenance 311
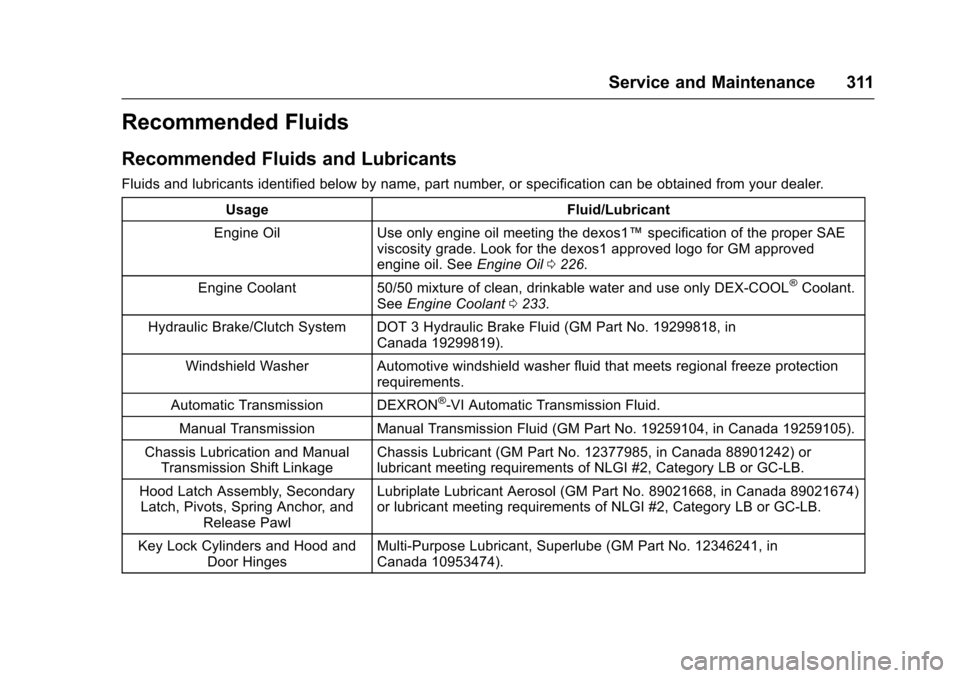
Recommended Fluids
Recommended Fluids and Lubricants
Fluids and lubricants identified below by name, part number, or specification can be obtained from your dealer.Usage Fluid/Lubricant
Engine Oil Use only engine oil meeting the dexos1™ specification of the proper SAE
viscosity grade. Look for the dexos1 approved logo for GM approved
engine oil. See Engine Oil0226.
Engine Coolant 50/50 mixture of clean, drinkable water and use only DEX-COOL
®Coolant.
See Engine Coolant 0233.
Hydraulic Brake/Clutch System DOT 3 Hydraulic Brake Fluid (GM Part No. 19299818, in Canada 19299819).
Windshield Washer Automotive windshield washer fluid that meets regional freeze protection requirements.
Automatic Transmission DEXRON
®-VI Automatic Transmission Fluid.
Manual Transmission Manual Transmission Fluid (GM Part No. 19259104, in Canada 19259105).
Chassis Lubrication and Manual Transmission Shift Linkage Chassis Lubricant (GM Part No. 12377985, in Canada 88901242) or
lubricant meeting requirements of NLGI #2, Category LB or GC-LB.
Hood Latch Assembly, Secondary Latch, Pivots, Spring Anchor, and Release Pawl Lubriplate Lubricant Aerosol (GM Part No. 89021668, in Canada 89021674)
or lubricant meeting requirements of NLGI #2, Category LB or GC-LB.
Key Lock Cylinders and Hood and Door Hinges Multi-Purpose Lubricant, Superlube (GM Part No. 12346241, in
Canada 10953474).
Page 336 of 353
Chevrolet Sonic Owner Manual (GMNA-Localizing-U.S/Canada-9085902) -
2016 - CRC - 5/27/15
OnStar 335
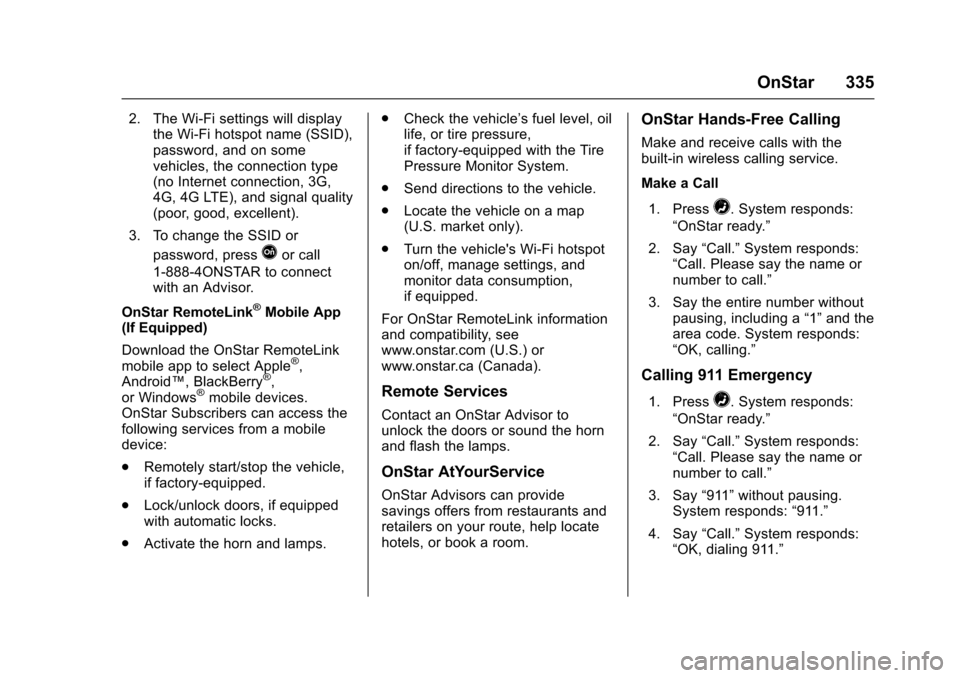
2. The Wi-Fi settings will displaythe Wi-Fi hotspot name (SSID),
password, and on some
vehicles, the connection type
(no Internet connection, 3G,
4G, 4G LTE), and signal quality
(poor, good, excellent).
3. To change the SSID or password, press
Qor call
1-888-4ONSTAR to connect
with an Advisor.
OnStar RemoteLink
®Mobile App
(If Equipped)
Download the OnStar RemoteLink
mobile app to select Apple
®,
Android™, BlackBerry®,
or Windows®mobile devices.
OnStar Subscribers can access the
following services from a mobile
device:
. Remotely start/stop the vehicle,
if factory-equipped.
. Lock/unlock doors, if equipped
with automatic locks.
. Activate the horn and lamps. .
Check the vehicle’s fuel level, oil
life, or tire pressure,
if factory-equipped with the Tire
Pressure Monitor System.
. Send directions to the vehicle.
. Locate the vehicle on a map
(U.S. market only).
. Turn the vehicle's Wi-Fi hotspot
on/off, manage settings, and
monitor data consumption,
if equipped.
For OnStar RemoteLink information
and compatibility, see
www.onstar.com (U.S.) or
www.onstar.ca (Canada).Remote Services
Contact an OnStar Advisor to
unlock the doors or sound the horn
and flash the lamps.
OnStar AtYourService
OnStar Advisors can provide
savings offers from restaurants and
retailers on your route, help locate
hotels, or book a room.
OnStar Hands-Free Calling
Make and receive calls with the
built-in wireless calling service.
Make a Call
1. Press
=. System responds:
“OnStar ready.”
2. Say “Call.”System responds:
“Call. Please say the name or
number to call.”
3. Say the entire number without pausing, including a “1”and the
area code. System responds:
“OK, calling.”
Calling 911 Emergency
1. Press=. System responds:
“OnStar ready.”
2. Say “Call.”System responds:
“Call. Please say the name or
number to call.”
3. Say “911”without pausing.
System responds: “911.”
4. Say “Call.”System responds:
“OK, dialing 911.”
Page 339 of 353

Chevrolet Sonic Owner Manual (GMNA-Localizing-U.S/Canada-9085902) -
2016 - CRC - 5/27/15
338 OnStar
Potential Issues
OnStar cannot perform Remote
Door Unlock or Stolen Vehicle
Assistance after the vehicle has
been off continuously for five days
without an ignition cycle. If the
vehicle has not been started for
five days, OnStar can contact
Roadside Assistance or a locksmith
to help gain access to the vehicle.
Global Positioning
System (GPS)
.Obstruction of the GPS can
occur in a large city with tall
buildings; in parking garages;
around airports; in tunnels and
underpasses; or in an area with
very dense trees. If GPS signals
are not available, the OnStar
system should still operate to
call OnStar. However, OnStar
could have difficulty identifying
the exact location.
. In emergency situations, OnStar
can use the last stored GPS
location to send to emergency
responders. A temporary loss of GPS can cause
loss of the ability to send a
Turn-by-Turn Navigation route. The
Advisor may give a verbal route or
may ask for a call back after the
vehicle is driven into an open area.
Cellular and GPS Antennas
Cellular reception is required for
OnStar to send remote signals to
the vehicle. Do not place items over
or near the antenna to prevent
blocking cellular and GPS signal
reception.
Unable to Connect to OnStar
Message
If there is limited cellular coverage
or the cellular network has reached
maximum capacity, this message
may come on. Press
Qto try the
call again or try again after driving a
few miles into another cellular area.
Vehicle and Power Issues
OnStar services require a vehicle
electrical system, wireless service,
and GPS satellite technologies to be
available and operating for features
to function properly. These systems
may not operate if the battery is
discharged or disconnected.
Add-on Electrical Equipment
The OnStar system is integrated
into the electrical architecture of the
vehicle. Do not add any electrical
equipment. See Add-On Electrical
Equipment 0217. Added electrical
equipment may interfere with the
operation of the OnStar system and
cause it to not operate.
Vehicle Software Updates
OnStar or GM may remotely deliver
software updates or changes to the
vehicle without further notice or
consent. These updates or changes
may enhance or maintain safety,
security, or the operation of the
vehicle or the vehicle systems.
Software updates or changes may
affect or erase data or settings that
are stored in the vehicle, such as
Page 344 of 353
Chevrolet Sonic Owner Manual (GMNA-Localizing-U.S/Canada-9085902) -
2016 - CRC - 5/27/15
Index 343
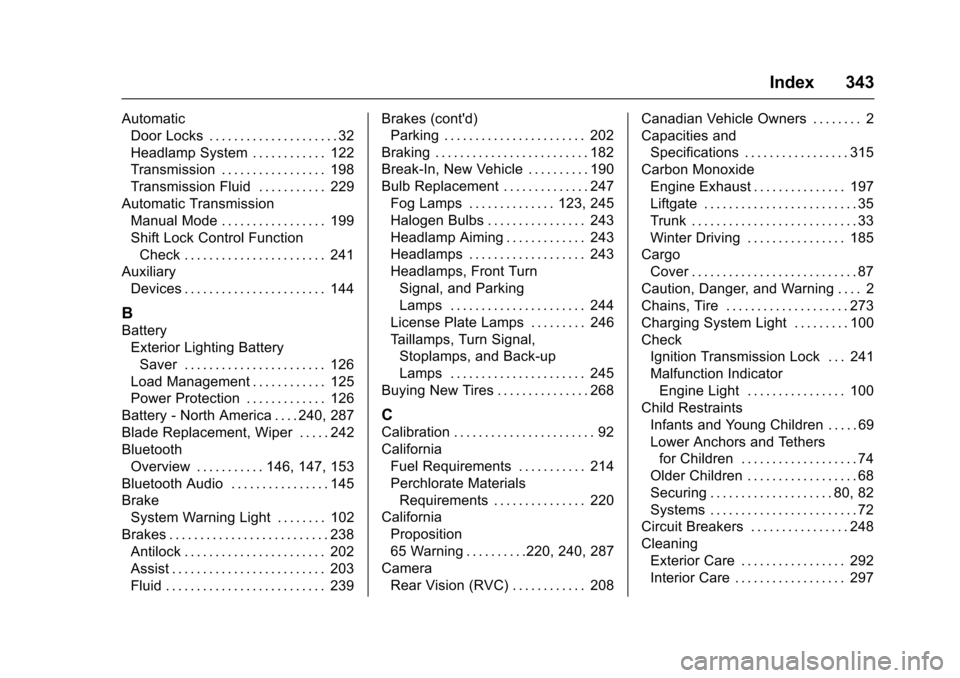
AutomaticDoor Locks . . . . . . . . . . . . . . . . . . . . . 32
Headlamp System . . . . . . . . . . . . 122
Transmission . . . . . . . . . . . . . . . . . 198
Transmission Fluid . . . . . . . . . . . 229
Automatic Transmission Manual Mode . . . . . . . . . . . . . . . . . 199
Shift Lock Control Function
Check . . . . . . . . . . . . . . . . . . . . . . . 241
Auxiliary Devices . . . . . . . . . . . . . . . . . . . . . . . 144
B
Battery
Exterior Lighting BatterySaver . . . . . . . . . . . . . . . . . . . . . . . 126
Load Management . . . . . . . . . . . . 125
Power Protection . . . . . . . . . . . . . 126
Battery - North America . . . . 240, 287
Blade Replacement, Wiper . . . . . 242
Bluetooth Overview . . . . . . . . . . . 146, 147, 153
Bluetooth Audio . . . . . . . . . . . . . . . . 145
Brake System Warning Light . . . . . . . . 102
Brakes . . . . . . . . . . . . . . . . . . . . . . . . . . 238
Antilock . . . . . . . . . . . . . . . . . . . . . . . 202
Assist . . . . . . . . . . . . . . . . . . . . . . . . . 203
Fluid . . . . . . . . . . . . . . . . . . . . . . . . . . 239 Brakes (cont'd)
Parking . . . . . . . . . . . . . . . . . . . . . . . 202
Braking . . . . . . . . . . . . . . . . . . . . . . . . . 182
Break-In, New Vehicle . . . . . . . . . . 190
Bulb Replacement . . . . . . . . . . . . . . 247 Fog Lamps . . . . . . . . . . . . . . 123, 245
Halogen Bulbs . . . . . . . . . . . . . . . . 243
Headlamp Aiming . . . . . . . . . . . . . 243
Headlamps . . . . . . . . . . . . . . . . . . . 243
Headlamps, Front TurnSignal, and Parking
Lamps . . . . . . . . . . . . . . . . . . . . . . 244
License Plate Lamps . . . . . . . . . 246
Taillamps, Turn Signal, Stoplamps, and Back-up
Lamps . . . . . . . . . . . . . . . . . . . . . . 245
Buying New Tires . . . . . . . . . . . . . . . 268
C
Calibration . . . . . . . . . . . . . . . . . . . . . . . 92
California Fuel Requirements . . . . . . . . . . . 214
Perchlorate MaterialsRequirements . . . . . . . . . . . . . . . 220
California Proposition
65 Warning . . . . . . . . . .220, 240, 287
Camera
Rear Vision (RVC) . . . . . . . . . . . . 208 Canadian Vehicle Owners . . . . . . . . 2
Capacities and
Specifications . . . . . . . . . . . . . . . . . 315
Carbon Monoxide Engine Exhaust . . . . . . . . . . . . . . . 197
Liftgate . . . . . . . . . . . . . . . . . . . . . . . . . 35
Trunk . . . . . . . . . . . . . . . . . . . . . . . . . . . 33
Winter Driving . . . . . . . . . . . . . . . . 185
Cargo Cover . . . . . . . . . . . . . . . . . . . . . . . . . . . 87
Caution, Danger, and Warning . . . . 2
Chains, Tire . . . . . . . . . . . . . . . . . . . . 273
Charging System Light . . . . . . . . . 100
Check
Ignition Transmission Lock . . . 241
Malfunction IndicatorEngine Light . . . . . . . . . . . . . . . . 100
Child Restraints Infants and Young Children . . . . . 69
Lower Anchors and Tethersfor Children . . . . . . . . . . . . . . . . . . . 74
Older Children . . . . . . . . . . . . . . . . . . 68
Securing . . . . . . . . . . . . . . . . . . . . 80, 82
Systems . . . . . . . . . . . . . . . . . . . . . . . . 72
Circuit Breakers . . . . . . . . . . . . . . . . 248
Cleaning
Exterior Care . . . . . . . . . . . . . . . . . 292
Interior Care . . . . . . . . . . . . . . . . . . 297