2016 CHEVROLET SILVERADO check engine
[x] Cancel search: check enginePage 331 of 533
Chevrolet Silverado Owner Manual (GMNA-Localizing-U.S./Canada/Mexico-
9159338) - 2016 - crc - 10/27/15
330 Driving and Operating
Parking on Hills
{Warning
Parking the vehicle on a hill with
the trailer attached can be
dangerous. If something goes
wrong, the rig could start to move.
People can be injured, and both
the vehicle and the trailer can be
damaged. When possible, always
park the rig on a flat surface.
If parking the rig on a hill: 1. Press the brake pedal, but do not shift into P (Park) yet. Turn
the wheels into the curb if
facing downhill or into traffic if
facing uphill.
2. Have someone place chocks under the trailer wheels.
3. When the wheel chocks are in place, release the regular
brakes until the chocks absorb
the load. 4. Reapply the brake pedal. Then
apply the parking brake and
shift into P (Park).
5. Release the brake pedal.Leaving After Parking on a Hill
1. Apply and hold the brake pedal.
2. Start the engine.
3. Shift into a gear.
4. Release the parking brake.
5. Let up on the brake pedal.
6. Drive slowly until the trailer is clear of the chocks.
7. Stop and have someone pick up and store the chocks.
Maintenance when Trailer
Towing
The vehicle needs service more
often when pulling a trailer. See
Maintenance Schedule 0462.
Things that are especially important
in trailer operation are automatic
transmission fluid, engine oil, axle
lubricant, belts, cooling system, and brake system. It is a good idea to
inspect these before and during
the trip.
Check periodically to see that all
hitch nuts and bolts are tight.
Trailer Towing
If the vehicle has a diesel engine,
see the Duramax diesel
supplement.
If the vehicle is bi-fuel, see the
bi-fuel supplement.
Do not tow a trailer during break-in.
See
New Vehicle Break-In 0280.
Page 355 of 533
Chevrolet Silverado Owner Manual (GMNA-Localizing-U.S./Canada/Mexico-
9159338) - 2016 - crc - 10/27/15
354 Driving and Operating
A GM dealer may be able to
diagnose and repair problems with
the trailer. However, any diagnosis
and repair of the trailer is not
covered under the vehicle warranty.
Contact your trailer dealer for
assistance with trailer repairs and
trailer warranty information.
Trailer Sway
Control (TSC)
Vehicles with StabiliTrak have a
TSC feature. Trailer sway is
unintended side-to-side motion of a
trailer while being towed. If the
vehicle is towing a trailer and the
TSC detects that sway is increasing,
the vehicle brakes are selectively
applied at each wheel, to help
reduce excessive trailer sway. If the
vehicle is equipped with the
Integrated Trailer Brake Control
(ITBC) system, and the trailer has
the electric actuated brake system,
StabiliTrak may also apply the trailer
brakes.
If TSC is enabled, the Traction
Control System (TCS)/StabiliTrak
warning light will flash on theinstrument cluster. Vehicle speed
must be reduced. If trailer sway
continues, StabiliTrak can reduce
engine torque to help slow the
vehicle. See
Traction Control/
Electronic Stability Control 0308.
{Warning
Even if the vehicle is equipped
with TSC, trailer sway could result
in loss of control and the vehicle
could crash. If excessive trailer
sway is detected, slow down to a
safe speed. Check the trailer and
vehicle to help correct possible
causes. These could include an
improperly or overloaded trailer,
unrestrained cargo, improper
trailer hitch configuration,
excessive vehicle-trailer speed,
or improperly inflated or incorrect
vehicle or trailer tires. See Towing
Equipment 0345 for trailer ratings
and hitch setup
recommendations. Adding non-dealer accessories can
affect the vehicle performance. See
Accessories and
Modifications
0362.
Page 356 of 533
Chevrolet Silverado Owner Manual (GMNA-Localizing-U.S./Canada/Mexico-
9159338) - 2016 - crc - 10/27/15
Driving and Operating 355
Conversions and
Add-Ons
Add-On Electrical
Equipment
{Warning
The Data Link Connector (DLC) is
used for vehicle service and
Emission Inspection/Maintenance
testing. SeeMalfunction Indicator
Lamp (Check Engine Light)
0 143. A device connected to the
DLC —such as an aftermarket
fleet or driver-behavior tracking
device —may interfere with
vehicle systems. This could affect
vehicle operation and cause a
crash. Such devices may also
access information stored in the
vehicle’s systems.
Caution
Some electrical equipment can
damage the vehicle or cause
components to not work and
would not be covered by the
vehicle warranty. Always check
with your dealer before adding
electrical equipment.
Add-on equipment can drain the
vehicle's 12-volt battery, even if the
vehicle is not operating.
The vehicle has an airbag system.
Before attempting to add anything
electrical to the vehicle, see
Servicing the Airbag-Equipped
Vehicle 087 and Adding Equipment
to the Airbag-Equipped
Vehicle 087.
For information on wiring auxiliary
switches, see www.gmupfitter.com
or contact your dealer.
Adding a Snow Plow or
Similar Equipment
Caution
Do not exceed 64 km/h (40 mph)
with a snow plow mounted to the
vehicle. The vehicle could
overheat and be damaged.
Before installing a snow plow on the
vehicle, here are some things you
need to know:
Caution
If the vehicle does not have the
snow plow prep package, adding
a plow can damage the vehicle,
and the repairs would not be
covered by warranty. Unless the
vehicle was built to carry a snow
plow, do not add one to the
vehicle. If the vehicle has the
snow plow prep package, called
RPO VYU, then the payload the
vehicle can carry will be reduced (Continued)
Page 361 of 533
Chevrolet Silverado Owner Manual (GMNA-Localizing-U.S./Canada/Mexico-
9159338) - 2016 - crc - 10/21/15
360 Vehicle Care
Vehicle Care
General Information
General Information . . . . . . . . . . 361
California Proposition65 Warning . . . . . . . . . . . . . . . . . 361
California Perchlorate Materials Requirements . . . . . 362
Accessories and Modifications . . . . . . . . . . . . . . . . 362
Vehicle Checks
Doing Your OwnService Work . . . . . . . . . . . . . . . 363
Hood . . . . . . . . . . . . . . . . . . . . . . . . . 363
Engine Compartment Overview . . . . . . . . . . . . . . . . . . . . 364
Engine Oil . . . . . . . . . . . . . . . . . . . . 369
Engine Oil Life System . . . . . . . 372
Automatic Transmission Fluid (6 Speed Transmission) . . . . . 373
Automatic Transmission Fluid (8 Speed Transmission) . . . . . 376
Manual Transmission Fluid . . . 376
Hydraulic Clutch . . . . . . . . . . . . . . 376
Engine Air Cleaner/Filter . . . . . . 377
Cooling System . . . . . . . . . . . . . . 378
Engine Coolant . . . . . . . . . . . . . . . 379
Engine Overheating . . . . . . . . . . 382 Overheated Engine Protection
Operating Mode . . . . . . . . . . . . . 384
Engine Fan . . . . . . . . . . . . . . . . . . . 384
Power Steering Fluid (1500 Series) . . . . . . . . . . . . . . . . . . . . . . 385
Power Steering Fluid (2500/ 3500 Series) . . . . . . . . . . . . . . . . 385
Washer Fluid . . . . . . . . . . . . . . . . . 385
Brakes . . . . . . . . . . . . . . . . . . . . . . . 386
Brake Fluid . . . . . . . . . . . . . . . . . . . 387
Battery - North America . . . . . . 388
Four-Wheel Drive . . . . . . . . . . . . . 389
Front Axle . . . . . . . . . . . . . . . . . . . . 390
Rear Axle . . . . . . . . . . . . . . . . . . . . 390
Noise Control System . . . . . . . . 392
Starter Switch Check . . . . . . . . . 393
Automatic Transmission Shift Lock Control Function
Check . . . . . . . . . . . . . . . . . . . . . . . 393
Ignition Transmission Lock Check . . . . . . . . . . . . . . . . . . . . . . . 393
Park Brake and P (Park) Mechanism Check . . . . . . . . . . 394
Wiper Blade Replacement . . . . 394
Glass Replacement . . . . . . . . . . 395
Headlamp Aiming
Headlamp Aiming . . . . . . . . . . . . 395
Bulb Replacement
Bulb Replacement . . . . . . . . . . . . 395 Halogen Bulbs . . . . . . . . . . . . . . . . 395
High Intensity Discharge (HID)
Lighting . . . . . . . . . . . . . . . . . . . . . 395
LED Lighting . . . . . . . . . . . . . . . . . 396
Headlamps, Front Turn Signal, Sidemarker, and Parking
Lamps . . . . . . . . . . . . . . . . . . . . . . 396
Fog Lamps . . . . . . . . . . . . . . . . . . . 396
Taillamps (Chassis Cab Models) . . . . . . . . . . . . . . . . . . . . . 397
Taillamps, Turn Signal, Stoplamps, and Back-Up
Lamps . . . . . . . . . . . . . . . . . . . . . . 397
Center High-Mounted Stoplamp (CHMSL) and
Cargo Lamp . . . . . . . . . . . . . . . . . 398
Replacement Bulbs . . . . . . . . . . . 399
Electrical System
High Voltage Devices and Wiring . . . . . . . . . . . . . . . . . . . . . . . 399
Electrical System Overload . . . 399
Fuses . . . . . . . . . . . . . . . . . . . . . . . . 400
Engine Compartment Fuse Block . . . . . . . . . . . . . . . . . . . . . . . . 400
Instrument Panel Fuse Block (Right) . . . . . . . . . . . . . . . . . . . . . . 403
Instrument Panel Fuse Block (Left) . . . . . . . . . . . . . . . . . 405
Page 366 of 533
Chevrolet Silverado Owner Manual (GMNA-Localizing-U.S./Canada/Mexico-
9159338) - 2016 - crc - 10/21/15
Vehicle Care 365
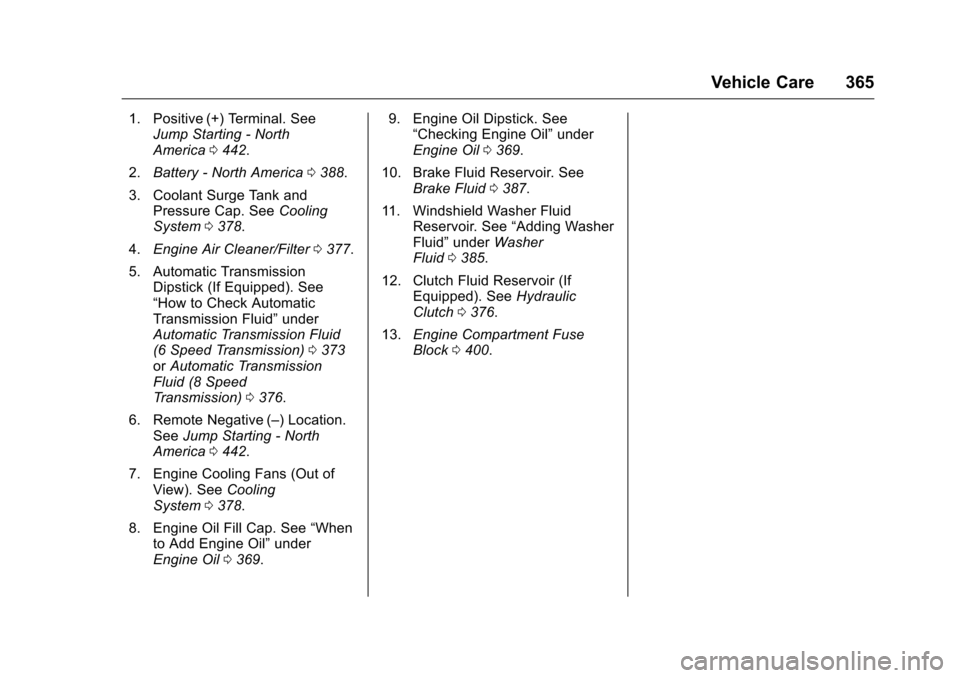
1. Positive (+) Terminal. SeeJump Starting - North
America 0442.
2. Battery - North America 0388.
3. Coolant Surge Tank and Pressure Cap. See Cooling
System 0378.
4. Engine Air Cleaner/Filter 0377.
5. Automatic Transmission Dipstick (If Equipped). See
“How to Check Automatic
Transmission Fluid” under
Automatic Transmission Fluid
(6 Speed Transmission) 0373
or Automatic Transmission
Fluid (8 Speed
Transmission) 0376.
6. Remote Negative (–) Location. See Jump Starting - North
America 0442.
7. Engine Cooling Fans (Out of View). See Cooling
System 0378.
8. Engine Oil Fill Cap. See “When
to Add Engine Oil” under
Engine Oil 0369. 9. Engine Oil Dipstick. See
“Checking Engine Oil” under
Engine Oil 0369.
10. Brake Fluid Reservoir. See Brake Fluid 0387.
11. Windshield Washer Fluid Reservoir. See “Adding Washer
Fluid” under Washer
Fluid 0385.
12. Clutch Fluid Reservoir (If Equipped). See Hydraulic
Clutch 0376.
13. Engine Compartment Fuse
Block 0400.
Page 368 of 533
Chevrolet Silverado Owner Manual (GMNA-Localizing-U.S./Canada/Mexico-
9159338) - 2016 - crc - 10/21/15
Vehicle Care 367
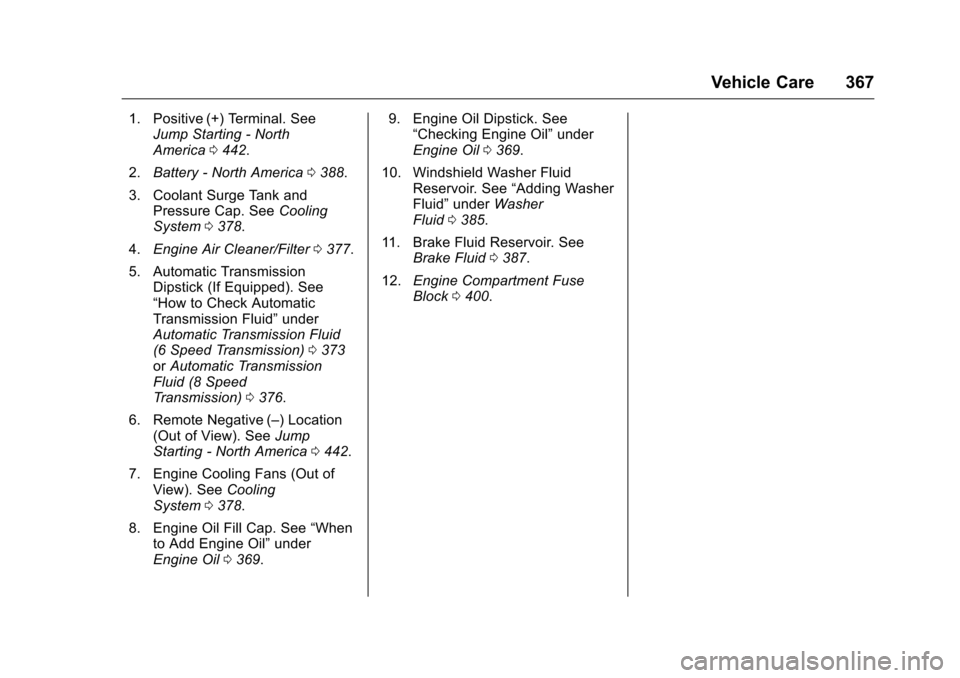
1. Positive (+) Terminal. SeeJump Starting - North
America 0442.
2. Battery - North America 0388.
3. Coolant Surge Tank and Pressure Cap. See Cooling
System 0378.
4. Engine Air Cleaner/Filter 0377.
5. Automatic Transmission Dipstick (If Equipped). See
“How to Check Automatic
Transmission Fluid” under
Automatic Transmission Fluid
(6 Speed Transmission) 0373
or Automatic Transmission
Fluid (8 Speed
Transmission) 0376.
6. Remote Negative (–) Location (Out of View). See Jump
Starting - North America 0442.
7. Engine Cooling Fans (Out of View). See Cooling
System 0378.
8. Engine Oil Fill Cap. See “When
to Add Engine Oil” under
Engine Oil 0369. 9. Engine Oil Dipstick. See
“Checking Engine Oil” under
Engine Oil 0369.
10. Windshield Washer Fluid Reservoir. See “Adding Washer
Fluid” under Washer
Fluid 0385.
11. Brake Fluid Reservoir. See Brake Fluid 0387.
12. Engine Compartment Fuse
Block 0400.
Page 370 of 533
Chevrolet Silverado Owner Manual (GMNA-Localizing-U.S./Canada/Mexico-
9159338) - 2016 - crc - 10/21/15
Vehicle Care 369
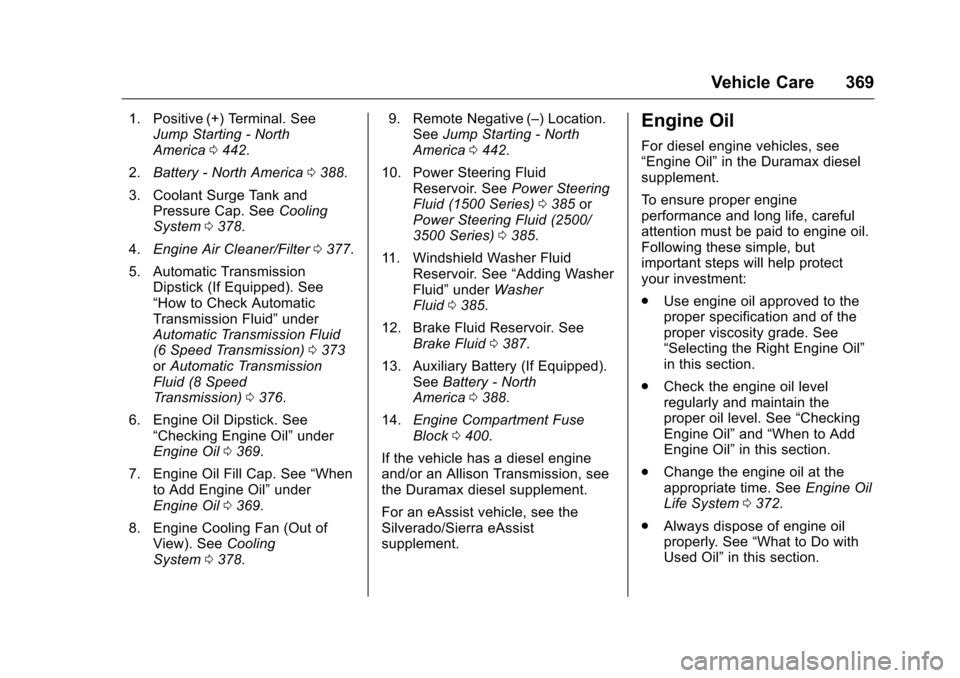
1. Positive (+) Terminal. SeeJump Starting - North
America 0442.
2. Battery - North America 0388.
3. Coolant Surge Tank and Pressure Cap. See Cooling
System 0378.
4. Engine Air Cleaner/Filter 0377.
5. Automatic Transmission Dipstick (If Equipped). See
“How to Check Automatic
Transmission Fluid” under
Automatic Transmission Fluid
(6 Speed Transmission) 0373
or Automatic Transmission
Fluid (8 Speed
Transmission) 0376.
6. Engine Oil Dipstick. See “Checking Engine Oil” under
Engine Oil 0369.
7. Engine Oil Fill Cap. See “When
to Add Engine Oil” under
Engine Oil 0369.
8. Engine Cooling Fan (Out of View). See Cooling
System 0378. 9. Remote Negative (–) Location.
See Jump Starting - North
America 0442.
10. Power Steering Fluid Reservoir. See Power Steering
Fluid (1500 Series) 0385 or
Power Steering Fluid (2500/
3500 Series) 0385.
11. Windshield Washer Fluid Reservoir. See “Adding Washer
Fluid” under Washer
Fluid 0385.
12. Brake Fluid Reservoir. See Brake Fluid 0387.
13. Auxiliary Battery (If Equipped). SeeBattery - North
America 0388.
14. Engine Compartment Fuse
Block 0400.
If the vehicle has a diesel engine
and/or an Allison Transmission, see
the Duramax diesel supplement.
For an eAssist vehicle, see the
Silverado/Sierra eAssist
supplement.Engine Oil
For diesel engine vehicles, see
“Engine Oil” in the Duramax diesel
supplement.
To ensure proper engine
performance and long life, careful
attention must be paid to engine oil.
Following these simple, but
important steps will help protect
your investment:
. Use engine oil approved to the
proper specification and of the
proper viscosity grade. See
“Selecting the Right Engine Oil”
in this section.
. Check the engine oil level
regularly and maintain the
proper oil level. See “Checking
Engine Oil” and“When to Add
Engine Oil” in this section.
. Change the engine oil at the
appropriate time. See Engine Oil
Life System 0372.
. Always dispose of engine oil
properly. See “What to Do with
Used Oil” in this section.
Page 371 of 533
Chevrolet Silverado Owner Manual (GMNA-Localizing-U.S./Canada/Mexico-
9159338) - 2016 - crc - 10/21/15
370 Vehicle Care
Checking Engine Oil
It is a good idea to check the engine
oil level at each fuel fill. In order to
get an accurate reading, the vehicle
must be on level ground. The
engine oil dipstick handle is a loop.
SeeEngine Compartment Overview
0 364 for the location of the engine
oil dipstick.
If a low oil message displays on the
DIC, it is important to park on level
ground to accurately measure the
oil level on the dipstick. Idling the
vehicle on steep grades for a long
time can influence the level sensing
accuracy.
Obtaining an accurate oil level
reading is essential:
1. If the engine has been running recently, turn off the engine and
allow several minutes for the oil
to drain back into the oil pan.
Checking the oil level too soon
after engine shutoff will not
provide an accurate oil level
reading.{Warning
The engine oil dipstick handle
may be hot; it could burn you.
Use a towel or glove to touch the
dipstick handle.
2. Pull out the dipstick and wipe it with a clean paper towel or
cloth, then push it back in all
the way. Remove it again,
keeping the tip down, and
check the level.
When to Add Engine Oil
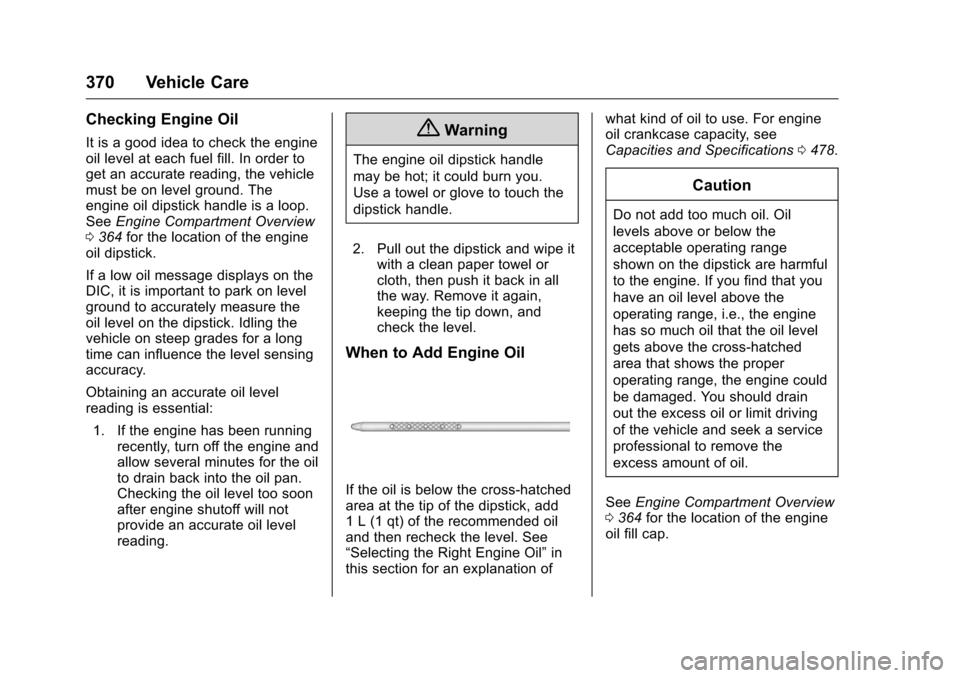
If the oil is below the cross-hatched
area at the tip of the dipstick, add
1 L (1 qt) of the recommended oil
and then recheck the level. See
“Selecting the Right Engine Oil” in
this section for an explanation of what kind of oil to use. For engine
oil crankcase capacity, see
Capacities and Specifications
0478.
Caution
Do not add too much oil. Oil
levels above or below the
acceptable operating range
shown on the dipstick are harmful
to the engine. If you find that you
have an oil level above the
operating range, i.e., the engine
has so much oil that the oil level
gets above the cross-hatched
area that shows the proper
operating range, the engine could
be damaged. You should drain
out the excess oil or limit driving
of the vehicle and seek a service
professional to remove the
excess amount of oil.
See Engine Compartment Overview
0 364 for the location of the engine
oil fill cap.