2016 CHEVROLET SILVERADO clock
[x] Cancel search: clockPage 244 of 533

Chevrolet Silverado Owner Manual (GMNA-Localizing-U.S./Canada/Mexico-
9159338) - 2016 - crc - 10/21/15
Infotainment System 243
Playing a Movie File1. Connect the USB device to the USB port.
2. Touch the screen to open to full screen. Touch the screen again
to return to the previous
screen.
If the USB device is already
connected:
1. Press
{.
2. Touch GALLERY.
3. Touch
z.
Movie is not available while driving.
Pause
. Touch
jto pause.
. Touch
rto resume.
Changing to Next/Previous Movie
. Touch
uto change to the
next file.
. Touch
twithin five seconds of
the playback time to play the
previous file. Returning to the Beginning of the
Current Movie
Touch
tafter five seconds of the
playback time.
Scanning Forward or Backward
Touch and hold
toruduring
playback to rewind or fast forward.
Release the button to resume
playback at normal speed.
Viewing Full Screen
Touch
tfrom the movie screen.
Touch
tagain to return to the
previous screen.
Using the USB Movie Menu
1. Touch MENU from the movie screen.
2. Touch the appropriate menu:
.Tone Settings: Shows the
sound setup. See “Tone
Settings” under“Base
Radio with Touchscreen” in
AM-FM Radio (Base Radio
with Touchscreen) 0199 or
AM-FM Radio (Base
Radio) 0197.
. Auto Volume: Automatically
adjusts the volume
according to the speed of
the vehicle. See “Auto
Volume” under“Base Radio
with Touchscreen” in
AM-FM Radio (Base Radio
with Touchscreen) 0199 or
AM-FM Radio (Base
Radio) 0197.
. Clock Temp. Display:
Allows selection of On or
Off to show the clock and
temperature on the full
screen.
. Display Settings: Adjusts
for brightness and contrast.
3. Touch
0to exit.
Page 251 of 533
Chevrolet Silverado Owner Manual (GMNA-Localizing-U.S./Canada/Mexico-
9159338) - 2016 - crc - 10/21/15
250 Climate Controls
Climate Controls
Climate Control Systems
Climate Control Systems (withHeater Only) . . . . . . . . . . . . . . . . 250
Climate Control Systems (with Air Conditioning) . . . . . . . . . . . . 252
Dual Automatic Climate Control System . . . . . . . . . . . . . 253
Air Vents
Air Vents . . . . . . . . . . . . . . . . . . . . . 257
Maintenance
Passenger Compartment AirFilter . . . . . . . . . . . . . . . . . . . . . . . . 257
Service . . . . . . . . . . . . . . . . . . . . . . . 258
Climate Control Systems
Climate Control Systems (with Heater Only)
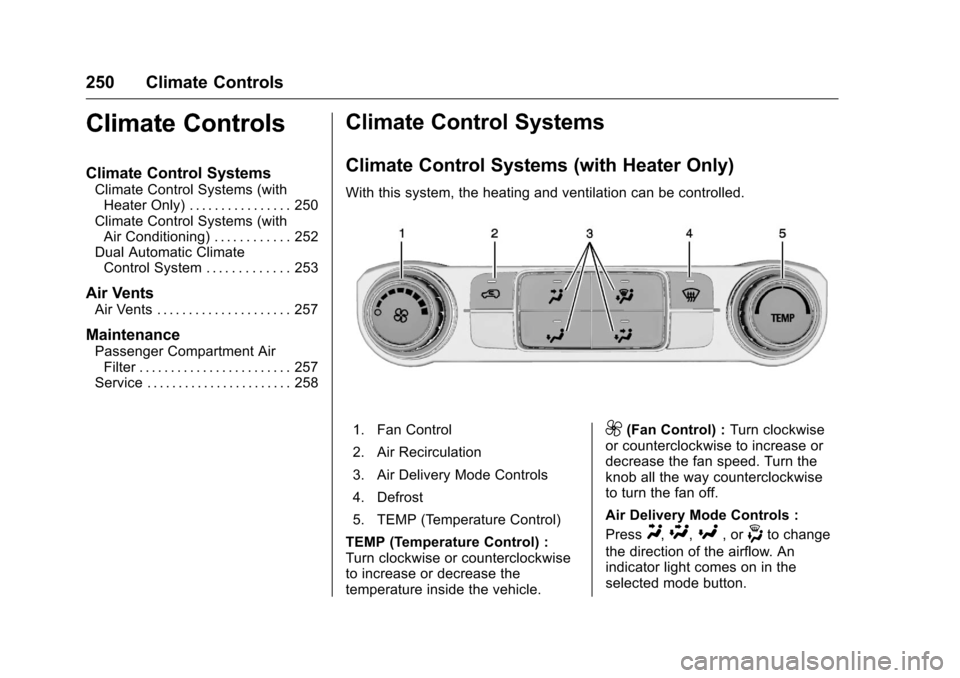
With this system, the heating and ventilation can be controlled.
1. Fan Control
2. Air Recirculation
3. Air Delivery Mode Controls
4. Defrost
5. TEMP (Temperature Control)
TEMP (Temperature Control) :
Turn clockwise or counterclockwise
to increase or decrease the
temperature inside the vehicle.9(Fan Control) : Turn clockwise
or counterclockwise to increase or
decrease the fan speed. Turn the
knob all the way counterclockwise
to turn the fan off.
Air Delivery Mode Controls :
Press
Y,\,[, or-to change
the direction of the airflow. An
indicator light comes on in the
selected mode button.
Page 253 of 533
Chevrolet Silverado Owner Manual (GMNA-Localizing-U.S./Canada/Mexico-
9159338) - 2016 - crc - 10/21/15
252 Climate Controls
Climate Control Systems (with Air Conditioning)
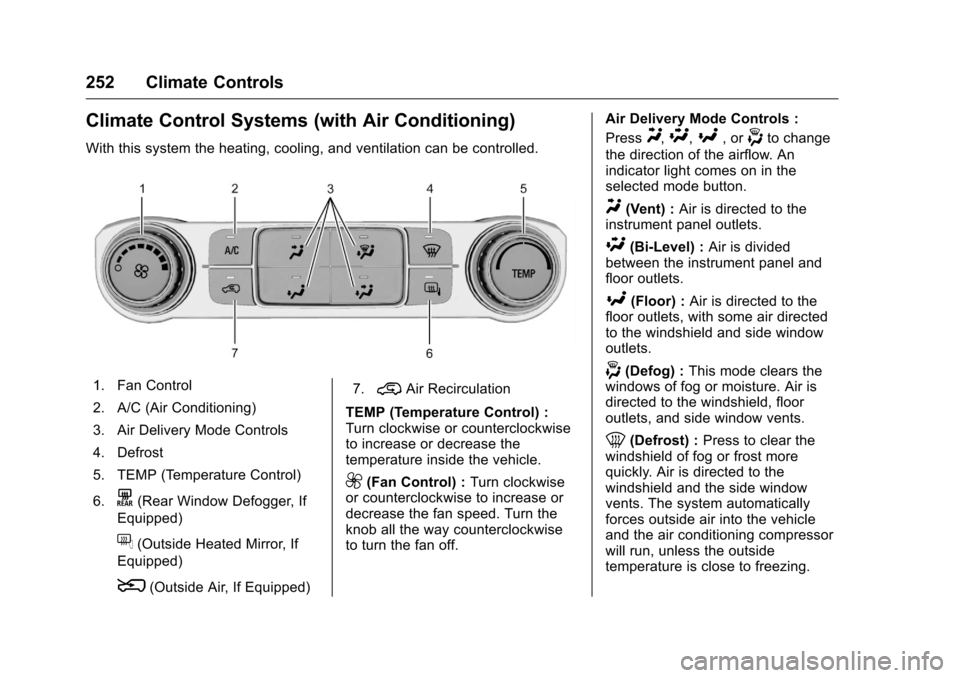
With this system the heating, cooling, and ventilation can be controlled.
1. Fan Control
2. A/C (Air Conditioning)
3. Air Delivery Mode Controls
4. Defrost
5. TEMP (Temperature Control)
6.
K(Rear Window Defogger, If
Equipped)
f(Outside Heated Mirror, If
Equipped)
8(Outside Air, If Equipped) 7.
@Air Recirculation
TEMP (Temperature Control) :
Turn clockwise or counterclockwise
to increase or decrease the
temperature inside the vehicle.
9(Fan Control) : Turn clockwise
or counterclockwise to increase or
decrease the fan speed. Turn the
knob all the way counterclockwise
to turn the fan off. Air Delivery Mode Controls :
Press
Y,\,[, or-to change
the direction of the airflow. An
indicator light comes on in the
selected mode button.
Y(Vent) : Air is directed to the
instrument panel outlets.
\(Bi-Level) : Air is divided
between the instrument panel and
floor outlets.
[(Floor) : Air is directed to the
floor outlets, with some air directed
to the windshield and side window
outlets.
-(Defog) : This mode clears the
windows of fog or moisture. Air is
directed to the windshield, floor
outlets, and side window vents.
0(Defrost) : Press to clear the
windshield of fog or frost more
quickly. Air is directed to the
windshield and the side window
vents. The system automatically
forces outside air into the vehicle
and the air conditioning compressor
will run, unless the outside
temperature is close to freezing.
Page 256 of 533

Chevrolet Silverado Owner Manual (GMNA-Localizing-U.S./Canada/Mexico-
9159338) - 2016 - crc - 10/21/15
Climate Controls 255
and is directed to the floor. This
direction can be changed by
pressing the air delivery mode.
9(Fan Control) :Turn clockwise
or counterclockwise to increase or
decrease the fan speed. Press the
knob to turn the fan off.
Press AUTO to return to automatic
operation.
Driver and Passenger
Temperature Control : The
temperature can be adjusted
separately for the driver and
passenger.
Turn the knob clockwise or
counterclockwise to increase or
decrease the driver or passenger
temperature setting.
SYNC (Synchronized
Temperature) : Press to link the
passenger temperature setting to
the driver setting. The SYNC
indicator light will turn on. When the
passenger setting is adjusted, the
SYNC indicator light is off. The driver side or passenger side
temperature display shows the
temperature setting increasing or
decreasing.
Air Delivery Mode Control :
Press
Y,\,[, or-to change
the direction of the airflow. An
indicator light comes on in the
selected mode button.
Changing the mode cancels the
automatic operation and the system
goes into manual mode. Press
AUTO to return to automatic
operation.
Y(Vent) : Air is directed to the
instrument panel outlets.
\(Bi-Level) : Air is divided
between the instrument panel and
floor outlets. Some air is directed
toward the windshield and side
window outlets.
[(Floor) : Air is directed to the
floor outlets, with some to the
windshield, side window outlets, and
second row floor outlets.
-(Defog) : This mode clears the
windows of fog or moisture. Air is
directed to the windshield, floor outlets, and side window vents. The
system automatically forces outside
air into the vehicle and the air
conditioning compressor will run,
unless the outside temperature is
close to freezing.
0(Defrost) :
Press to clear the
windshield of fog or frost more
quickly. Air is directed to the
windshield and the side window
vents. The air conditioning
compressor also comes on, unless
the outside temperature is below
freezing.
Do not drive the vehicle until all
windows are clear.
See Air Vents 0257.
A/C (Air Conditioning) : Press to
turn the air conditioning system on
or off. An indicator light comes on to
show that the air conditioning is
enabled. If the fan is turned off, the
air conditioner will not run. The A/C
light will stay on even if the outside
temperatures are below freezing.
@(Recirculation) : Press to turn
on recirculation. An indicator light
comes on. Air is recirculated to
Page 302 of 533
Chevrolet Silverado Owner Manual (GMNA-Localizing-U.S./Canada/Mexico-
9159338) - 2016 - crc - 10/27/15
Driving and Operating 301
2. Turn the knob to 4n. Wait for
the 4
nindicator light to stop
flashing before shifting the
transmission into gear.
If the transmission is in gear and/or
moving more than 5 km/h (3 mph),
the 4
nindicator light will flash for
30 seconds and not complete the
shift. After 30 seconds the transfer
case will shift to 4
m. Turn the knob
to 4
mto see the indicator. With the
vehicle moving less than 5 km/h
(3 mph), and the transmission in
N (Neutral), attempt the shift again.
Shifting Out of 4
n
1. To shift out of 4nthe vehicle
must be stopped or moving
less than 5 km/h (3 mph) with
the transmission in N (Neutral)
and the ignition in ON/RUN.
It is best for the vehicle to be
moving 1.6 to 3.2 km/h
(1 to 2 mph). 2. Turn the knob to 4
mor 2m.
Wait for the 4
mor 2mindicator
light to stop flashing before
shifting the transmission
into gear.
If the transmission is in gear and/or
moving more than 5 km/h (3 mph),
the 4
mor 2mindicator light will flash
for 30 seconds, but will not complete
the shift. With the vehicle moving
less than 5 km/h (3 mph), and the
transmission in N (Neutral), attempt
the shift again.
Shifting Into N (Neutral)
To shift:
1. Park the vehicle on a level surface.
2. Set the parking brake and press and hold the brake
pedal. See Parking
Brake 0306.
3. Start the vehicle or turn the ignition to ON/RUN.
4. Shift the transmission to N (Neutral). 5. Shift the transfer case to 2
m.
6. Turn the transfer case knob clockwise to N (Neutral) until it
stops and hold it there until the
N (Neutral) light starts blinking.
This will take at least
10 seconds. Then slowly
release the dial to the 4
n
position. The N (Neutral) light
will come on when the transfer
case shift to N (Neutral) is
complete.
7. With the engine running, verify that the transfer case is in
N (Neutral) by shifting the
transmission to R (Reverse),
then to D (Drive). There should
be no movement of the vehicle
while shifting the transmission.
8. Turn the engine off, and the ignition to ACC/ACCESSORY.
9. Place the transmission shift lever in P (Park). See
Recreational Vehicle
Towing 0447.
10. Turn the ignition to LOCK/OFF.
Page 305 of 533
Chevrolet Silverado Owner Manual (GMNA-Localizing-U.S./Canada/Mexico-
9159338) - 2016 - crc - 10/27/15
304 Driving and Operating
Shifting Out of 4n
To shift:1. The vehicle must be stopped or moving less than 5 km/h
(3 mph) with the transmission
in N (Neutral) and the ignition in
ON/RUN. It is best for the
vehicle to be moving
1.6 to 3.2 km/h (1 to 2 mph).
2. Turn the knob to 4
m, AUTO,
or 2
m. Wait for the 4m, AUTO,
or 2
mindicator light to stop
flashing before shifting the
transmission into gear.
Caution
Shifting the transmission into gear
before the requested mode
indicator light has stopped
flashing could damage the
transfer case.
If the transmission is in gear and/or
moving more than 5 km/h (3 mph),
the 4
m, AUTO, or 2mindicator light
will flash for 30 seconds but will not complete the shift. With the vehicle
moving less than 5 km/h (3 mph),
and the transmission in N (Neutral),
attempt the shift again.
Shifting Into N (Neutral)
To shift into N (Neutral):
1. Park the vehicle on a level surface.
2. Set the parking brake and press and hold the brake
pedal. See Parking
Brake 0306.
3. Start the vehicle or turn the ignition to ON/RUN.
4. Shift the transmission to N (Neutral).
5. Shift the transfer case to 2
m.
6. Turn the transfer case knob clockwise to N (Neutral) until it
stops and hold it there until the
N (Neutral) light starts blinking.
This will take at least
10 seconds. Then slowly
release the dial to the 4
n
position. The N (Neutral) light will come on when the transfer
case shift to N (Neutral) is
complete.
7. With the engine running, verify that the transfer case is in
N (Neutral) by shifting the
transmission to R (Reverse),
then shift the transmission to
D (Drive). There should be no
movement of the vehicle while
shifting the transmission.
8. Turn the engine off, and the ignition to ACC/ACCESSORY.
9. Place the transmission shift lever in P (Park). See
Recreational Vehicle
Towing 0447.
10. Turn the ignition to LOCK/OFF.
Shifting Out of N (Neutral)
To shift out of N (Neutral): 1. Set the parking brake and apply the brake pedal.
2. Turn the ignition to ON/RUN with the engine off.
3. Shift the transmission to N (Neutral).
Page 327 of 533
Chevrolet Silverado Owner Manual (GMNA-Localizing-U.S./Canada/Mexico-
9159338) - 2016 - crc - 10/27/15
326 Driving and Operating
The fuel cap is behind a hinged fuel
door on the driver side of the
vehicle. Vehicles that have a
FlexFuel badge and a yellow fuel
cap can use either unleaded
gasoline or ethanol fuel containing
up to 85% ethanol (E85). SeeE85
or FlexFuel 0324.
To remove the fuel cap, turn it
slowly counterclockwise.
If the vehicle is a dual fuel tank
chassis cab model, and it runs out
of fuel, refuel the front fuel tank first
to ensure a quick restart.
{Warning
Overfilling the fuel tank by more
than three clicks of a standard fill
nozzle may cause: . Vehicle performance issues,
including engine stalling and
damage to the fuel system.
. Fuel spills.
. Potential fuel fires. Be careful not to spill fuel. Wait a
few seconds after you have finished
pumping before removing the
nozzle. Clean fuel from painted
surfaces as soon as possible. See
Exterior Care
0452.
When replacing the fuel cap, turn it
clockwise until it clicks. It will require
more effort to turn the fuel cap on
the last turn as you tighten it. Make
sure the cap is fully installed. The
diagnostic system can determine if
the fuel cap has been left off or
improperly installed. This would
allow fuel to evaporate into the
atmosphere. See Malfunction
Indicator Lamp (Check Engine
Light) 0143.
The TIGHTEN GAS CAP message
displays on the Driver Information
Center (DIC) if the fuel cap is not
properly installed. See Fuel System
Messages 0158 for more
information.
{Warning
If a fire starts while you are
refueling, do not remove the
nozzle. Shut off the flow of fuel by
shutting off the pump or by
notifying the station attendant.
Leave the area immediately.
Caution
If a new fuel cap is needed, be
sure to get the right type of cap
from your dealer. The wrong type
of fuel cap may not fit properly,
may cause the malfunction
indicator lamp to light, and could
damage the fuel tank and
emissions system. See
Malfunction Indicator Lamp
(Check Engine Light) 0143.
Page 382 of 533
Chevrolet Silverado Owner Manual (GMNA-Localizing-U.S./Canada/Mexico-
9159338) - 2016 - crc - 10/21/15
Vehicle Care 381
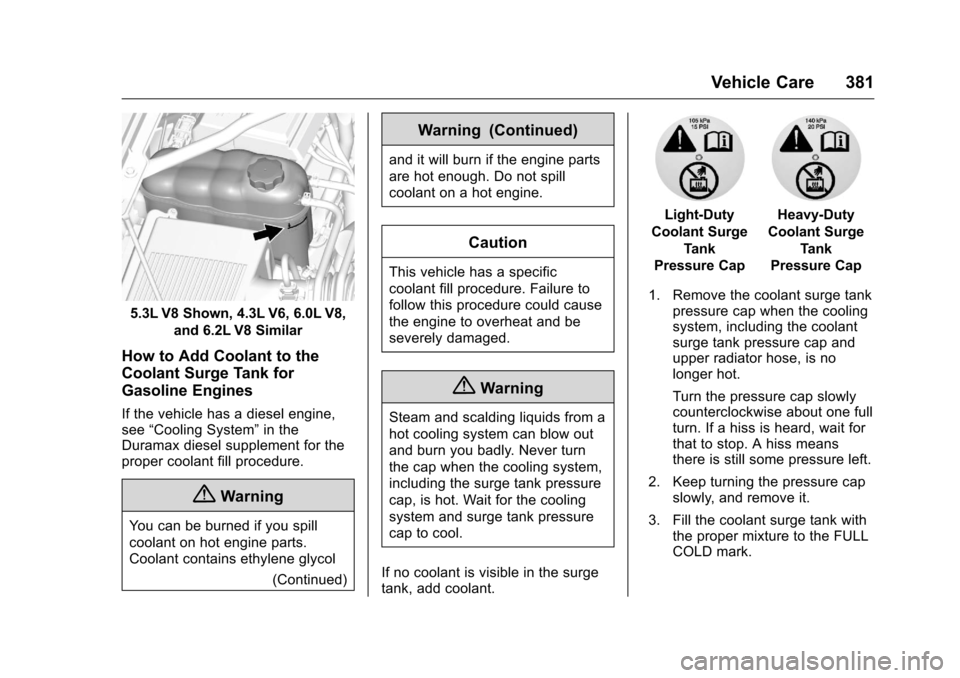
5.3L V8 Shown, 4.3L V6, 6.0L V8,and 6.2L V8 Similar
How to Add Coolant to the
Coolant Surge Tank for
Gasoline Engines
If the vehicle has a diesel engine,
see“Cooling System” in the
Duramax diesel supplement for the
proper coolant fill procedure.
{Warning
You can be burned if you spill
coolant on hot engine parts.
Coolant contains ethylene glycol
(Continued)
Warning (Continued)
and it will burn if the engine parts
are hot enough. Do not spill
coolant on a hot engine.
Caution
This vehicle has a specific
coolant fill procedure. Failure to
follow this procedure could cause
the engine to overheat and be
severely damaged.
{Warning
Steam and scalding liquids from a
hot cooling system can blow out
and burn you badly. Never turn
the cap when the cooling system,
including the surge tank pressure
cap, is hot. Wait for the cooling
system and surge tank pressure
cap to cool.
If no coolant is visible in the surge
tank, add coolant.
Light-Duty
Coolant Surge Tank
Pressure CapHeavy-Duty
Coolant Surge Tank
Pressure Cap
1. Remove the coolant surge tank pressure cap when the cooling
system, including the coolant
surge tank pressure cap and
upper radiator hose, is no
longer hot.
Turn the pressure cap slowly
counterclockwise about one full
turn. If a hiss is heard, wait for
that to stop. A hiss means
there is still some pressure left.
2. Keep turning the pressure cap slowly, and remove it.
3. Fill the coolant surge tank with the proper mixture to the FULL
COLD mark.