2016 CHEVROLET MALIBU ABS
[x] Cancel search: ABSPage 238 of 420
Chevrolet Malibu Owner Manual (GMNA-Localizing-U.S./Canada/Mexico-
9087641) - 2016 - crc - 9/3/15
Driving and Operating 237
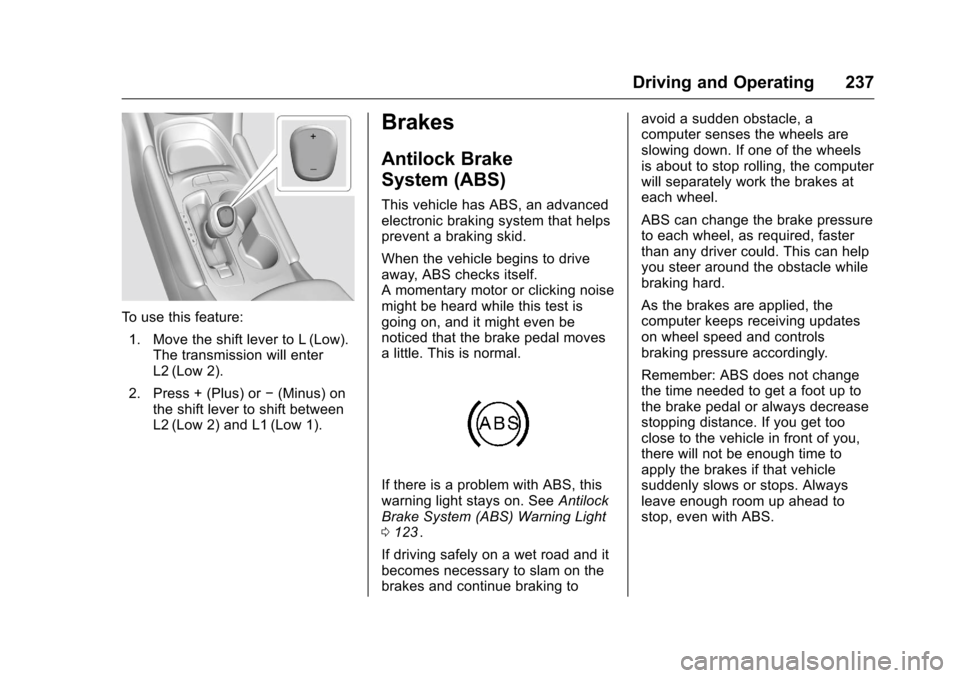
To use this feature:1. Move the shift lever to L (Low). The transmission will enter
L2 (Low 2).
2. Press + (Plus) or −(Minus) on
the shift lever to shift between
L2 (Low 2) and L1 (Low 1).
Brakes
Antilock Brake
System (ABS)
This vehicle has ABS, an advanced
electronic braking system that helps
prevent a braking skid.
When the vehicle begins to drive
away, ABS checks itself.
A momentary motor or clicking noise
might be heard while this test is
going on, and it might even be
noticed that the brake pedal moves
a little. This is normal.
If there is a problem with ABS, this
warning light stays on. See Antilock
Brake System (ABS) Warning Light
0 123
ii.
If driving safely on a wet road and it
becomes necessary to slam on the
brakes and continue braking to avoid a sudden obstacle, a
computer senses the wheels are
slowing down. If one of the wheels
is about to stop rolling, the computer
will separately work the brakes at
each wheel.
ABS can change the brake pressure
to each wheel, as required, faster
than any driver could. This can help
you steer around the obstacle while
braking hard.
As the brakes are applied, the
computer keeps receiving updates
on wheel speed and controls
braking pressure accordingly.
Remember: ABS does not change
the time needed to get a foot up to
the brake pedal or always decrease
stopping distance. If you get too
close to the vehicle in front of you,
there will not be enough time to
apply the brakes if that vehicle
suddenly slows or stops. Always
leave enough room up ahead to
stop, even with ABS.
Page 239 of 420
Chevrolet Malibu Owner Manual (GMNA-Localizing-U.S./Canada/Mexico-
9087641) - 2016 - crc - 9/3/15
238 Driving and Operating
Using ABS
Do not pump the brakes. Just hold
the brake pedal down firmly and let
ABS work. You may hear the ABS
pump or motor operating and feel
the brake pedal pulsate. This is
normal.
Braking in Emergencies
ABS allows you to steer and brake
at the same time. In many
emergencies, steering can help
more than even the very best
braking.
Parking Brake
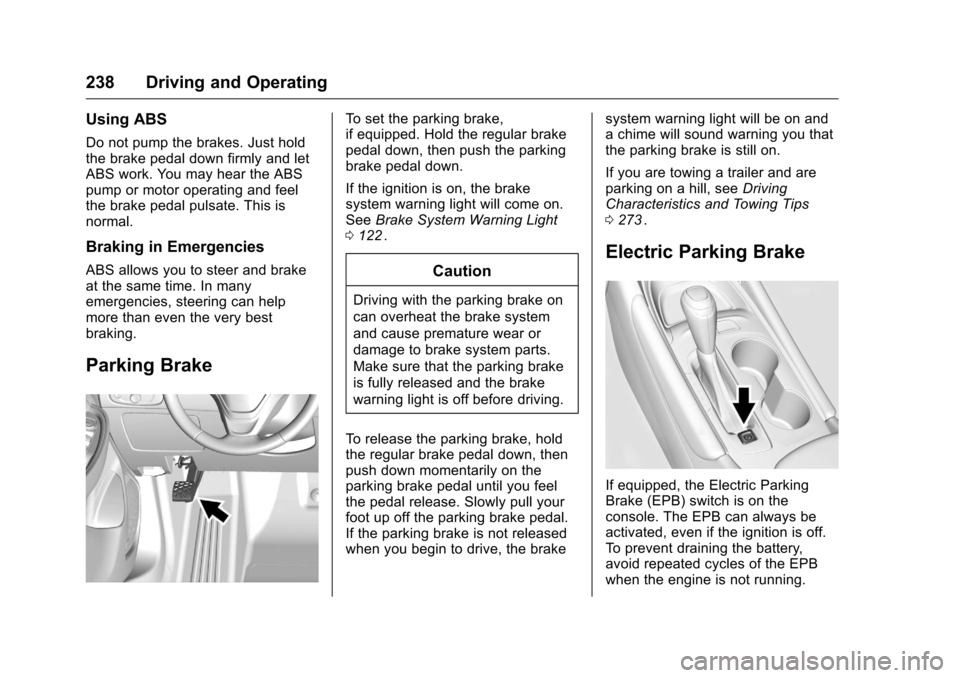
To set the parking brake,
if equipped. Hold the regular brake
pedal down, then push the parking
brake pedal down.
If the ignition is on, the brake
system warning light will come on.
SeeBrake System Warning Light
0 122
ii.
Caution
Driving with the parking brake on
can overheat the brake system
and cause premature wear or
damage to brake system parts.
Make sure that the parking brake
is fully released and the brake
warning light is off before driving.
To release the parking brake, hold
the regular brake pedal down, then
push down momentarily on the
parking brake pedal until you feel
the pedal release. Slowly pull your
foot up off the parking brake pedal.
If the parking brake is not released
when you begin to drive, the brake system warning light will be on and
a chime will sound warning you that
the parking brake is still on.
If you are towing a trailer and are
parking on a hill, see
Driving
Characteristics and Towing Tips
0 273
ii.
Electric Parking Brake
If equipped, the Electric Parking
Brake (EPB) switch is on the
console. The EPB can always be
activated, even if the ignition is off.
To prevent draining the battery,
avoid repeated cycles of the EPB
when the engine is not running.
Page 241 of 420
Chevrolet Malibu Owner Manual (GMNA-Localizing-U.S./Canada/Mexico-
9087641) - 2016 - crc - 9/3/15
240 Driving and Operating
Caution
Driving with the parking brake on
can overheat the brake system
and cause premature wear or
damage to brake system parts.
Make sure that the parking brake
is fully released and the brake
warning light is off before driving.
Automatic EPB Release
The EPB will automatically release if
the vehicle is running, placed into
gear, and an attempt is made to
drive away. Avoid rapid acceleration
when the EPB is applied, to
preserve parking brake lining life.
If parking on a hill, or if the vehicle
is pulling a trailer, seeDriving
Characteristics and Towing Tips
0 273
ii.
Brake Assist
The Brake Assist feature is
designed to assist the driver in
stopping or decreasing vehicle
speed in emergency driving
conditions. This feature uses the stability system hydraulic brake
control module to supplement the
power brake system under
conditions where the driver has
quickly and forcefully applied the
brake pedal in an attempt to quickly
stop or slow down the vehicle. The
stability system hydraulic brake
control module increases brake
pressure at each corner of the
vehicle until the ABS activates.
Minor brake pedal pulsation or
pedal movement during this time is
normal and the driver should
continue to apply the brake pedal as
the driving situation dictates. The
Brake Assist feature will
automatically disengage when the
brake pedal is released or brake
pedal pressure is quickly
decreased.
Hill Start Assist (HSA)
The HSA feature will activate when
the vehicle is stopped on a
moderate to steep grade to help
prevent it from rolling in an
unintended direction. After the brake
pedal has been released and before
the accelerator pedal has been
pressed, HSA uses braking
pressure to hold the vehicle
stationary. If HSA is holding the
vehicle, a DIC message displays.
HSA will not activate in a forward
drive gear when facing downhill,
or in R (Reverse) when facing uphill.
Extended Hill Start
Assist (EHSA)
Select the duration of the HSA
feature on the center stack
touchscreen by choosing the
submenu for Hill Start Assist or
Extended Hill Start Assist (EHSA).
See
“Extended Hill Start Assist"
under “Comfort and Convenience” in
Vehicle Personalization 0145
ii.
When Standard Hold is selected,
the vehicle is held stationary for up
to two seconds after the brake pedal
is released. When Extended Hold is
selected, the vehicle is held
stationary for up to five minutes
after the brake pedal is released. In
either case, override the hold
feature by pressing the accelerator
pedal and attempting to drive away.
Page 276 of 420
Chevrolet Malibu Owner Manual (GMNA-Localizing-U.S./Canada/Mexico-
9087641) - 2016 - crc - 9/3/15
Driving and Operating 275
When towing a trailer, the arrows on
the instrument cluster flash for turns
even if the bulbs on the trailer are
burned out. Check occasionally to
be sure the trailer bulbs are still
working.
Driving on Grades
Reduce speed and shift to a lower
gear before starting down a long or
steep downgrade. If the
transmission is not shifted down, the
brakes might have to be used so
much that they would get hot and no
longer work well.
The vehicle can tow in D (Drive).
Use a lower gear if the transmission
shifts too often.
When towing at high altitude on
steep uphill grades, engine coolant
boils at a lower temperature than at
normal altitudes. If the engine is
turned off immediately after towing
at high altitude on steep uphill
grades, the vehicle could show
signs similar to engine overheating.
To avoid this, let the engine run
while parked, preferably on level
ground, with the transmission in
P (Park) for a few minutes beforeturning the engine off. If the
overheat warning comes on, see
Engine Overheating
0298
ii.
Parking on Hills
{Warning
Parking the vehicle on a hill with
the trailer attached can be
dangerous. If something goes
wrong, the rig could start to move.
People can be injured, and both
the vehicle and the trailer can be
damaged. When possible, always
park the rig on a flat surface.
If parking the rig on a hill: 1. Press the brake pedal, but do not shift into P (Park) yet. Turn
the wheels into the curb if
facing downhill or into traffic if
facing uphill.
2. Have someone place chocks under the trailer wheels.
3. When the wheel chocks are in place, release the brake pedal
until the chocks absorb
the load. 4. Reapply the brake pedal. Then
apply the parking brake and
shift into P (Park).
5. Release the brake pedal.
Leaving After Parking on a Hill
1. Apply and hold the brake pedal while you:
1.1. Start the engine.
1.2. Shift into a gear.
1.3. Release the parking brake.
2. Let up on the brake pedal.
3. Drive slowly until the trailer is clear of the chocks.
4. Stop and have someone pick up and store the chocks.
Maintenance When Trailer
Towing
The vehicle needs service more
often when pulling a trailer. See the
Maintenance Schedule 0368
ii.
Things that are especially important
in trailer operation are automatic
transmission fluid, engine oil, axle
Page 303 of 420
Chevrolet Malibu Owner Manual (GMNA-Localizing-U.S./Canada/Mexico-
9087641) - 2016 - crc - 9/3/15
302 Vehicle Care
{Warning
If too much brake fluid is added, it
can spill on the engine and burn,
if the engine is hot enough. You
or others could be burned, and
the vehicle could be damaged.
Add brake fluid only when work is
done on the brake hydraulic
system.
When the brake fluid falls to a low
level, the brake warning light comes
on. See Brake System Warning
Light 0122
ii.
Brake fluid absorbs water over time
which degrades the effectiveness of
the brake fluid. Replace brake fluid
at the specified intervals to prevent
increased stopping distance. See
Maintenance Schedule 0368
ii.
What to Add
Use only GM approved DOT 3
brake fluid from a clean, sealed
container. See Recommended
Fluids and Lubricants 0376
ii.
{Warning
The wrong or contaminated brake
fluid could result in damage to the
brake system. This could result in
the loss of braking leading to a
possible injury. Always use the
proper GM approved brake fluid.
Caution
If brake fluid is spilled on the
vehicle's painted surfaces, the
paint finish can be damaged.
Immediately wash off any painted
surface.
Battery - North America
The original equipment battery is
maintenance free. Do not remove
the cap and do not add fluid.
The non-hybrid vehicle has a
standard 12-volt battery under the
hood. See Engine Compartment
Overview 0284
ii. Refer to the replacement number
shown on the original battery label
when a new 12-volt battery is
needed.
Hybrid Vehicle
The hybrid vehicle 12-volt battery is
in the trunk on the driver side.
Hybrid vehicles also have a high
voltage battery. Only a trained
service technician with the proper
knowledge and tools should inspect,
test, or replace the high voltage
battery. See your dealer if the high
voltage battery needs service. The
dealer has information on how to
recycle the high voltage battery.
The hybrid high voltage battery is
cooled with air drawn from the
vehicle interior. The cold air intake
for the battery is under the rear
seat. Do not block the area in front
of the cold air intake.
Page 304 of 420
Chevrolet Malibu Owner Manual (GMNA-Localizing-U.S./Canada/Mexico-
9087641) - 2016 - crc - 9/3/15
Vehicle Care 303
{Warning
Damage to the high voltage
battery or high voltage system
can create a risk of electric shock,
overheating, or fire.
If the vehicle is damaged from a
moderate to severe crash, flood,
fire, or other event, the vehicle
should be inspected as soon as
possible. Until the vehicle has
been inspected, store it outside at
least 15 m (50 ft) from any
structure or anything that can
burn. Ventilate the vehicle by
opening a window or a door.
Contact Customer Assistance as
soon as possible to determine
whether an inspection is needed.
SeeCustomer Assistance Offices
0 386
ii. Stop/Start System
If equipped with the 1.5L L4 engine,
the vehicle has a stop/start system
to shut off the engine to help
conserve fuel. See
Starting the
Engine 0228
ii.
Vehicles with a 1.5L engine have an
Absorbed Glass Mat (AGM) 12-volt
battery. Installation of a standard
12-volt battery will result in reduced
12-volt battery life.
When using a 12-volt battery
charger on the 12-volt AGM battery,
some chargers have an AGM
battery setting on the charger.
If available, use the AGM setting on
the charger, to limit charge voltage
to 14.8 volts.
{Warning
WARNING: Battery posts,
terminals, and related
accessories contain lead and lead
compounds, chemicals known to
the State of California to cause
cancer and birth defects or other
(Continued)
Warning (Continued)
reproductive harm. Batteries also
contain other chemicals known to
the State of California to cause
cancer.WASH HANDS AFTER
HANDLING. SeeCalifornia
Proposition 65 Warning 0280
ii.
Vehicle Storage
{Warning
Batteries have acid that can burn
you and gas that can explode.
You can be badly hurt if you are
not careful. See Jump Starting -
North America 0352
iifor tips on
working around a battery without
getting hurt.
Infrequent Usage: Remove the
12-volt battery black, negative (−)
cable from the battery to keep the
battery from running down.
Page 317 of 420
Chevrolet Malibu Owner Manual (GMNA-Localizing-U.S./Canada/Mexico-
9087641) - 2016 - crc - 9/3/15
316 Vehicle Care
Instrument Panel Fuse
Block
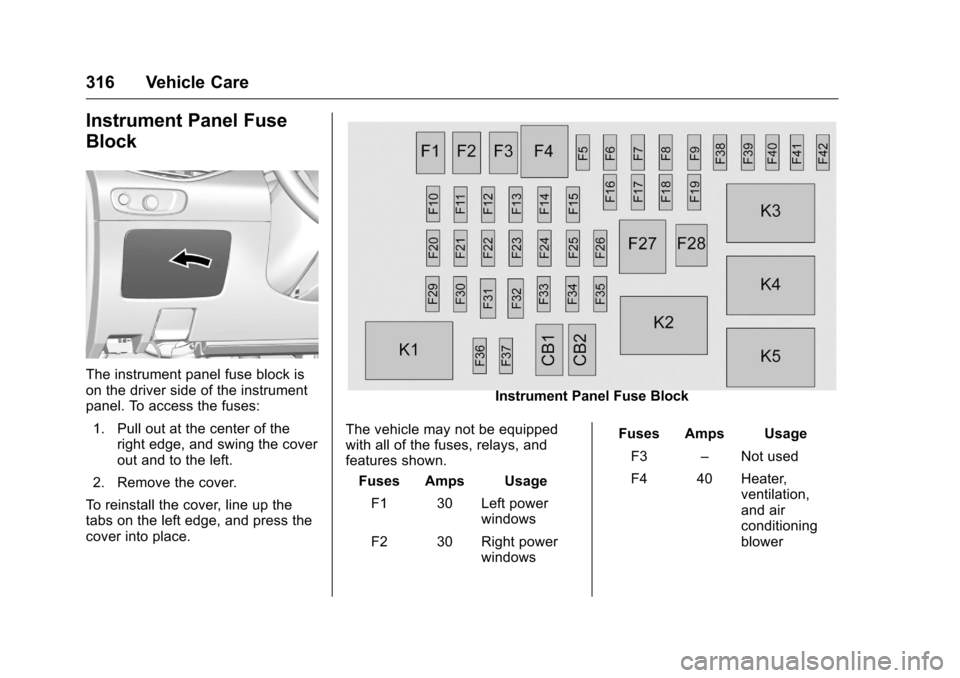
The instrument panel fuse block is
on the driver side of the instrument
panel. To access the fuses:1. Pull out at the center of the right edge, and swing the cover
out and to the left.
2. Remove the cover.
To reinstall the cover, line up the
tabs on the left edge, and press the
cover into place.
Instrument Panel Fuse Block
The vehicle may not be equipped
with all of the fuses, relays, and
features shown. Fuses Amps Usage
F1 30 Left power windows
F2 30 Right power windows Fuses Amps Usage
F3 –Not used
F4 40 Heater, ventilation,
and air
conditioning
blower
Page 352 of 420
Chevrolet Malibu Owner Manual (GMNA-Localizing-U.S./Canada/Mexico-
9087641) - 2016 - crc - 9/3/15
Vehicle Care 351
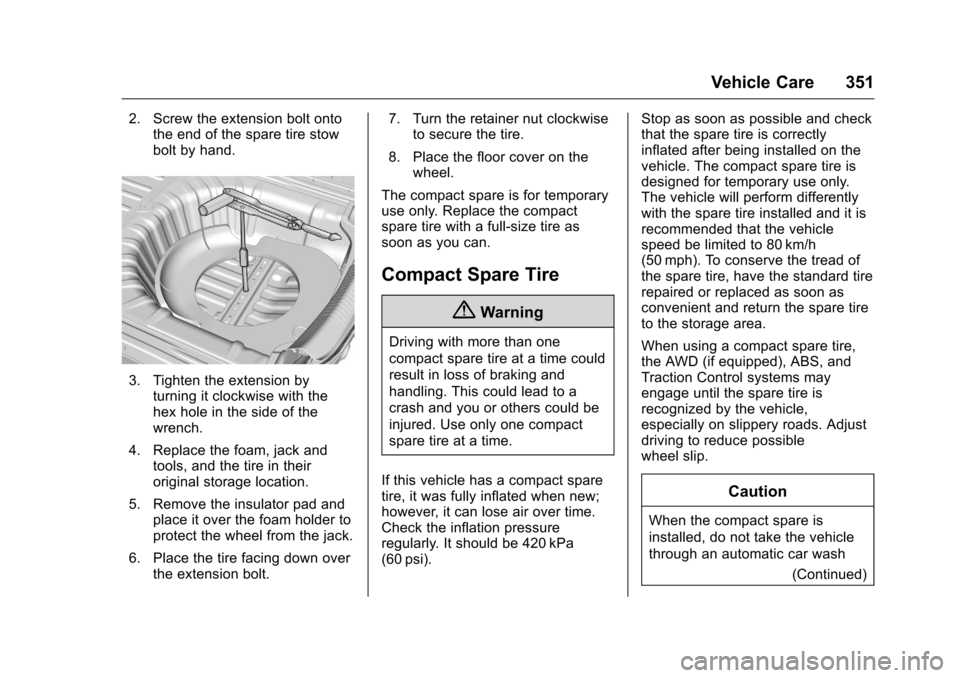
2. Screw the extension bolt ontothe end of the spare tire stow
bolt by hand.
3. Tighten the extension by
turning it clockwise with the
hex hole in the side of the
wrench.
4. Replace the foam, jack and tools, and the tire in their
original storage location.
5. Remove the insulator pad and place it over the foam holder to
protect the wheel from the jack.
6. Place the tire facing down over the extension bolt. 7. Turn the retainer nut clockwise
to secure the tire.
8. Place the floor cover on the wheel.
The compact spare is for temporary
use only. Replace the compact
spare tire with a full-size tire as
soon as you can.
Compact Spare Tire
{Warning
Driving with more than one
compact spare tire at a time could
result in loss of braking and
handling. This could lead to a
crash and you or others could be
injured. Use only one compact
spare tire at a time.
If this vehicle has a compact spare
tire, it was fully inflated when new;
however, it can lose air over time.
Check the inflation pressure
regularly. It should be 420 kPa
(60 psi). Stop as soon as possible and check
that the spare tire is correctly
inflated after being installed on the
vehicle. The compact spare tire is
designed for temporary use only.
The vehicle will perform differently
with the spare tire installed and it is
recommended that the vehicle
speed be limited to 80 km/h
(50 mph). To conserve the tread of
the spare tire, have the standard tire
repaired or replaced as soon as
convenient and return the spare tire
to the storage area.
When using a compact spare tire,
the AWD (if equipped), ABS, and
Traction Control systems may
engage until the spare tire is
recognized by the vehicle,
especially on slippery roads. Adjust
driving to reduce possible
wheel slip.
Caution
When the compact spare is
installed, do not take the vehicle
through an automatic car wash
(Continued)