2016 CHEVROLET MALIBU LIMITED run flat
[x] Cancel search: run flatPage 24 of 360

Chevrolet Malibu Limited Owner Manual (GMNA-Localizing-U.S/Canada-
9086425) - 2016 - crc - 7/30/15
In Brief 23
the center stack, untiliandg
illuminate in the instrument
cluster.
. Press and release the TCS/
StabiliTrak button again to turn
on both systems.
See Traction Control/Electronic
Stability Control 0202.
Tire Pressure Monitor
This vehicle may have a Tire
Pressure Monitor System (TPMS).
The low tire pressure warning light
alerts to a significant loss in
pressure of one of the vehicle's
tires. If the warning light comes on,
stop as soon as possible and inflate
the tires to the recommended
pressure shown on the Tire and Loading Information label. See
Vehicle Load Limits
0183. The
warning light will remain on until the
tire pressure is corrected.
The low tire pressure warning light
may come on in cool weather when
the vehicle is first started, and then
turn off as the vehicle is driven. This
may be an early indicator that the
tire pressures are getting low and
the tires need to be inflated to the
proper pressure.
The TPMS does not replace normal
monthly tire maintenance. Maintain
the correct tire pressures.
See Tire Pressure Monitor System
0 269.
Engine Oil Life System
The engine oil life system calculates
engine oil life based on vehicle use
and displays the CHANGE ENGINE
OIL SOON message when it is time
to change the engine oil and filter.
The oil life system should be reset
to 100% only following an oil
change. Resetting the Oil Life System
1. Turn the ignition to ON/RUN with the engine off.
2. Press the DIC MENU button on the turn signal lever to enter
the Vehicle Information Menu.
Use the thumbwheel to scroll
through the menu items until
you reach REMAINING
OIL LIFE.
3. Press the SET/CLR button to reset the oil life at 100%.
4. Turn the ignition to LOCK/OFF.
See Engine Oil Life System 0232.
Driving for Better Fuel
Economy
Driving habits can affect fuel
mileage. Here are some driving tips
to get the best fuel economy
possible.
.
Avoid fast starts and accelerate
smoothly.
. Brake gradually and avoid
abrupt stops.
Page 106 of 360

Chevrolet Malibu Limited Owner Manual (GMNA-Localizing-U.S/Canada-
9086425) - 2016 - crc - 7/30/15
Instruments and Controls 105
United States
Canada
When the vehicle is started, the
passenger airbag status indicator
will light ON and OFF, or the symbol
for on and off, for several seconds
as a system check. Then, after
several more seconds, the status
indicator will light either ON or OFF,
or either the on or off symbol, to let
you know the status of the front
outboard passenger frontal airbag
and knee airbag.
If the word ON or the on symbol is
lit on the passenger airbag status
indicator, it means that the front outboard passenger frontal airbag
and knee airbag are allowed to
inflate.
If the word OFF or the off symbol is
lit on the airbag status indicator, it
means that the passenger sensing
system has turned off the front
outboard passenger frontal airbag
and knee airbag.
If, after several seconds, both status
indicator lights remain on, or if there
are no lights at all, there may be a
problem with the lights or the
passenger sensing system. See
your dealer for service.
{Warning
If the airbag readiness light ever
comes on and stays on, it means
that something may be wrong
with the airbag system. To help
avoid injury to yourself or others,
have the vehicle serviced right
away. See
Airbag Readiness
Light 0104 for more information,
including important safety
information.
Charging System Light
This light comes on briefly when the
ignition key is turned to START, but
the engine is not running, as a
check to show it is working.
If it does not, have the vehicle
serviced by your dealer.
The light should go out once the
engine starts. If it stays on,
or comes on while driving, there
could be a problem with the
charging system. This light could
indicate that there are problems with
a generator drive belt, or that there
is an electrical problem. Have it
checked right away. If the vehicle
must be driven a short distance with
the light on, turn off accessories,
such as the radio and air
conditioner.
Page 182 of 360
Chevrolet Malibu Limited Owner Manual (GMNA-Localizing-U.S/Canada-
9086425) - 2016 - crc - 7/30/15
Driving and Operating 181
Warning (Continued)
occupants could drown. Do not
ignore police warnings and be
very cautious about trying to drive
through flowing water.
Hydroplaning
Hydroplaning is dangerous. Water
can build up under the vehicle's
tires so they actually ride on the
water. This can happen if the road is
wet enough and you are going fast
enough. When the vehicle is
hydroplaning, it has little or no
contact with the road.
There is no hard and fast rule about
hydroplaning. The best advice is to
slow down when the road is wet.
Other Rainy Weather Tips
Besides slowing down, other wet
weather driving tips include:
.Allow extra following distance.
. Pass with caution.
. Keep windshield wiping
equipment in good shape. .
Keep the windshield washer fluid
reservoir filled.
. Have good tires with proper
tread depth. See Tires0260.
. Turn off cruise control.
Hill and Mountain Roads
Driving on steep hills or through
mountains is different than driving
on flat or rolling terrain. Tips include:
.Keep the vehicle serviced and in
good shape.
. Check all fluid levels and brakes,
tires, cooling system, and
transmission.
. Shift to a lower gear when going
down steep or long hills.
{Warning
Using the brakes to slow the
vehicle on a long downhill slope
can cause brake overheating, can
reduce brake performance, and
could result in a loss of braking.
(Continued)
Warning (Continued)
Shift the transmission to a lower
gear to let the engine assist the
brakes on a steep downhill slope.
{Warning
Coasting downhill in N (Neutral)
or with the ignition off is
dangerous. This can cause
overheating of the brakes and
loss of steering. Always have the
engine running and the vehicle
in gear.
. Drive at speeds that keep the
vehicle in its own lane. Do not
swing wide or cross the
center line.
. Be alert on top of hills;
something could be in your lane
(e.g., stalled car, accident).
Page 282 of 360
Chevrolet Malibu Limited Owner Manual (GMNA-Localizing-U.S/Canada-
9086425) - 2016 - crc - 7/30/15
Vehicle Care 281
Warning (Continued)
2. Put an automatictransmission in P (Park) or a
manual transmission in
1 (First) or R (Reverse).
3. Turn off the engine and do not restart while the vehicle
is raised.
4. Do not allow passengers to remain in the vehicle.
5. Place wheel blocks, if equipped, on both sides of
the tire at the opposite
corner of the tire being
changed.
This vehicle may come with a jack
and spare tire or a tire sealant and
compressor kit. To use the jacking
equipment to change a spare tire
safely, follow the instructions below.
Then see Tire Changing 0287. To
use the tire sealant and compressor
kit, see Tire Sealant and
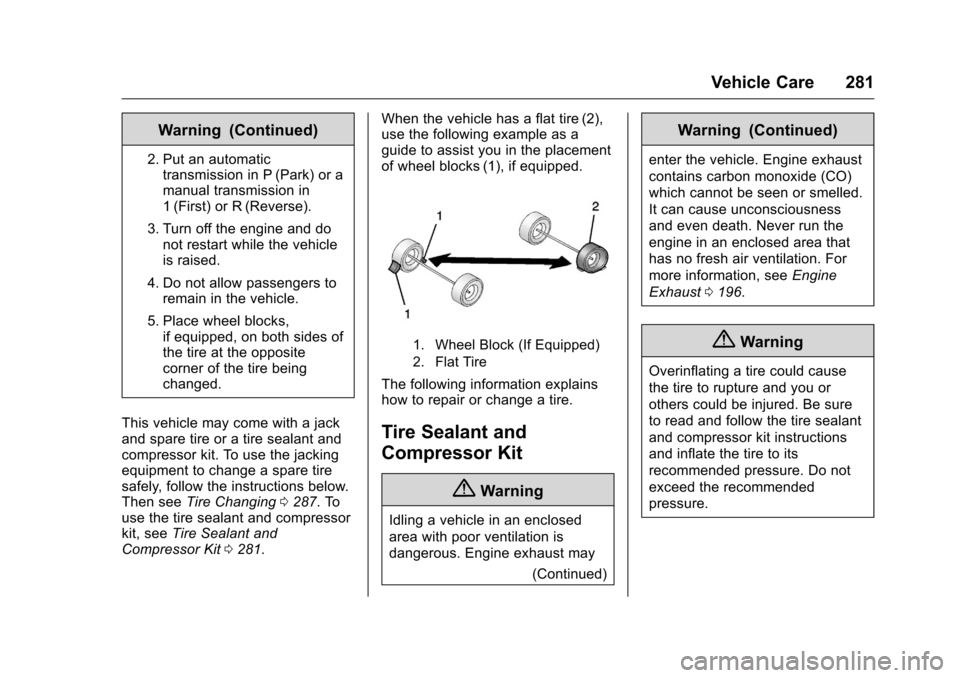
Compressor Kit 0281. When the vehicle has a flat tire (2),
use the following example as a
guide to assist you in the placement
of wheel blocks (1), if equipped.
1. Wheel Block (If Equipped)
2. Flat Tire
The following information explains
how to repair or change a tire.
Tire Sealant and
Compressor Kit
{Warning
Idling a vehicle in an enclosed
area with poor ventilation is
dangerous. Engine exhaust may
(Continued)
Warning (Continued)
enter the vehicle. Engine exhaust
contains carbon monoxide (CO)
which cannot be seen or smelled.
It can cause unconsciousness
and even death. Never run the
engine in an enclosed area that
has no fresh air ventilation. For
more information, seeEngine
Exhaust 0196.
{Warning
Overinflating a tire could cause
the tire to rupture and you or
others could be injured. Be sure
to read and follow the tire sealant
and compressor kit instructions
and inflate the tire to its
recommended pressure. Do not
exceed the recommended
pressure.
Page 284 of 360
Chevrolet Malibu Limited Owner Manual (GMNA-Localizing-U.S/Canada-
9086425) - 2016 - crc - 7/30/15
Vehicle Care 283
When using the tire sealant and
compressor kit during cold
temperatures, warm the kit in a
heated environment for five minutes.
This will help to inflate the tire
faster.
If a tire goes flat, avoid further tire
and wheel damage by driving slowly
to a level place. Turn on the hazard
warning flashers. SeeHazard
Warning Flashers 0134.
See If a Tire Goes Flat 0280 for
other important safety warnings.
Do not remove any objects that
have penetrated the tire. 1. Remove the tire sealant and
compressor kit from its storage
location. See Storing the Tire
Sealant and Compressor Kit
0 287.
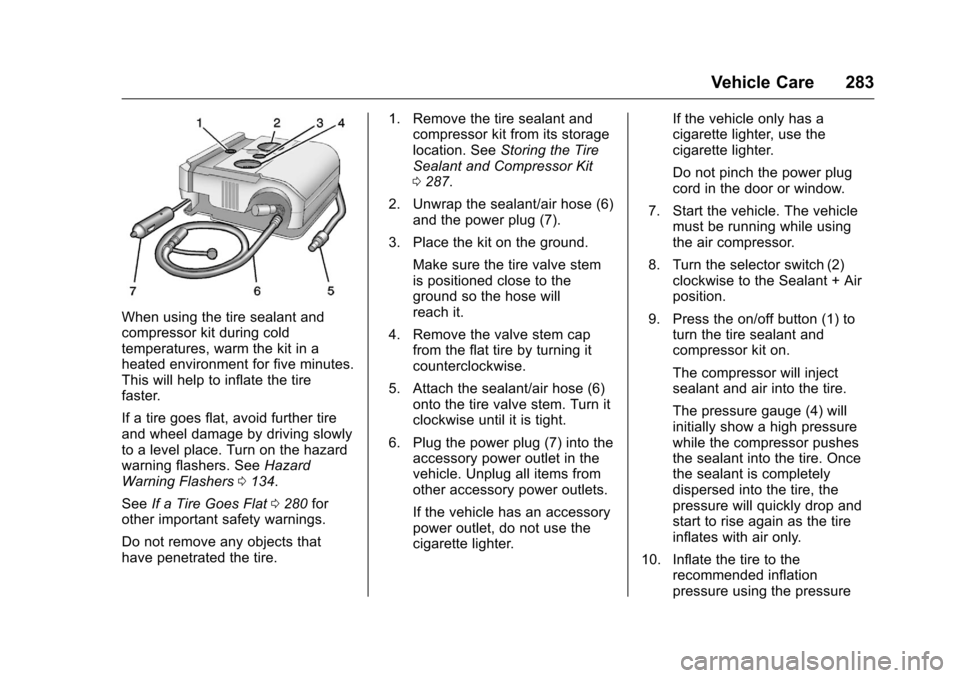
2. Unwrap the sealant/air hose (6) and the power plug (7).
3. Place the kit on the ground. Make sure the tire valve stem
is positioned close to the
ground so the hose will
reach it.
4. Remove the valve stem cap from the flat tire by turning it
counterclockwise.
5. Attach the sealant/air hose (6) onto the tire valve stem. Turn it
clockwise until it is tight.
6. Plug the power plug (7) into the accessory power outlet in the
vehicle. Unplug all items from
other accessory power outlets.
If the vehicle has an accessory
power outlet, do not use the
cigarette lighter. If the vehicle only has a
cigarette lighter, use the
cigarette lighter.
Do not pinch the power plug
cord in the door or window.
7. Start the vehicle. The vehicle must be running while using
the air compressor.
8. Turn the selector switch (2) clockwise to the Sealant + Air
position.
9. Press the on/off button (1) to turn the tire sealant and
compressor kit on.
The compressor will inject
sealant and air into the tire.
The pressure gauge (4) will
initially show a high pressure
while the compressor pushes
the sealant into the tire. Once
the sealant is completely
dispersed into the tire, the
pressure will quickly drop and
start to rise again as the tire
inflates with air only.
10. Inflate the tire to the recommended inflation
pressure using the pressure
Page 287 of 360
Chevrolet Malibu Limited Owner Manual (GMNA-Localizing-U.S/Canada-
9086425) - 2016 - crc - 7/30/15
286 Vehicle Care
If the vehicle has an accessory
power outlet, do not use the
cigarette lighter.
If the vehicle only has a
cigarette lighter, use the
cigarette lighter.
Do not pinch the power plug
cord in the door or window.
7. Start the vehicle. The vehicle must be running while using
the air compressor.
8. Turn the selector switch (2) counterclockwise to the Air
Only position.
9. Press the on/off button (1) to turn the compressor on.
The compressor will inflate the
tire with air only.
10. Inflate the tire to the recommended inflation
pressure using the pressure
gauge (4). The recommended
inflation pressure can be found
on the Tire and Loading
Information label. See Tire
Pressure 0267. The pressure gauge (4) may
read higher than the actual tire
pressure while the compressor
is on. Turn the compressor off
to get an accurate reading. The
compressor may be turned on/
off until the correct pressure is
reached. If the tire is inflated
higher than the recommended
pressure, press the pressure
relief button (3), if equipped,
until the proper pressure
reading is reached. This option
is only functional when using
the air only hose (5).
11. Press the on/off button (1) to turn the tire sealant and
compressor kit off.
Be careful while handling the
tire sealant and compressor kit
as it could be warm after
usage.
12. Unplug the power plug (7) from the accessory power outlet in
the vehicle. 13. Disconnect the air only
hose (5) from the tire valve
stem, by turning it
counterclockwise, and replace
the tire valve stem cap.
14. Return the air only hose (5) and the power plug (7) back to
their original locations.
15. Return the equipment to its original storage location in the
vehicle.
Removal and Installation of the
Sealant Canister
To remove the sealant canister:
1. Remove the plastic cover.
Page 289 of 360
Chevrolet Malibu Limited Owner Manual (GMNA-Localizing-U.S/Canada-
9086425) - 2016 - crc - 7/30/15
288 Vehicle Care
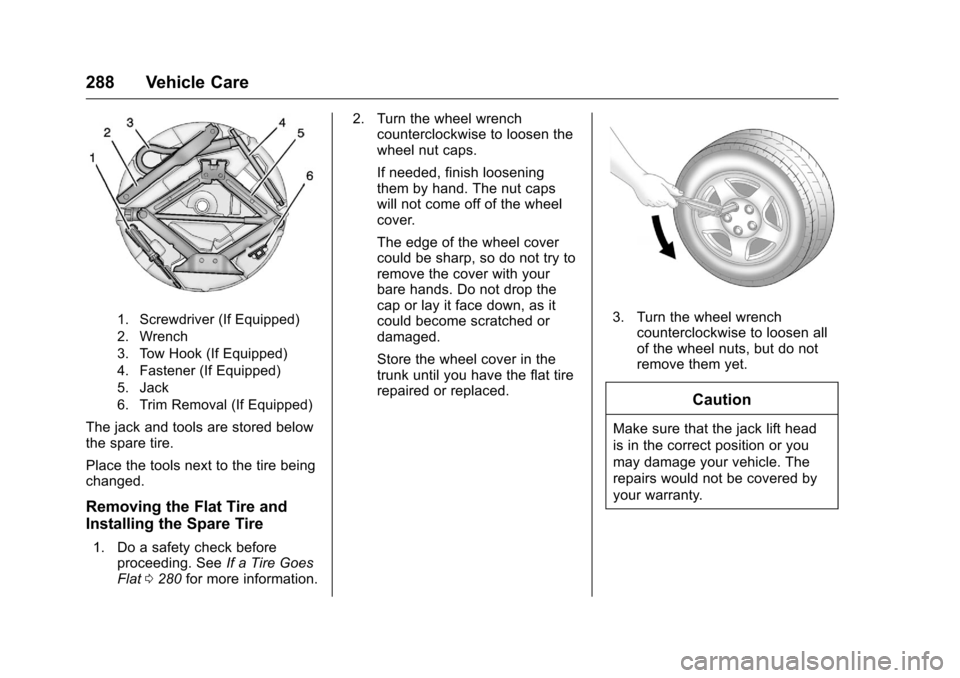
1. Screwdriver (If Equipped)
2. Wrench
3. Tow Hook (If Equipped)
4. Fastener (If Equipped)
5. Jack
6. Trim Removal (If Equipped)
The jack and tools are stored below
the spare tire.
Place the tools next to the tire being
changed.
Removing the Flat Tire and
Installing the Spare Tire
1. Do a safety check beforeproceeding. See If a Tire Goes
Flat 0280 for more information. 2. Turn the wheel wrench
counterclockwise to loosen the
wheel nut caps.
If needed, finish loosening
them by hand. The nut caps
will not come off of the wheel
cover.
The edge of the wheel cover
could be sharp, so do not try to
remove the cover with your
bare hands. Do not drop the
cap or lay it face down, as it
could become scratched or
damaged.
Store the wheel cover in the
trunk until you have the flat tire
repaired or replaced.
3. Turn the wheel wrench
counterclockwise to loosen all
of the wheel nuts, but do not
remove them yet.
Caution
Make sure that the jack lift head
is in the correct position or you
may damage your vehicle. The
repairs would not be covered by
your warranty.
Page 353 of 360
Chevrolet Malibu Limited Owner Manual (GMNA-Localizing-U.S/Canada-
9086425) - 2016 - crc - 7/30/15
352 Index
Driving (cont'd)Defensive . . . . . . . . . . . . . . . . . . . . . 177
Drunk . . . . . . . . . . . . . . . . . . . . . . . . . 177
For Better Fuel Economy . . . . . . . 23
Hill and Mountain Roads . . . . . . 181
If the Vehicle is Stuck . . . . . . . . . 183
Loss of Control . . . . . . . . . . . . . . . 179
Off-Road Recovery . . . . . . . . . . . 179
Track Events and
Competitive . . . . . . . . . . . . . . . . . 180
Vehicle Load Limits . . . . . . . . . . . 183
Wet Roads . . . . . . . . . . . . . . . . . . . 180
Winter . . . . . . . . . . . . . . . . . . . . . . . . 182
Dual Automatic Climate
Control System . . . . . . . . . . . . . . . . 170
E
Electrical Equipment,Add-On . . . . . . . . . . . . . . . . . . . . . . . 223
Electrical System Engine Compartment FuseBlock . . . . . . . . . . . . . . . . . . . . . . . . 254
Fuses . . . . . . . . . . . . . . . . . . . . . . . . 253
Instrument Panel Fuse Block . . . . . . . . . . . . . . . . . . . . . . . . 258
Overload . . . . . . . . . . . . . . . . . . . . . 253
Emergency OnStar
®. . . . . . . . . . . . . . . . . . . . . . 340 Engine
Air Cleaner/Filter . . . . . . . . . . . . . 233
Check and Service Engine
Soon Light . . . . . . . . . . . . . . . . . . 106
Compartment Overview . . . . . . . 229
Coolant . . . . . . . . . . . . . . . . . . . . . . . 235
Coolant Temperature Gauge . . . . . . . . . . . . . . . . . . . . . . 103
Cooling System . . . . . . . . . . . . . . . 234
Cooling System Messages . . . .117
Drive Belt Routing . . . . . . . . . . . . 324
Exhaust . . . . . . . . . . . . . . . . . . . . . . 196
Heater . . . . . . . . . . . . . . . . . . . . . . . . 192
Oil Life System . . . . . . . . . . . . . . . 232
Oil Messages . . . . . . . . . . . . . . . . . .117
Oil Pressure Light . . . . . . . . . . . . .110
Overheating . . . . . . . . . . . . . . . . . . 238
Power Messages . . . . . . . . . . . . . .118
Running While Parked . . . . . . . . 197
Starting . . . . . . . . . . . . . . . . . . . . . . . 191
Entry Lighting . . . . . . . . . . . . . . . . . . . 137
Equipment, Towing . . . . . . . . . . . . . 222
Event Data Recorders . . . . . . . . . . 337
Exit Lighting . . . . . . . . . . . . . . . . . . . . 137
Extender, Safety Belt . . . . . . . . . . . . 61
Exterior Lamp Controls . . . . . . . . . 132
Exterior Lamps Off Reminder . . . 132
F
Features
Memory . . . . . . . . . . . . . . . . . . . . . . . . . 12
Filter, Engine Air Cleaner . . . . . . . . . . . 233
Flash-to-Pass . . . . . . . . . . . . . . . . . . . 133
Flashers, Hazard Warning . . . . . . 134
Flat Tire . . . . . . . . . . . . . . . . . . . . . . . . 280 Changing . . . . . . . . . . . . . . . . . . . . . 287
Floor Mats . . . . . . . . . . . . . . . . . . . . . . 306
Fluid
Automatic Transmission . . . . . . 233
Brakes . . . . . . . . . . . . . . . . . . . . . . . . 240
Washer . . . . . . . . . . . . . . . . . . . . . . . 239
Fog Lamps Bulb Replacement . . . . . . . 135, 248
Forward Collision Alert (FCA) System . . . . . . . . . . . . . . . . . 210
Frequency Statement
Radio . . . . . . . . . . . . . . . . . . . . . . . . . 335
Front Fog Lamp Light . . . . . . . . . . . . . . . . . . . . . . . . . . . 111
Front Seats Adjustment . . . . . . . . . . . . . . . . . . . . . 49
Heated . . . . . . . . . . . . . . . . . . . . . . . . . 53
Fuel . . . . . . . . . . . . . . . . . . . . . . . . . . . . 215 Additives . . . . . . . . . . . . . . . . . . . . . 216
Economy Driving . . . . . . . . . . . . . . . 23