2016 CHEVROLET MALIBU LIMITED length
[x] Cancel search: lengthPage 75 of 360

Chevrolet Malibu Limited Owner Manual (GMNA-Localizing-U.S/Canada-
9086425) - 2016 - crc - 7/30/15
74 Seats and Restraints
Replacing Airbag System
Parts after a Crash
{Warning
A crash can damage the airbag
systems in the vehicle.
A damaged airbag system may
not work properly and may not
protect you and your
passenger(s) in a crash, resulting
in serious injury or even death. To
help make sure the airbag
systems are working properly
after a crash, have them
inspected and any necessary
replacements made as soon as
possible.
If an airbag inflates, you will need to
replace airbag system parts. See
your dealer for service.
If the airbag readiness light stays on
after the vehicle is started or comes
on when you are driving, the airbag
system may not work properly. Have
the vehicle serviced right away. See
Airbag Readiness Light 0104.
Child Restraints
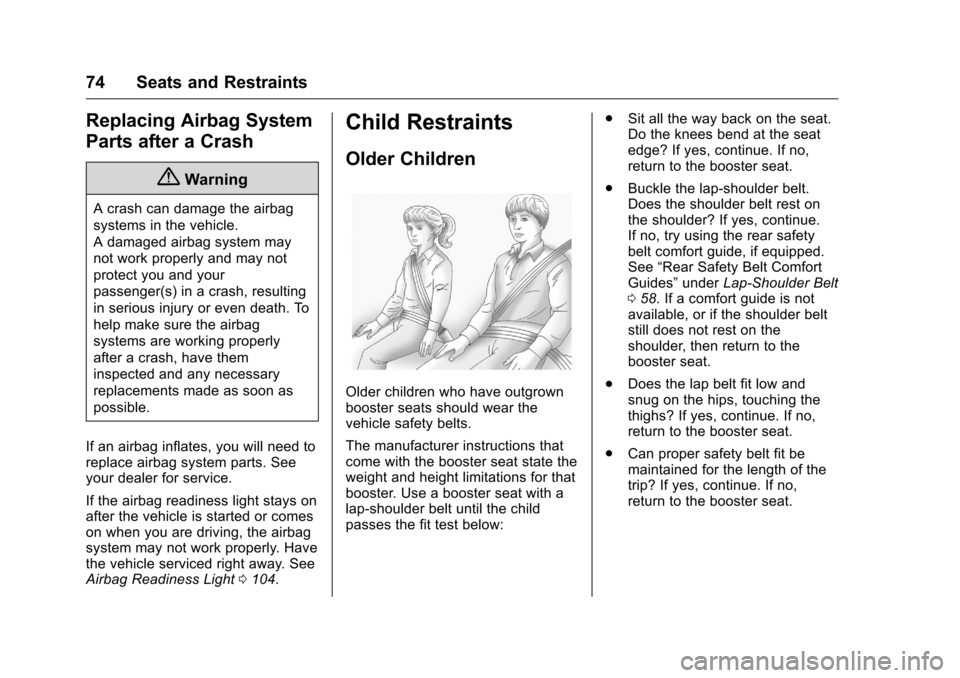
Older Children
Older children who have outgrown
booster seats should wear the
vehicle safety belts.
The manufacturer instructions that
come with the booster seat state the
weight and height limitations for that
booster. Use a booster seat with a
lap-shoulder belt until the child
passes the fit test below: .
Sit all the way back on the seat.
Do the knees bend at the seat
edge? If yes, continue. If no,
return to the booster seat.
. Buckle the lap-shoulder belt.
Does the shoulder belt rest on
the shoulder? If yes, continue.
If no, try using the rear safety
belt comfort guide, if equipped.
See “Rear Safety Belt Comfort
Guides” underLap-Shoulder Belt
0 58. If a comfort guide is not
available, or if the shoulder belt
still does not rest on the
shoulder, then return to the
booster seat.
. Does the lap belt fit low and
snug on the hips, touching the
thighs? If yes, continue. If no,
return to the booster seat.
. Can proper safety belt fit be
maintained for the length of the
trip? If yes, continue. If no,
return to the booster seat.
Page 156 of 360

Chevrolet Malibu Limited Owner Manual (GMNA-Localizing-U.S/Canada-
9086425) - 2016 - crc - 7/30/15
Infotainment System 155
3. After the system determineswhat type of Bluetooth device
is being paired, the Bluetooth
device will need to be put into
discovery mode.
4. Some devices may require a Personal Identification Number
(PIN) in order to complete the
pairing process. Locate the
device named
“GMusicConnect” in the list on
the Bluetooth device and follow
the instructions on the device
to enter the four-digit PIN
provided by the infotainment
system.
Connecting to a Device
Once a device is paired to the
infotainment system, it can be
connected to the infotainment
system.
To connect a paired device when no
other device is connected to the
infotainment system: 1. Select the Select Device option from the Bluetooth Music
Setup menu.
2. Select the new device. To connect a paired device when
another device is connected to the
infotainment system:
1. Select the Select Device option from the Bluetooth Music
Setup menu.
2. Select the new device.
3. The active device is disconnected from the system
and the new device is
connected.
Removing a Device 1. Select Remove Device from the Bluetooth Music
Setup menu.
2. Select the device.
3. The device is removed from the system.
Before connecting to the removed
device again, it will need to paired
to the infotainment system.
Changing the Default PIN
To change the default PIN: 1. Select Change Default PIN from the Bluetooth Music
Setup menu. 2. Select one of the pre-defined
PINs, or select Other to create
a PIN.
To create a PIN: 1. Select the length of the PIN.
2. Enter the character sequence.
Messages
The following messages may
appear on the infotainment screen.
Poor Bluetooth Signal Quality :
This message displays when the
Bluetooth signal strength is low.
This Feature is Unavailable While
Vehicle is Moving : This message
displays when an action is not
allowed while the vehicle is moving.
Controlling a Bluetooth Device
Bluetooth devices that support
AVRCP (Audio/Video Remote
Control Profile) version 1.0 may be
able to be controlled by the
infotainment system. Control of a
Bluetooth device by the infotainment
system may not be supported in all
vehicles.
Page 195 of 360

Chevrolet Malibu Limited Owner Manual (GMNA-Localizing-U.S/Canada-
9086425) - 2016 - crc - 7/30/15
194 Driving and Operating
The length of time the heater should
remain plugged in depends on
several factors. Ask a dealer in the
area where you will be parking the
vehicle for the best advice on this.
Retained Accessory
Power (RAP)
These vehicle accessories can be
used for up to 10 minutes after the
engine is turned off:
.Audio System
. Power Windows
. Sunroof (if equipped)
These features continue to work up
to 10 minutes after the ignition is
turned to LOCK/OFF.
The power windows and sunroof will
work until any door is opened.
The radio continues to work until the
driver door is opened.
All these features operate when the
key is in ON/RUN or ACC/
ACCESSORY.
Shifting Into Park
1. Hold the brake pedal down and set the parking brake. See
Parking Brake 0200.
2. Move the shift lever into P (Park) by holding in the
button on the shift lever and
pushing the shift lever all the
way toward the front of the
vehicle.
3. Turn the ignition to LOCK/OFF.
4. Remove the key (if equipped) and take it with you. If you can
leave the vehicle with the
ignition key in your hand, the
vehicle is in P (Park).
Leaving the Vehicle with the
Engine Running
{Warning
It can be dangerous to leave the
vehicle with the engine running.
It could overheat and catch fire.
(Continued)
Warning (Continued)
It is dangerous to get out of the
vehicle if the shift lever is not fully
in P (Park) with the parking brake
firmly set. The vehicle can roll.
Do not leave the vehicle when the
engine is running. If you have left
the engine running, the vehicle
can move suddenly. You or others
could be injured. To be sure the
vehicle will not move, even when
you are on fairly level ground,
always set the parking brake and
move the shift lever to P (Park).
SeeShifting Into Park 0194.
If you have to leave the vehicle with
the engine running, be sure the
vehicle is in P (Park) and the
parking brake is firmly set before
you leave it. After you have moved
the shift lever into P (Park), hold the
regular brake pedal down. Then,
see if you can move the shift lever
away from P (Park) without first
pushing the button.
Page 245 of 360

Chevrolet Malibu Limited Owner Manual (GMNA-Localizing-U.S/Canada-
9086425) - 2016 - crc - 7/30/15
244 Vehicle Care
Warning (Continued)
roll. Be ready to apply the regular
brake at once should the vehicle
begin to move.
Park on a fairly steep hill, with the
vehicle facing downhill. Keeping
your foot on the regular brake, set
the parking brake.
. To check the parking brake's
holding ability: With the engine
running and the transmission in
N (Neutral), slowly remove foot
pressure from the regular brake
pedal. Do this until the vehicle is
held by the parking brake only.
. To check the P (Park)
mechanism's holding ability:
With the engine running, shift to
P (Park). Then release the
parking brake followed by the
regular brake.
Contact your dealer if service is
required.
Wiper Blade Replacement
Windshield wiper blades should be
inspected for wear or cracking.
It is a good idea to clean the wiper
blade assembly on a regular basis.
When worn, or when cleaning is
ineffective, replace the wiper blade.
For proper windshield wiper blade
length and type, see Maintenance
Replacement Parts 0320.
Caution
Allowing the wiper arm to touch
the windshield when no wiper
blade is installed could damage
the windshield. Any damage that
occurs would not be covered by
the vehicle warranty. Do not allow
the wiper arm to touch the
windshield.
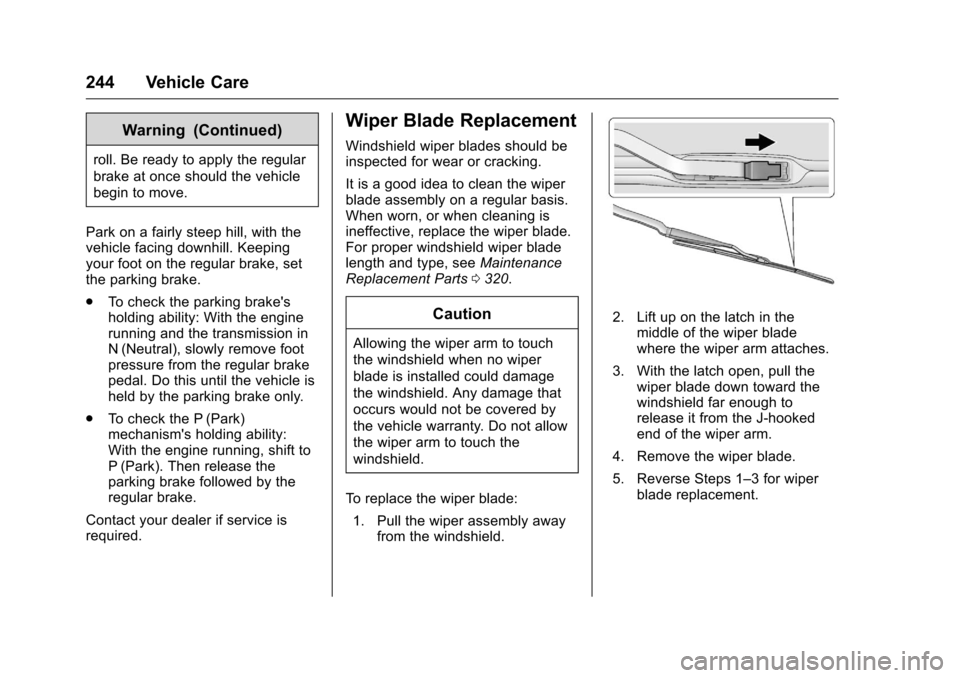
To replace the wiper blade: 1. Pull the wiper assembly away from the windshield.
2. Lift up on the latch in the
middle of the wiper blade
where the wiper arm attaches.
3. With the latch open, pull the wiper blade down toward the
windshield far enough to
release it from the J-hooked
end of the wiper arm.
4. Remove the wiper blade.
5. Reverse Steps 1–3 for wiper blade replacement.