2016 CHEVROLET MALIBU LIMITED display
[x] Cancel search: displayPage 20 of 360

Chevrolet Malibu Limited Owner Manual (GMNA-Localizing-U.S/Canada-
9086425) - 2016 - crc - 7/30/15
In Brief 19
Steering Wheel Controls
b/g:Press to interact with
OnStar, Bluetooth, or navigation,
if equipped.
$/i: Press to mute. Press
again to turn the sound on. Press to
reject an incoming call, or to end a
current call.
_SRC^: Use to select a radio
band or audio source.
Use
_or^to select the next or
previous favorite radio station, CD
track, or MP3 track. Press SRC to change between
radio and CD.
Press and hold SRC to interact with
the navigation system, if equipped.
+
x−
:Press + to increase or −to
decrease the volume.
See Steering Wheel Controls 096.
Cruise Control
1:Press to turn the cruise control
on or off. A white indicator comes
on in the instrument cluster.
*: Press to disengage cruise
control without erasing the set
speed from memory.
RES/+ : If there is a set speed in
memory, press the control up briefly
to resume to that speed or hold to
accelerate. If cruise control is
already active, use to increase
vehicle speed.
SET/− :Press the control down
briefly to set the speed and activate
cruise control. If cruise control is
already active, use to decrease
speed.
See Cruise Control 0204.
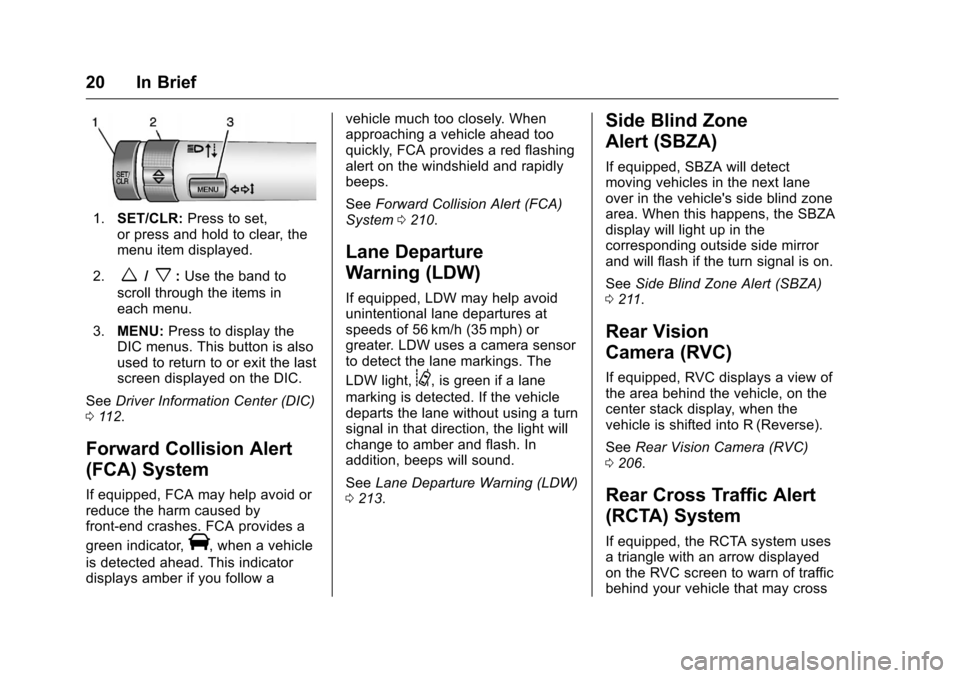
Driver Information
Center (DIC)
The DIC display is in the center of
the instrument cluster. It shows the
status of many vehicle systems. The
controls for the DIC are on the turn
signal lever.
Page 21 of 360

Chevrolet Malibu Limited Owner Manual (GMNA-Localizing-U.S/Canada-
9086425) - 2016 - crc - 7/30/15
20 In Brief
1.SET/CLR: Press to set,
or press and hold to clear, the
menu item displayed.
2.
w/x: Use the band to
scroll through the items in
each menu.
3. MENU: Press to display the
DIC menus. This button is also
used to return to or exit the last
screen displayed on the DIC.
See Driver Information Center (DIC)
0 112.
Forward Collision Alert
(FCA) System
If equipped, FCA may help avoid or
reduce the harm caused by
front-end crashes. FCA provides a
green indicator,
V, when a vehicle
is detected ahead. This indicator
displays amber if you follow a vehicle much too closely. When
approaching a vehicle ahead too
quickly, FCA provides a red flashing
alert on the windshield and rapidly
beeps.
See
Forward Collision Alert (FCA)
System 0210.
Lane Departure
Warning (LDW)
If equipped, LDW may help avoid
unintentional lane departures at
speeds of 56 km/h (35 mph) or
greater. LDW uses a camera sensor
to detect the lane markings. The
LDW light,
@, is green if a lane
marking is detected. If the vehicle
departs the lane without using a turn
signal in that direction, the light will
change to amber and flash. In
addition, beeps will sound.
See Lane Departure Warning (LDW)
0 213.
Side Blind Zone
Alert (SBZA)
If equipped, SBZA will detect
moving vehicles in the next lane
over in the vehicle's side blind zone
area. When this happens, the SBZA
display will light up in the
corresponding outside side mirror
and will flash if the turn signal is on.
See Side Blind Zone Alert (SBZA)
0 211.
Rear Vision
Camera (RVC)
If equipped, RVC displays a view of
the area behind the vehicle, on the
center stack display, when the
vehicle is shifted into R (Reverse).
See Rear Vision Camera (RVC)
0 206.
Rear Cross Traffic Alert
(RCTA) System
If equipped, the RCTA system uses
a triangle with an arrow displayed
on the RVC screen to warn of traffic
behind your vehicle that may cross
Page 24 of 360

Chevrolet Malibu Limited Owner Manual (GMNA-Localizing-U.S/Canada-
9086425) - 2016 - crc - 7/30/15
In Brief 23
the center stack, untiliandg
illuminate in the instrument
cluster.
. Press and release the TCS/
StabiliTrak button again to turn
on both systems.
See Traction Control/Electronic
Stability Control 0202.
Tire Pressure Monitor
This vehicle may have a Tire
Pressure Monitor System (TPMS).
The low tire pressure warning light
alerts to a significant loss in
pressure of one of the vehicle's
tires. If the warning light comes on,
stop as soon as possible and inflate
the tires to the recommended
pressure shown on the Tire and Loading Information label. See
Vehicle Load Limits
0183. The
warning light will remain on until the
tire pressure is corrected.
The low tire pressure warning light
may come on in cool weather when
the vehicle is first started, and then
turn off as the vehicle is driven. This
may be an early indicator that the
tire pressures are getting low and
the tires need to be inflated to the
proper pressure.
The TPMS does not replace normal
monthly tire maintenance. Maintain
the correct tire pressures.
See Tire Pressure Monitor System
0 269.
Engine Oil Life System
The engine oil life system calculates
engine oil life based on vehicle use
and displays the CHANGE ENGINE
OIL SOON message when it is time
to change the engine oil and filter.
The oil life system should be reset
to 100% only following an oil
change. Resetting the Oil Life System
1. Turn the ignition to ON/RUN with the engine off.
2. Press the DIC MENU button on the turn signal lever to enter
the Vehicle Information Menu.
Use the thumbwheel to scroll
through the menu items until
you reach REMAINING
OIL LIFE.
3. Press the SET/CLR button to reset the oil life at 100%.
4. Turn the ignition to LOCK/OFF.
See Engine Oil Life System 0232.
Driving for Better Fuel
Economy
Driving habits can affect fuel
mileage. Here are some driving tips
to get the best fuel economy
possible.
.
Avoid fast starts and accelerate
smoothly.
. Brake gradually and avoid
abrupt stops.
Page 32 of 360

Chevrolet Malibu Limited Owner Manual (GMNA-Localizing-U.S/Canada-
9086425) - 2016 - crc - 7/31/15
Keys, Doors, and Windows 31
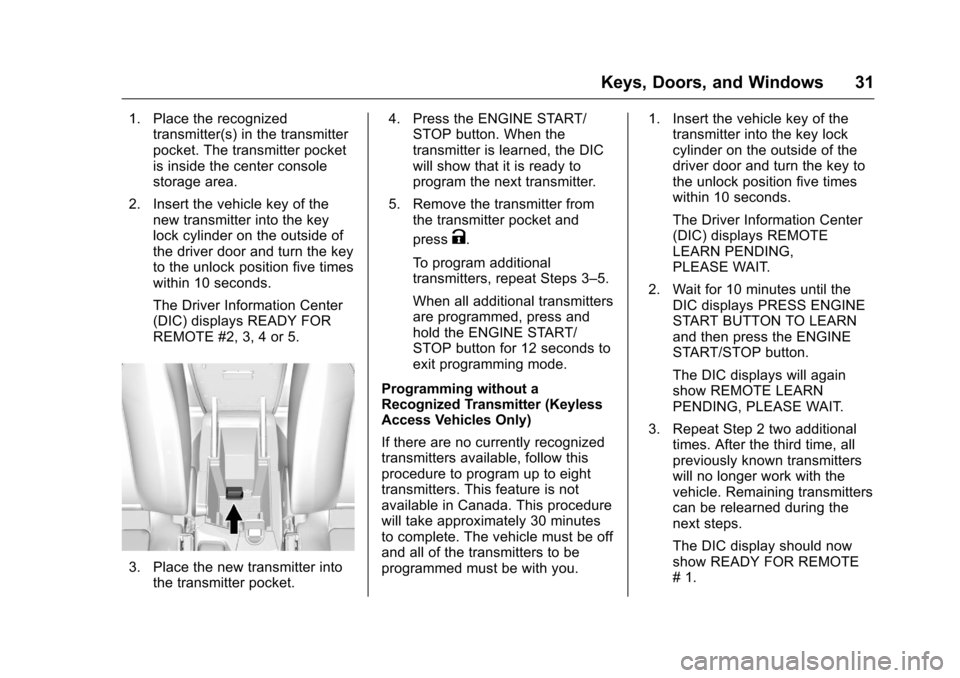
1. Place the recognizedtransmitter(s) in the transmitter
pocket. The transmitter pocket
is inside the center console
storage area.
2. Insert the vehicle key of the new transmitter into the key
lock cylinder on the outside of
the driver door and turn the key
to the unlock position five times
within 10 seconds.
The Driver Information Center
(DIC) displays READY FOR
REMOTE #2, 3, 4 or 5.
3. Place the new transmitter intothe transmitter pocket. 4. Press the ENGINE START/
STOP button. When the
transmitter is learned, the DIC
will show that it is ready to
program the next transmitter.
5. Remove the transmitter from the transmitter pocket and
press
K.
To program additional
transmitters, repeat Steps 3–5.
When all additional transmitters
are programmed, press and
hold the ENGINE START/
STOP button for 12 seconds to
exit programming mode.
Programming without a
Recognized Transmitter (Keyless
Access Vehicles Only)
If there are no currently recognized
transmitters available, follow this
procedure to program up to eight
transmitters. This feature is not
available in Canada. This procedure
will take approximately 30 minutes
to complete. The vehicle must be off
and all of the transmitters to be
programmed must be with you. 1. Insert the vehicle key of the
transmitter into the key lock
cylinder on the outside of the
driver door and turn the key to
the unlock position five times
within 10 seconds.
The Driver Information Center
(DIC) displays REMOTE
LEARN PENDING,
PLEASE WAIT.
2. Wait for 10 minutes until the DIC displays PRESS ENGINE
START BUTTON TO LEARN
and then press the ENGINE
START/STOP button.
The DIC displays will again
show REMOTE LEARN
PENDING, PLEASE WAIT.
3. Repeat Step 2 two additional times. After the third time, all
previously known transmitters
will no longer work with the
vehicle. Remaining transmitters
can be relearned during the
next steps.
The DIC display should now
show READY FOR REMOTE
# 1.
Page 33 of 360

Chevrolet Malibu Limited Owner Manual (GMNA-Localizing-U.S/Canada-
9086425) - 2016 - crc - 7/31/15
32 Keys, Doors, and Windows
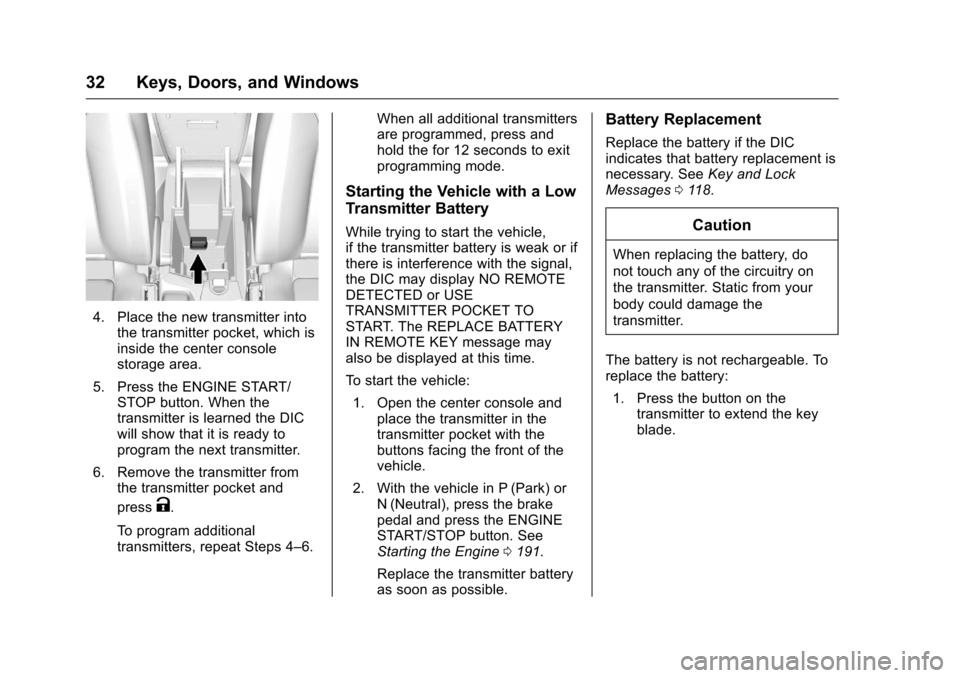
4. Place the new transmitter intothe transmitter pocket, which is
inside the center console
storage area.
5. Press the ENGINE START/ STOP button. When the
transmitter is learned the DIC
will show that it is ready to
program the next transmitter.
6. Remove the transmitter from the transmitter pocket and
press
K.
To program additional
transmitters, repeat Steps 4–6. When all additional transmitters
are programmed, press and
hold the for 12 seconds to exit
programming mode.
Starting the Vehicle with a Low
Transmitter Battery
While trying to start the vehicle,
if the transmitter battery is weak or if
there is interference with the signal,
the DIC may display NO REMOTE
DETECTED or USE
TRANSMITTER POCKET TO
START. The REPLACE BATTERY
IN REMOTE KEY message may
also be displayed at this time.
To start the vehicle:
1. Open the center console and place the transmitter in the
transmitter pocket with the
buttons facing the front of the
vehicle.
2. With the vehicle in P (Park) or N (Neutral), press the brake
pedal and press the ENGINE
START/STOP button. See
Starting the Engine 0191.
Replace the transmitter battery
as soon as possible.
Battery Replacement
Replace the battery if the DIC
indicates that battery replacement is
necessary. See Key and Lock
Messages 0118.
Caution
When replacing the battery, do
not touch any of the circuitry on
the transmitter. Static from your
body could damage the
transmitter.
The battery is not rechargeable. To
replace the battery: 1. Press the button on the transmitter to extend the key
blade.
Page 94 of 360

Chevrolet Malibu Limited Owner Manual (GMNA-Localizing-U.S/Canada-
9086425) - 2016 - crc - 7/30/15
Storage 93
Storage
Storage Compartments
Storage Compartments . . . . . . . . 93
Instrument Panel Storage . . . . . . 93
Glove Box . . . . . . . . . . . . . . . . . . . . . 93
Cupholders . . . . . . . . . . . . . . . . . . . . 94
Center Console Storage . . . . . . . 94
Additional Storage Features
Cargo Tie-Downs . . . . . . . . . . . . . . 94
Convenience Net . . . . . . . . . . . . . . 94
Storage
Compartments
{Warning
Do not store heavy or sharp
objects in storage compartments.
In a crash, these objects may
cause the cover to open and
could result in injury.
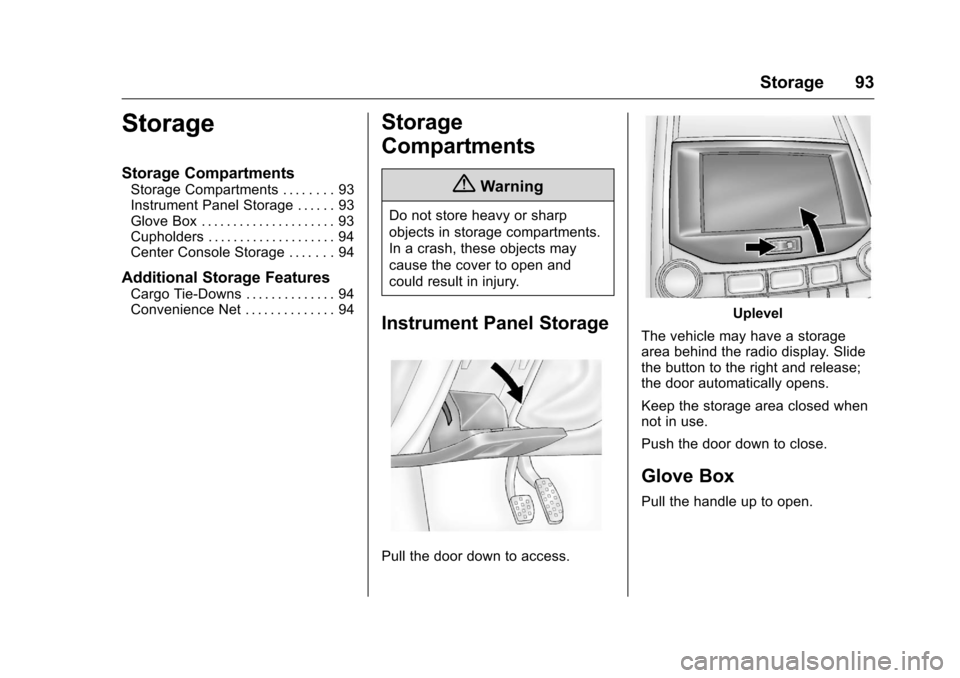
Instrument Panel Storage
Pull the door down to access.
Uplevel
The vehicle may have a storage
area behind the radio display. Slide
the button to the right and release;
the door automatically opens.
Keep the storage area closed when
not in use.
Push the door down to close.
Glove Box
Pull the handle up to open.
Page 96 of 360

Chevrolet Malibu Limited Owner Manual (GMNA-Localizing-U.S/Canada-
9086425) - 2016 - crc - 7/30/15
Instruments and Controls 95
Instruments and
Controls
Controls
Steering Wheel Adjustment . . . . 96
Steering Wheel Controls . . . . . . . 96
Horn . . . . . . . . . . . . . . . . . . . . . . . . . . . 97
Windshield Wiper/Washer . . . . . . 97
Compass . . . . . . . . . . . . . . . . . . . . . . 98
Clock . . . . . . . . . . . . . . . . . . . . . . . . . . 98
Power Outlets . . . . . . . . . . . . . . . . . 99
Warning Lights, Gauges, and
Indicators
Warning Lights, Gauges, andIndicators . . . . . . . . . . . . . . . . . . . 100
Instrument Cluster . . . . . . . . . . . . 101
Speedometer . . . . . . . . . . . . . . . . . 102
Odometer . . . . . . . . . . . . . . . . . . . . . 102
Trip Odometer . . . . . . . . . . . . . . . . 102
Tachometer . . . . . . . . . . . . . . . . . . . 102
Fuel Gauge . . . . . . . . . . . . . . . . . . . 102
Engine Coolant Temperature Gauge . . . . . . . . . . . . . . . . . . . . . . 103
Safety Belt Reminders . . . . . . . . 103
Airbag Readiness Light . . . . . . . 104
Passenger Airbag Status Indicator . . . . . . . . . . . . . . . . . . . . 104
Charging System Light . . . . . . . 105 Malfunction Indicator Lamp
(Check Engine Light) . . . . . . . . 106
Brake System Warning Light . . . . . . . . . . . . . . . . . . . . . . . . 107
Antilock Brake System (ABS)
Warning Light . . . . . . . . . . . . . . . 108
Lane Departure Warning (LDW) Light . . . . . . . . . . . . . . . . . 108
Vehicle Ahead Indicator . . . . . . 109
Traction Off Light . . . . . . . . . . . . . 109
StabiliTrak
®OFF Light . . . . . . . . 109
Traction Control System (TCS)/ StabiliTrak
®Light . . . . . . . . . . . 109
Tire Pressure Light . . . . . . . . . . . 110
Engine Oil Pressure Light . . . . . 110
Low Fuel Warning Light . . . . . . . 111
Security Light . . . . . . . . . . . . . . . . . 111
High-Beam On Light . . . . . . . . . . 111
Front Fog Lamp Light . . . . . . . . . 111
Lamps On Reminder . . . . . . . . . . 112
Cruise Control Light . . . . . . . . . . 112
Door Ajar Light . . . . . . . . . . . . . . . 112
Information Displays
Center Stack Display . . . . . . . . . 112
Driver Information Center (DIC) . . . . . . . . . . . . . . . . 112
Vehicle Messages
Vehicle Messages . . . . . . . . . . . . 115 Battery Voltage and Charging
Messages . . . . . . . . . . . . . . . . . . . 116
Brake System Messages . . . . . 116
Compass Messages . . . . . . . . . . 116
Cruise Control Messages . . . . . 116
Door Ajar Messages . . . . . . . . . . 116
Engine Cooling System Messages . . . . . . . . . . . . . . . . . . . 117
Engine Oil Messages . . . . . . . . . 117
Engine Power Messages . . . . . 118
Fuel System Messages . . . . . . . 118
Key and Lock Messages . . . . . . 118
Lamp Messages . . . . . . . . . . . . . . 118
Object Detection System Messages . . . . . . . . . . . . . . . . . . . 119
Ride Control System Messages . . . . . . . . . . . . . . . . . . . 120
Security Messages . . . . . . . . . . . 120
Service Vehicle Messages . . . . 120
Tire Messages . . . . . . . . . . . . . . . . 120
Transmission Messages . . . . . . 121
Vehicle Reminder Messages . . . . . . . . . . . . . . . . . . . 121
Washer Fluid Messages . . . . . . 121
Window Messages . . . . . . . . . . . 121
Vehicle Personalization
Vehicle Personalization . . . . . . . 122
Universal Remote System
Universal Remote System . . . . 128
Page 99 of 360

Chevrolet Malibu Limited Owner Manual (GMNA-Localizing-U.S/Canada-
9086425) - 2016 - crc - 7/30/15
98 Instruments and Controls
activated. SeeWasher Fluid0239
for information on filling the
windshield washer fluid reservoir.
Clear snow and ice from the wiper
blades and windshield before using
them. If frozen to the windshield,
carefully loosen or thaw them.
Damaged blades should be
replaced. See Wiper Blade
Replacement 0244.
Heavy snow or ice can overload the
wiper motor.
Wiper Parking
If the ignition is put in OFF while the
wipers are on LO, HI, or INT, they
will immediately stop.
If the windshield wiper lever is then
moved to OFF before the driver
door is opened or within 10 minutes,
the wipers will restart and move to
the base of the windshield.
If the ignition is put in OFF while the
wipers are performing wipes due to
windshield washing, the wipers
continue to run until they reach the
base of the windshield.Compass
The vehicle may have a compass
display on the center stack. The
compass receives its heading and
other information from the Global
Positioning System (GPS) antenna,
StabiliTrak
®, and vehicle speed
information.
The compass system is designed to
operate for a certain number of
miles or degrees of turn before
needing a signal from the GPS
satellites. When the compass
display shows CAL, drive the
vehicle for a short distance in an
open area where it can receive a
GPS signal. The compass system
will automatically determine when a
GPS signal is restored and provide
a heading again. See Compass
Messages 0116 for the messages
that may be displayed for the
compass.
Clock
The infotainment system controls
are used to access the time and
date settings through the menu
system. The clock menu can only be used with the radio on while in
ON/RUN or ACC/ACCESSORY.
See
Overview 0140 for information
about how to use the menu system.
For vehicles with a navigation
system, see the navigation manual.
Setting the Clock (Radio
with CD)
To set the time:
1. Press the CONFIG button and select Time Settings.
2. Select Set Time.
3. Turn the TUNE/MENU knob to adjust the highlighted number.
4. Press the TUNE/MENU knob to select the next number.
5. To save the time and return to the Time Settings menu, press
the BACK
/button at any time
or press the TUNE/MENU knob
after adjusting the minutes.
Setting the 12/24 Hour Format 1. Press the CONFIG button and select Time Settings.
2. Highlight 12/24 Hour Format.