2016 CHEVROLET MALIBU LIMITED bulb
[x] Cancel search: bulbPage 119 of 360
Chevrolet Malibu Limited Owner Manual (GMNA-Localizing-U.S/Canada-
9086425) - 2016 - crc - 7/30/15
118 Instruments and Controls
Engine Power Messages
ENGINE POWER IS REDUCED
This message displays when the
vehicle's engine power is reduced.
Reduced engine power can affect
the vehicle's ability to accelerate.
If this message is on, but there is no
reduction in performance, proceed
to your destination. The
performance may be reduced the
next time the vehicle is driven. The
vehicle may be driven at a reduced
speed while this message is on, but
maximum acceleration and speed
may be reduced. Anytime this
message stays on, the vehicle
should be taken to your dealer for
service as soon as possible.
Fuel System Messages
FUEL LEVEL LOW
This message displays when the
vehicle is low on fuel. Refuel as
soon as possible.
TIGHTEN GAS CAP
This message displays when the
fuel cap is not on tight. Tighten the
fuel cap.
Key and Lock Messages
NO REMOTE DETECTED
This message displays when the
transmitter battery is weak on
vehicles with Keyless Access. See
“Starting the Vehicle with a Low
Transmitter Battery”underRemote
Keyless Entry (RKE) System
Operation 027.
REPLACE BATTERY IN
REMOTE KEY
This message displays when the
battery in the Remote Keyless Entry
(RKE) transmitter needs to be
replaced. See “Battery
Replacement” underRemote
Keyless Entry (RKE) System
Operation 027.
USE TRANSMITTER POCKET
TO START
This message displays when trying
to start the vehicle if an RKE
transmitter is not detected. The
transmitter battery may be weak.
See “Starting the Vehicle with a Low
Transmitter Battery” underRemote
Keyless Entry (RKE) System
Operation 027.
Lamp Messages
AUTOMATIC LIGHT CONTROL
ON/OFF
This message is displayed when the
automatic light control has been
turned on or off. See Automatic
Headlamp System 0133.
CHECK XXX TURN
SIGNAL LAMP
When one of the turn signals is out,
this message displays to show
which bulb needs to be replaced.
See Bulb Replacement 0245 and
Replacement Bulbs 0252.
Page 136 of 360
Chevrolet Malibu Limited Owner Manual (GMNA-Localizing-U.S/Canada-
9086425) - 2016 - crc - 7/30/15
Lighting 135
If after signaling a turn or lane
change, the arrow flashes rapidly or
does not come on, a signal bulb
may be burned out.
Have any burned out bulbs
replaced. If a bulb is not burned out,
check the fuse. SeeFuses0253.
Fog Lamps
To turn on the fog lamps,
if equipped, the ignition and the
headlamps or parking lamps must
be on.
If the fog lamps are turned on while
the exterior lamp control is in the
AUTO position, the headlamps
come on automatically.
#(Fog Lamps, If Equipped) :
Press to turn on or off. An indicator
light on the instrument cluster
comes on when the fog lamps
are on.
Some localities have laws that
require the headlamps to be on
along with the fog lamps.Interior Lighting
Instrument Panel
Illumination Control
The brightness of the instrument
panel lighting and steering wheel
controls can be adjusted.
D(Instrument Panel
Illumination) : Move and hold the
thumbwheel up or down to brighten
or dim the lights.
Courtesy Lamps
The courtesy lamps come on
automatically when any door is
opened and the dome lamp is in the
door position.
Page 221 of 360
Chevrolet Malibu Limited Owner Manual (GMNA-Localizing-U.S/Canada-
9086425) - 2016 - crc - 7/30/15
220 Driving and Operating
Passing
More passing distance is needed
when towing a trailer. Because the
rig is longer, it is necessary to go
farther beyond the passed vehicle
before returning to the lane.
Backing Up
Hold the bottom of the steering
wheel with one hand. To move the
trailer to the left, move your hand to
the left. To move the trailer to the
right, move your hand to the right.
Always back up slowly and,
if possible, have someone
guide you.
Making TurnsCaution
Making very sharp turns while
trailering could cause the trailer to
come in contact with the vehicle.
The vehicle could be damaged.
Avoid making very sharp turns
while trailering. When turning with a trailer, make
wider turns than normal so the
trailer will not strike soft shoulders,
curbs, road signs, trees, or other
objects. Use the turn signal well in
advance and avoid jerky or sudden
maneuvers.
Turn Signals When Towing a
Trailer
The turn signal indicators on the
instrument cluster flash whenever
signaling a turn or lane change.
Properly hooked up, the trailer
lamps also flash, telling other
drivers the vehicle is turning,
changing lanes, or stopping.
When towing a trailer, the arrows on
the instrument cluster flash for turns
even if the bulbs on the trailer are
burned out. Check occasionally to
be sure the trailer bulbs are still
working.
Driving on Grades
Reduce speed and shift to a lower
gear before starting down a long or
steep downgrade. If the
transmission is not shifted down, the brakes might have to be used so
much that they would get hot and no
longer work well.
The vehicle can tow in D (Drive).
Use a lower gear if the transmission
shifts too often.
When towing at high altitude on
steep uphill grades, engine coolant
boils at a lower temperature than at
normal altitudes. If the engine is
turned off immediately after towing
at high altitude on steep uphill
grades, the vehicle could show
signs similar to engine overheating.
To avoid this, let the engine run
while parked, preferably on level
ground, with the transmission in
P (Park) for a few minutes before
turning the engine off. If the
overheat warning comes on, see
Engine Overheating
0238.
Page 226 of 360
Chevrolet Malibu Limited Owner Manual (GMNA-Localizing-U.S/Canada-
9086425) - 2016 - crc - 7/30/15
Vehicle Care 225
Vehicle Care
General Information
General Information . . . . . . . . . . 226
California Proposition65 Warning . . . . . . . . . . . . . . . . . 226
California Perchlorate Materials Requirements . . . . . 226
Accessories and Modifications . . . . . . . . . . . . . . . . 226
Vehicle Checks
Doing Your OwnService Work . . . . . . . . . . . . . . . 227
Hood . . . . . . . . . . . . . . . . . . . . . . . . . 227
Engine Compartment Overview . . . . . . . . . . . . . . . . . . . . 229
Engine Oil . . . . . . . . . . . . . . . . . . . . 230
Engine Oil Life System . . . . . . . 232
Automatic Transmission Fluid . . . . . . . . . . . . . . . . . . . . . . . . 233
Engine Air Cleaner/Filter . . . . . . 233
Cooling System . . . . . . . . . . . . . . 234
Engine Coolant . . . . . . . . . . . . . . . 235
Engine Overheating . . . . . . . . . . 238
Washer Fluid . . . . . . . . . . . . . . . . . 239
Brakes . . . . . . . . . . . . . . . . . . . . . . . 240
Brake Fluid . . . . . . . . . . . . . . . . . . . 240
Battery - North America . . . . . . 241
Starter Switch Check . . . . . . . . . 243 Automatic Transmission Shift
Lock Control Function
Check . . . . . . . . . . . . . . . . . . . . . . . 243
Ignition Transmission Lock Check . . . . . . . . . . . . . . . . . . . . . . . 243
Park Brake and P (Park) Mechanism Check . . . . . . . . . . 243
Wiper Blade Replacement . . . . 244
Headlamp Aiming
Headlamp Aiming . . . . . . . . . . . . 245
Bulb Replacement
Bulb Replacement . . . . . . . . . . . . 245
Halogen Bulbs . . . . . . . . . . . . . . . . 245
High Intensity Discharge (HID) Lighting . . . . . . . . . . . . . . . . . . . . . 245
LED Lighting . . . . . . . . . . . . . . . . . 245
Headlamps, Front Turn Signal, Sidemarker, and Parking
Lamps . . . . . . . . . . . . . . . . . . . . . . 246
Fog Lamps . . . . . . . . . . . . . . . . . . . 248
Taillamps, Turn Signal, Stoplamps, and Back-Up
Lamps (LS and LT) . . . . . . . . . . 249
Taillamps, Turn Signal, Stoplamps, and Back-Up
Lamps (LTZ) . . . . . . . . . . . . . . . . 250
License Plate Lamp . . . . . . . . . . 251
Replacement Bulbs . . . . . . . . . . . 252
Electrical System
High Voltage Devices and
Wiring . . . . . . . . . . . . . . . . . . . . . . . 253
Electrical System Overload . . . 253
Fuses . . . . . . . . . . . . . . . . . . . . . . . . 253
Engine Compartment Fuse Block . . . . . . . . . . . . . . . . . . . . . . . . 254
Instrument Panel Fuse Block . . . . . . . . . . . . . . . . . . . . . . . . 258
Wheels and Tires
Tires . . . . . . . . . . . . . . . . . . . . . . . . . . 260
All-Season Tires . . . . . . . . . . . . . . 261
Winter Tires . . . . . . . . . . . . . . . . . . 261
Summer Tires . . . . . . . . . . . . . . . . 261
Tire Sidewall Labeling . . . . . . . . 262
Tire Designations . . . . . . . . . . . . . 264
Tire Terminology andDefinitions . . . . . . . . . . . . . . . . . . 264
Tire Pressure . . . . . . . . . . . . . . . . . 267
Tire Pressure for High-Speed Operation . . . . . . . . . . . . . . . . . . . 268
Tire Pressure Monitor System . . . . . . . . . . . . . . . . . . . . . . 269
Tire Pressure Monitor Operation . . . . . . . . . . . . . . . . . . . 270
Tire Inspection . . . . . . . . . . . . . . . . 273
Tire Rotation . . . . . . . . . . . . . . . . . 273
When It Is Time for New Tires . . . . . . . . . . . . . . . . . . . . . . . . 274
Buying New Tires . . . . . . . . . . . . . 275
Page 246 of 360
Chevrolet Malibu Limited Owner Manual (GMNA-Localizing-U.S/Canada-
9086425) - 2016 - crc - 7/30/15
Vehicle Care 245
Headlamp Aiming
Headlamp aim has been preset and
should need no further adjustment.
If the vehicle is damaged in a crash,
the headlamp aim may be affected.
If adjustment to the headlamps is
necessary, see your dealer.
Bulb Replacement
For the proper type of replacement
bulbs, seeReplacement Bulbs
0 252.
For any bulb-changing procedure
not listed in this section, contact
your dealer.
Halogen Bulbs
{Warning
Halogen bulbs have pressurized
gas inside and can burst if you
drop or scratch the bulb. You or
others could be injured. Be sure
to read and follow the instructions
on the bulb package.
High Intensity Discharge
(HID) Lighting
{Warning
The high intensity discharge
lighting system operates at a very
high voltage. If you try to service
any of the system components,
you could be seriously injured.
Have your dealer or a qualified
technician service them.
The vehicle may have HID
headlamps. After an HID headlamp
bulb has been replaced, you may
notice that the beam is a slightly
different shade than it was originally.
This is normal.
LED Lighting
This vehicle has several LED lamps.
For replacement of any LED lighting
assembly, contact your dealer.
Page 247 of 360
Chevrolet Malibu Limited Owner Manual (GMNA-Localizing-U.S/Canada-
9086425) - 2016 - crc - 7/30/15
246 Vehicle Care
Headlamps, Front Turn
Signal, Sidemarker, and
Parking Lamps
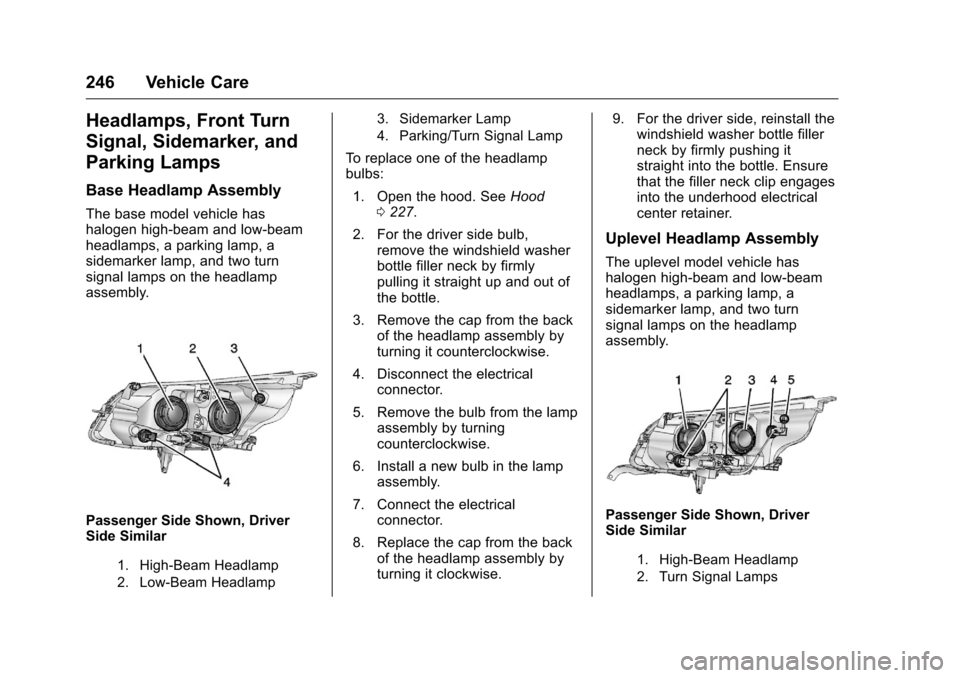
Base Headlamp Assembly
The base model vehicle has
halogen high-beam and low-beam
headlamps, a parking lamp, a
sidemarker lamp, and two turn
signal lamps on the headlamp
assembly.
Passenger Side Shown, Driver
Side Similar
1. High-Beam Headlamp
2. Low-Beam Headlamp3. Sidemarker Lamp
4. Parking/Turn Signal Lamp
To replace one of the headlamp
bulbs:
1. Open the hood. See Hood
0 227.
2. For the driver side bulb, remove the windshield washer
bottle filler neck by firmly
pulling it straight up and out of
the bottle.
3. Remove the cap from the back of the headlamp assembly by
turning it counterclockwise.
4. Disconnect the electrical connector.
5. Remove the bulb from the lamp assembly by turning
counterclockwise.
6. Install a new bulb in the lamp assembly.
7. Connect the electrical connector.
8. Replace the cap from the back of the headlamp assembly by
turning it clockwise. 9. For the driver side, reinstall the
windshield washer bottle filler
neck by firmly pushing it
straight into the bottle. Ensure
that the filler neck clip engages
into the underhood electrical
center retainer.
Uplevel Headlamp Assembly
The uplevel model vehicle has
halogen high-beam and low-beam
headlamps, a parking lamp, a
sidemarker lamp, and two turn
signal lamps on the headlamp
assembly.
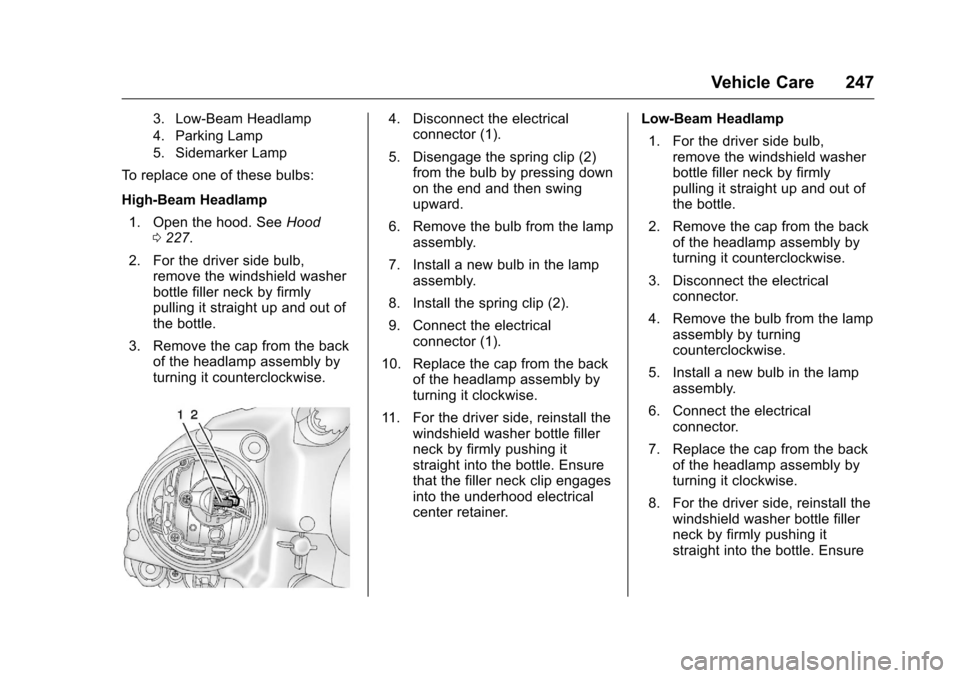
Passenger Side Shown, Driver
Side Similar
1. High-Beam Headlamp
2. Turn Signal Lamps
Page 248 of 360
Chevrolet Malibu Limited Owner Manual (GMNA-Localizing-U.S/Canada-
9086425) - 2016 - crc - 7/30/15
Vehicle Care 247
3. Low-Beam Headlamp
4. Parking Lamp
5. Sidemarker Lamp
To replace one of these bulbs:
High-Beam Headlamp1. Open the hood. See Hood
0 227.
2. For the driver side bulb, remove the windshield washer
bottle filler neck by firmly
pulling it straight up and out of
the bottle.
3. Remove the cap from the back of the headlamp assembly by
turning it counterclockwise.
4. Disconnect the electricalconnector (1).
5. Disengage the spring clip (2) from the bulb by pressing down
on the end and then swing
upward.
6. Remove the bulb from the lamp assembly.
7. Install a new bulb in the lamp assembly.
8. Install the spring clip (2).
9. Connect the electrical connector (1).
10. Replace the cap from the back of the headlamp assembly by
turning it clockwise.
11. For the driver side, reinstall the windshield washer bottle filler
neck by firmly pushing it
straight into the bottle. Ensure
that the filler neck clip engages
into the underhood electrical
center retainer. Low-Beam Headlamp
1. For the driver side bulb, remove the windshield washer
bottle filler neck by firmly
pulling it straight up and out of
the bottle.
2. Remove the cap from the back of the headlamp assembly by
turning it counterclockwise.
3. Disconnect the electrical connector.
4. Remove the bulb from the lamp assembly by turning
counterclockwise.
5. Install a new bulb in the lamp assembly.
6. Connect the electrical connector.
7. Replace the cap from the back of the headlamp assembly by
turning it clockwise.
8. For the driver side, reinstall the windshield washer bottle filler
neck by firmly pushing it
straight into the bottle. Ensure
Page 249 of 360
Chevrolet Malibu Limited Owner Manual (GMNA-Localizing-U.S/Canada-
9086425) - 2016 - crc - 7/30/15
248 Vehicle Care
that the filler neck clip engages
into the underhood electrical
center retainer.
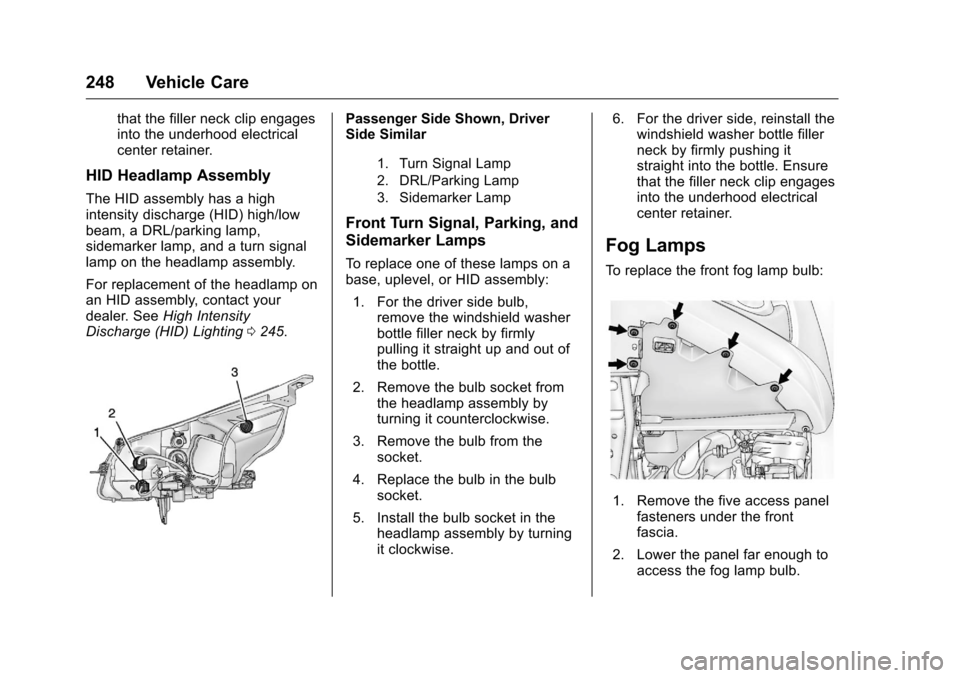
HID Headlamp Assembly
The HID assembly has a high
intensity discharge (HID) high/low
beam, a DRL/parking lamp,
sidemarker lamp, and a turn signal
lamp on the headlamp assembly.
For replacement of the headlamp on
an HID assembly, contact your
dealer. SeeHigh Intensity
Discharge (HID) Lighting 0245.
Passenger Side Shown, Driver
Side Similar
1. Turn Signal Lamp
2. DRL/Parking Lamp
3. Sidemarker Lamp
Front Turn Signal, Parking, and
Sidemarker Lamps
To replace one of these lamps on a
base, uplevel, or HID assembly:
1. For the driver side bulb, remove the windshield washer
bottle filler neck by firmly
pulling it straight up and out of
the bottle.
2. Remove the bulb socket from the headlamp assembly by
turning it counterclockwise.
3. Remove the bulb from the socket.
4. Replace the bulb in the bulb socket.
5. Install the bulb socket in the headlamp assembly by turning
it clockwise. 6. For the driver side, reinstall the
windshield washer bottle filler
neck by firmly pushing it
straight into the bottle. Ensure
that the filler neck clip engages
into the underhood electrical
center retainer.
Fog Lamps
To replace the front fog lamp bulb:
1. Remove the five access panelfasteners under the front
fascia.
2. Lower the panel far enough to access the fog lamp bulb.