2016 CHEVROLET MALIBU LIMITED air condition
[x] Cancel search: air conditionPage 239 of 360
Chevrolet Malibu Limited Owner Manual (GMNA-Localizing-U.S/Canada-
9086425) - 2016 - crc - 7/30/15
238 Vehicle Care
5. Replace the cap tightly.
Caution
If the pressure cap is not tightly
installed, coolant loss and
possible engine damage may
occur. Be sure the cap is properly
and tightly secured.
Engine Overheating
The vehicle has an engine coolant
temperature gauge on the
instrument cluster to warn of engine
overheating. SeeEngine Coolant
Temperature Gauge 0103.
If the decision is made not to lift the
hood when this warning appears,
get service help right away. Contact
your dealer for additional
information.
If the decision is made to lift the
hood, make sure the vehicle is
parked on a level surface.
Then check to see if the engine
cooling fans are running. If the
engine is overheating, both fans should be running. If they are not,
do not continue to run the engine
and have the vehicle serviced.
Caution
Running the engine without
coolant may cause damage or a
fire. Vehicle damage would not be
covered by the vehicle warranty.
If Steam Is Coming from the
Engine Compartment
{Warning
Steam from an overheated engine
can burn you badly, even if you
just open the hood. Stay away
from the engine if you see or hear
steam coming from it. Just turn it
off and get everyone away from
the vehicle until it cools down.
Wait until there is no sign of
steam or coolant before you open
the hood.
(Continued)
Warning (Continued)
If you keep driving when the
engine is overheated, the liquids
in it can catch fire. You or others
could be badly burned. Stop the
engine if it overheats, and get out
of the vehicle until the engine
is cool.
If No Steam Is Coming from
the Engine Compartment
If an engine overheat warning is
displayed but no steam can be seen
or heard, the problem may not be
too serious. Sometimes the engine
can get a little too hot when the
vehicle:
.Climbs a long hill on a hot day.
. Stops after high-speed driving.
. Idles for long periods in traffic.
If the overheat warning is displayed
with no sign of steam: 1. Turn the air conditioning off.
Page 241 of 360

Chevrolet Malibu Limited Owner Manual (GMNA-Localizing-U.S/Canada-
9086425) - 2016 - crc - 7/30/15
240 Vehicle Care
Caution (Continued)
freezing occurs, which could
damage the tank if it is
completely full.
Brakes
Disc brake pads have built-in wear
indicators that make a high-pitched
warning sound when the brake pads
are worn and new pads are needed.
The sound can come and go or can
be heard all the time when the
vehicle is moving, except when
applying the brake pedal firmly.
{Warning
The brake wear warning sound
means that soon the brakes will
not work well. That could lead to
a crash. When the brake wear
warning sound is heard, have the
vehicle serviced.
Caution
Continuing to drive with worn-out
brake pads could result in costly
brake repair.
Some driving conditions or climates
can cause a brake squeal when the
brakes are first applied or lightly
applied. This does not mean
something is wrong with the brakes.
Properly torqued wheel nuts are
necessary to help prevent brake
pulsation. When tires are rotated,
inspect brake pads for wear and
evenly tighten wheel nuts in the
proper sequence to torque
specifications. See Capacities and
Specifications 0323.
Brake pads should be replaced as
complete sets.
Brake Pedal Travel
See your dealer if the brake pedal
does not return to normal height,
or if there is a rapid increase in
pedal travel. This could be a sign
that brake service may be required.
Replacing Brake System Parts
Always replace brake system parts
with new, approved replacement
parts. If this is not done, the brakes
may not work properly. The braking
performance expected can change
in many other ways if the wrong
replacement brake parts are
installed or if parts are improperly
installed.
Brake Fluid
The brake master cylinder reservoir
is filled with GM approved DOT 3
brake fluid as indicated on the
reservoir cap. See Engine
Compartment Overview 0229 for
the location of the reservoir.
Page 257 of 360
Chevrolet Malibu Limited Owner Manual (GMNA-Localizing-U.S/Canada-
9086425) - 2016 - crc - 7/30/15
256 Vehicle Care
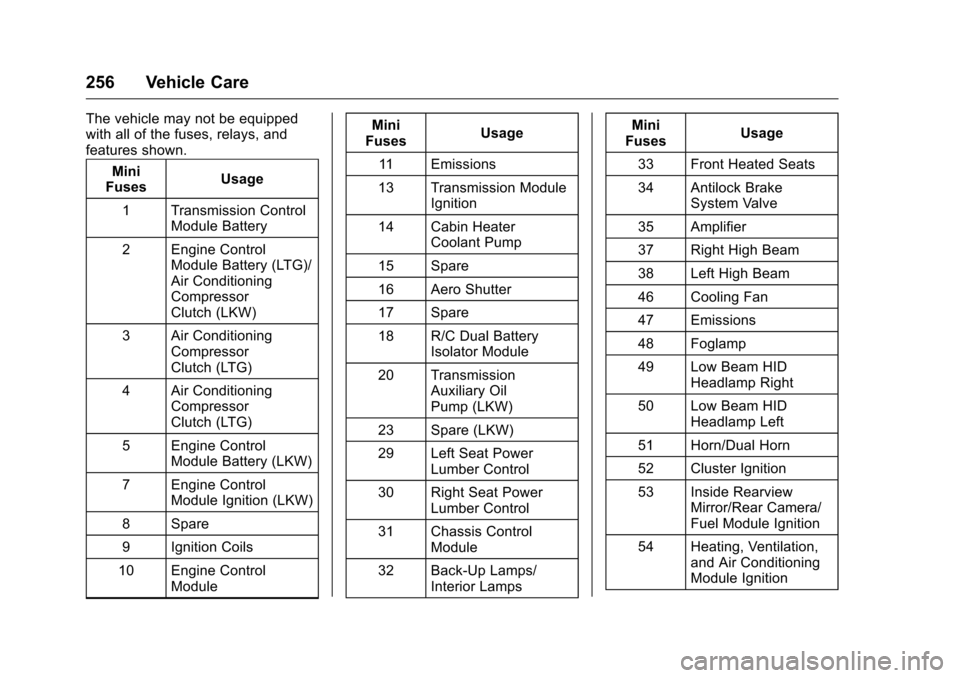
The vehicle may not be equipped
with all of the fuses, relays, and
features shown.Mini
Fuses Usage
1 Transmission Control Module Battery
2 Engine Control Module Battery (LTG)/
Air Conditioning
Compressor
Clutch (LKW)
3 Air Conditioning Compressor
Clutch (LTG)
4 Air Conditioning Compressor
Clutch (LTG)
5 Engine Control Module Battery (LKW)
7 Engine Control Module Ignition (LKW)
8 Spare
9 Ignition Coils
10 Engine Control Module Mini
Fuses Usage
11 Emissions
13 Transmission Module Ignition
14 Cabin Heater Coolant Pump
15 Spare
16 Aero Shutter
17 Spare
18 R/C Dual Battery Isolator Module
20 Transmission Auxiliary Oil
Pump (LKW)
23 Spare (LKW)
29 Left Seat Power Lumber Control
30 Right Seat Power Lumber Control
31 Chassis Control Module
32 Back-Up Lamps/ Interior Lamps Mini
Fuses Usage
33 Front Heated Seats
34 Antilock Brake System Valve
35 Amplifier
37 Right High Beam
38 Left High Beam
46 Cooling Fan
47 Emissions
48 Foglamp
49 Low Beam HID Headlamp Right
50 Low Beam HID Headlamp Left
51 Horn/Dual Horn
52 Cluster Ignition
53 Inside Rearview Mirror/Rear Camera/
Fuel Module Ignition
54 Heating, Ventilation, and Air Conditioning
Module Ignition
Page 258 of 360
Chevrolet Malibu Limited Owner Manual (GMNA-Localizing-U.S/Canada-
9086425) - 2016 - crc - 7/30/15
Vehicle Care 257
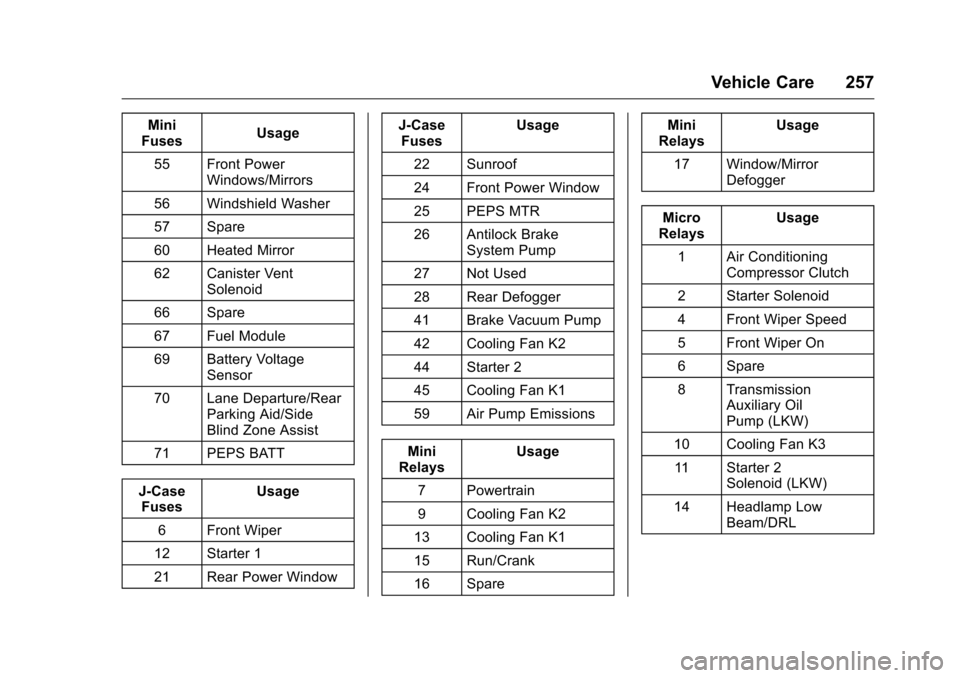
Mini
Fuses Usage
55 Front Power Windows/Mirrors
56 Windshield Washer
57 Spare
60 Heated Mirror
62 Canister Vent Solenoid
66 Spare
67 Fuel Module
69 Battery Voltage Sensor
70 Lane Departure/Rear Parking Aid/Side
Blind Zone Assist
71 PEPS BATT
J-Case Fuses Usage
6 Front Wiper
12 Starter 1
21 Rear Power Window J-Case
Fuses Usage
22 Sunroof
24 Front Power Window
25 PEPS MTR
26 Antilock Brake System Pump
27 Not Used
28 Rear Defogger
41 Brake Vacuum Pump
42 Cooling Fan K2
44 Starter 2
45 Cooling Fan K1
59 Air Pump Emissions
Mini
Relays Usage
7 Powertrain
9 Cooling Fan K2
13 Cooling Fan K1
15 Run/Crank
16 Spare Mini
Relays Usage
17 Window/Mirror Defogger
Micro
Relays Usage
1 Air Conditioning Compressor Clutch
2 Starter Solenoid
4 Front Wiper Speed
5 Front Wiper On
6 Spare
8 Transmission Auxiliary Oil
Pump (LKW)
10 Cooling Fan K3 11 Starter 2 Solenoid (LKW)
14 Headlamp Low Beam/DRL
Page 260 of 360
Chevrolet Malibu Limited Owner Manual (GMNA-Localizing-U.S/Canada-
9086425) - 2016 - crc - 7/30/15
Vehicle Care 259
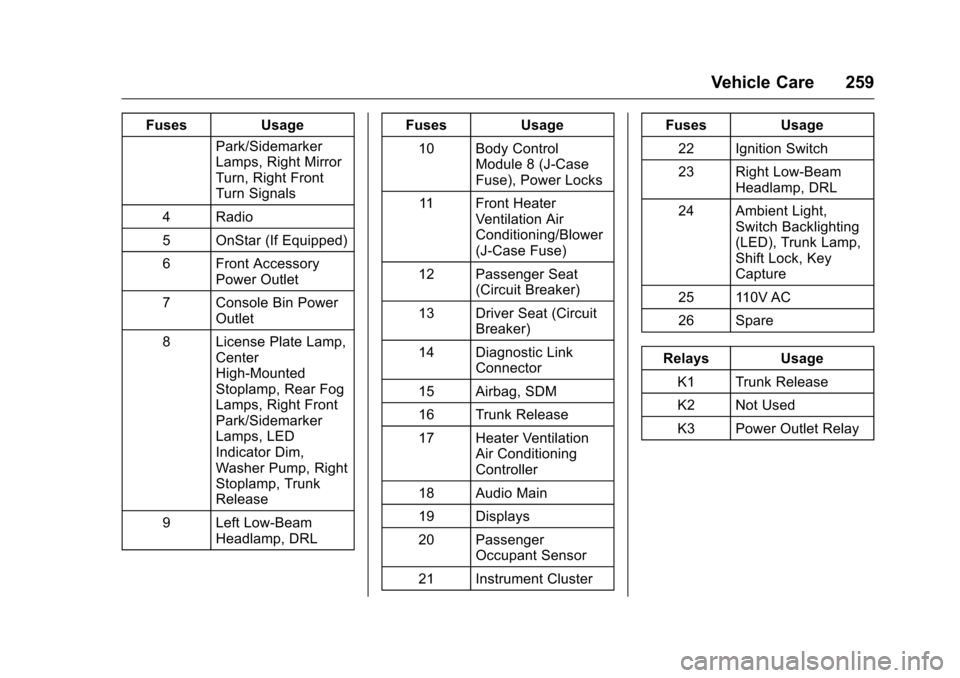
FusesUsage
Park/Sidemarker
Lamps, Right Mirror
Turn, Right Front
Turn Signals
4 Radio
5 OnStar (If Equipped)
6 Front Accessory Power Outlet
7 Console Bin Power Outlet
8 License Plate Lamp, Center
High-Mounted
Stoplamp, Rear Fog
Lamps, Right Front
Park/Sidemarker
Lamps, LED
Indicator Dim,
Washer Pump, Right
Stoplamp, Trunk
Release
9 Left Low-Beam Headlamp, DRL Fuses
Usage
10 Body Control Module 8 (J-Case
Fuse), Power Locks
11 Front Heater Ventilation Air
Conditioning/Blower
(J-Case Fuse)
12 Passenger Seat (Circuit Breaker)
13 Driver Seat (Circuit Breaker)
14 Diagnostic Link Connector
15 Airbag, SDM
16 Trunk Release
17 Heater Ventilation Air Conditioning
Controller
18 Audio Main
19 Displays
20 Passenger Occupant Sensor
21 Instrument Cluster Fuses
Usage
22 Ignition Switch
23 Right Low-Beam Headlamp, DRL
24 Ambient Light, Switch Backlighting
(LED), Trunk Lamp,
Shift Lock, Key
Capture
25 110V AC
26 Spare
Relays Usage
K1 Trunk Release
K2 Not Used
K3 Power Outlet Relay
Page 266 of 360
Chevrolet Malibu Limited Owner Manual (GMNA-Localizing-U.S/Canada-
9086425) - 2016 - crc - 7/30/15
Vehicle Care 265
the tire. Air pressure is
expressed in kPa (kilopascal)
or psi (pounds per square inch).
Accessory Weight
:The
combined weight of optional
accessories. Some examples of
optional accessories are
automatic transmission, power
windows, power seats, and air
conditioning.
Aspect Ratio
:The relationship
of a tire's height to its width.
Belt
:A rubber coated layer of
cords between the plies and the
tread. Cords may be made from
steel or other reinforcing
materials.
Bead
:The tire bead contains
steel wires wrapped by steel
cords that hold the tire onto
the rim.
Bias Ply Tire
:A pneumatic tire
in which the plies are laid at
alternate angles less than
90 degrees to the centerline of
the tread. Cold Tire Pressure
:The
amount of air pressure in a tire,
measured in kPa (kilopascal)
or psi (pounds per square inch)
before a tire has built up heat
from driving. See Tire Pressure
0 267.
Curb Weight
:The weight of a
motor vehicle with standard and
optional equipment including the
maximum capacity of fuel, oil,
and coolant, but without
passengers and cargo.
DOT Markings
:A code molded
into the sidewall of a tire
signifying that the tire is in
compliance with the U.S.
Department of Transportation
(DOT) Motor Vehicle Safety
Standards. The DOT code
includes the Tire Identification
Number (TIN), an alphanumeric
designator which can also
identify the tire manufacturer,
production plant, brand, and
date of production. GVWR
:Gross Vehicle Weight
Rating. See Vehicle Load Limits
0 183.
GAWR FRT
:Gross Axle Weight
Rating for the front axle. See
Vehicle Load Limits 0183.
GAWR RR
:Gross Axle Weight
Rating for the rear axle. See
Vehicle Load Limits 0183.
Intended Outboard Sidewall
:
The side of an asymmetrical tire
that must always face outward
when mounted on a vehicle.
Kilopascal (kPa)
:The metric
unit for air pressure.
Light Truck (LT-Metric) Tire
:A
tire used on light duty trucks and
some multipurpose passenger
vehicles.
Load Index
:An assigned
number ranging from 1 to 279
that corresponds to the load
carrying capacity of a tire.
Page 269 of 360
Chevrolet Malibu Limited Owner Manual (GMNA-Localizing-U.S/Canada-
9086425) - 2016 - crc - 7/30/15
268 Vehicle Care
When to Check
Check the tires once a month or
more. Do not forget the compact
spare, if the vehicle has one.
The cold compact spare tire
pressure should be at 420 kPa
(60 psi). SeeCompact Spare
Tire 0292.
How to Check
Use a good quality pocket-type
gauge to check tire pressure.
Proper tire inflation cannot be
determined by looking at the tire.
Check the tire inflation pressure
when the tires are cold, meaning
the vehicle has not been driven
for at least three hours or no
more than 1.6 km (1 mi).
Remove the valve cap from the
tire valve stem. Press the tire
gauge firmly onto the valve to
get a pressure measurement.
If the cold tire inflation pressure
matches the recommended
pressure on the Tire and
Loading Information label, no further adjustment is necessary.
If the inflation pressure is low,
add air until the recommended
pressure is reached. If the
inflation pressure is high, press
on the metal stem in the center
of the tire valve to release air.
Recheck the tire pressure with
the tire gauge.
Put the valve caps back on the
valve stems to keep out dirt and
moisture and prevent leaks. Use
only valve caps designed for the
vehicle by GM. TPMS sensors
could be damaged and would
not be covered by the vehicle
warranty.
Tire Pressure for
High-Speed Operation
{Warning
Driving at high speeds, 160 km/h
(100 mph) or higher, puts
additional strain on tires.
(Continued)
Warning (Continued)
Sustained high-speed driving
causes excessive heat buildup
and can cause sudden tire failure.
This could cause a crash, and
you or others could be killed.
Some high-speed rated tires
require inflation pressure
adjustment for high-speed
operation. When speed limits and
road conditions allow the vehicle
to be driven at high speeds, make
sure the tires are rated for
high-speed operation, are in
excellent condition, and are set to
the correct cold tire inflation
pressure for the vehicle load.
Vehicles with P235/50R18 size tires
require inflation pressure adjustment
when driving the vehicle at speeds
of 160 km/h (100 mph) or higher.
Set the cold inflation pressure to
270 kPa (39 psi).
Vehicles with P245/40R19 size tires
require inflation pressure adjustment
when driving the vehicle at speeds
Page 271 of 360

Chevrolet Malibu Limited Owner Manual (GMNA-Localizing-U.S/Canada-
9086425) - 2016 - crc - 7/30/15
270 Vehicle Care
alternate tires and wheels allow the
TPMS to continue to function
properly.
SeeTire Pressure Monitor
Operation 0270.
See Radio Frequency Statement
0 335.
Tire Pressure Monitor
Operation
This vehicle may have a Tire
Pressure Monitor System (TPMS).
The TPMS is designed to warn the
driver when a low tire pressure
condition exists. TPMS sensors are
mounted onto each tire and wheel
assembly, excluding the spare tire
and wheel assembly. The TPMS
sensors monitor the air pressure in
the tires and transmits the tire
pressure readings to a receiver in
the vehicle.
When a low tire pressure condition
is detected, the TPMS illuminates
the low tire pressure warning light
on the instrument cluster. If the
warning light comes on, stop as
soon as possible and inflate the
tires to the recommended pressure
shown on the Tire and Loading
Information label. See Vehicle Load
Limits 0183.
A message to check the pressure in
a specific tire displays in the Driver
Information Center (DIC). The low
tire pressure warning light and the
DIC warning message come on at
each ignition cycle until the tires are
inflated to the correct inflation
pressure. Using the DIC, tire
pressure levels can be viewed. For
additional information and details
about the DIC operation and
displays see Driver Information
Center (DIC) 0112. The low tire pressure warning light
may come on in cool weather when
the vehicle is first started, and then
turn off as the vehicle is driven. This
could be an early indicator that the
air pressure is getting low and
needs to be inflated to the proper
pressure.
A Tire and Loading Information
label, attached to your vehicle,
shows the size of the original
equipment tires and the correct
inflation pressure for the tires when
they are cold. See
Vehicle Load
Limits 0183, for an example of the
Tire and Loading Information label
and its location. Also see Tire
Pressure 0267.
The TPMS can warn about a low
tire pressure condition but it does
not replace normal tire
maintenance. See Tire Inspection
0 273, Tire Rotation 0273 andTires
0 260.