2016 CHEVROLET MALIBU LIMITED clock
[x] Cancel search: clockPage 247 of 360
Chevrolet Malibu Limited Owner Manual (GMNA-Localizing-U.S/Canada-
9086425) - 2016 - crc - 7/30/15
246 Vehicle Care
Headlamps, Front Turn
Signal, Sidemarker, and
Parking Lamps
Base Headlamp Assembly
The base model vehicle has
halogen high-beam and low-beam
headlamps, a parking lamp, a
sidemarker lamp, and two turn
signal lamps on the headlamp
assembly.
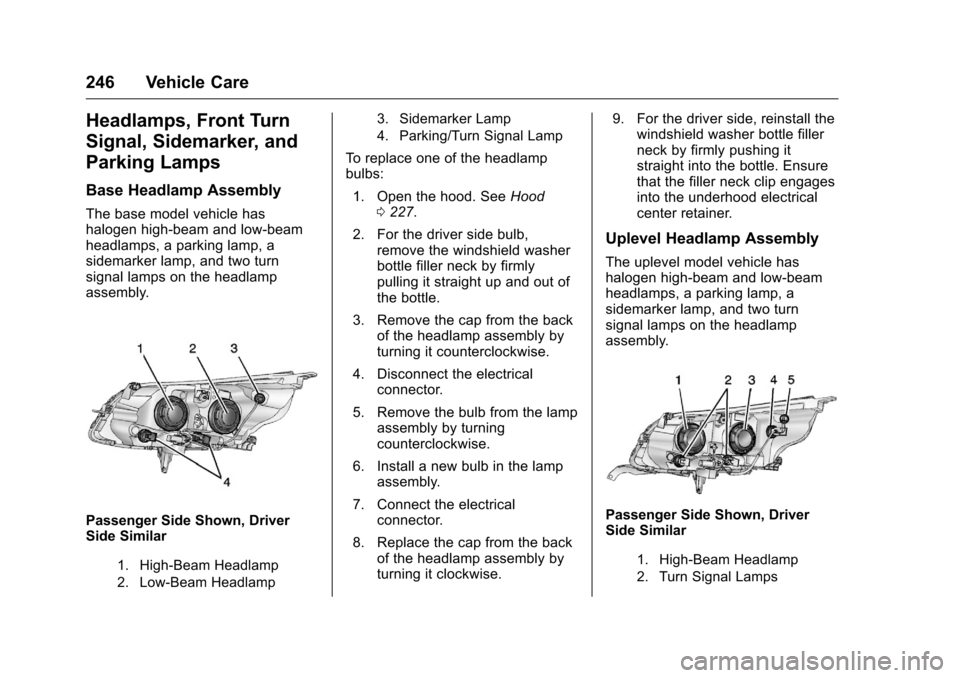
Passenger Side Shown, Driver
Side Similar
1. High-Beam Headlamp
2. Low-Beam Headlamp3. Sidemarker Lamp
4. Parking/Turn Signal Lamp
To replace one of the headlamp
bulbs:
1. Open the hood. See Hood
0 227.
2. For the driver side bulb, remove the windshield washer
bottle filler neck by firmly
pulling it straight up and out of
the bottle.
3. Remove the cap from the back of the headlamp assembly by
turning it counterclockwise.
4. Disconnect the electrical connector.
5. Remove the bulb from the lamp assembly by turning
counterclockwise.
6. Install a new bulb in the lamp assembly.
7. Connect the electrical connector.
8. Replace the cap from the back of the headlamp assembly by
turning it clockwise. 9. For the driver side, reinstall the
windshield washer bottle filler
neck by firmly pushing it
straight into the bottle. Ensure
that the filler neck clip engages
into the underhood electrical
center retainer.
Uplevel Headlamp Assembly
The uplevel model vehicle has
halogen high-beam and low-beam
headlamps, a parking lamp, a
sidemarker lamp, and two turn
signal lamps on the headlamp
assembly.
Passenger Side Shown, Driver
Side Similar
1. High-Beam Headlamp
2. Turn Signal Lamps
Page 248 of 360
Chevrolet Malibu Limited Owner Manual (GMNA-Localizing-U.S/Canada-
9086425) - 2016 - crc - 7/30/15
Vehicle Care 247
3. Low-Beam Headlamp
4. Parking Lamp
5. Sidemarker Lamp
To replace one of these bulbs:
High-Beam Headlamp1. Open the hood. See Hood
0 227.
2. For the driver side bulb, remove the windshield washer
bottle filler neck by firmly
pulling it straight up and out of
the bottle.
3. Remove the cap from the back of the headlamp assembly by
turning it counterclockwise.
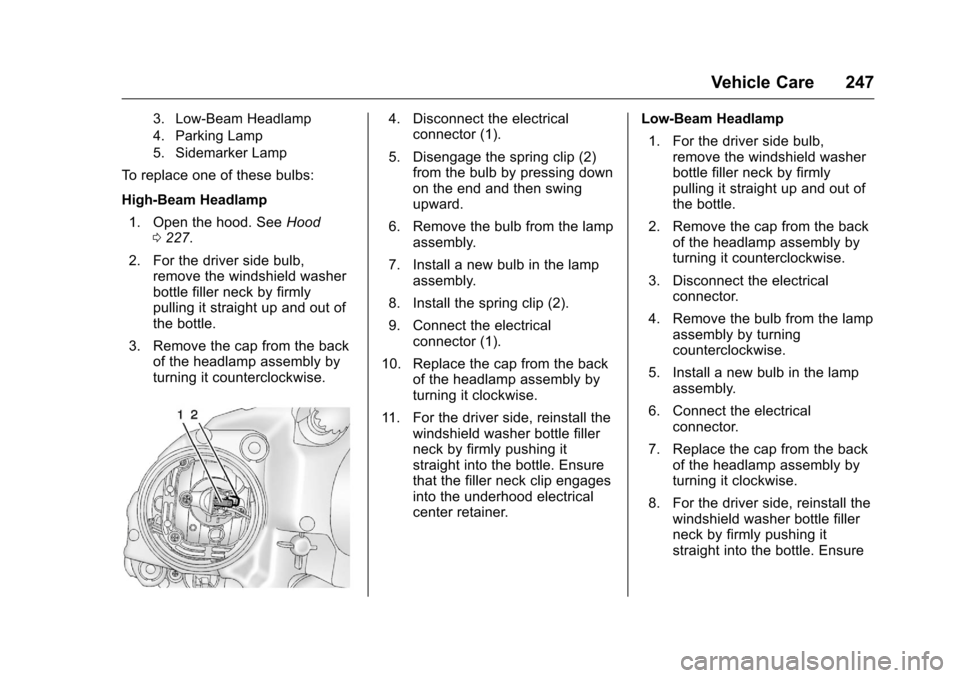
4. Disconnect the electricalconnector (1).
5. Disengage the spring clip (2) from the bulb by pressing down
on the end and then swing
upward.
6. Remove the bulb from the lamp assembly.
7. Install a new bulb in the lamp assembly.
8. Install the spring clip (2).
9. Connect the electrical connector (1).
10. Replace the cap from the back of the headlamp assembly by
turning it clockwise.
11. For the driver side, reinstall the windshield washer bottle filler
neck by firmly pushing it
straight into the bottle. Ensure
that the filler neck clip engages
into the underhood electrical
center retainer. Low-Beam Headlamp
1. For the driver side bulb, remove the windshield washer
bottle filler neck by firmly
pulling it straight up and out of
the bottle.
2. Remove the cap from the back of the headlamp assembly by
turning it counterclockwise.
3. Disconnect the electrical connector.
4. Remove the bulb from the lamp assembly by turning
counterclockwise.
5. Install a new bulb in the lamp assembly.
6. Connect the electrical connector.
7. Replace the cap from the back of the headlamp assembly by
turning it clockwise.
8. For the driver side, reinstall the windshield washer bottle filler
neck by firmly pushing it
straight into the bottle. Ensure
Page 249 of 360
Chevrolet Malibu Limited Owner Manual (GMNA-Localizing-U.S/Canada-
9086425) - 2016 - crc - 7/30/15
248 Vehicle Care
that the filler neck clip engages
into the underhood electrical
center retainer.
HID Headlamp Assembly
The HID assembly has a high
intensity discharge (HID) high/low
beam, a DRL/parking lamp,
sidemarker lamp, and a turn signal
lamp on the headlamp assembly.
For replacement of the headlamp on
an HID assembly, contact your
dealer. SeeHigh Intensity
Discharge (HID) Lighting 0245.
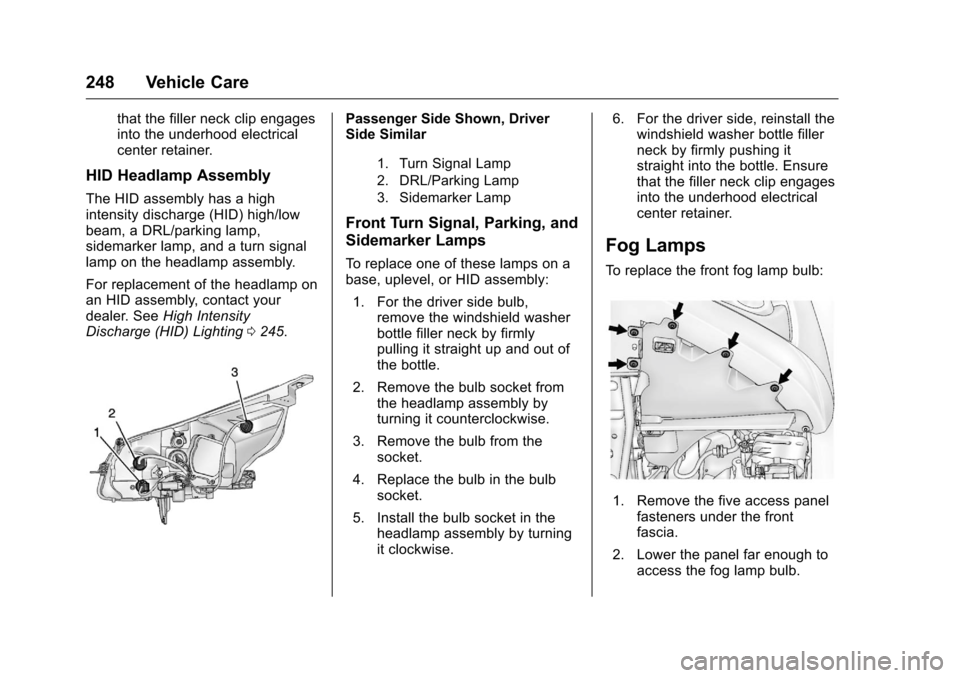
Passenger Side Shown, Driver
Side Similar
1. Turn Signal Lamp
2. DRL/Parking Lamp
3. Sidemarker Lamp
Front Turn Signal, Parking, and
Sidemarker Lamps
To replace one of these lamps on a
base, uplevel, or HID assembly:
1. For the driver side bulb, remove the windshield washer
bottle filler neck by firmly
pulling it straight up and out of
the bottle.
2. Remove the bulb socket from the headlamp assembly by
turning it counterclockwise.
3. Remove the bulb from the socket.
4. Replace the bulb in the bulb socket.
5. Install the bulb socket in the headlamp assembly by turning
it clockwise. 6. For the driver side, reinstall the
windshield washer bottle filler
neck by firmly pushing it
straight into the bottle. Ensure
that the filler neck clip engages
into the underhood electrical
center retainer.
Fog Lamps
To replace the front fog lamp bulb:
1. Remove the five access panelfasteners under the front
fascia.
2. Lower the panel far enough to access the fog lamp bulb.
Page 250 of 360
Chevrolet Malibu Limited Owner Manual (GMNA-Localizing-U.S/Canada-
9086425) - 2016 - crc - 7/30/15
Vehicle Care 249
3. Remove the bulb by turning itcounterclockwise and pulling it
straight out of the assembly.
4. Disconnect the electrical connector from the fog lamp
bulb assembly.
5. Install the new bulb by turning it clockwise into the assembly.
6. Reverse Steps 1–4 to reinstall.
Taillamps, Turn Signal,
Stoplamps, and Back-Up
Lamps (LS and LT)
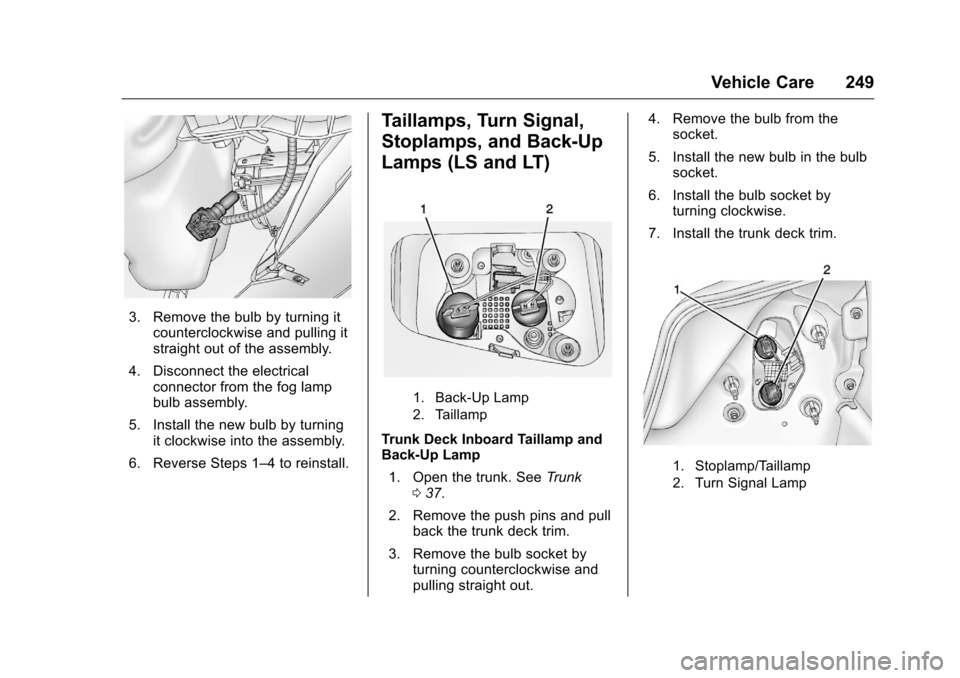
1. Back-Up Lamp
2. Taillamp
Trunk Deck Inboard Taillamp and
Back-Up Lamp 1. Open the trunk. See Trunk
0 37.
2. Remove the push pins and pull back the trunk deck trim.
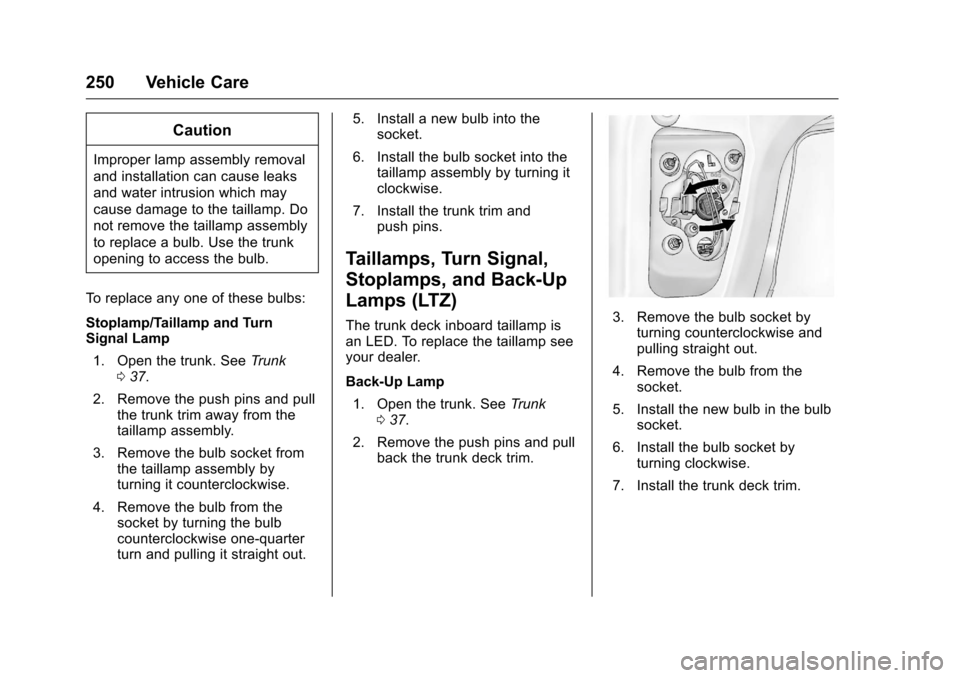
3. Remove the bulb socket by turning counterclockwise and
pulling straight out. 4. Remove the bulb from the
socket.
5. Install the new bulb in the bulb socket.
6. Install the bulb socket by turning clockwise.
7. Install the trunk deck trim.
1. Stoplamp/Taillamp
2. Turn Signal Lamp
Page 251 of 360
Chevrolet Malibu Limited Owner Manual (GMNA-Localizing-U.S/Canada-
9086425) - 2016 - crc - 7/30/15
250 Vehicle Care
Caution
Improper lamp assembly removal
and installation can cause leaks
and water intrusion which may
cause damage to the taillamp. Do
not remove the taillamp assembly
to replace a bulb. Use the trunk
opening to access the bulb.
To replace any one of these bulbs:
Stoplamp/Taillamp and Turn
Signal Lamp 1. Open the trunk. See Trunk
0 37.
2. Remove the push pins and pull the trunk trim away from the
taillamp assembly.
3. Remove the bulb socket from the taillamp assembly by
turning it counterclockwise.
4. Remove the bulb from the socket by turning the bulb
counterclockwise one-quarter
turn and pulling it straight out. 5. Install a new bulb into the
socket.
6. Install the bulb socket into the taillamp assembly by turning it
clockwise.
7. Install the trunk trim and push pins.
Taillamps, Turn Signal,
Stoplamps, and Back-Up
Lamps (LTZ)
The trunk deck inboard taillamp is
an LED. To replace the taillamp see
your dealer.
Back-Up Lamp
1. Open the trunk. See Trunk
0 37.
2. Remove the push pins and pull back the trunk deck trim.3. Remove the bulb socket by
turning counterclockwise and
pulling straight out.
4. Remove the bulb from the socket.
5. Install the new bulb in the bulb socket.
6. Install the bulb socket by turning clockwise.
7. Install the trunk deck trim.
Page 252 of 360
Chevrolet Malibu Limited Owner Manual (GMNA-Localizing-U.S/Canada-
9086425) - 2016 - crc - 7/30/15
Vehicle Care 251
Caution
Improper lamp assembly removal
and installation can cause leaks
and water intrusion which may
cause damage to the taillamp. Do
not remove the taillamp assembly
to replace a bulb. Use the trunk
opening to access the bulb.
The stoplamp/taillamp is an LED. To
replace the stoplamp/taillamp see
your dealer.
Turn Signal Lamp 1. Open the trunk. See Trunk
0 37.
2. Remove the push pins and pull the trunk trim away from the
taillamp assembly.
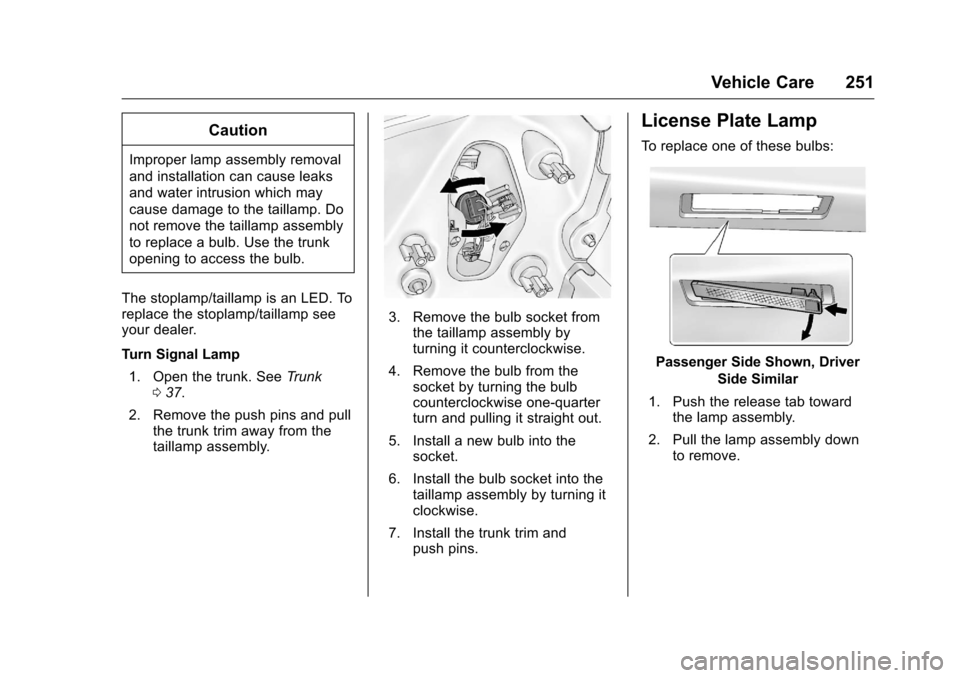
3. Remove the bulb socket fromthe taillamp assembly by
turning it counterclockwise.
4. Remove the bulb from the socket by turning the bulb
counterclockwise one-quarter
turn and pulling it straight out.
5. Install a new bulb into the socket.
6. Install the bulb socket into the taillamp assembly by turning it
clockwise.
7. Install the trunk trim and push pins.
License Plate Lamp
To replace one of these bulbs:
Passenger Side Shown, Driver
Side Similar
1. Push the release tab toward the lamp assembly.
2. Pull the lamp assembly down to remove.
Page 253 of 360
Chevrolet Malibu Limited Owner Manual (GMNA-Localizing-U.S/Canada-
9086425) - 2016 - crc - 7/30/15
252 Vehicle Care
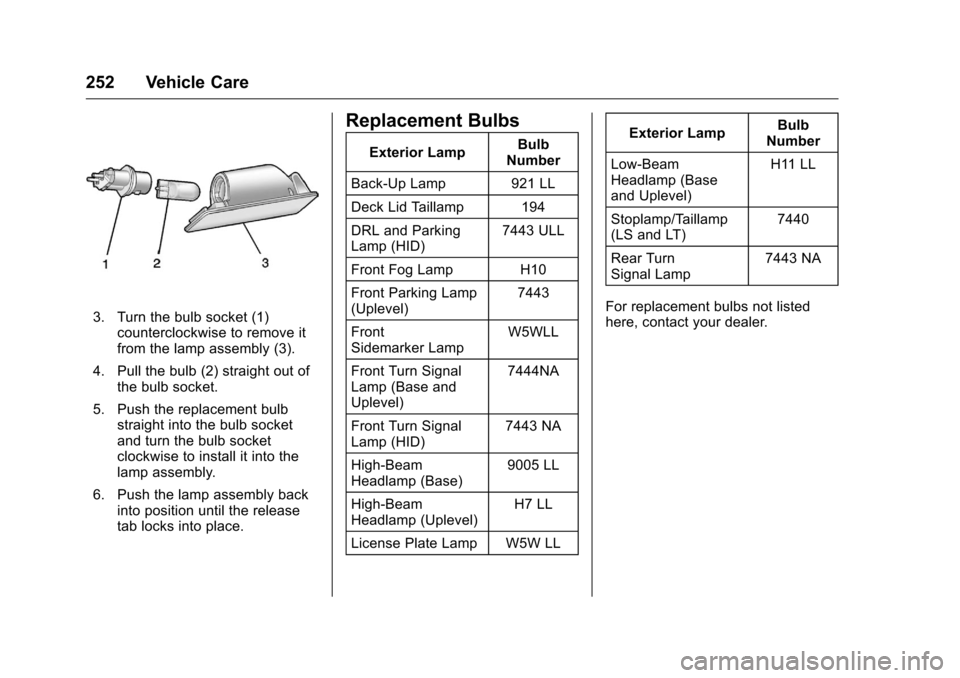
3. Turn the bulb socket (1)counterclockwise to remove it
from the lamp assembly (3).
4. Pull the bulb (2) straight out of the bulb socket.
5. Push the replacement bulb straight into the bulb socket
and turn the bulb socket
clockwise to install it into the
lamp assembly.
6. Push the lamp assembly back into position until the release
tab locks into place.
Replacement Bulbs
Exterior Lamp Bulb
Number
Back-Up Lamp 921 LL
Deck Lid Taillamp 194
DRL and Parking
Lamp (HID) 7443 ULL
Front Fog Lamp H10
Front Parking Lamp
(Uplevel) 7443
Front
Sidemarker Lamp W5WLL
Front Turn Signal
Lamp (Base and
Uplevel) 7444NA
Front Turn Signal
Lamp (HID) 7443 NA
High-Beam
Headlamp (Base) 9005 LL
High-Beam
Headlamp (Uplevel) H7 LL
License Plate Lamp W5W LL Exterior Lamp
Bulb
Number
Low-Beam
Headlamp (Base
and Uplevel) H11 LL
Stoplamp/Taillamp
(LS and LT) 7440
Rear Turn
Signal Lamp 7443 NA
For replacement bulbs not listed
here, contact your dealer.
Page 284 of 360
Chevrolet Malibu Limited Owner Manual (GMNA-Localizing-U.S/Canada-
9086425) - 2016 - crc - 7/30/15
Vehicle Care 283
When using the tire sealant and
compressor kit during cold
temperatures, warm the kit in a
heated environment for five minutes.
This will help to inflate the tire
faster.
If a tire goes flat, avoid further tire
and wheel damage by driving slowly
to a level place. Turn on the hazard
warning flashers. SeeHazard
Warning Flashers 0134.
See If a Tire Goes Flat 0280 for
other important safety warnings.
Do not remove any objects that
have penetrated the tire. 1. Remove the tire sealant and
compressor kit from its storage
location. See Storing the Tire
Sealant and Compressor Kit
0 287.
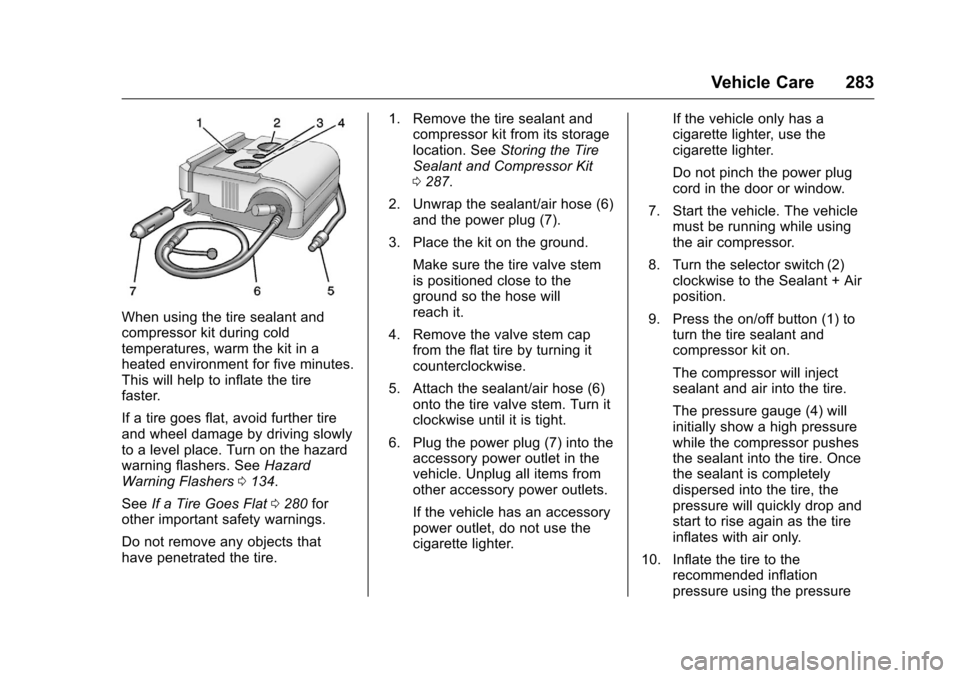
2. Unwrap the sealant/air hose (6) and the power plug (7).
3. Place the kit on the ground. Make sure the tire valve stem
is positioned close to the
ground so the hose will
reach it.
4. Remove the valve stem cap from the flat tire by turning it
counterclockwise.
5. Attach the sealant/air hose (6) onto the tire valve stem. Turn it
clockwise until it is tight.
6. Plug the power plug (7) into the accessory power outlet in the
vehicle. Unplug all items from
other accessory power outlets.
If the vehicle has an accessory
power outlet, do not use the
cigarette lighter. If the vehicle only has a
cigarette lighter, use the
cigarette lighter.
Do not pinch the power plug
cord in the door or window.
7. Start the vehicle. The vehicle must be running while using
the air compressor.
8. Turn the selector switch (2) clockwise to the Sealant + Air
position.
9. Press the on/off button (1) to turn the tire sealant and
compressor kit on.
The compressor will inject
sealant and air into the tire.
The pressure gauge (4) will
initially show a high pressure
while the compressor pushes
the sealant into the tire. Once
the sealant is completely
dispersed into the tire, the
pressure will quickly drop and
start to rise again as the tire
inflates with air only.
10. Inflate the tire to the recommended inflation
pressure using the pressure