2016 CHEVROLET MALIBU LIMITED climate control
[x] Cancel search: climate controlPage 38 of 360
Chevrolet Malibu Limited Owner Manual (GMNA-Localizing-U.S/Canada-
9086425) - 2016 - crc - 7/31/15
Keys, Doors, and Windows 37
2. Close the door.
3. Do the same for the otherrear door.
To open a rear door when the safety
lock is on: 1. Unlock the door by activating the inside handle, by using the
power door lock switch, or by
using the Remote Keyless
Entry (RKE) transmitter.
2. Open the door from the outside.
To cancel the safety lock:
1. Unlock the door and open it from the outside.
2. Insert the key into the safety lock slot and turn it so the slot
is in the vertical position. Do
the same for the other door.Doors
Trunk
{Warning
Exhaust gases can enter the
vehicle if it is driven with the
liftgate, hatch/trunk open, or with
any objects that pass through the
seal between the body and the
hatch/trunk or liftgate. Engine
exhaust contains carbon
monoxide (CO) which cannot be
seen or smelled. It can cause
unconsciousness and even death.
If the vehicle must be driven with
the liftgate or hatch/trunk open:
. Close all of the windows.
. Fully open the air outlets on
or under the instrument
panel.
. Adjust the climate control
system to a setting that
brings in only outside air
and set the fan speed to the
(Continued)
Warning (Continued)
highest setting. See
“Climate Control Systems”
in the Index.
. If the vehicle is equipped
with a power liftgate, disable
the power liftgate function.
For more information about
carbon monoxide, see Engine
Exhaust 0196.
Trunk Release
To open the trunk the vehicle must
be off or the shift lever must be in
P (Park).
.
Press
Yon the RKE
transmitter when removed from
the ignition.
Page 43 of 360
Chevrolet Malibu Limited Owner Manual (GMNA-Localizing-U.S/Canada-
9086425) - 2016 - crc - 7/31/15
42 Keys, Doors, and Windows
Exterior Mirrors
Convex Mirrors
{Warning
A convex mirror can make things,
like other vehicles, look farther
away than they really are. If you
cut too sharply into the right lane,
you could hit a vehicle on the
right. Check the inside mirror or
glance over your shoulder before
changing lanes.
The passenger side mirror is convex
shaped. A convex mirror's surface is
curved so more can be seen from
the driver seat.
Power Mirrors
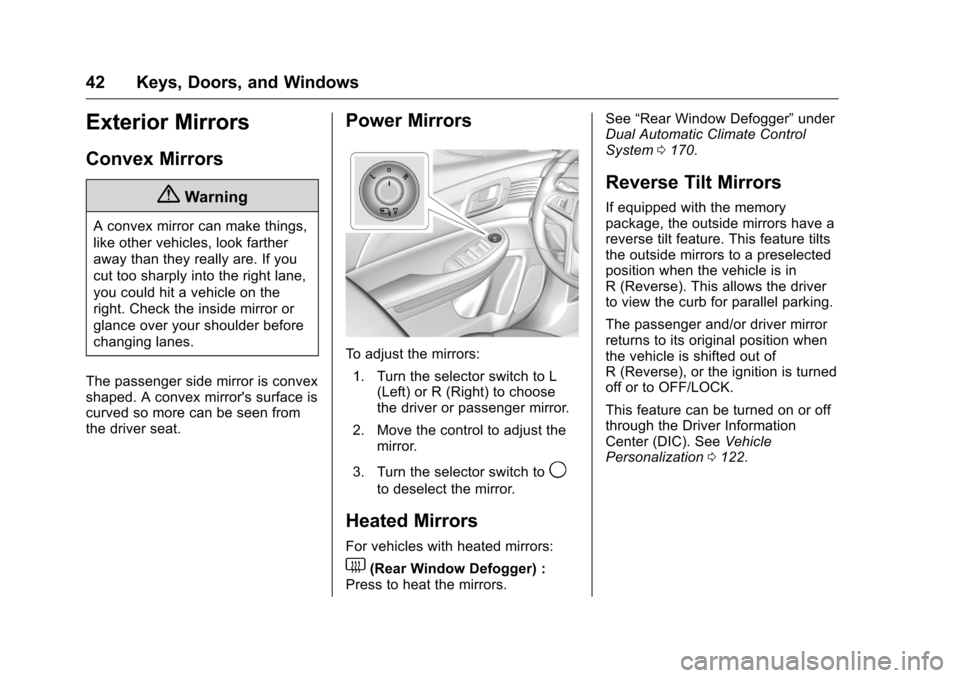
To adjust the mirrors: 1. Turn the selector switch to L (Left) or R (Right) to choose
the driver or passenger mirror.
2. Move the control to adjust the mirror.
3. Turn the selector switch to
9
to deselect the mirror.
Heated Mirrors
For vehicles with heated mirrors:
1(Rear Window Defogger) :
Press to heat the mirrors. See
“Rear Window Defogger” under
Dual Automatic Climate Control
System 0170.
Reverse Tilt Mirrors
If equipped with the memory
package, the outside mirrors have a
reverse tilt feature. This feature tilts
the outside mirrors to a preselected
position when the vehicle is in
R (Reverse). This allows the driver
to view the curb for parallel parking.
The passenger and/or driver mirror
returns to its original position when
the vehicle is shifted out of
R (Reverse), or the ignition is turned
off or to OFF/LOCK.
This feature can be turned on or off
through the Driver Information
Center (DIC). See Vehicle
Personalization 0122.
Page 55 of 360
Chevrolet Malibu Limited Owner Manual (GMNA-Localizing-U.S/Canada-
9086425) - 2016 - crc - 7/30/15
54 Seats and Restraints
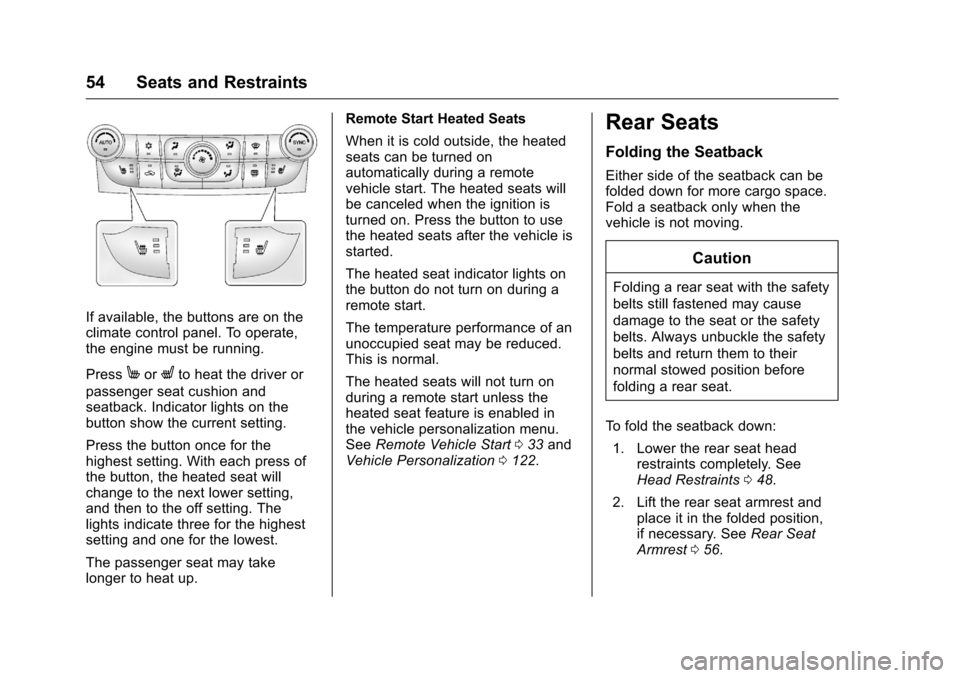
If available, the buttons are on the
climate control panel. To operate,
the engine must be running.
Press
MorLto heat the driver or
passenger seat cushion and
seatback. Indicator lights on the
button show the current setting.
Press the button once for the
highest setting. With each press of
the button, the heated seat will
change to the next lower setting,
and then to the off setting. The
lights indicate three for the highest
setting and one for the lowest.
The passenger seat may take
longer to heat up. Remote Start Heated Seats
When it is cold outside, the heated
seats can be turned on
automatically during a remote
vehicle start. The heated seats will
be canceled when the ignition is
turned on. Press the button to use
the heated seats after the vehicle is
started.
The heated seat indicator lights on
the button do not turn on during a
remote start.
The temperature performance of an
unoccupied seat may be reduced.
This is normal.
The heated seats will not turn on
during a remote start unless the
heated seat feature is enabled in
the vehicle personalization menu.
See
Remote Vehicle Start 033 and
Vehicle Personalization 0122.
Rear Seats
Folding the Seatback
Either side of the seatback can be
folded down for more cargo space.
Fold a seatback only when the
vehicle is not moving.
Caution
Folding a rear seat with the safety
belts still fastened may cause
damage to the seat or the safety
belts. Always unbuckle the safety
belts and return them to their
normal stowed position before
folding a rear seat.
To fold the seatback down: 1. Lower the rear seat head restraints completely. See
Head Restraints 048.
2. Lift the rear seat armrest and place it in the folded position,
if necessary. See Rear Seat
Armrest 056.
Page 100 of 360

Chevrolet Malibu Limited Owner Manual (GMNA-Localizing-U.S/Canada-
9086425) - 2016 - crc - 7/30/15
Instruments and Controls 99
3. Press the TUNE/MENU knob toselect the 12 hour or 24 hour
display format.
Setting the Clock (Radio with
Touchscreen)
To set the time:
1. Press the CONFIG button to enter the menu options. Turn
the TUNE/MENU knob to scroll
through the available setup
features. Press the TUNE/
MENU knob or press the Time
screen button to display other
options within that feature.
2. Press + or −to increase or
decrease the Hours and
Minutes displayed on the clock.
To turn Auto Set on and off, press
the Auto Set button.
If auto timing is set, the time
displayed on the clock may not
update immediately when driving
into a new time zone.
12/24 HR Format : Press the 12 HR
screen button for standard time;
press the 24 HR screen button for
military time. Day + or Day
−:Press the Day +
or Day −display buttons to increase
or decrease the day.
Display : Press Display to turn the
display of the time on the screen on
or off.
Power Outlets
Power Outlets 12 Volt Direct
Current
The accessory power outlets can be
used to plug in electrical equipment,
such as a cell phone or MP3 player.
There are two accessory power
outlets: one on the center stack
below the climate control system,
and one under the armrest inside
the center console storage.
The outlet is powered when the
ignition is in ON/RUN or ACC/
ACCESSORY, or until the driver
door is opened within 10 minutes of
turning off the vehicle. See Retained
Accessory Power (RAP) 0194.
Open the protective cover to use the
accessory power outlet. Certain electrical accessories may
not be compatible with the
accessory power outlets and could
overload vehicle or adapter fuses.
If there is a problem, see your
dealer.
When adding electrical equipment,
be sure to follow the installation
instructions included with the
equipment. See
Add-On Electrical
Equipment 0223.
Caution
Hanging heavy equipment from
the power outlet can cause
damage not covered by the
vehicle warranty. The power
outlets are designed for
accessory power plugs only, such
as cell phone charge cords.
Power Outlet 110/120 Volt
Alternating Current
If equipped with this power outlet it
can be used to plug in electrical
equipment that uses a maximum
limit of 150 watts.
Page 125 of 360
Chevrolet Malibu Limited Owner Manual (GMNA-Localizing-U.S/Canada-
9086425) - 2016 - crc - 7/30/15
124 Instruments and Controls
Display Settings
Press and the following may
display:
.Home Page Menu
. Rear Camera Options
. Display Off
. Map Settings
Home Page Menu
Select and the following may
display:
. Customize
. Sort
. Restore Home Page Defaults
Customize
This feature allows the selection of
what icons will be on the first
Home Page.
Select and follow the screen
prompts.
Sort
This feature allows the icons on the
Home Page to be moved. Select and follow the screen
prompts.
Restore Home Page Defaults
This feature will restore the Home
Page to the factory settings.
Select and follow the screen
prompts.
Rear Camera Options
Select and the following may
display:
.
Symbols
. Guiding Lines
Symbols
Select to turn the rear camera
symbols on or off. See Rear Vision
Camera (RVC) 0206.
Guiding Lines
Select to turn the rear camera
guiding lines on or off. See Rear
Vision Camera (RVC) 0206. Display Off
Press to turn the display off. The
display will return when any radio
buttons are pressed or the screen is
touched (if equipped).
Map Settings
See
“Map Settings” in“Configure
Menu” in the infotainment manual.
Vehicle Settings
Select and the following may
display:
.
Climate and Air Quality
. Comfort and Convenience
. Collision/Detection Systems
. Lighting
. Power Door Locks
. Remote Lock/Unlock/Start
. Return to Factory Settings?
Climate and Air Quality
Select and the following may
display:
.
Auto Fan Speed
. Remote Start Heated Seats
Page 126 of 360
Chevrolet Malibu Limited Owner Manual (GMNA-Localizing-U.S/Canada-
9086425) - 2016 - crc - 7/30/15
Instruments and Controls 125
.Auto Defog
. Auto Rear Defog
Auto Fan Speed
This allows for selecting the
automatic fan speed. It can be
adjusted to run lower or higher than
normal.
Select High, Medium, or Low.
Remote Start Heated Seats
When turned on, this feature will
turn the heated seats on when using
remote start on cold days.
Select On or Off.
Auto Defog
Only vehicles with dual automatic
climate control will have this option.
This allows for turning the auto
defog on or off.
Select On or Off.
Auto Rear Defog
This will allow for turning the auto
rear defog on or off. This feature will
automatically turn on the rear
window defogger when it is cold
outside. Select On or Off.
Comfort and Convenience
Select and the following may
display:
.
Easy Exit Driver Seat
. Chime Volume
. Reverse Tilt Mirror
Easy Exit Driver Seat
This feature moves the seat
rearward allowing the driver more
room to exit the vehicle.
See “Easy Exit Driver Seat” under
Memory Seats 052.
Select On or Off.
Chime Volume
This allows selection of the chime
volume level.
Select Normal or High.
Reverse Tilt Mirror
When on, both the driver and
passenger mirrors will tilt downward
when the vehicle is shifted to
R (Reverse) to improve visibility of
the ground near the rear wheels. They will return to their previous
driving position when the vehicle is
shifted out of R (Reverse), the
ignition is turned to OFF, or the
vehicle is left in R (Reverse). See
Reverse Tilt Mirrors
042.
Select On or Off.
Collision/Detection Systems
Select and the following may
display:
. Park Assist
. Side Blind Zone Alert (SBZA)
. Rear Cross Traffic Alert
Park Assist
This allows the Park Assist feature
to be turned on or off.
Select On or Off.
See Parking Assist 0208.
Side Blind Zone Alert (SBZA)
This allows the SBZA feature to be
turned on or off.
Select On or Off.
See Side Blind Zone Alert (SBZA)
0 211.
Page 138 of 360
Chevrolet Malibu Limited Owner Manual (GMNA-Localizing-U.S/Canada-
9086425) - 2016 - crc - 7/30/15
Lighting 137
Lighting Features
Entry Lighting
Some exterior lamps and most of
the interior lights turn on briefly
when the Remote Keyless Entry
(RKE) transmitter
Kbutton is
pressed. After about 30 seconds the
exterior lamps turn off, then the
dome lamps and remaining interior
lights dim to off. Entry lighting can
be disabled manually by changing
the ignition out of the OFF position,
or by pressing the RKE transmitter
Qbutton.
This feature can be changed. See
Vehicle Personalization 0122.
Exit Lighting
Some exterior lamps come on at
night, or in areas with limited
lighting, when the key is removed
from the ignition. The dome lamps
also come on when the key is
removed from the ignition. The
exterior lamps and dome lamps remain on after the door is closed
for a set amount of time, then
automatically turn off.
For vehicles with Keyless Access,
the exterior lamps automatically turn
on when a door is opened after the
ignition is changed to the OFF
position. The dome lamps also
come on after the ignition is
changed to the OFF position. See
Ignition Positions (Keyless Access)
0
187 orIgnition Positions (Key
Access) 0189.
The exterior lamps turn off
immediately by turning the exterior
lamps control off.
This feature can be changed. See
Vehicle Personalization 0122.
Battery Load
Management
The vehicle has Electric Power
Management (EPM), which
estimates the battery's temperature
and state of charge. It then adjusts
the voltage for best performance
and extended life of the battery. When the battery's state of charge
is low, the voltage is raised slightly
to quickly bring the charge back up.
When the state of charge is high,
the voltage is lowered slightly to
prevent overcharging. If the vehicle
has a voltage display on the Driver
Information Center (DIC), you may
see the voltage move up or down.
This is normal. If there is a problem,
an alert will be displayed.
The battery can be discharged at
idle if the electrical loads are very
high. This is true for all vehicles.
This is because the generator
(alternator) may not be spinning fast
enough at idle to produce all the
power that is needed for very high
electrical loads.
A high electrical load occurs when
several of the following are on, such
as: headlamps, high beams, fog
lamps, rear window defogger,
climate control fan at high speed,
heated seats, engine cooling fans,
trailer loads, and loads plugged into
accessory power outlets.
Page 168 of 360
Chevrolet Malibu Limited Owner Manual (GMNA-Localizing-U.S/Canada-
9086425) - 2016 - crc - 7/30/15
Climate Controls 167
Climate Controls
Climate Control Systems
Climate Control Systems . . . . . 167
Dual Automatic ClimateControl System . . . . . . . . . . . . . 170
Air Vents
Air Vents . . . . . . . . . . . . . . . . . . . . . 173
Maintenance
Passenger Compartment AirFilter . . . . . . . . . . . . . . . . . . . . . . . . 174
Service . . . . . . . . . . . . . . . . . . . . . . . 175
Climate Control Systems
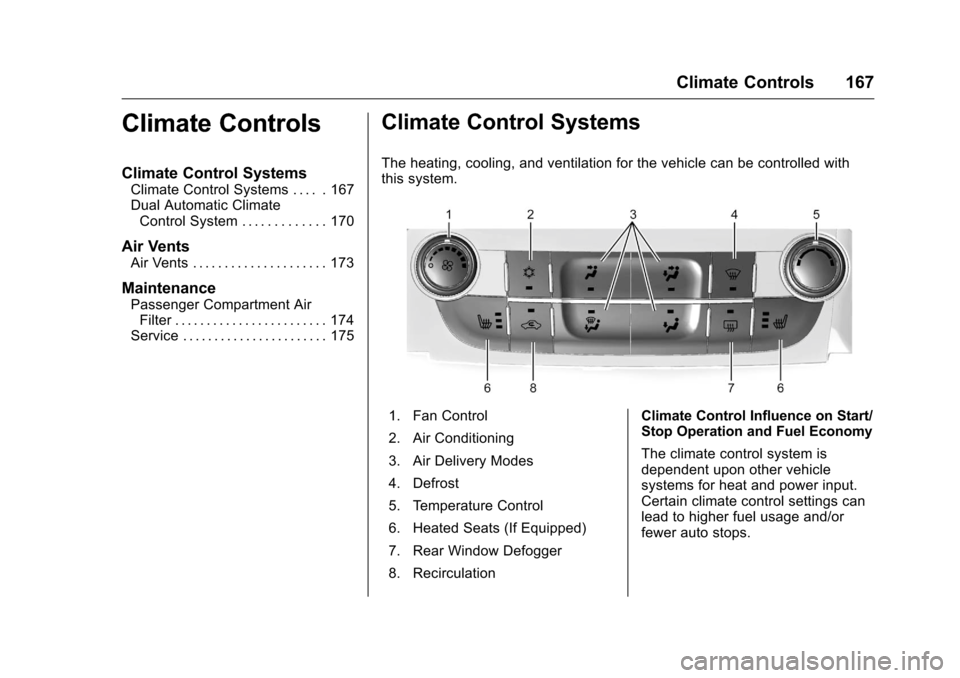
The heating, cooling, and ventilation for the vehicle can be controlled with
this system.
1. Fan Control
2. Air Conditioning
3. Air Delivery Modes
4. Defrost
5. Temperature Control
6. Heated Seats (If Equipped)
7. Rear Window Defogger
8. Recirculation Climate Control Influence on Start/
Stop Operation and Fuel Economy
The climate control system is
dependent upon other vehicle
systems for heat and power input.
Certain climate control settings can
lead to higher fuel usage and/or
fewer auto stops.