2016 CHEVROLET IMPALA turn signal
[x] Cancel search: turn signalPage 244 of 377
Chevrolet Impala Owner Manual (GMNA-Localizing-U.S/Canada-9086448) -
2016 - CRC - 5/20/15
Driving and Operating 243
vehicle itself. Get acquainted with
the handling and braking of the rig
before setting out for the open road.
Before starting, check all trailer hitch
parts and attachments, safety
chains, electrical connectors, lamps,
tires, and mirrors. If the trailer has
electric brakes, start the
combination moving and then apply
the trailer brake controller by hand
to be sure the brakes work.
During the trip, check occasionally
to be sure that the load is secure
and the lamps and any trailer
brakes still work.
Following Distance
Stay at least twice as far behind the
vehicle ahead as you would when
driving the vehicle without a trailer.
This can help to avoid heavy
braking and sudden turns.
Passing
More passing distance is needed
when towing a trailer. The
combination will not accelerate as
quickly and is longer so it isnecessary to go much farther
beyond the passed vehicle before
returning to the lane.
Backing Up
Hold the bottom of the steering
wheel with one hand. To move the
trailer to the left, move that hand to
the left. To move the trailer to the
right, move your hand to the right.
Always back up slowly and,
if possible, have someone
guide you.
Making Turns
Caution
Making very sharp turns while
trailering could cause the trailer to
come in contact with the vehicle.
The vehicle could be damaged.
Avoid making very sharp turns
while trailering.
When turning with a trailer, make
wider turns than normal. Do this so
the trailer will not strike soft
shoulders, curbs, road signs, trees, or other objects. Avoid jerky or
sudden maneuvers. Signal well in
advance.
If the trailer turn signal bulbs burn
out, the arrows on the instrument
cluster will still flash for turns. It is
important to check occasionally to
be sure the trailer bulbs are still
working.
Driving on Grades
Reduce speed and shift to a lower
gear
before starting down a long or
steep downgrade. If the
transmission is not shifted down, the
brakes might get hot and no longer
work well.
Vehicles can tow in D (Drive). Shift
the transmission to a lower gear if
the transmission shifts too often
under heavy loads and/or hilly
conditions.
When towing at high altitude on
steep uphill grades, consider the
following: Engine coolant will boil at
a lower temperature than at normal
altitudes. If the engine is turned off
immediately after towing at high
altitude on steep uphill grades, the
Page 249 of 377

Chevrolet Impala Owner Manual (GMNA-Localizing-U.S/Canada-9086448) -
2016 - CRC - 5/20/15
248 Vehicle Care
Vehicle Care
General Information
General Information . . . . . . . . . . 249
California Proposition65 Warning . . . . . . . . . . . . . . . . . 249
California Perchlorate Materials Requirements . . . . . 249
Accessories and Modifications . . . . . . . . . . . . . . . . 249
Vehicle Checks
Doing Your OwnService Work . . . . . . . . . . . . . . . 250
Hood . . . . . . . . . . . . . . . . . . . . . . . . . 250
Engine Compartment Overview . . . . . . . . . . . . . . . . . . . . 252
Engine Oil . . . . . . . . . . . . . . . . . . . . 255
Engine Oil Life System . . . . . . . 257
Automatic Transmission Fluid . . . . . . . . . . . . . . . . . . . . . . . . 258
Engine Air Cleaner/Filter . . . . . . 259
Cooling System . . . . . . . . . . . . . . 260
Engine Coolant . . . . . . . . . . . . . . . 261
Engine Overheating . . . . . . . . . . 264
Overheated Engine Protection Operating Mode . . . . . . . . . . . . . 265
Washer Fluid . . . . . . . . . . . . . . . . . 265
Brakes . . . . . . . . . . . . . . . . . . . . . . . 266
Brake Fluid . . . . . . . . . . . . . . . . . . . 267 Battery - North America . . . . . . 268
Starter Switch Check . . . . . . . . . 269
Automatic Transmission Shift
Lock Control Function
Check . . . . . . . . . . . . . . . . . . . . . . . 269
Ignition Transmission Lock Check . . . . . . . . . . . . . . . . . . . . . . . 270
Park Brake and P (Park) Mechanism Check . . . . . . . . . . 270
Wiper Blade Replacement . . . . 270
Headlamp Aiming
Headlamp Aiming . . . . . . . . . . . . 271
Bulb Replacement
Bulb Replacement . . . . . . . . . . . . 271
Halogen Bulbs . . . . . . . . . . . . . . . . 271
High Intensity Discharge (HID) Lighting . . . . . . . . . . . . . . . . . . . . . 272
LED Lighting . . . . . . . . . . . . . . . . . 272
Headlamps, Front Turn Signal, Sidemarker, and Parking
Lamps . . . . . . . . . . . . . . . . . . . . . . 272
Taillamps, Turn Signal, Stoplamps, and Back-Up
Lamps . . . . . . . . . . . . . . . . . . . . . . 273
License Plate Lamp . . . . . . . . . . 275
Replacement Bulbs . . . . . . . . . . . 275
Electrical System
High Voltage Devices and Wiring . . . . . . . . . . . . . . . . . . . . . . . 276 Electrical System Overload . . . 276
Fuses . . . . . . . . . . . . . . . . . . . . . . . . 276
Engine Compartment Fuse
Block . . . . . . . . . . . . . . . . . . . . . . . . 277
Instrument Panel Fuse
Block . . . . . . . . . . . . . . . . . . . . . . . . 280
Wheels and Tires
Tires . . . . . . . . . . . . . . . . . . . . . . . . . . 283
All-Season Tires . . . . . . . . . . . . . . 284
Winter Tires . . . . . . . . . . . . . . . . . . 284
Summer Tires . . . . . . . . . . . . . . . . 284
Tire Sidewall Labeling . . . . . . . . 285
Tire Designations . . . . . . . . . . . . . 287
Tire Terminology andDefinitions . . . . . . . . . . . . . . . . . . 288
Tire Pressure . . . . . . . . . . . . . . . . . 290
Tire Pressure for High-Speed
Operation . . . . . . . . . . . . . . . . . . . 291
Tire Pressure Monitor System . . . . . . . . . . . . . . . . . . . . . . 292
Tire Pressure Monitor Operation . . . . . . . . . . . . . . . . . . . 293
Tire Inspection . . . . . . . . . . . . . . . . 296
Tire Rotation . . . . . . . . . . . . . . . . . 296
When It Is Time for New Tires . . . . . . . . . . . . . . . . . . . . . . . . 297
Buying New Tires . . . . . . . . . . . . . 298
Different Size Tires and Wheels . . . . . . . . . . . . . . . . . . . . . . 299
Page 273 of 377
Chevrolet Impala Owner Manual (GMNA-Localizing-U.S/Canada-9086448) -
2016 - CRC - 5/20/15
272 Vehicle Care
High Intensity Discharge
(HID) Lighting
{Warning
The high intensity discharge
lighting system operates at a very
high voltage. If you try to service
any of the system components,
you could be seriously injured.
Have your dealer or a qualified
technician service them.
The vehicle may have HID
headlamps. After an HID headlamp
bulb has been replaced, you may
notice that the beam is a slightly
different shade than it was originally.
This is normal.
LED Lighting
This vehicle has several LED lamps.
For replacement of any LED lighting
assembly, contact your dealer.
Headlamps, Front Turn
Signal, Sidemarker, and
Parking Lamps
Base Headlamp Assembly
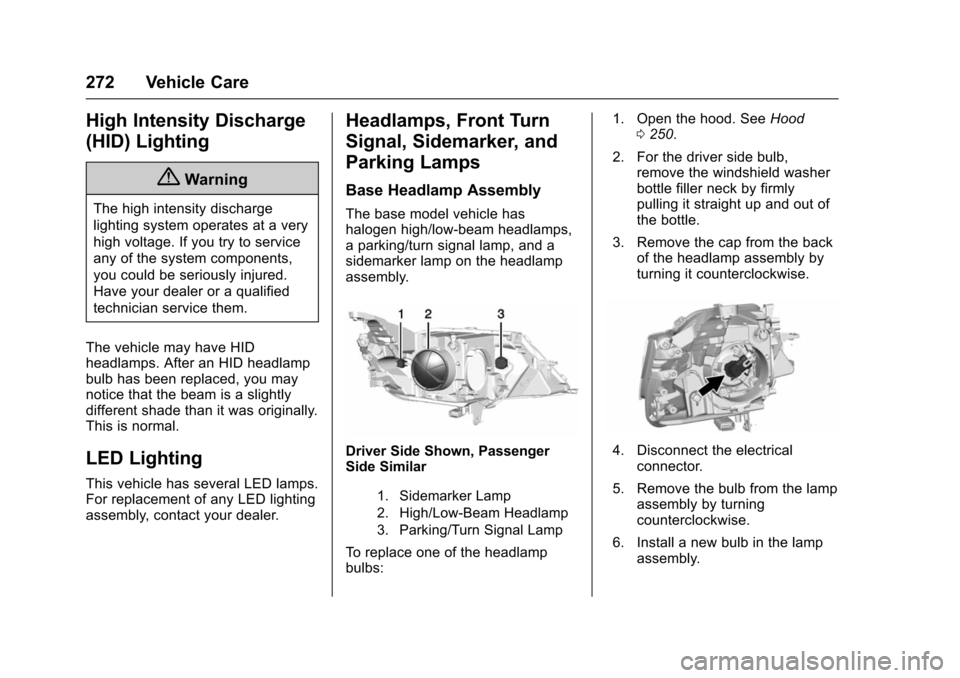
The base model vehicle has
halogen high/low-beam headlamps,
a parking/turn signal lamp, and a
sidemarker lamp on the headlamp
assembly.
Driver Side Shown, Passenger
Side Similar
1. Sidemarker Lamp
2. High/Low-Beam Headlamp
3. Parking/Turn Signal Lamp
To replace one of the headlamp
bulbs: 1. Open the hood. See
Hood
0 250.
2. For the driver side bulb, remove the windshield washer
bottle filler neck by firmly
pulling it straight up and out of
the bottle.
3. Remove the cap from the back of the headlamp assembly by
turning it counterclockwise.
4. Disconnect the electricalconnector.
5. Remove the bulb from the lamp assembly by turning
counterclockwise.
6. Install a new bulb in the lamp assembly.
Page 274 of 377
Chevrolet Impala Owner Manual (GMNA-Localizing-U.S/Canada-9086448) -
2016 - CRC - 5/20/15
Vehicle Care 273
7. Connect the electricalconnector.
8. Replace the cap on the back of the headlamp assembly by
turning it clockwise.
9. For the driver side, reinstall the windshield washer bottle filler
neck by firmly pushing it
straight into the bottle. Ensure
that the filler neck clip engages
into the underhood electrical
center retainer.
Uplevel Headlamp Assembly
The uplevel model vehicle has a
high intensity discharge (HID) high/
low-beam headlamp, a parking/turn
signal lamp, and a sidemarker lamp
on the headlamp assembly.
For replacement of the headlamp on
an HID assembly, contact your
dealer. See High Intensity
Discharge (HID) Lighting 0272.
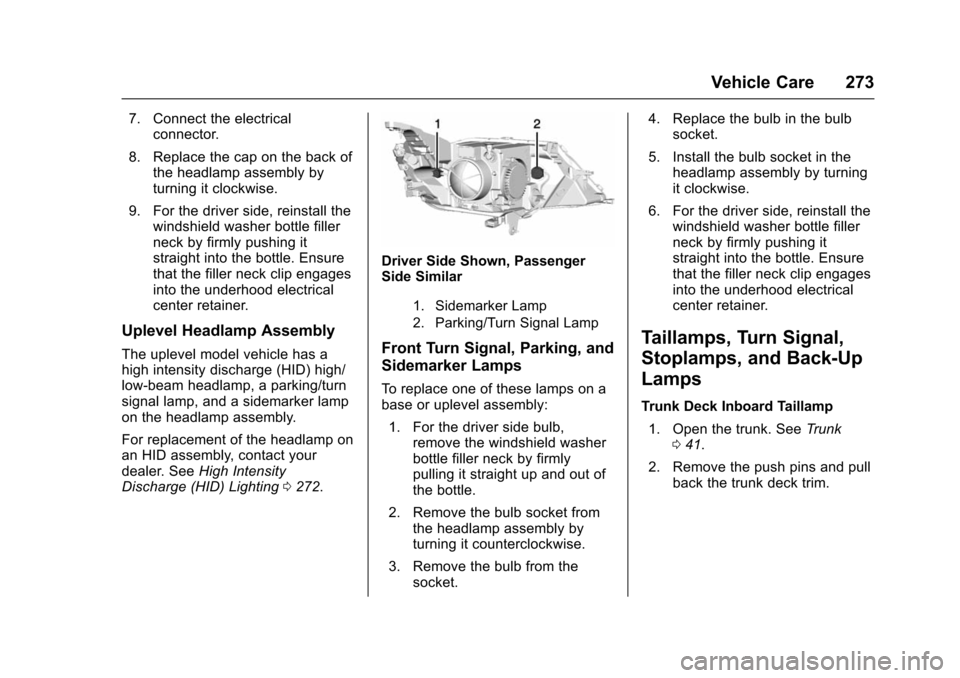
Driver Side Shown, Passenger
Side Similar
1. Sidemarker Lamp
2. Parking/Turn Signal Lamp
Front Turn Signal, Parking, and
Sidemarker Lamps
To replace one of these lamps on a
base or uplevel assembly:
1. For the driver side bulb, remove the windshield washer
bottle filler neck by firmly
pulling it straight up and out of
the bottle.
2. Remove the bulb socket from the headlamp assembly by
turning it counterclockwise.
3. Remove the bulb from the socket. 4. Replace the bulb in the bulb
socket.
5. Install the bulb socket in the headlamp assembly by turning
it clockwise.
6. For the driver side, reinstall the windshield washer bottle filler
neck by firmly pushing it
straight into the bottle. Ensure
that the filler neck clip engages
into the underhood electrical
center retainer.
Taillamps, Turn Signal,
Stoplamps, and Back-Up
Lamps
Trunk Deck Inboard Taillamp
1. Open the trunk. See Trunk
0 41.
2. Remove the push pins and pull back the trunk deck trim.
Page 275 of 377
Chevrolet Impala Owner Manual (GMNA-Localizing-U.S/Canada-9086448) -
2016 - CRC - 5/20/15
274 Vehicle Care
3. Remove the bulb socket byturning counterclockwise and
pulling straight out.
4. Remove the bulb from the socket by pulling it straight out.
5. Install the new bulb in the bulb socket.
6. Install the bulb socket by turning clockwise.
7. Install the trunk deck trim.
Stoplamp/Taillamp/Turn Signal
Lamp and Back-Up Lamp
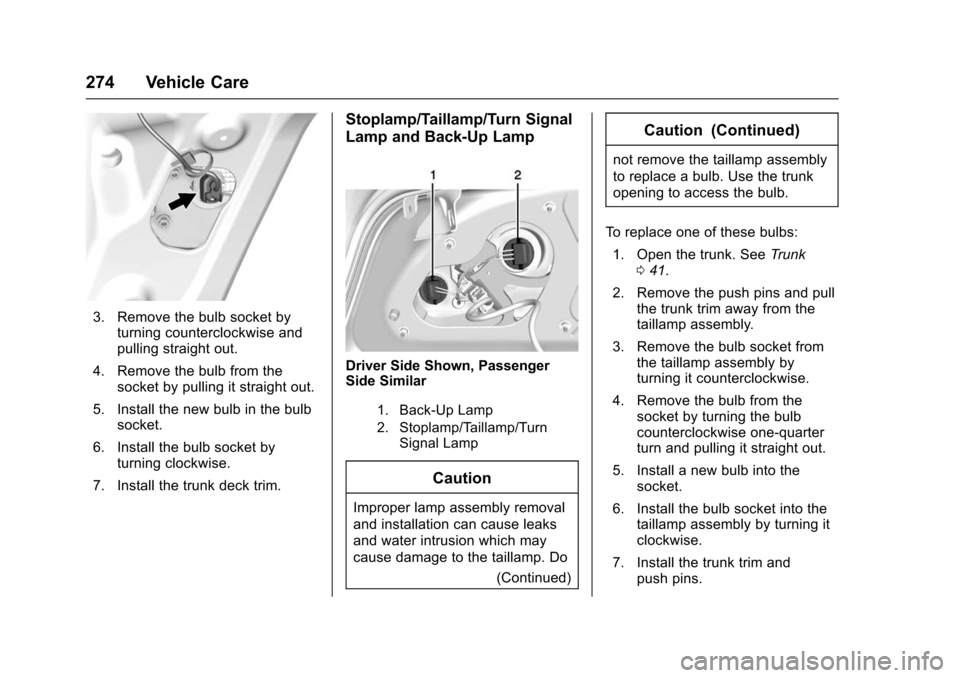
Driver Side Shown, Passenger
Side Similar
1. Back-Up Lamp
2. Stoplamp/Taillamp/Turn Signal Lamp
Caution
Improper lamp assembly removal
and installation can cause leaks
and water intrusion which may
cause damage to the taillamp. Do
(Continued)
Caution (Continued)
not remove the taillamp assembly
to replace a bulb. Use the trunk
opening to access the bulb.
To replace one of these bulbs: 1. Open the trunk. See Trunk
0 41.
2. Remove the push pins and pull the trunk trim away from the
taillamp assembly.
3. Remove the bulb socket from the taillamp assembly by
turning it counterclockwise.
4. Remove the bulb from the socket by turning the bulb
counterclockwise one-quarter
turn and pulling it straight out.
5. Install a new bulb into the socket.
6. Install the bulb socket into the taillamp assembly by turning it
clockwise.
7. Install the trunk trim and push pins.
Page 276 of 377
Chevrolet Impala Owner Manual (GMNA-Localizing-U.S/Canada-9086448) -
2016 - CRC - 5/20/15
Vehicle Care 275
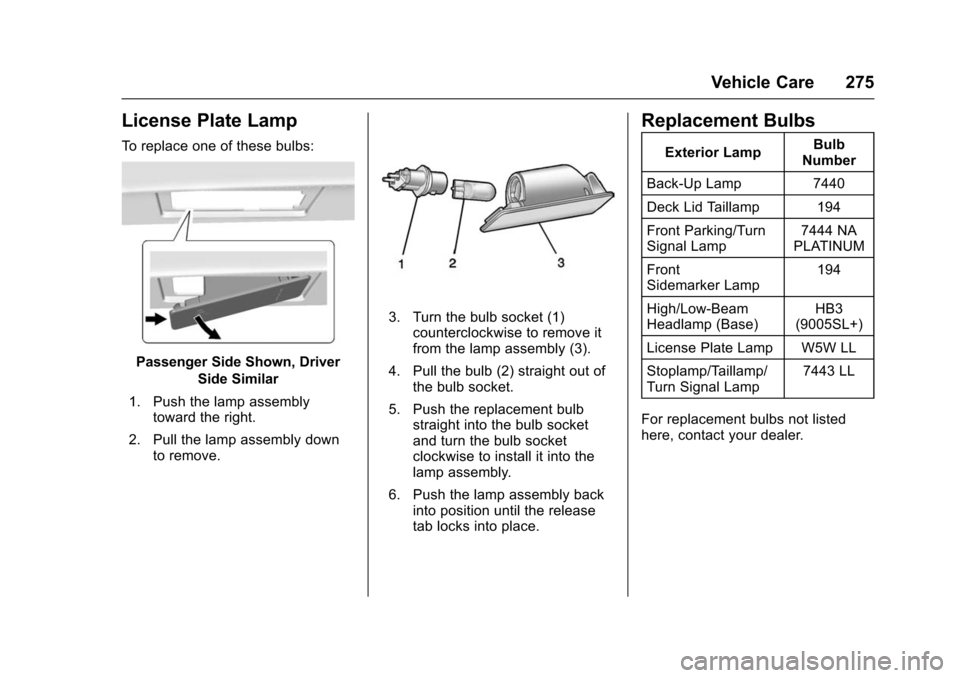
License Plate Lamp
To replace one of these bulbs:
Passenger Side Shown, DriverSide Similar
1. Push the lamp assembly toward the right.
2. Pull the lamp assembly down to remove.
3. Turn the bulb socket (1)counterclockwise to remove it
from the lamp assembly (3).
4. Pull the bulb (2) straight out of the bulb socket.
5. Push the replacement bulb straight into the bulb socket
and turn the bulb socket
clockwise to install it into the
lamp assembly.
6. Push the lamp assembly back into position until the release
tab locks into place.
Replacement Bulbs
Exterior Lamp Bulb
Number
Back-Up Lamp 7440
Deck Lid Taillamp 194
Front Parking/Turn
Signal Lamp 7444 NA
PLATINUM
Front
Sidemarker Lamp 194
High/Low-Beam
Headlamp (Base) HB3
(9005SL+)
License Plate Lamp W5W LL
Stoplamp/Taillamp/
Turn Signal Lamp 7443 LL
For replacement bulbs not listed
here, contact your dealer.
Page 293 of 377
Chevrolet Impala Owner Manual (GMNA-Localizing-U.S/Canada-9086448) -
2016 - CRC - 5/20/15
292 Vehicle Care
Warning (Continued)
to be driven at high speeds, make
sure the tires are rated for
high-speed operation, are in
excellent condition, and are set to
the correct cold tire inflation
pressure for the vehicle load.
Vehicles with P245/45R19 and
P245/40R20 size tires require
inflation pressure adjustment when
driving the vehicle at speeds of
160 km/h (100 mph) or higher. Set
the cold inflation pressure to
270 kPa (39 psi).
Return the tires to the
recommended cold tire inflation
pressure when high-speed driving
has ended. See Vehicle Load Limits
0 198 andTire Pressure 0290.
Tire Pressure Monitor
System
The Tire Pressure Monitor System
(TPMS) uses radio and sensor
technology to check tire pressure
levels. The TPMS sensors monitor the air pressure in your tires and
transmit tire pressure readings to a
receiver located in the vehicle.
Each tire, including the spare (if
provided), should be checked
monthly when cold and inflated to
the inflation pressure recommended
by the vehicle manufacturer on the
vehicle placard or tire inflation
pressure label. (If your vehicle has
tires of a different size than the size
indicated on the vehicle placard or
tire inflation pressure label, you
should determine the proper tire
inflation pressure for those tires.)
As an added safety feature, your
vehicle has been equipped with a
tire pressure monitoring system
(TPMS) that illuminates a low tire
pressure telltale when one or more
of your tires is significantly
under-inflated.
Accordingly, when the low tire
pressure telltale illuminates, you
should stop and check your tires as
soon as possible, and inflate them
to the proper pressure. Driving on a
significantly under-inflated tire
causes the tire to overheat and can
lead to tire failure. Under-inflation
also reduces fuel efficiency and tire
tread life, and may affect the
vehicle's handling and stopping
ability.
Please note that the TPMS is not a
substitute for proper tire
maintenance, and it is the driver's
responsibility to maintain correct tire
pressure, even if under-inflation has
not reached the level to trigger
illumination of the TPMS low tire
pressure telltale.
Your vehicle has also been
equipped with a TPMS malfunction
indicator to indicate when the
system is not operating properly.
The TPMS malfunction indicator is
combined with the low tire pressure
telltale. When the system detects a
malfunction, the telltale will flash for
approximately one minute and then
remain continuously illuminated.
This sequence will continue upon
subsequent vehicle start-ups as
long as the malfunction exists.
When the malfunction indicator is
illuminated, the system may not be
able to detect or signal low tire
Page 296 of 377

Chevrolet Impala Owner Manual (GMNA-Localizing-U.S/Canada-9086448) -
2016 - CRC - 5/20/15
Vehicle Care 295
more of the TPMS sensors. The
TPMS sensor matching process
should also be performed after
replacing a spare tire with a road
tire containing the TPMS sensor.
The malfunction light and the DIC
message should go off at the next
ignition cycle. The sensors are
matched to the tire/wheel positions,
using a TPMS relearn tool, in the
following order: driver side front tire,
passenger side front tire, passenger
side rear tire, and driver side rear.
See your dealer for service or to
purchase a relearn tool. A TPMS
relearn tool can also be purchased.
See Tire Pressure Monitor Sensor
Activation Tool at
www.gmtoolsandequipment.com or
call 1-800-GM TOOLS
(1-800-468-6657).
There are two minutes to match the
first tire/wheel position, and
five minutes overall to match all four
tire/wheel positions. If it takes
longer, the matching process stops
and must be restarted.
The TPMS sensor matching
process is:1. Set the parking brake.
2. Turn the ignition to ON/RUN
with the engine off or place the
vehicle power mode in ON/
RUN/START. See Ignition
Positions (Keyless Access)
0 201 orIgnition Positions (Key
Access) 0203.
3. Make sure the Tire Pressure info page option is turned on.
The info pages on the DIC can
be turned on and off through
the Settings menu. See Driver
Information Center (DIC) 0127.
4. Use the DIC controls on the right side of the steering wheel
to scroll to the Tire Pressure
screen under the DIC
info page.
5. Press and hold the
V(Set/
Reset) button located in the
center of the DIC controls.
The horn sounds twice to
signal the receiver is in relearn
mode and the TIRE
LEARNING ACTIVE message
displays on the DIC screen. 6. Start with the driver side
front tire.
7. Place the relearn tool against the tire sidewall, near the valve
stem. Then press the button to
activate the TPMS sensor.
A horn chirp confirms that the
sensor identification code has
been matched to this tire and
wheel position.
8. Proceed to the passenger side front tire, and repeat the
procedure in Step 7.
9. Proceed to the passenger side rear tire, and repeat the
procedure in Step 7.
10. Proceed to the driver side rear tire, and repeat the procedure
in Step 7. The horn sounds two
times to indicate the sensor
identification code has been
matched to the driver side rear
tire, and the TPMS sensor
matching process is no longer
active. The TIRE LEARNING
ACTIVE message on the DIC
display screen goes off.