2016 CHEVROLET IMPALA lock
[x] Cancel search: lockPage 43 of 377
Chevrolet Impala Owner Manual (GMNA-Localizing-U.S/Canada-9086448) -
2016 - CRC - 5/20/15
42 Keys, Doors, and Windows
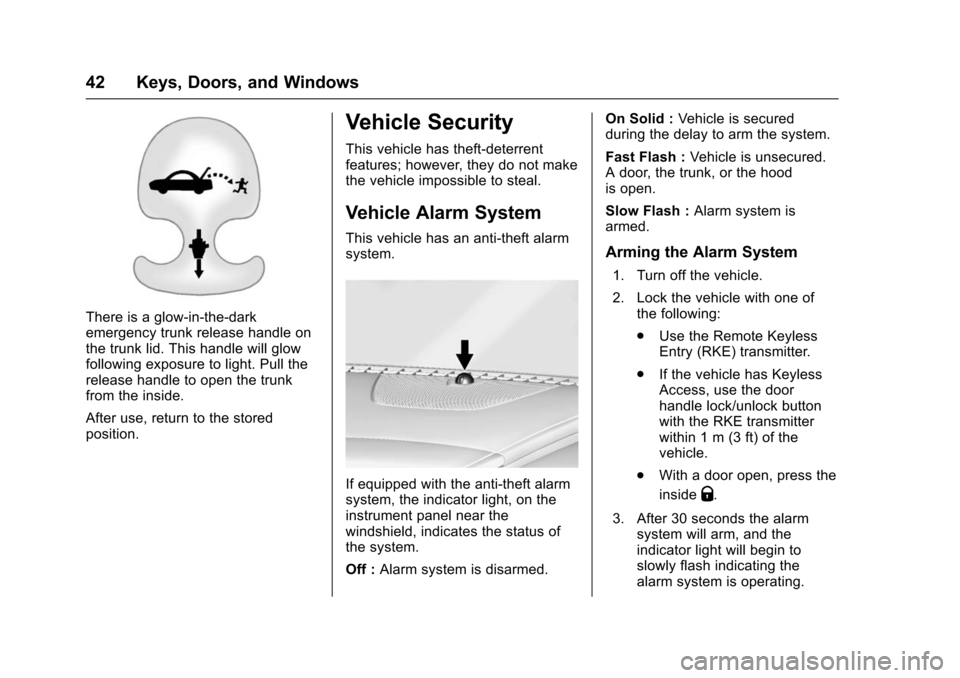
There is a glow-in-the-dark
emergency trunk release handle on
the trunk lid. This handle will glow
following exposure to light. Pull the
release handle to open the trunk
from the inside.
After use, return to the stored
position.
Vehicle Security
This vehicle has theft-deterrent
features; however, they do not make
the vehicle impossible to steal.
Vehicle Alarm System
This vehicle has an anti-theft alarm
system.
If equipped with the anti-theft alarm
system, the indicator light, on the
instrument panel near the
windshield, indicates the status of
the system.
Off :Alarm system is disarmed. On Solid :
Vehicle is secured
during the delay to arm the system.
Fast Flash : Vehicle is unsecured.
A door, the trunk, or the hood
is open.
Slow Flash : Alarm system is
armed.
Arming the Alarm System
1. Turn off the vehicle.
2. Lock the vehicle with one of the following:
.Use the Remote Keyless
Entry (RKE) transmitter.
. If the vehicle has Keyless
Access, use the door
handle lock/unlock button
with the RKE transmitter
within 1 m (3 ft) of the
vehicle.
. With a door open, press the
inside
Q.
3. After 30 seconds the alarm system will arm, and the
indicator light will begin to
slowly flash indicating the
alarm system is operating.
Page 44 of 377
Chevrolet Impala Owner Manual (GMNA-Localizing-U.S/Canada-9086448) -
2016 - CRC - 5/20/15
Keys, Doors, and Windows 43
PressingQon the RKE
transmitter a second time will
bypass the 30-second delay
and immediately arm the alarm
system.
The theft-deterrent alarm system will
not arm if the doors are locked with
the key.
If the driver door is opened without
first unlocking the RKE transmitter,
the horn will chirp and the lights will
flash to indicate pre-alarm. If the
vehicle is not started, or the door is
not unlocked by pressing
Kon the
RKE transmitter during the
10-second pre-alarm, the alarm will
be activated.
If a door, the trunk, or the hood is
opened without first disarming the
system, the turn signals will flash
and the horn will sound for about
30 seconds. The alarm system will
then re-arm to monitor for the next
unauthorized event.
Disarming the System
To disarm the system, do one of the
following: .
Press
Kon the RKE transmitter.
. If the vehicle has Keyless
Access, unlock the vehicle using
the door handle lock/unlock
button with the RKE transmitter
within 1 m (3 ft) of the vehicle.
. Start the vehicle.
To avoid setting off the alarm by
accident:
. Lock the vehicle after all
occupants have left the vehicle
and all doors are closed.
. Always unlock a door with the
RKE transmitter.
Unlocking the driver door with the
key will not disarm the system or
turn off the alarm.
How to Detect a Tamper
Condition
IfKis pressed and the horn chirps
and the lights flash three times, an
alarm occurred previously while the
alarm system was armed.
If the alarm has been activated, a
message will appear on the DIC.
See Security Messages 0136.
Immobilizer
See Radio Frequency Statement
0 351.
Immobilizer Operation
(Key Access)
This vehicle has a passive
theft-deterrent system.
The system does not have to be
manually armed or disarmed.
The vehicle is automatically
immobilized when the key is
removed from the ignition.
The system is automatically
disarmed when the vehicle is
started with the correct key. The key
uses a transponder that matches an
immobilizer control unit in the
vehicle and automatically disarms
the system. Only the correct key
starts the vehicle. The vehicle may
not start if the key is damaged.
Page 48 of 377

Chevrolet Impala Owner Manual (GMNA-Localizing-U.S/Canada-9086448) -
2016 - CRC - 5/20/15
Keys, Doors, and Windows 47
Interior Mirrors
Interior Rearview Mirrors
Adjust the rearview mirror for a clear
view of the area behind your
vehicle.
Do not spray glass cleaner directly
on the mirror. Use a soft towel
dampened with water.
Manual Rearview Mirror
If equipped with a manual rearview
mirror, push the tab forward for
daytime use and pull it for nighttime
use to avoid glare from the
headlamps from behind.
Automatic Dimming
Rearview Mirror
If equipped, automatic dimming
reduces the glare of headlamps
from behind. The dimming feature
comes on when the vehicle is
started.
Windows
{Warning
Never leave a child, a helpless
adult, or a pet alone in a vehicle,
especially with the windows
closed in warm or hot weather.
They can be overcome by the
extreme heat and suffer
permanent injuries or even death
from heat stroke.
The vehicle aerodynamics are
designed to improve fuel economy
performance. This may result in apulsing sound when either rear
window is down and the front
windows are up. To reduce the
sound, open either a front window
or the sunroof, if equipped.
Power Windows
{Warning
Children could be seriously
injured or killed if caught in the
path of a closing window. Never
leave the Remote Keyless Entry
(RKE) transmitter in a vehicle with
children. When there are children
in the rear seat, use the window
lockout switch to prevent
operation of the windows. See
Keys
028.
Page 50 of 377
Chevrolet Impala Owner Manual (GMNA-Localizing-U.S/Canada-9086448) -
2016 - CRC - 5/20/15
Keys, Doors, and Windows 49
Programming the Power
Windows
If the vehicle battery has been
recharged or disconnected, or is not
working, the front power windows
will need to be reprogrammed for
the express-up feature to work.
Before reprogramming, replace or
recharge the vehicle's battery.
To program:1. With the ignition in ON/RUN or ACC/ACCESSORY, or when
RAP is active, close all doors.
2. Press and hold the power window switch until the window
is fully open.
3. Pull the power window switch up until the window is fully
closed.
4. Continue holding the switch up for approximately two seconds
after the window is completely
closed.
The window is now reprogrammed.
Repeat the process for the other
windows.
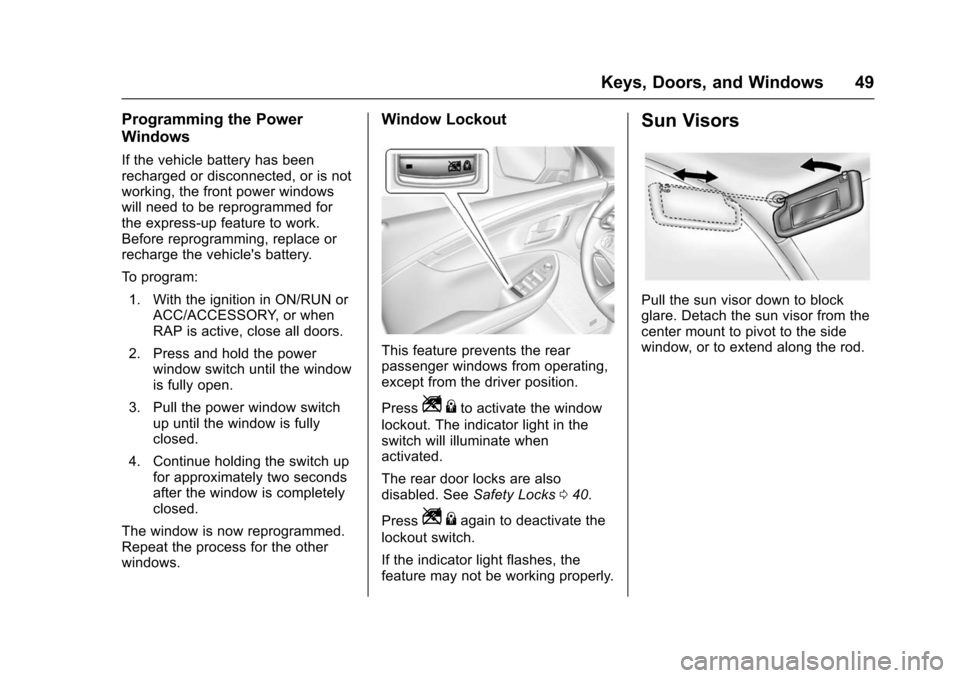
Window Lockout
This feature prevents the rear
passenger windows from operating,
except from the driver position.
Press
Z {to activate the window
lockout. The indicator light in the
switch will illuminate when
activated.
The rear door locks are also
disabled. See Safety Locks040.
Press
Z {again to deactivate the
lockout switch.
If the indicator light flashes, the
feature may not be working properly.
Sun Visors
Pull the sun visor down to block
glare. Detach the sun visor from the
center mount to pivot to the side
window, or to extend along the rod.
Page 54 of 377
Chevrolet Impala Owner Manual (GMNA-Localizing-U.S/Canada-9086448) -
2016 - CRC - 5/20/15
Seats and Restraints 53
Head Restraints
{Warning
With head restraints that are not
installed and adjusted properly,
there is a greater chance that
occupants will suffer a neck/
spinal injury in a crash. Do not
drive until the head restraints for
all occupants are installed and
adjusted properly.
If your vehicle has rear head
restraints that fold down, always
return them to the full upright
position whenever an occupant is
seated in the seat.
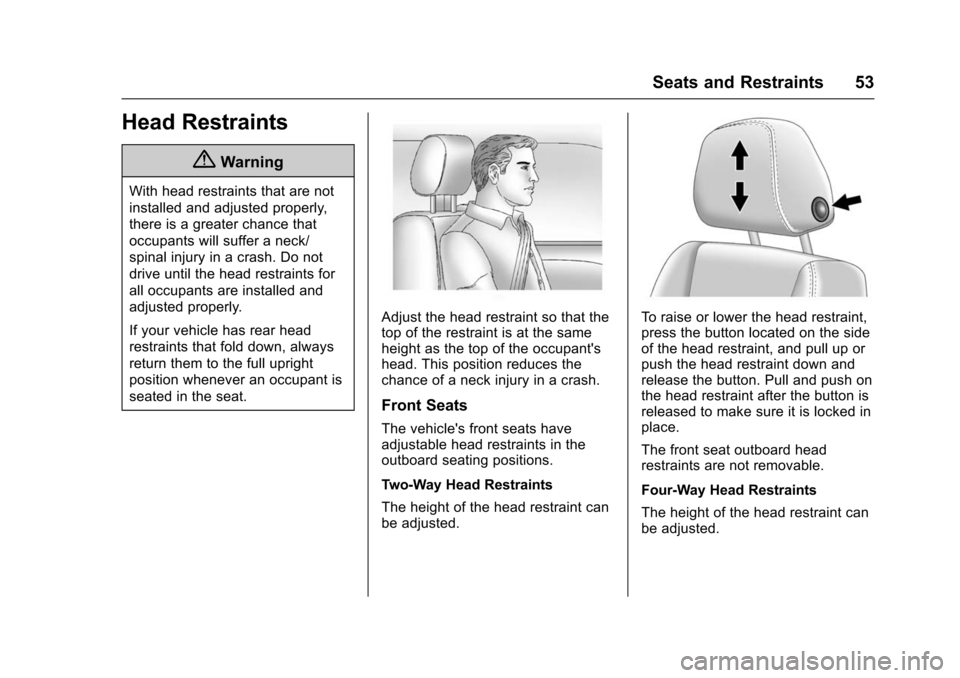
Adjust the head restraint so that the
top of the restraint is at the same
height as the top of the occupant's
head. This position reduces the
chance of a neck injury in a crash.
Front Seats
The vehicle's front seats have
adjustable head restraints in the
outboard seating positions.
Two-Way Head Restraints
The height of the head restraint can
be adjusted.
To raise or lower the head restraint,
press the button located on the side
of the head restraint, and pull up or
push the head restraint down and
release the button. Pull and push on
the head restraint after the button is
released to make sure it is locked in
place.
The front seat outboard head
restraints are not removable.
Four-Way Head Restraints
The height of the head restraint can
be adjusted.
Page 55 of 377
Chevrolet Impala Owner Manual (GMNA-Localizing-U.S/Canada-9086448) -
2016 - CRC - 5/20/15
54 Seats and Restraints
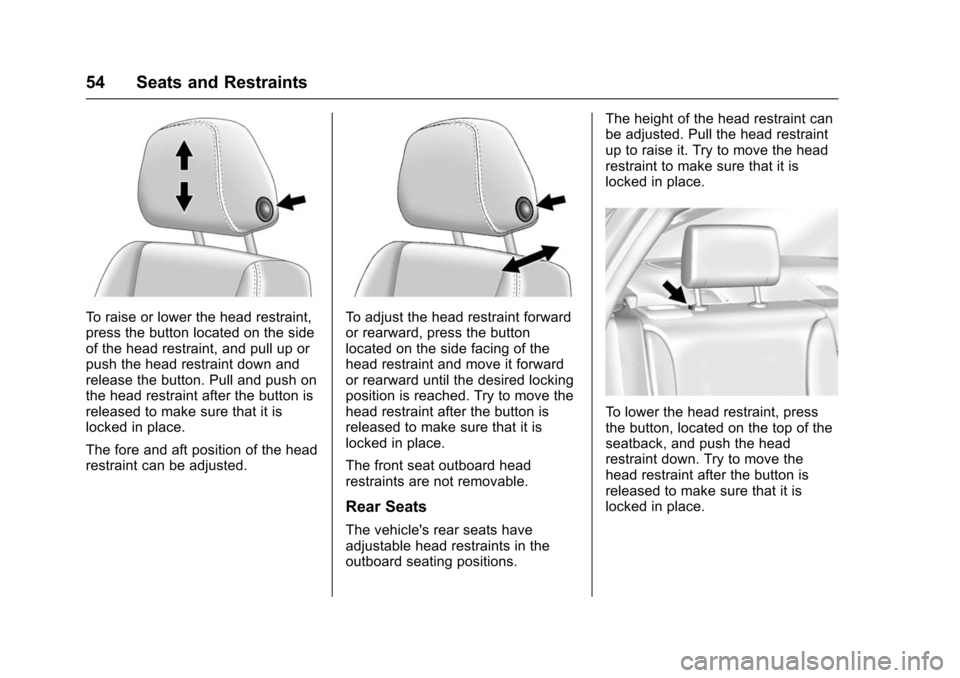
To raise or lower the head restraint,
press the button located on the side
of the head restraint, and pull up or
push the head restraint down and
release the button. Pull and push on
the head restraint after the button is
released to make sure that it is
locked in place.
The fore and aft position of the head
restraint can be adjusted.To adjust the head restraint forward
or rearward, press the button
located on the side facing of the
head restraint and move it forward
or rearward until the desired locking
position is reached. Try to move the
head restraint after the button is
released to make sure that it is
locked in place.
The front seat outboard head
restraints are not removable.
Rear Seats
The vehicle's rear seats have
adjustable head restraints in the
outboard seating positions.The height of the head restraint can
be adjusted. Pull the head restraint
up to raise it. Try to move the head
restraint to make sure that it is
locked in place.
To lower the head restraint, press
the button, located on the top of the
seatback, and push the head
restraint down. Try to move the
head restraint after the button is
released to make sure that it is
locked in place.
Page 56 of 377
Chevrolet Impala Owner Manual (GMNA-Localizing-U.S/Canada-9086448) -
2016 - CRC - 5/20/15
Seats and Restraints 55
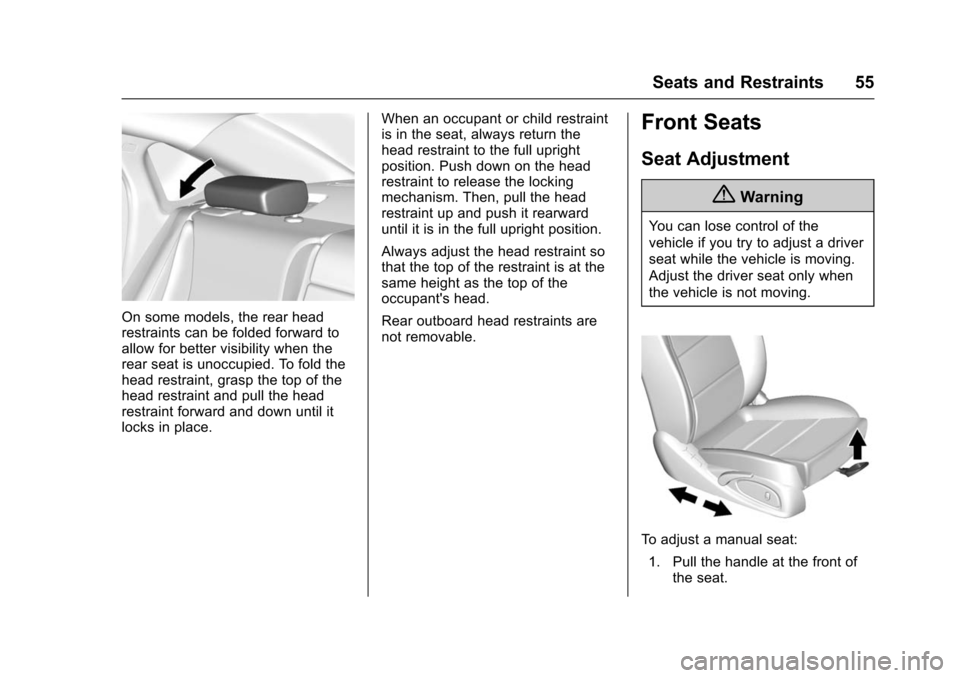
On some models, the rear head
restraints can be folded forward to
allow for better visibility when the
rear seat is unoccupied. To fold the
head restraint, grasp the top of the
head restraint and pull the head
restraint forward and down until it
locks in place.When an occupant or child restraint
is in the seat, always return the
head restraint to the full upright
position. Push down on the head
restraint to release the locking
mechanism. Then, pull the head
restraint up and push it rearward
until it is in the full upright position.
Always adjust the head restraint so
that the top of the restraint is at the
same height as the top of the
occupant's head.
Rear outboard head restraints are
not removable.
Front Seats
Seat Adjustment
{Warning
You can lose control of the
vehicle if you try to adjust a driver
seat while the vehicle is moving.
Adjust the driver seat only when
the vehicle is not moving.
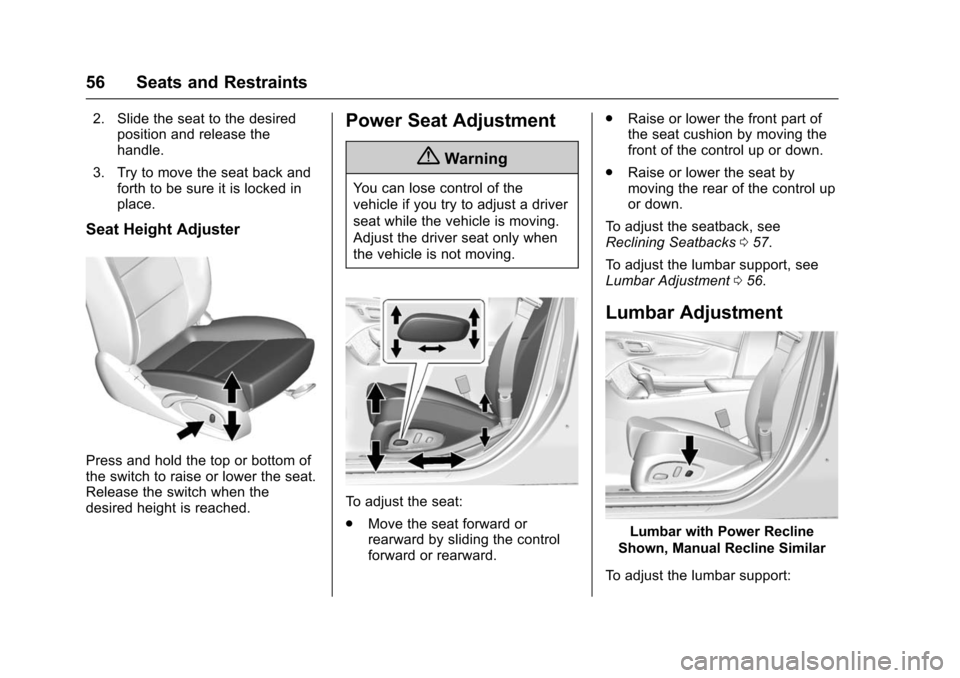
To adjust a manual seat:
1. Pull the handle at the front of the seat.
Page 57 of 377
Chevrolet Impala Owner Manual (GMNA-Localizing-U.S/Canada-9086448) -
2016 - CRC - 5/20/15
56 Seats and Restraints
2. Slide the seat to the desiredposition and release the
handle.
3. Try to move the seat back and forth to be sure it is locked in
place.
Seat Height Adjuster
Press and hold the top or bottom of
the switch to raise or lower the seat.
Release the switch when the
desired height is reached.
Power Seat Adjustment
{Warning
You can lose control of the
vehicle if you try to adjust a driver
seat while the vehicle is moving.
Adjust the driver seat only when
the vehicle is not moving.
To adjust the seat:
.Move the seat forward or
rearward by sliding the control
forward or rearward. .
Raise or lower the front part of
the seat cushion by moving the
front of the control up or down.
. Raise or lower the seat by
moving the rear of the control up
or down.
To adjust the seatback, see
Reclining Seatbacks 057.
To adjust the lumbar support, see
Lumbar Adjustment 056.
Lumbar Adjustment
Lumbar with Power Recline
Shown, Manual Recline Similar
To adjust the lumbar support: