2016 CHEVROLET IMPALA clock
[x] Cancel search: clockPage 305 of 377

Chevrolet Impala Owner Manual (GMNA-Localizing-U.S/Canada-9086448) -
2016 - CRC - 5/20/15
304 Vehicle Care
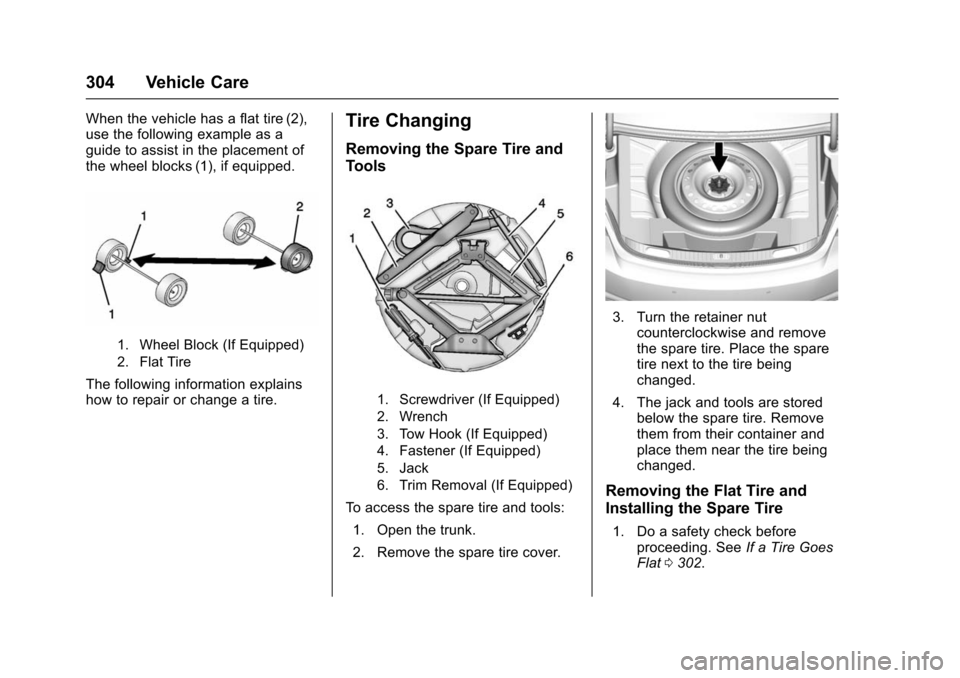
When the vehicle has a flat tire (2),
use the following example as a
guide to assist in the placement of
the wheel blocks (1), if equipped.
1. Wheel Block (If Equipped)
2. Flat Tire
The following information explains
how to repair or change a tire.
Tire Changing
Removing the Spare Tire and
Tools
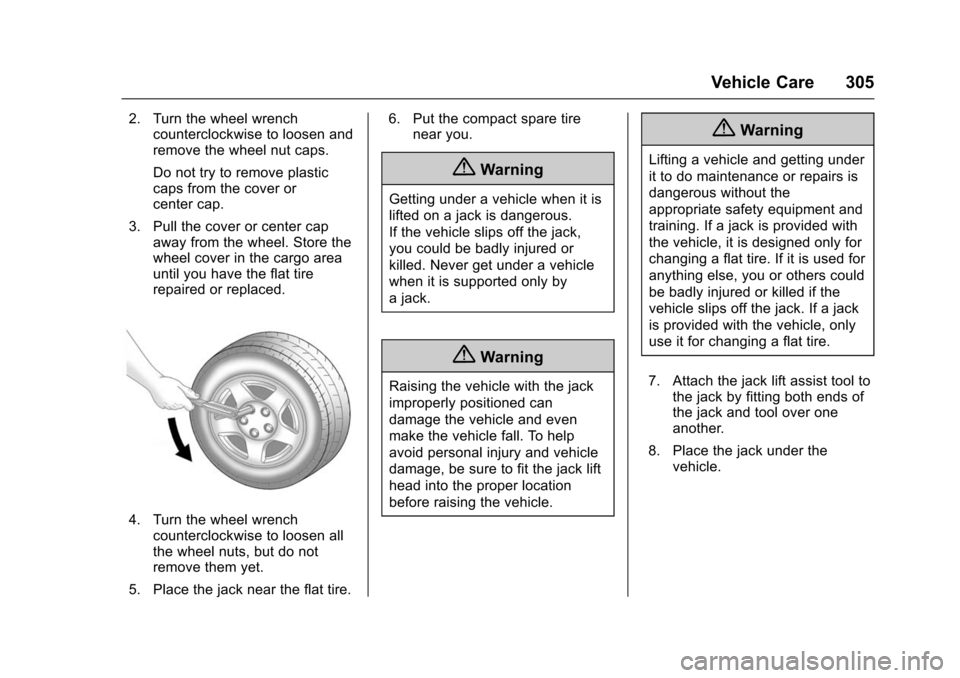
1. Screwdriver (If Equipped)
2. Wrench
3. Tow Hook (If Equipped)
4. Fastener (If Equipped)
5. Jack
6. Trim Removal (If Equipped)
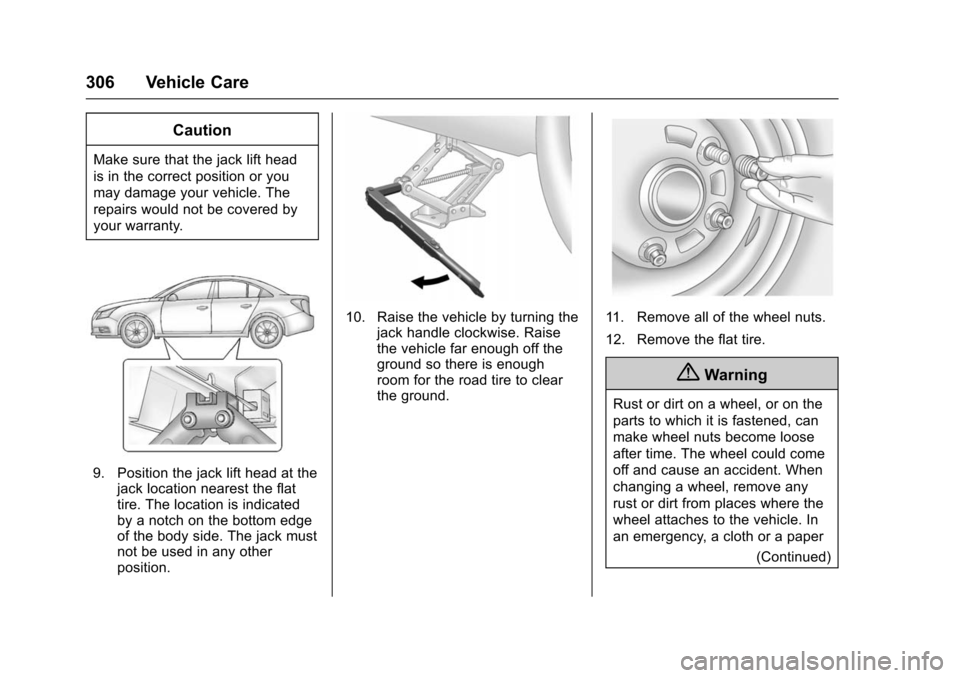
To access the spare tire and tools:1. Open the trunk.
2. Remove the spare tire cover.
3. Turn the retainer nut counterclockwise and remove
the spare tire. Place the spare
tire next to the tire being
changed.
4. The jack and tools are stored below the spare tire. Remove
them from their container and
place them near the tire being
changed.
Removing the Flat Tire and
Installing the Spare Tire
1. Do a safety check beforeproceeding. See If a Tire Goes
Flat 0302.
Page 306 of 377

Chevrolet Impala Owner Manual (GMNA-Localizing-U.S/Canada-9086448) -
2016 - CRC - 5/20/15
Vehicle Care 305
2. Turn the wheel wrenchcounterclockwise to loosen and
remove the wheel nut caps.
Do not try to remove plastic
caps from the cover or
center cap.
3. Pull the cover or center cap away from the wheel. Store the
wheel cover in the cargo area
until you have the flat tire
repaired or replaced.
4. Turn the wheel wrenchcounterclockwise to loosen all
the wheel nuts, but do not
remove them yet.
5. Place the jack near the flat tire. 6. Put the compact spare tire
near you.
{Warning
Getting under a vehicle when it is
lifted on a jack is dangerous.
If the vehicle slips off the jack,
you could be badly injured or
killed. Never get under a vehicle
when it is supported only by
a jack.
{Warning
Raising the vehicle with the jack
improperly positioned can
damage the vehicle and even
make the vehicle fall. To help
avoid personal injury and vehicle
damage, be sure to fit the jack lift
head into the proper location
before raising the vehicle.
{Warning
Lifting a vehicle and getting under
it to do maintenance or repairs is
dangerous without the
appropriate safety equipment and
training. If a jack is provided with
the vehicle, it is designed only for
changing a flat tire. If it is used for
anything else, you or others could
be badly injured or killed if the
vehicle slips off the jack. If a jack
is provided with the vehicle, only
use it for changing a flat tire.
7. Attach the jack lift assist tool to the jack by fitting both ends of
the jack and tool over one
another.
8. Place the jack under the vehicle.
Page 307 of 377

Chevrolet Impala Owner Manual (GMNA-Localizing-U.S/Canada-9086448) -
2016 - CRC - 5/20/15
306 Vehicle Care
Caution
Make sure that the jack lift head
is in the correct position or you
may damage your vehicle. The
repairs would not be covered by
your warranty.
9. Position the jack lift head at thejack location nearest the flat
tire. The location is indicated
by a notch on the bottom edge
of the body side. The jack must
not be used in any other
position.
10. Raise the vehicle by turning the jack handle clockwise. Raise
the vehicle far enough off the
ground so there is enough
room for the road tire to clear
the ground.11. Remove all of the wheel nuts.
12. Remove the flat tire.
{Warning
Rust or dirt on a wheel, or on the
parts to which it is fastened, can
make wheel nuts become loose
after time. The wheel could come
off and cause an accident. When
changing a wheel, remove any
rust or dirt from places where the
wheel attaches to the vehicle. In
an emergency, a cloth or a paper
(Continued)
Page 308 of 377

Chevrolet Impala Owner Manual (GMNA-Localizing-U.S/Canada-9086448) -
2016 - CRC - 5/20/15
Vehicle Care 307
Warning (Continued)
towel can be used; however, use
a scraper or wire brush later to
remove all rust or dirt.
13. Remove any rust or dirt fromthe wheel bolts, mounting
surfaces, and spare wheel.
14. Place the compact spare tire on the wheel-mounting surface.
{Warning
Never use oil or grease on bolts
or nuts because the nuts might
come loose. The vehicle's wheel
could fall off, causing a crash.
15. Reinstall the wheel nuts. Tighten each nut by hand until
the wheel is held against
the hub.
16. Lower the vehicle by turning the jack handle
counterclockwise.
{Warning
Wheel nuts that are improperly or
incorrectly tightened can cause
the wheels to become loose or
come off. The wheel nuts should
be tightened with a torque wrench
to the proper torque specification
after replacing. Follow the torque
specification supplied by the
aftermarket manufacturer when
using accessory locking wheel
(Continued)
Warning (Continued)
nuts. SeeCapacities and
Specifications 0338 for original
equipment wheel nut torque
specifications.
Caution
Improperly tightened wheel nuts
can lead to brake pulsation and
rotor damage. To avoid expensive
brake repairs, evenly tighten the
wheel nuts in the proper
sequence and to the proper
torque specification. See
Capacities and Specifications
0 338 for the wheel nut torque
specification.
Page 309 of 377

Chevrolet Impala Owner Manual (GMNA-Localizing-U.S/Canada-9086448) -
2016 - CRC - 5/20/15
308 Vehicle Care
17. Tighten the wheel nuts firmly ina crisscross sequence, as
shown.
18. Lower the jack all the way and remove the jack from under the
vehicle.
19. Tighten the wheel nuts firmly with the wheel wrench.
When reinstalling the wheel cover or
center cap on the full-size tire,
tighten all five plastic caps hand
snug, then tighten them with the
wheel wrench an additional
one-quarter turn.
Caution
Wheel covers will not fit on the
vehicle's compact spare. If you try
to put a wheel cover on the
compact spare, the cover or the
spare could be damaged.
Storing a Flat or Spare Tire
and Tools
{Warning
Storing a jack, a tire, or other
equipment in the passenger
compartment of the vehicle could
cause injury. In a sudden stop or
collision, loose equipment could
strike someone. Store all these in
the proper place.
1. Turn the wrench counterclockwise to remove the
fastener.
2. Replace the fastener with the one provided in the foam.
3. Turn the wrench clockwise to tighten the fastener.
4. Replace the foam, jack and tools, and the tire.
5. Turn the retainer nut clockwise to secure the tire.
6. Place the floor cover on the wheel.
To store the compact spare tire, use
the shorter mounting bolt.
Page 368 of 377

Chevrolet Impala Owner Manual (GMNA-Localizing-U.S/Canada-9086448) -
2016 - CRC - 5/20/15
Index 367
ChargingWireless . . . . . . . . . . . . . . . . . . . . . . 109
Charging System Light . . . . . . . . . 119
Check Ignition Transmission Lock . . . 270
Malfunction IndicatorEngine Light . . . . . . . . . . . . . . . . 120
Child Restraints Infants and Young Children . . . . . 83
Lower Anchors and Tethersfor Children . . . . . . . . . . . . . . . . . . . 88
Older Children . . . . . . . . . . . . . . . . . . 81
Securing . . . . . . . . . . . . . . . . . . . . 94, 96
Systems . . . . . . . . . . . . . . . . . . . . . . . . 85
Cleaning Exterior Care . . . . . . . . . . . . . . . . . 315
Interior Care . . . . . . . . . . . . . . . . . . 319
Climate Control Systems . . . . . . . 181 Air Conditioning . . . . . . . . . . . . . . 181
Dual Automatic . . . . . . . . . . . . . . . 184
Heating . . . . . . . . . . . . . . . . . . . . . . . 181
Clock . . . . . . . . . . . . . . . . . . . . . . 107, 108
Cluster, Instrument . . . . . . . . . . . . . 112
Collision Damage Repair . . . . . . . 348
Compact Spare Tire . . . . . . . . . . . . 309
Compartments Storage . . . . . . . . . . . . . . . . . . . . . . . . . 99
Compass . . . . . . . . . . . . . . . . . . . . . . . 107 Compass (cont'd)
Messages . . . . . . . . . . . . . . . . . . . . 130
Connections OnStar
®. . . . . . . . . . . . . . . . . . . . . . 357
Control Traction and ElectronicStability . . . . . . . . . . . . . . . . . . . . . 216
Control of a Vehicle . . . . . . . . . . . . . 192
Convenience Net . . . . . . . . . . . . . . . 102
Convex Mirrors . . . . . . . . . . . . . . . . . . 45
Coolant Engine . . . . . . . . . . . . . . . . . . . . . . . . 261
Engine Temperature Gauge . . .117
Cooling System . . . . . . . . . . . . . . . . . 260
Engine Messages . . . . . . . . . . . . 132
Courtesy Lamps . . . . . . . . . . . . . . . . 151
Courtesy Transportation Program . . . . . . . . . . . . . . . . . . . . . . . 347
Cruise Control . . . . . . . . . . . . . . . . . . 218 Light . . . . . . . . . . . . . . . . . . . . . . . . . . 126
Messages . . . . . . . . . . . . . . . . . . . . 131
Cruise Control, Adaptive . . . . . . . . 220
Cupholders . . . . . . . . . . . . . . . . . . . . . 100
Customer Assistance . . . . . . . . . . . 344 Offices . . . . . . . . . . . . . . . . . . . . . . . . 343
Text Telephone (TTY)Users . . . . . . . . . . . . . . . . . . . . . . . 344 Customer Information
Service Publications
Ordering Information . . . . . . . . 350
Customer Satisfaction Procedure . . . . . . . . . . . . . . . . . . . . . 341
D
Damage Repair, Collision . . . . . . . 348
Danger, Warning, and Caution . . . . 2
Data Recorders, Event . . . . . . . . . 353
Daytime RunningLamps (DRL) . . . . . . . . . . . . . . . . . . 149
Defensive Driving . . . . . . . . . . . . . . . 192
Delayed Locking . . . . . . . . . . . . . . . . . 39
Diagnostics OnStar
®. . . . . . . . . . . . . . . . . . . . . . 359
Distracted Driving . . . . . . . . . . . . . . . 191
Dome Lamps . . . . . . . . . . . . . . . . . . . 152
Door
Ajar Light . . . . . . . . . . . . . . . . . . . . . 127
Ajar Messages . . . . . . . . . . . . . . . 131
Delayed Locking . . . . . . . . . . . . . . . . 39
Locks . . . . . . . . . . . . . . . . . . . . . . . . . . . 37
Power Locks . . . . . . . . . . . . . . . . . . . . 39
Drive Belt Routing, Engine . . . . . . 340
Driver Assistance Systems . . . . . 227
Driver Information Center (DIC) . . . . . . . . . . . . . . . . . . 127