2016 CHEVROLET IMPALA hood open
[x] Cancel search: hood openPage 251 of 377
Chevrolet Impala Owner Manual (GMNA-Localizing-U.S/Canada-9086448) -
2016 - CRC - 5/20/15
250 Vehicle Care
airbags, braking, stability, ride and
handling, emissions systems,
aerodynamics, durability, and
electronic systems like antilock
brakes, traction control, and stability
control. These accessories or
modifications could even cause
malfunction or damage not covered
by the vehicle warranty.
Damage to vehicle components
resulting from modifications or the
installation or use of non-GM
certified parts, including control
module or software modifications, is
not covered under the terms of the
vehicle warranty and may affect
remaining warranty coverage for
affected parts.
GM Accessories are designed to
complement and function with other
systems on the vehicle. See your
dealer to accessorize the vehicle
using genuine GM Accessories
installed by a dealer technician.
Also, seeAdding Equipment to the
Airbag-Equipped Vehicle 079.Vehicle Checks
Doing Your Own
Service Work
{Warning
It can be dangerous to work on
your vehicle if you do not have
the proper knowledge, service
manual, tools, or parts. Always
follow owner manual procedures
and consult the service manual
for your vehicle before doing any
service work.
If doing some of your own service
work, use the proper service
manual. It tells you much more
about how to service the vehicle
than this manual can. To order the
proper service manual, see Service
Publications Ordering Information
0 350.
This vehicle has an airbag system.
Before attempting to do your own
service work, see Airbag System
Check 080. Keep a record with all parts receipts
and list the mileage and the date of
any service work performed. See
Maintenance Records
0336.
Caution
Even small amounts of
contamination can cause damage
to vehicle systems. Do not allow
contaminants to contact the fluids,
reservoir caps, or dipsticks.
Hood
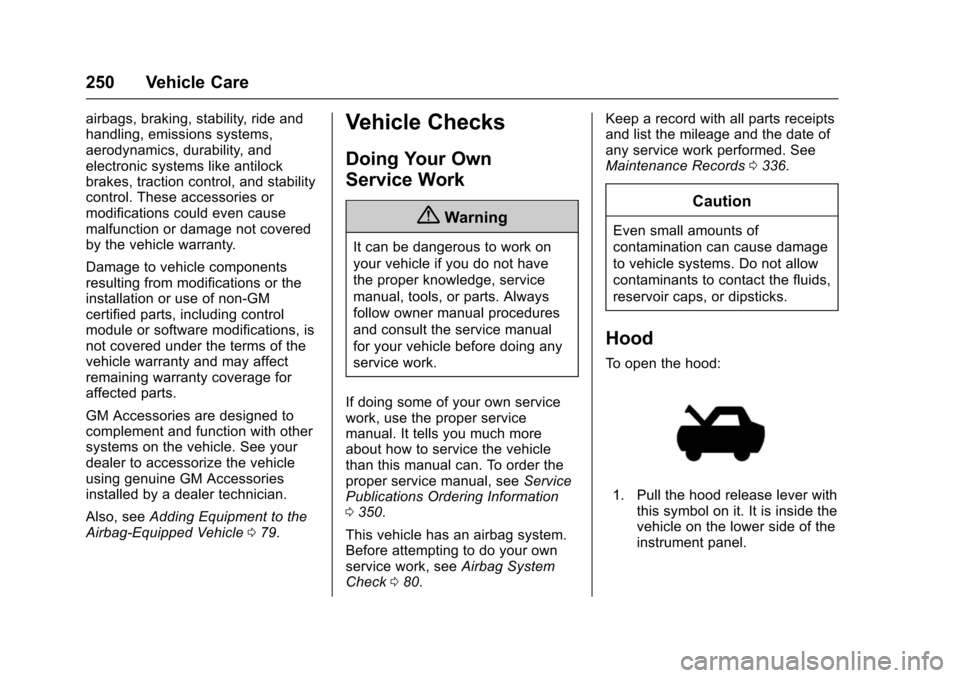
To open the hood:
1. Pull the hood release lever with
this symbol on it. It is inside the
vehicle on the lower side of the
instrument panel.
Page 260 of 377
Chevrolet Impala Owner Manual (GMNA-Localizing-U.S/Canada-9086448) -
2016 - CRC - 5/20/15
Vehicle Care 259
Engine Air Cleaner/Filter
The engine air cleaner/filter is in the
engine compartment on the
passenger side of the vehicle. See
Engine Compartment Overview
0252.
When to Inspect the Engine Air
Cleaner/Filter
For intervals on changing and
inspecting the engine air cleaner/
filter, see Maintenance Schedule
0 325.
How to Inspect the Engine Air
Cleaner/Filter
Do not start the engine or have the
engine running with the engine air
cleaner/filter housing open. Before
removing the engine air cleaner/
filter, make sure that the engine air
cleaner/filter housing and nearby
components are free of dirt and
debris. Remove the engine air
cleaner/filter. Lightly tap and shake
the engine air cleaner/filter (away
from the vehicle), to release loose
dust and dirt. Inspect the engine air
cleaner/filter for damage, and replace if damaged. Do not clean
the engine air cleaner/filter or
components with water or
compressed air.
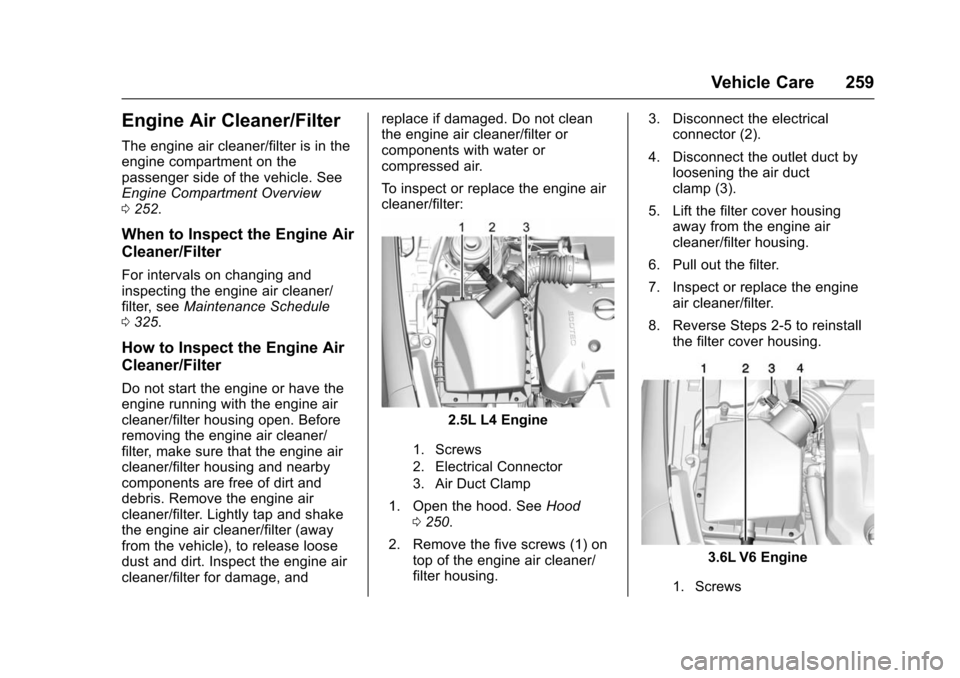
To inspect or replace the engine air
cleaner/filter:
2.5L L4 Engine
1. Screws
2. Electrical Connector
3. Air Duct Clamp
1. Open the hood. See
Hood
0 250.
2. Remove the five screws (1) on top of the engine air cleaner/
filter housing. 3. Disconnect the electrical
connector (2).
4. Disconnect the outlet duct by loosening the air duct
clamp (3).
5. Lift the filter cover housing away from the engine air
cleaner/filter housing.
6. Pull out the filter.
7. Inspect or replace the engine air cleaner/filter.
8. Reverse Steps 2-5 to reinstall the filter cover housing.
3.6L V6 Engine
1. Screws
Page 261 of 377
Chevrolet Impala Owner Manual (GMNA-Localizing-U.S/Canada-9086448) -
2016 - CRC - 5/20/15
260 Vehicle Care
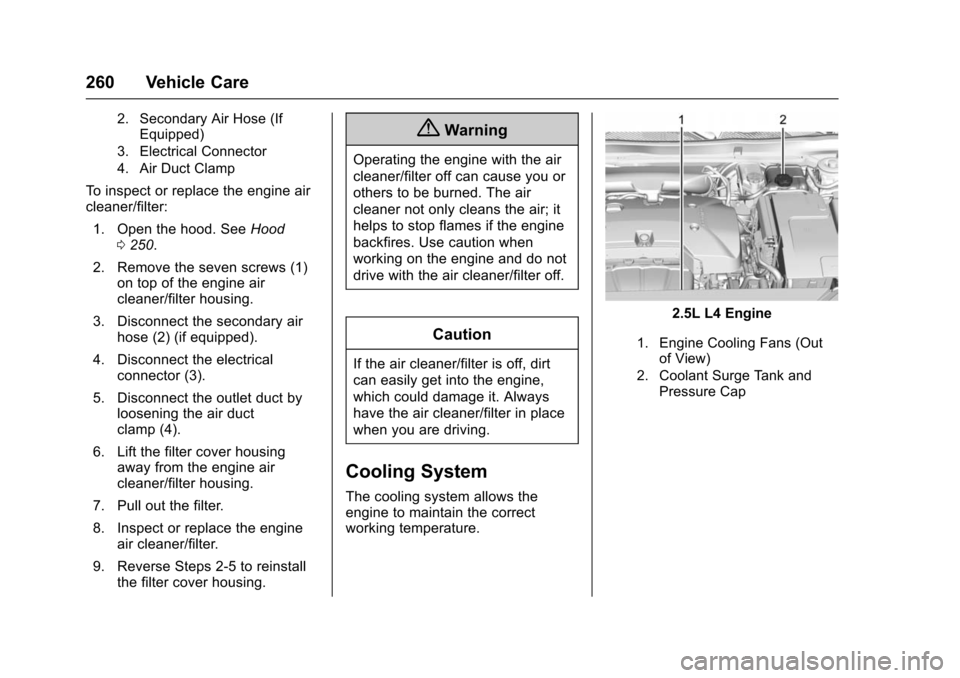
2. Secondary Air Hose (IfEquipped)
3. Electrical Connector
4. Air Duct Clamp
To inspect or replace the engine air
cleaner/filter:
1. Open the hood. See Hood
0 250.
2. Remove the seven screws (1) on top of the engine air
cleaner/filter housing.
3. Disconnect the secondary air hose (2) (if equipped).
4. Disconnect the electrical connector (3).
5. Disconnect the outlet duct by loosening the air duct
clamp (4).
6. Lift the filter cover housing away from the engine air
cleaner/filter housing.
7. Pull out the filter.
8. Inspect or replace the engine air cleaner/filter.
9. Reverse Steps 2-5 to reinstall the filter cover housing.
{Warning
Operating the engine with the air
cleaner/filter off can cause you or
others to be burned. The air
cleaner not only cleans the air; it
helps to stop flames if the engine
backfires. Use caution when
working on the engine and do not
drive with the air cleaner/filter off.
Caution
If the air cleaner/filter is off, dirt
can easily get into the engine,
which could damage it. Always
have the air cleaner/filter in place
when you are driving.
Cooling System
The cooling system allows the
engine to maintain the correct
working temperature.
2.5L L4 Engine
1. Engine Cooling Fans (Out
of View)
2. Coolant Surge Tank and Pressure Cap
Page 273 of 377
Chevrolet Impala Owner Manual (GMNA-Localizing-U.S/Canada-9086448) -
2016 - CRC - 5/20/15
272 Vehicle Care
High Intensity Discharge
(HID) Lighting
{Warning
The high intensity discharge
lighting system operates at a very
high voltage. If you try to service
any of the system components,
you could be seriously injured.
Have your dealer or a qualified
technician service them.
The vehicle may have HID
headlamps. After an HID headlamp
bulb has been replaced, you may
notice that the beam is a slightly
different shade than it was originally.
This is normal.
LED Lighting
This vehicle has several LED lamps.
For replacement of any LED lighting
assembly, contact your dealer.
Headlamps, Front Turn
Signal, Sidemarker, and
Parking Lamps
Base Headlamp Assembly
The base model vehicle has
halogen high/low-beam headlamps,
a parking/turn signal lamp, and a
sidemarker lamp on the headlamp
assembly.
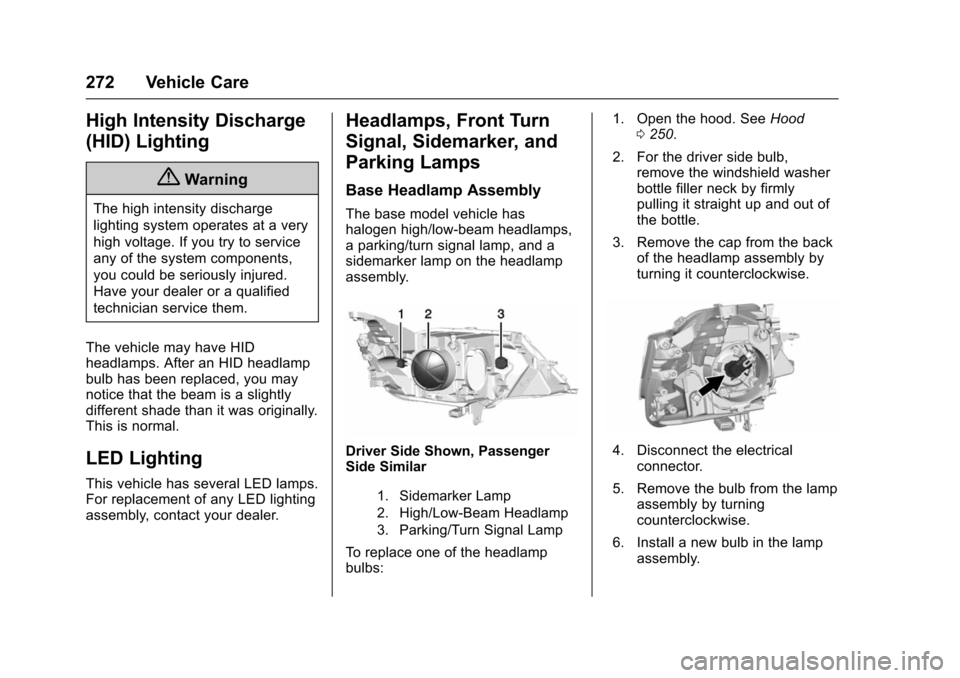
Driver Side Shown, Passenger
Side Similar
1. Sidemarker Lamp
2. High/Low-Beam Headlamp
3. Parking/Turn Signal Lamp
To replace one of the headlamp
bulbs: 1. Open the hood. See
Hood
0 250.
2. For the driver side bulb, remove the windshield washer
bottle filler neck by firmly
pulling it straight up and out of
the bottle.
3. Remove the cap from the back of the headlamp assembly by
turning it counterclockwise.
4. Disconnect the electricalconnector.
5. Remove the bulb from the lamp assembly by turning
counterclockwise.
6. Install a new bulb in the lamp assembly.
Page 274 of 377
Chevrolet Impala Owner Manual (GMNA-Localizing-U.S/Canada-9086448) -
2016 - CRC - 5/20/15
Vehicle Care 273
7. Connect the electricalconnector.
8. Replace the cap on the back of the headlamp assembly by
turning it clockwise.
9. For the driver side, reinstall the windshield washer bottle filler
neck by firmly pushing it
straight into the bottle. Ensure
that the filler neck clip engages
into the underhood electrical
center retainer.
Uplevel Headlamp Assembly
The uplevel model vehicle has a
high intensity discharge (HID) high/
low-beam headlamp, a parking/turn
signal lamp, and a sidemarker lamp
on the headlamp assembly.
For replacement of the headlamp on
an HID assembly, contact your
dealer. See High Intensity
Discharge (HID) Lighting 0272.
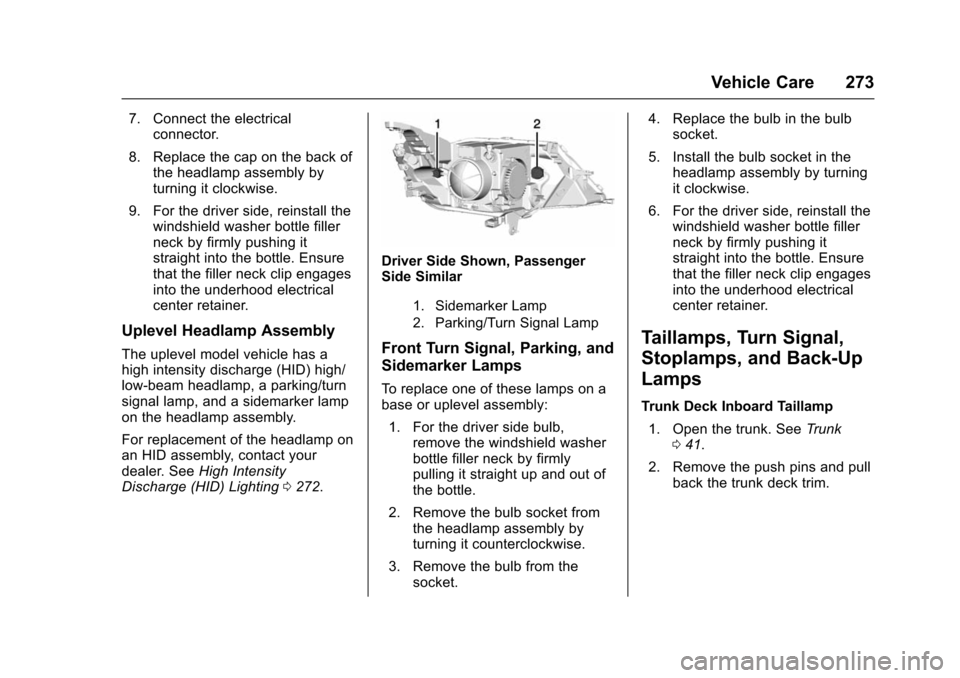
Driver Side Shown, Passenger
Side Similar
1. Sidemarker Lamp
2. Parking/Turn Signal Lamp
Front Turn Signal, Parking, and
Sidemarker Lamps
To replace one of these lamps on a
base or uplevel assembly:
1. For the driver side bulb, remove the windshield washer
bottle filler neck by firmly
pulling it straight up and out of
the bottle.
2. Remove the bulb socket from the headlamp assembly by
turning it counterclockwise.
3. Remove the bulb from the socket. 4. Replace the bulb in the bulb
socket.
5. Install the bulb socket in the headlamp assembly by turning
it clockwise.
6. For the driver side, reinstall the windshield washer bottle filler
neck by firmly pushing it
straight into the bottle. Ensure
that the filler neck clip engages
into the underhood electrical
center retainer.
Taillamps, Turn Signal,
Stoplamps, and Back-Up
Lamps
Trunk Deck Inboard Taillamp
1. Open the trunk. See Trunk
0 41.
2. Remove the push pins and pull back the trunk deck trim.
Page 370 of 377

Chevrolet Impala Owner Manual (GMNA-Localizing-U.S/Canada-9086448) -
2016 - CRC - 5/20/15
Index 369
Frequency StatementRadio . . . . . . . . . . . . . . . . . . . . . . . . . 351
Front Automatic Braking (FAB) System . . . . . . . . . . . . . . . . . 232
Front Seats Adjustment . . . . . . . . . . . . . . . . . . . . . 55
Heated and Ventilated . . . . . . . . . . 60
Fuel . . . . . . . . . . . . . . . . . . . . . . . . . . . . 237 Additives . . . . . . . . . . . . . . . . . . . . . 238
Economy Driving . . . . . . . . . . . . . . . 26
Filling a Portable FuelContainer . . . . . . . . . . . . . . . . . . . 241
Filling the Tank . . . . . . . . . . . . . . . 239
Foreign Countries . . . . . . . . . . . . 238
Gauge . . . . . . . . . . . . . . . . . . . . . . . . .116
Low Fuel Warning Light . . . . . . . 125
Requirements, California . . . . . 238
System Messages . . . . . . . . . . . . 133
Fuses . . . . . . . . . . . . . . . . . . . . . . . . . . 276 Engine Compartment FuseBlock . . . . . . . . . . . . . . . . . . . . . . . . 277
Instrument Panel Fuse Block . . . . . . . . . . . . . . . . . . . . . . . . 280
G
Garage Door Opener . . . . . . . . . . . 144Programming . . . . . . . . . . . . . . . . . 144 Gauges
Engine Coolant
Temperature . . . . . . . . . . . . . . . . .117
Fuel . . . . . . . . . . . . . . . . . . . . . . . . . . .116
Odometer . . . . . . . . . . . . . . . . . . . . . .115
Speedometer . . . . . . . . . . . . . . . . . .115
Tachometer . . . . . . . . . . . . . . . . . . . .115
Trip Odometer . . . . . . . . . . . . . . . . .115
Warning Lights and Indicators . . . . . . . . . . . . . . . . . . . . 111
General Information
Service and Maintenance . . . . . 324
Towing . . . . . . . . . . . . . . . . . . . . . . . . 242
Vehicle Care . . . . . . . . . . . . . . . . . . 249
Glove Box . . . . . . . . . . . . . . . . . . . . . . 100
GM Mobility Reimbursement Program . . . . . . . . . . . . . . . . . . . . . . . 345
H
Halogen Bulbs . . . . . . . . . . . . . . . . . . 271
Hazard Warning Flashers . . . . . . . 150
Head Restraints . . . . . . . . . . . . . . . . . 53
HeadlampsAiming . . . . . . . . . . . . . . . . . . . . . . . . 271
Automatic . . . . . . . . . . . . . . . . . . . . . 150
Bulb Replacement . . . . . . . . . . . . 271
Daytime RunningLamps (DRL) . . . . . . . . . . . . . . . . 149
Flash-to-Pass . . . . . . . . . . . . . . . . . 149 Headlamps (cont'd)
Headlamps, Front Turn
Signal, Sidemarker, and
Parking Lamps . . . . . . . . . . . . . . 272
High Intensity Discharge (HID) Lighting . . . . . . . . . . . . . . . 272
High-Beam On Light . . . . . . . . . . 126
High/Low Beam Changer . . . . . 149
Lamps On Reminder . . . . . . . . . 126
Heated Steering Wheel . . . . . . . . . . . . . . . 105
Heated and Ventilated Front Seats . . . . . . . . . . . . . . . . . . . . . . . . . . 60
Heated Mirrors . . . . . . . . . . . . . . . . . . . 46
Heater
Engine . . . . . . . . . . . . . . . . . . . . . . . . 207
Heating and Air Conditioning . . . 181
High Voltage Devices and Wiring . . . . . . . . . . . . . . . . . . . . . . . . . 276
High-Beam On Light . . . . . . . . . . . . 126
High-Speed Operation . . . . . . . . . . 291
Hill and Mountain Roads . . . . . . . . 195
Hill Start Assist (HSA) . . . . . . . . . . 216
Home Page . . . . . . . . . . . . . . . . . . . . . 158
Hood . . . . . . . . . . . . . . . . . . . . . . . . . . . 250
Horn . . . . . . . . . . . . . . . . . . . . . . . . . . . . 105
How to Wear Safety Belts Properly . . . . . . . . . . . . . . . . . . . . . . . . 64