2016 CHEVROLET EQUINOX change time
[x] Cancel search: change timePage 15 of 324
Chevrolet Equinox Owner Manual (GMNA-Localizing-U.S./Canada/Mexico-
9234773) - 2016 - crc - 9/3/15
14 In Brief
3. Return the selector switch tothe middle position.
See Power Mirrors 038
ii.
Interior
Adjustment
Adjust the rearview mirror to clearly
view the area behind the vehicle.
Manual Rearview Mirror
For vehicles with a manual rearview
mirror, push the tab forward for
daytime use and pull it rearward for
nighttime use to avoid the glare of
the headlamps from behind. See
Manual Rearview Mirror 039
ii.
Automatic Dimming Rearview
Mirror
Vehicles with an automatic dimming
inside rearview mirror automatically
reduce the glare of the headlamps
from behind. The dimming feature
comes on when the vehicle is
started. See Automatic Dimming
Rearview Mirror 039
ii.
Steering Wheel
Adjustment
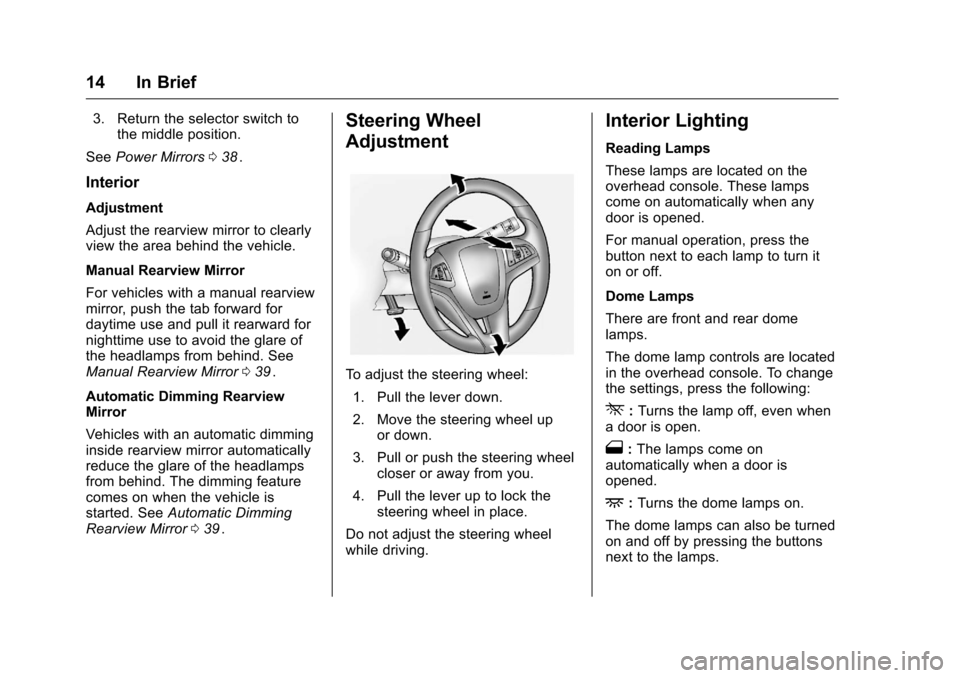
To adjust the steering wheel:
1. Pull the lever down.
2. Move the steering wheel up or down.
3. Pull or push the steering wheel closer or away from you.
4. Pull the lever up to lock the steering wheel in place.
Do not adjust the steering wheel
while driving.
Interior Lighting
Reading Lamps
These lamps are located on the
overhead console. These lamps
come on automatically when any
door is opened.
For manual operation, press the
button next to each lamp to turn it
on or off.
Dome Lamps
There are front and rear dome
lamps.
The dome lamp controls are located
in the overhead console. To change
the settings, press the following:
*: Turns the lamp off, even when
a door is open.
1: The lamps come on
automatically when a door is
opened.
+: Turns the dome lamps on.
The dome lamps can also be turned
on and off by pressing the buttons
next to the lamps.
Page 23 of 324
Chevrolet Equinox Owner Manual (GMNA-Localizing-U.S./Canada/Mexico-
9234773) - 2016 - crc - 9/3/15
22 In Brief
Loading Information label. See
Vehicle Load Limits0156ii. The
warning light will remain on until the
tire pressure is corrected.
The low tire pressure warning light
may come on in cool weather when
the vehicle is first started, and then
turn off as the vehicle is driven. This
may be an early indicator that the
tire pressures are getting low and
the tires need to be inflated to the
proper pressure.
The TPMS does not replace normal
monthly tire maintenance. Maintain
the correct tire pressures.
See Tire Pressure Monitor System
0 238
ii.
Engine Oil Life System
The engine oil life system calculates
engine oil life based on vehicle use
and displays the CHANGE ENGINE
OIL SOON message when it is time
to change the engine oil and filter.
The oil life system should be reset
to 100% only following an oil
change. Resetting the Oil Life System
1. Turn the ignition to ON/RUN, with the engine off.
2. Press the DIC MENU button to display the Vehicle
Information menu.
3. Press either the up or down arrows to view REMAINING
OIL LIFE.
4. Press the SET/CLR button until 100% is displayed.
5. Turn the key to LOCK/OFF.
Or: 1. Turn the ignition to ON/RUN with the engine off.
2. Fully press and release the accelerator pedal three times
within five seconds.
See Engine Oil Life System 0207ii.
E85 or FlexFuel
Vehicles with a yellow fuel cap can
use either unleaded gasoline or
ethanol fuel containing up to 85% ethanol (E85). See
E85 or FlexFuel
0 187
ii. For all other vehicles, use
only the unleaded gasoline
described under Fuel0185
ii.
Driving for Better Fuel
Economy
Driving habits can affect fuel
mileage. Here are some driving tips
to get the best fuel economy
possible.
.
Avoid fast starts and accelerate
smoothly.
. Brake gradually and avoid
abrupt stops.
. Avoid idling the engine for long
periods of time.
. When road and weather
conditions are appropriate, use
cruise control.
. Always follow posted speed
limits or drive more slowly when
conditions require.
. Keep vehicle tires properly
inflated.
. Combine several trips into a
single trip.
Page 51 of 324
Chevrolet Equinox Owner Manual (GMNA-Localizing-U.S./Canada/Mexico-
9234773) - 2016 - crc - 9/3/15
50 Seats and Restraints
two seconds. Try recalling the exit
position again. If the exit position is
still not recalling, see your dealer for
service.
Heated Front Seats
{Warning
If you cannot feel temperature
change or pain to the skin, the
seat heater may cause burns. To
reduce the risk of burns, people
with such a condition should use
care when using the seat heater,
especially for long periods of
time. Do not place anything on
the seat that insulates against
heat, such as a blanket, cushion,
cover, or similar item. This may
cause the seat heater to
overheat. An overheated seat
heater may cause a burn or may
damage the seat.
Uplevel Climate Control SystemShown, Base Similar
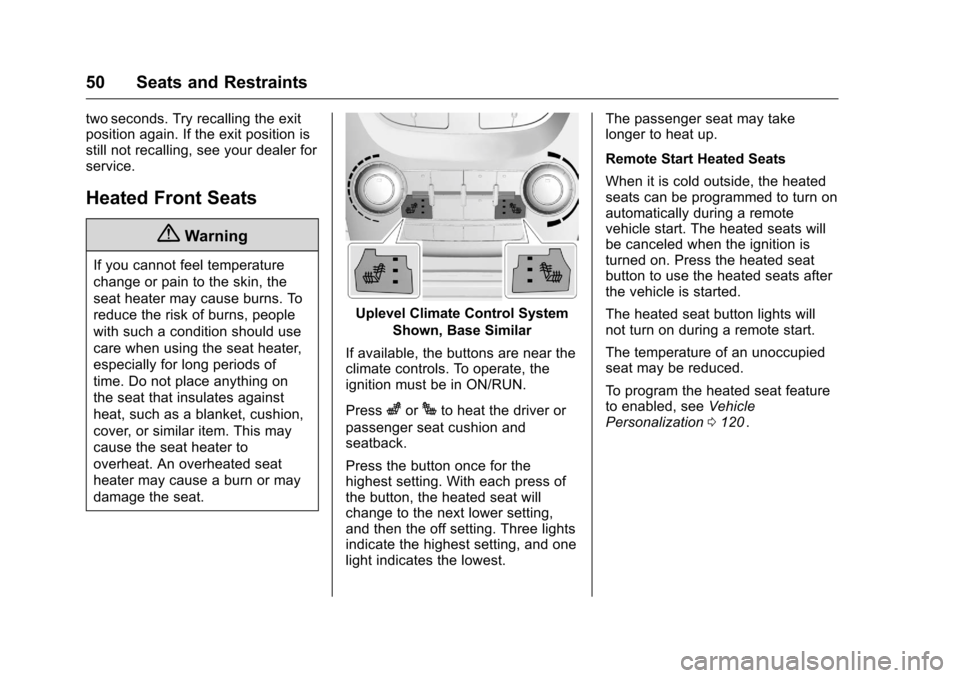
If available, the buttons are near the
climate controls. To operate, the
ignition must be in ON/RUN.
Press
zorJto heat the driver or
passenger seat cushion and
seatback.
Press the button once for the
highest setting. With each press of
the button, the heated seat will
change to the next lower setting,
and then the off setting. Three lights
indicate the highest setting, and one
light indicates the lowest. The passenger seat may take
longer to heat up.
Remote Start Heated Seats
When it is cold outside, the heated
seats can be programmed to turn on
automatically during a remote
vehicle start. The heated seats will
be canceled when the ignition is
turned on. Press the heated seat
button to use the heated seats after
the vehicle is started.
The heated seat button lights will
not turn on during a remote start.
The temperature of an unoccupied
seat may be reduced.
To program the heated seat feature
to enabled, see
Vehicle
Personalization 0120ii.
Page 74 of 324
Chevrolet Equinox Owner Manual (GMNA-Localizing-U.S./Canada/Mexico-
9234773) - 2016 - crc - 9/3/15
Seats and Restraints 73
Infants and Young
Children
Everyone in a vehicle needs
protection! This includes infants and
all other children. Neither the
distance traveled nor the age and
size of the traveler changes the
need, for everyone, to use safety
restraints. In fact, the law in every
state in the United States and in
every Canadian province says
children up to some age must be
restrained while in a vehicle.
{Warning
Children can be seriously injured
or strangled if a shoulder belt is
wrapped around their neck. The
shoulder belt can tighten but
cannot be loosened if it is locked.
The shoulder belt locks when it is
pulled all the way out of the
retractor. It unlocks when the
shoulder belt is allowed to go all
the way back into the retractor,
but it cannot do this if it is
wrapped around a child’s neck.
If the shoulder belt is locked and
tightened around a child’s neck,
the only way to loosen the belt is
to cut it.
Never leave children unattended
in a vehicle and never allow
children to play with the safety
belts.
Every time infants and young
children ride in vehicles, they should
have the protection provided by
appropriate child restraints. Neither the vehicle's safety belt system nor
its airbag system is designed
for them.
Children who are not restrained
properly can strike other people,
or can be thrown out of the vehicle.
{Warning
Never hold an infant or a child
while riding in a vehicle. Due to
crash forces, an infant or a child
will become so heavy it is not
possible to hold it during a crash.
For example, in a crash at only
40 km/h (25 mph), a 5.5 kg (12 lb)
infant will suddenly become a
110 kg (240 lb) force on a person's
arms. An infant should be
secured in an appropriate
restraint.
Page 112 of 324
Chevrolet Equinox Owner Manual (GMNA-Localizing-U.S./Canada/Mexico-
9234773) - 2016 - crc - 9/3/15
Instruments and Controls 111
.Digital Speedometer
. Trip 1
. Trip 2
. Fuel Range
. Average Fuel Economy
. Best Average Fuel Economy
. Average Vehicle Speed
. Timer
. Navigation
. Blank Display
Digital Speedometer
The speedometer shows how fast
the vehicle is moving in either
kilometers per hour (km/h) or miles
per hour (mph). The speedometer
cannot be reset.
Trip 1 and Trip 2
This display shows the current
distance traveled, in either
kilometers (km) or miles (mi), since
the last reset for the trip odometer.
The trip odometer can be reset to
zero by pressing SET/CLR while the
trip odometer display is showing. Fuel Range
This display shows the approximate
distance the vehicle can be driven
without refueling. The fuel range
estimate is based on an average of
the vehicle's fuel economy over
recent driving history and the
amount of fuel remaining in the fuel
tank. Fuel range cannot be reset.
Average Fuel Economy
This display shows the approximate
average liters per 100 kilometers (L/
100 km) or miles per gallon (mpg).
This number is calculated based on
the number of L/100 km (mpg)
recorded since the last time this
menu item was reset. This number
reflects only the approximate
average fuel economy that the
vehicle has right now, and will
change as driving conditions
change. The fuel economy can be
reset by pressing SET/CLR while
the Average Fuel Economy display
is showing. The display may not
reset to zero.
Best Average Fuel Economy
The right hand side displays the
best average fuel economy (AFE)
that is achieved for a selected
distance. The left hand side displays
a running average of fuel economy
for the most recently traveled
selected distance. The center of the
Best AFE menu includes a digital
readout and bar graph to show the
instantaneous fuel economy.
Quickly press the SET/CLR button
to display a page for selecting one
of the distance options. Move the
up/down arrow to choose the
selection, and SET/CLR to change
the setting.
When viewing best AFE, a several
second press and hold of SET/CLR
will reset the best value. The best
value will show
“- - -”until the
selected distance has been
traveled.
The display provides feedback on
how current driving behavior in the
bar graph affects the running
average in the left display and how
well recent driving compares to the
best that has been achieved.
Page 113 of 324
Chevrolet Equinox Owner Manual (GMNA-Localizing-U.S./Canada/Mexico-
9234773) - 2016 - crc - 9/3/15
112 Instruments and Controls
Average Vehicle Speed
This display shows the average
speed of the vehicle in kilometers
per hour (km/h) or miles per
hour (mph). This average is
calculated based on the various
vehicle speeds recorded since the
last reset of this value. The average
speed can be reset by pressing
SET/CLR while the Average Vehicle
Speed display is showing.
Timer
This display can be used as a timer.
To start the timer, press SET/CLR
while Timer is displayed. The
display will show the amount of time
that has passed since the timer was
last reset, not including time the
ignition is off. Time will continue to
be counted as long as the ignition is
on, even if another display is being
shown on the DIC. The timer will
record up to 99 hours, 59 minutes
and 59 seconds (99:59:59) after
which the display will return to zero.
To stop the timer, press SET/CLR
briefly while Timer is displayed. To
reset the timer to zero, press and
hold SET/CLR.Navigation
This display is used for the OnStar
or Navigation System Turn-by-Turn
guidance, if equipped. See
OnStar
Overview 0303
iior the infotainment
manual, if equipped.
Blank Display
This display shows no information.
Vehicle Information Menu
Items
Press the MENU button until Vehicle
Information Menu is displayed. Then
press
Rto scroll through the
following menu items:
. Unit
. Tire Pressure
. Remaining Oil Life
. Blank Display
Unit
Press SET/CLR to enter the unit
menu. Then press
QorRto switch
between METRIC or US when the
Unit display is active. Press SET/
CLR to confirm the setting. This will change the displays on the cluster
and DIC to either metric or English
(US) measurements.
Tire Pressure
The display will show a vehicle with
the approximate pressures of all
four tires. Tire pressure is displayed
in either kilopascal (kPa) or in
pounds per square inch (psi).
See
Tire Pressure Monitor System
0 238
iiand Tire Pressure Monitor
Operation 0239ii.
Remaining Oil Life
This display shows an estimate of
the oil's remaining useful life.
If REMAINING OIL LIFE 99% is
displayed, that means 99% of the
current oil life remains.
When the remaining oil life is low,
the CHANGE ENGINE OIL SOON
message will appear on the display.
See Engine Oil Messages 0115
ii.
The oil should be changed as soon
as possible. See Engine Oil0204
ii.
In addition to the engine oil life
system monitoring the oil life,
additional maintenance is
Page 114 of 324
Chevrolet Equinox Owner Manual (GMNA-Localizing-U.S./Canada/Mexico-
9234773) - 2016 - crc - 9/3/15
Instruments and Controls 113
recommended in the Maintenance
Schedule in this manual. See
Maintenance Schedule0273
ii.
Remember, the Oil Life display must
be reset after each oil change. It will
not reset itself. Also, be careful not
to reset the Oil Life display
accidentally at any time other than
when the oil has just been changed.
It cannot be reset accurately until
the next oil change. To reset the
engine oil life system, press SET/
CLR while the Oil Life display is
active. The display will ask for
confirmation of a reset. Press
Qor
Rto select Yes or No. Then press
SET/CLR to confirm the selection.
See Engine Oil Life System 0207
ii.
Blank Display
This display shows no information.
Compass
The vehicle may have a compass in
the Driver Information Center (DIC).
See Compass 095
ii.
Vehicle Messages
Messages are displayed on the DIC
to notify the driver that the status of
the vehicle has changed and that
some action may be needed by the
driver to correct the condition.
Multiple messages may appear one
after another.
Some messages may not require
immediate action, but you can press
SET/CLR to acknowledge that you
received the messages and to clear
them from the display. Some
messages cannot be cleared from
the DIC display because they are
more urgent. These messages
require action before they can be
cleared. You should take any
messages that appear on the
display seriously and remember that
clearing the messages will only
make the messages disappear, not
correct the problem. You will find the
possible messages that can be
displayed and some information
about them grouped by subject in
the following information.
Battery Voltage and
Charging Messages
BATTERY SAVER ACTIVE
This message displays when the
vehicle has detected that the battery
voltage is dropping beyond a
reasonable point. The battery saver
system starts reducing features of
the vehicle that may be noticed. At
the point that features are disabled,
this message displays. Turn off
unnecessary accessories to allow
the battery to recharge.
LOW BATTERY
This message is displayed when the
battery voltage is low. See Battery -
North America 0218
ii.
SERVICE BATTERY
CHARGING SYSTEM
This message is displayed when
there is a fault in the battery
charging system. Take the vehicle to
your dealer for service.
Page 128 of 324
Chevrolet Equinox Owner Manual (GMNA-Localizing-U.S./Canada/Mexico-
9234773) - 2016 - crc - 9/3/15
Instruments and Controls 127
reverse feature. This includes any
garage door opener model
manufactured before April 1, 1982.
Read these instructions completely
before programming the Universal
Remote system. It may help to have
another person assist with the
programming process.
Keep the original hand-held
transmitter for use in other vehicles
as well as for future programming.
Erase the programming when
vehicle ownership is terminated.
See“Erasing Universal Remote
System Buttons” later in this
section.
To program a garage door opener,
park outside directly in line with and
facing the garage door opener
receiver. Clear all people and
objects near the garage door.
Make sure the hand-held transmitter
has a new battery for quick and
accurate transmission of the
radio-frequency signal.Programming the Universal
Remote System
For questions or help programming
the Universal Remote system, call
1-800-355-3515 or see
www.homelink.com.
Programming involves
time-sensitive actions, and may time
out causing the procedure to be
repeated.
To program up to three devices:
1. Hold the end of the hand-held transmitter about 3 to 8 cm (1
to 3 in) away from the
Universal Remote system
buttons with the indicator light
in view. The hand-held
transmitter was supplied by the
manufacturer of the garage
door opener receiver.
2. At the same time, press and hold both the hand-held
transmitter button and one of
the three Universal Remote
system buttons to be used to
operate the garage door. Do
not release either button until the indicator light changes from
a slow to a rapid flash. Then
release both buttons.
Some garage door openers
may require substitution of
Step 2 with the procedure
under
“Radio Signals for
Canada and Some Gate
Operators” later in this section.
3. Press and hold the newly programmed Universal Remote
system button for five seconds
while watching the indicator
light and garage door
activation.
.If the indicator light stays on
continuously or the garage
door moves when the
button is pressed, then
programming is complete.
There is no need to
complete Steps 4–6.
. If the indicator light does
not come on or the garage
door does not move, a
second button press may
be required. For a second
time, press and hold the
newly programmed button