2016 CHEVROLET CRUZE LIMITED service schedule
[x] Cancel search: service schedulePage 72 of 357
Chevrolet Cruze Limited Owner Manual (GMNA-Localizing-U.S./Canada-
9282844) - 2016 - crc - 9/3/15
Seats and Restraints 71
turning off the passenger airbag(s).
SeePassenger Sensing System
0 66
ii.
If the vehicle has rollover roof-rail
airbags, see Different Size Tires
and Wheels 0271
iifor additional
important information.
If you have to modify your vehicle
because you have a disability and
you have questions about whether
the modifications will affect the
vehicle's airbag system, or if you
have questions about whether the
airbag system will be affected if the
vehicle is modified for any other
reason, call Customer Assistance.
See Customer Assistance Offices
0 325
ii.
Airbag System Check
The airbag system does not need
regularly scheduled maintenance or
replacement. Make sure the airbag
readiness light is working. See
Airbag Readiness Light 0103
ii.
Caution
If an airbag covering is damaged,
opened, or broken, the airbag
may not work properly. Do not
open or break the airbag
coverings. If there are any
opened or broken airbag
coverings, have the airbag
covering and/or airbag module
replaced. For the location of the
airbags, see Where Are the
Airbags? 061
ii. See your dealer
for service.
Replacing Airbag System
Parts after a Crash
{Warning
A crash can damage the airbag
systems in the vehicle.
A damaged airbag system may
not work properly and may not
protect you and your
passenger(s) in a crash, resulting
(Continued)
Warning (Continued)
in serious injury or even death. To
help make sure the airbag
systems are working properly
after a crash, have them
inspected and any necessary
replacements made as soon as
possible.
If an airbag inflates, you will need to
replace airbag system parts. See
your dealer for service.
If the airbag readiness light stays on
after the vehicle is started or comes
on when you are driving, the airbag
system may not work properly. Have
the vehicle serviced right away. See
Airbag Readiness Light 0103
ii.
Page 110 of 357
Chevrolet Cruze Limited Owner Manual (GMNA-Localizing-U.S./Canada-
9282844) - 2016 - crc - 9/3/15
Instruments and Controls 109
If the light does not come on, have
the vehicle serviced by your dealer.
If the system is working normally,
the indicator light turns off.
If the light is on and not flashing, the
TCS and potentially the StabiliTrak
system have been disabled. A DIC
message may display. Check the
DIC messages to determine which
feature(s) is no longer functioning
and whether the vehicle requires
service.
If the light is on and flashing, the
TCS and/or the StabiliTrak system
is actively working.
SeeTraction Control/Electronic
Stability Control 0199
ii.
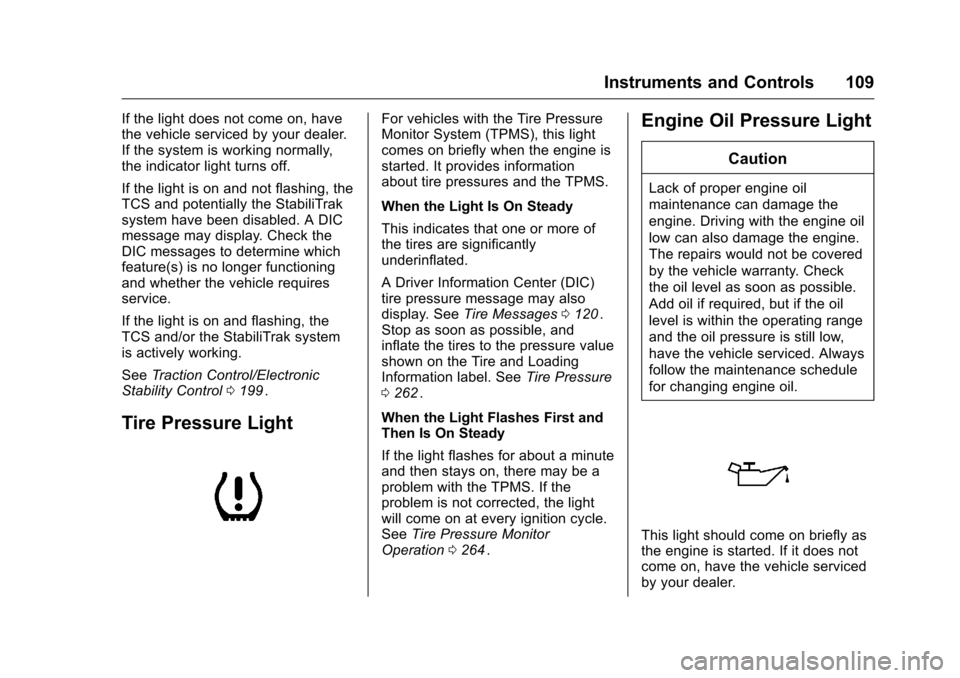
Tire Pressure Light
For vehicles with the Tire Pressure
Monitor System (TPMS), this light
comes on briefly when the engine is
started. It provides information
about tire pressures and the TPMS.
When the Light Is On Steady
This indicates that one or more of
the tires are significantly
underinflated.
A Driver Information Center (DIC)
tire pressure message may also
display. See Tire Messages 0120
ii.
Stop as soon as possible, and
inflate the tires to the pressure value
shown on the Tire and Loading
Information label. See Tire Pressure
0 262
ii.
When the Light Flashes First and
Then Is On Steady
If the light flashes for about a minute
and then stays on, there may be a
problem with the TPMS. If the
problem is not corrected, the light
will come on at every ignition cycle.
See Tire Pressure Monitor
Operation 0264
ii.
Engine Oil Pressure Light
Caution
Lack of proper engine oil
maintenance can damage the
engine. Driving with the engine oil
low can also damage the engine.
The repairs would not be covered
by the vehicle warranty. Check
the oil level as soon as possible.
Add oil if required, but if the oil
level is within the operating range
and the oil pressure is still low,
have the vehicle serviced. Always
follow the maintenance schedule
for changing engine oil.
This light should come on briefly as
the engine is started. If it does not
come on, have the vehicle serviced
by your dealer.
Page 118 of 357
Chevrolet Cruze Limited Owner Manual (GMNA-Localizing-U.S./Canada-
9282844) - 2016 - crc - 9/3/15
Instruments and Controls 117
ENGINE OVERHEATED—
IDLE ENGINE
This message displays when the
engine coolant temperature is too
hot. Stop and allow the vehicle to
idle until it cools down.
ENGINE OVERHEATED —
STOP ENGINE
This message displays and a
continuous chime sounds if the
engine cooling system reaches
unsafe temperatures for operation.
Stop and turn off the vehicle as
soon as it is safe to do so to avoid
severe damage. This message
clears when the engine has cooled
to a safe operating temperature.
HIGH COOLANT
TEMPERATURE
This message displays if the coolant
temperature is hot. See Engine
Overheating 0236
ii.
Engine Oil Messages
CHANGE ENGINE OIL SOON
This message displays when the
engine oil needs to be changed.
When you change the engine oil, be
sure to reset the Oil Life System.
See Engine Oil Life System 0229
iiand Driver Information Center (DIC)
0 112iifor information on how to
reset the system. See Engine Oil
0 227
iiand Maintenance Schedule
0 307iifor more information.
OIL PRESSURE LOW —STOP
ENGINE
This message displays if low oil
pressure levels occur. Stop the
vehicle as soon as safely possible
and do not operate it until the cause
of the low oil pressure has been
corrected. Check the oil as soon as
possible and have the vehicle
serviced by your dealer.
Engine Power Messages
ENGINE POWER IS REDUCED
This message displays when the
vehicle's engine power is reduced.
Reduced engine power can affect
the vehicle's ability to accelerate.
If this message is on, but there is no
reduction in performance, proceed
to your destination. The
performance may be reduced the
next time the vehicle is driven. The
vehicle may be driven at a reduced
speed while this message is on, but
maximum acceleration and speed
may be reduced. Anytime this
message stays on, the vehicle
should be taken to your dealer for
service as soon as possible.
Fuel System Messages
FUEL LEVEL LOW
This message displays when the
vehicle is low on fuel. Refuel as
soon as possible.
Page 121 of 357
Chevrolet Cruze Limited Owner Manual (GMNA-Localizing-U.S./Canada-
9282844) - 2016 - crc - 9/3/15
120 Instruments and Controls
SHIFTER UNLOCKED. BRAKE
TO SHIFT
This message displays when the
Safety Belt Assurance System times
out and allows the vehicle to be
shifted out of P (Park) after
30 seconds following brake apply.
See“Safety Belts” and“Child
Restraints” in the Index for
information about the importance of
proper restraint use.
This system may not function
properly if the airbag readiness light
is on. See Airbag Readiness Light
0 103
ii.
Security Messages
THEFT ATTEMPTED
This message displays if the vehicle
detects a tamper condition.
Service Vehicle Messages
CHANGE TIMING BELT
This message displays when
scheduled maintenance on the
timing belt is required. See your
dealer for service.
SERVICE POWER STEERING
This message displays and a chime
may sound when there may be a
problem with the power steering
system. If this message displays
and a reduction in steering
performance or loss of power
steering assistance is noticed, see
your dealer.
SERVICE STEERING
COLUMN LOCK
This message displays if there is a
problem with the steering column
lock. Take the vehicle to your dealer
for service.
SERVICE VEHICLE SOON
This message displays if there is a
problem with the vehicle. Take the
vehicle to your dealer for service.
Starting the Vehicle
Messages
TURN STEERING WHEEL
START VEHICLE AGAIN
This message displays when you try
to start the vehicle, but the column
remains locked. Try turning the
steering wheel while starting the
vehicle to unlock the steering
column. If the vehicle still does not
start, turn the steering wheel the
other way, and try starting the
vehicle again.
Tire Messages
SERVICE TIRE MONITOR
SYSTEM
This message displays if there is a
problem with the Tire Pressure
Monitor System (TPMS). See Tire
Pressure Monitor Operation 0264
iifor more information.
Page 169 of 357
Chevrolet Cruze Limited Owner Manual (GMNA-Localizing-U.S./Canada-
9282844) - 2016 - crc - 9/3/15
168 Climate Controls
Air Vents
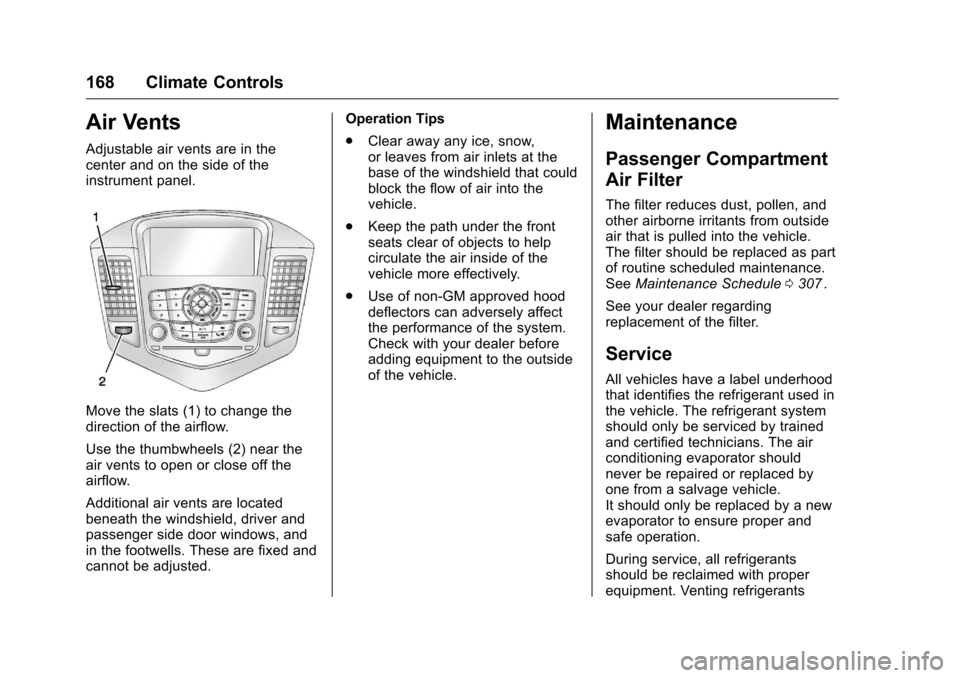
Adjustable air vents are in the
center and on the side of the
instrument panel.
Move the slats (1) to change the
direction of the airflow.
Use the thumbwheels (2) near the
air vents to open or close off the
airflow.
Additional air vents are located
beneath the windshield, driver and
passenger side door windows, and
in the footwells. These are fixed and
cannot be adjusted.Operation Tips
.
Clear away any ice, snow,
or leaves from air inlets at the
base of the windshield that could
block the flow of air into the
vehicle.
. Keep the path under the front
seats clear of objects to help
circulate the air inside of the
vehicle more effectively.
. Use of non-GM approved hood
deflectors can adversely affect
the performance of the system.
Check with your dealer before
adding equipment to the outside
of the vehicle.
Maintenance
Passenger Compartment
Air Filter
The filter reduces dust, pollen, and
other airborne irritants from outside
air that is pulled into the vehicle.
The filter should be replaced as part
of routine scheduled maintenance.
See Maintenance Schedule 0307
ii.
See your dealer regarding
replacement of the filter.
Service
All vehicles have a label underhood
that identifies the refrigerant used in
the vehicle. The refrigerant system
should only be serviced by trained
and certified technicians. The air
conditioning evaporator should
never be repaired or replaced by
one from a salvage vehicle.
It should only be replaced by a new
evaporator to ensure proper and
safe operation.
During service, all refrigerants
should be reclaimed with proper
equipment. Venting refrigerants
Page 216 of 357
Chevrolet Cruze Limited Owner Manual (GMNA-Localizing-U.S./Canada-
9282844) - 2016 - crc - 9/3/15
Driving and Operating 215
Parking on Hills
{Warning
Parking the vehicle on a hill with
the trailer attached can be
dangerous. If something goes
wrong, the rig could start to move.
People can be injured, and both
the vehicle and the trailer can be
damaged. When possible, always
park the rig on a flat surface.
If parking the rig on a hill: 1. Press the brake pedal, but do not shift into P (Park) yet. Turn
the wheels into the curb if
facing downhill or into traffic if
facing uphill.
2. Have someone place chocks under the trailer wheels.
3. When the wheel chocks are in place, release the brake pedal
until the chocks absorb
the load.
4. Reapply the brake pedal. Then apply the parking brake and
shift into P (Park) for vehicles with an automatic transmission
or into reverse gear for
vehicles with a manual
transmission.
5. Release the brake pedal.
Leaving After Parking on a Hill
1. Apply and hold the brake pedal while you:
.Start the engine.
. Shift into a gear.
. Release the parking brake.
2. Let up on the brake pedal.
3. Drive slowly until the trailer is clear of the chocks.
4. Stop and have someone pick up and store the chocks.
Maintenance When Trailer
Towing
The vehicle needs service more
often when pulling a trailer. See
Maintenance Schedule 0307
ii.
Things that are especially important
in trailer operation are automatic
transmission fluid, engine oil, axle lubricant, belts, cooling system and
brake system. Inspect these before
and during the trip.
Check periodically to see that all
hitch nuts and bolts are tight.
Engine Cooling When Trailer
Towing
The cooling system may temporarily
overheat during severe operating
conditions. See
Engine Overheating
0 236
ii.
Trailer Towing (Fuel
Economy Model)
The vehicle is neither designed nor
intended to tow a trailer.
Trailer Towing (Except
Fuel Economy Model)
Before pulling a trailer, there are
three important considerations that
have to do with weight:
.
The weight of the trailer.
. The weight of the trailer tongue.
. The total weight on your
vehicle's tires.
Page 240 of 357
Chevrolet Cruze Limited Owner Manual (GMNA-Localizing-U.S./Canada-
9282844) - 2016 - crc - 9/3/15
Vehicle Care 239
Brakes
Disc brake pads have built-in wear
indicators that make a high-pitched
warning sound when the brake pads
are worn and new pads are needed.
The sound can come and go or be
heard all the time the vehicle is
moving, except when applying the
brake pedal firmly.
{Warning
The brake wear warning sound
means that soon the brakes will
not work well. That could lead to
a crash. When the brake wear
warning sound is heard, have the
vehicle serviced.
Caution
Continuing to drive with worn-out
brake pads could result in costly
brake repair.Some driving conditions or climates
can cause a brake squeal when the
brakes are first applied or lightly
applied. This does not mean
something is wrong with the brakes.
Properly torqued wheel nuts are
necessary to help prevent brake
pulsation. When tires are rotated,
inspect brake pads for wear and
evenly tighten wheel nuts in the
proper sequence to torque
specifications in
Capacities and
Specifications 0321
ii.
If the vehicle has rear drum brakes,
they do not have wear indicators,
but if a rear brake rubbing noise is
heard, have the rear brake linings
inspected immediately. Rear brake
drums should be removed and
inspected each time the tires are
removed for rotation or changing.
Drum brakes have an inspection
hole to inspect lining wear during
scheduled maintenance. When the
front brake pads are replaced, have
the rear brakes inspected, too.
Brake linings should always be
replaced as complete axle sets.
Brake Pedal Travel
See your dealer if the brake pedal
does not return to normal height,
or if there is a rapid increase in
pedal travel. This could be a sign
that brake service may be required.
Replacing Brake System Parts
Always replace brake system parts
with new, approved replacement
parts. If this is not done, the brakes
may not work properly. The braking
performance expected can change
in many other ways if the wrong
replacement brake parts are
installed or parts are improperly
installed.
Brake Fluid
The brake/clutch master cylinder
reservoir is filled with GM approved
DOT 3 brake fluid as indicated on
Page 244 of 357
Chevrolet Cruze Limited Owner Manual (GMNA-Localizing-U.S./Canada-
9282844) - 2016 - crc - 9/3/15
Vehicle Care 243
.To check the P (Park)
mechanism's holding ability:
With the engine running, shift to
P (Park). Then release the
parking brake followed by the
regular brake.
Contact your dealer if service is
required.
Wiper Blade Replacement
Windshield wiper blades should be
inspected for wear or cracking. See
Maintenance Schedule 0307
iifor
more information.
Replacement blades come in
different types and are removed in
different ways. For proper
windshield wiper blade length and
type, see Maintenance
Replacement Parts 0318
ii.
Caution
Allowing the wiper arm to touch
the windshield when no wiper
blade is installed could damage
the windshield. Any damage that
(Continued)
Caution (Continued)
occurs would not be covered by
the vehicle warranty. Do not allow
the wiper arm to touch the
windshield.
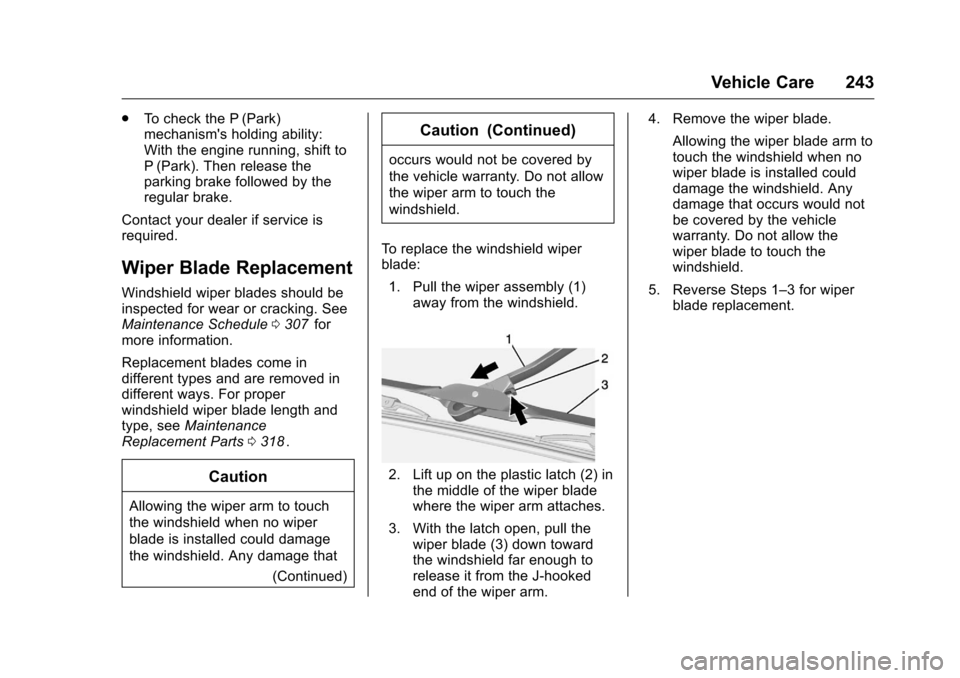
To replace the windshield wiper
blade: 1. Pull the wiper assembly (1) away from the windshield.
2. Lift up on the plastic latch (2) inthe middle of the wiper blade
where the wiper arm attaches.
3. With the latch open, pull the wiper blade (3) down toward
the windshield far enough to
release it from the J-hooked
end of the wiper arm. 4. Remove the wiper blade.
Allowing the wiper blade arm to
touch the windshield when no
wiper blade is installed could
damage the windshield. Any
damage that occurs would not
be covered by the vehicle
warranty. Do not allow the
wiper blade to touch the
windshield.
5. Reverse Steps 1–3 for wiper blade replacement.