2016 CHEVROLET CRUZE LIMITED fold seats
[x] Cancel search: fold seatsPage 12 of 357
Chevrolet Cruze Limited Owner Manual (GMNA-Localizing-U.S./Canada-
9282844) - 2016 - crc - 9/3/15
In Brief 11
2. Push and pull on the seatbackto make sure it is locked.
See Reclining Seatbacks 049
ii.
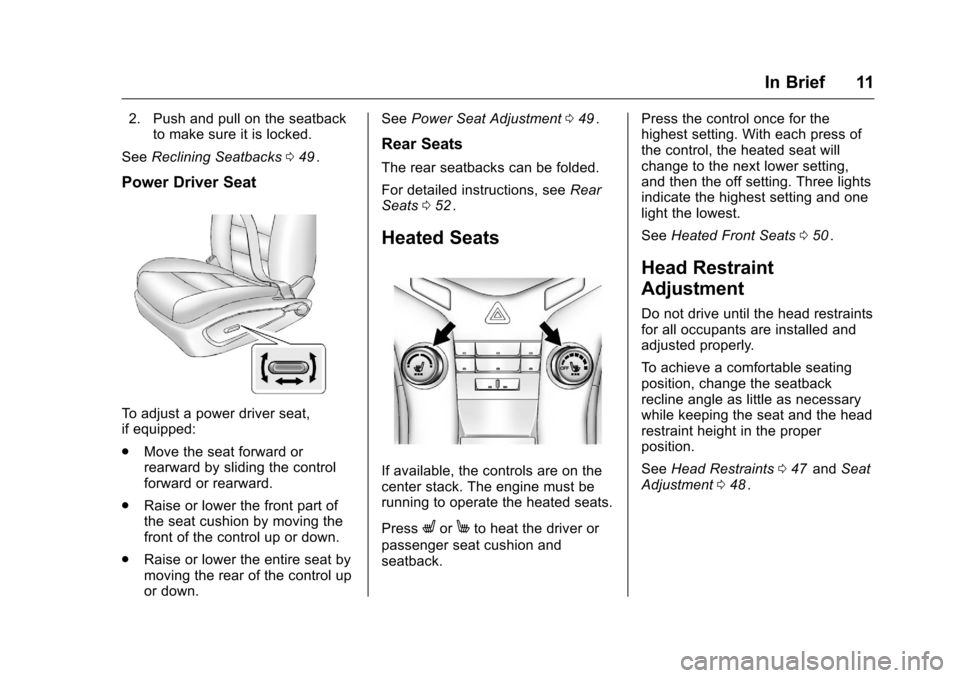
Power Driver Seat
To adjust a power driver seat,
if equipped:
.
Move the seat forward or
rearward by sliding the control
forward or rearward.
. Raise or lower the front part of
the seat cushion by moving the
front of the control up or down.
. Raise or lower the entire seat by
moving the rear of the control up
or down. See
Power Seat Adjustment 049
ii.
Rear Seats
The rear seatbacks can be folded.
For detailed instructions, see Rear
Seats 052
ii.
Heated Seats
If available, the controls are on the
center stack. The engine must be
running to operate the heated seats.
Press
LorMto heat the driver or
passenger seat cushion and
seatback. Press the control once for the
highest setting. With each press of
the control, the heated seat will
change to the next lower setting,
and then the off setting. Three lights
indicate the highest setting and one
light the lowest.
See
Heated Front Seats 050
ii.
Head Restraint
Adjustment
Do not drive until the head restraints
for all occupants are installed and
adjusted properly.
To achieve a comfortable seating
position, change the seatback
recline angle as little as necessary
while keeping the seat and the head
restraint height in the proper
position.
See Head Restraints 047
iiand Seat
Adjustment 048ii.
Page 53 of 357
Chevrolet Cruze Limited Owner Manual (GMNA-Localizing-U.S./Canada-
9282844) - 2016 - crc - 9/3/15
52 Seats and Restraints
Rear Seats
Either side of the rear seatback can
be folded.
To fold the rear seatbacks:1. Place the front seatbacks in the upright position. See Reclining
Seatbacks 049
ii.
Caution
Folding a rear seat with the safety
belts still fastened may cause
damage to the seat or the safety
belts. Always unbuckle the safety
belts and return them to their
normal stowed position before
folding a rear seat.
2. Unbuckle the rear safety belts and make sure the safety belt
buckles are stowed in the
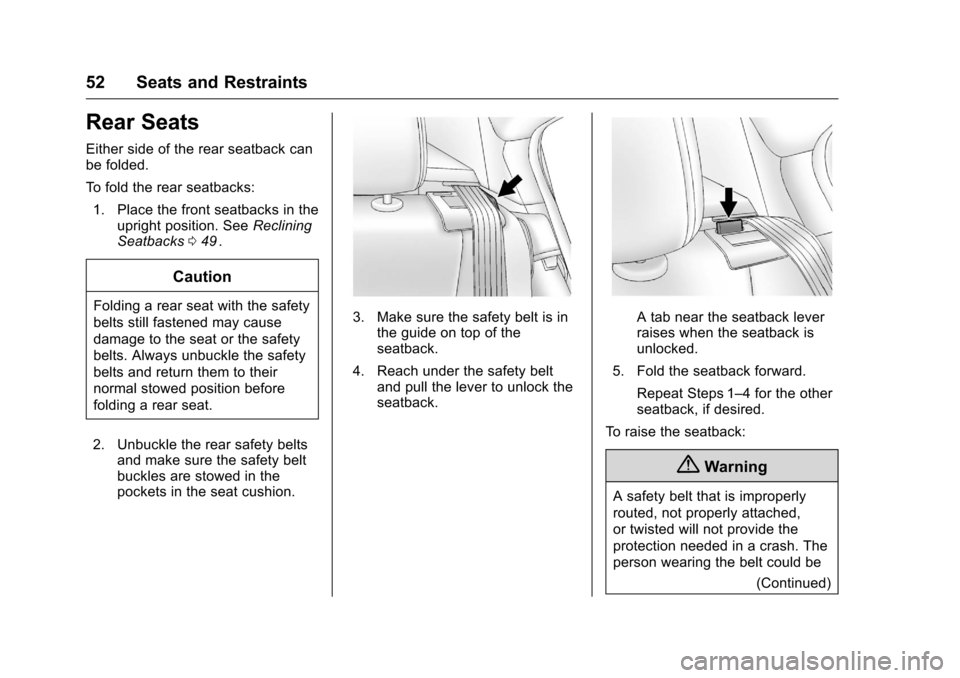
pockets in the seat cushion.3. Make sure the safety belt is inthe guide on top of the
seatback.
4. Reach under the safety belt and pull the lever to unlock the
seatback.A tab near the seatback lever
raises when the seatback is
unlocked.
5. Fold the seatback forward. Repeat Steps 1–4 for the other
seatback, if desired.
To raise the seatback:
{Warning
A safety belt that is improperly
routed, not properly attached,
or twisted will not provide the
protection needed in a crash. The
person wearing the belt could be (Continued)
Page 83 of 357
Chevrolet Cruze Limited Owner Manual (GMNA-Localizing-U.S./Canada-
9282844) - 2016 - crc - 9/3/15
82 Seats and Restraints
Warning (Continued)
wrapped around a child’s neck.
If the shoulder belt is locked and
tightened around a child’s neck,
the only way to loosen the belt is
to cut it.
Buckle any unused safety belts
behind the child restraint so
children cannot reach them. Pull
the shoulder belt all the way out
of the retractor to set the lock,
and tighten the belt behind the
child restraint after the child
restraint has been installed.
Caution
Do not let the LATCH
attachments rub against the
vehicle’s safety belts. This may
damage these parts. If necessary,
move buckled safety belts to
avoid rubbing the LATCH
attachments.(Continued)
Caution (Continued)
Do not fold the rear seatback
when the seat is occupied. Do not
fold the empty rear seat with a
safety belt buckled. This could
damage the safety belt or the
seat. Unbuckle and return the
safety belt to its stowed position,
before folding the seat.
If you need to secure more than one
child restraint in the rear seat, see
Where to Put the Restraint 077
iifor
additional information.
This system is designed to make
installation of child restraints easier.
When using lower anchors, do not
use the vehicle's safety belts.
Instead use the vehicle's anchors
and child restraint attachments to
secure the restraints. Some
restraints also use another vehicle
anchor to secure a top tether.
1. Attach and tighten the lower attachments to the lower
anchors. If the child restraint
does not have lower attachments or the desired
seating position does not have
lower anchors, secure the child
restraint with the top tether and
the safety belts. Refer to the
child restraint manufacturer
instructions and the
instructions in this manual.
1.1. Find the lower anchors for
the desired rear outboard
seating position.
1.2. Put the child restraint on the seat.
For outboard rear seating
positions, if the head
restraint interferes with the
proper installation of the
child restraint, the head
restraint may be removed.
See“Head Restraint
Removal and
Reinstallation” at the end
of this section.
1.3. Attach and tighten the lower attachments on the
child restraint to the lower
anchors.
Page 85 of 357
Chevrolet Cruze Limited Owner Manual (GMNA-Localizing-U.S./Canada-
9282844) - 2016 - crc - 9/3/15
84 Seats and Restraints
restraint has been
removed, route the dual
tether over the seatback.
3. Before placing a child in the child restraint, make sure it is
securely held in place. To
check, grasp the child restraint
at the LATCH path and attempt
to move it side to side and
back and forth. There should
be no more than 2.5 cm (1 in) of
movement, for proper
installation.
Head Restraint Removal and
Reinstallation
The rear outboard head restraints
can be removed if they interfere with
the proper installation of the child
restraint.
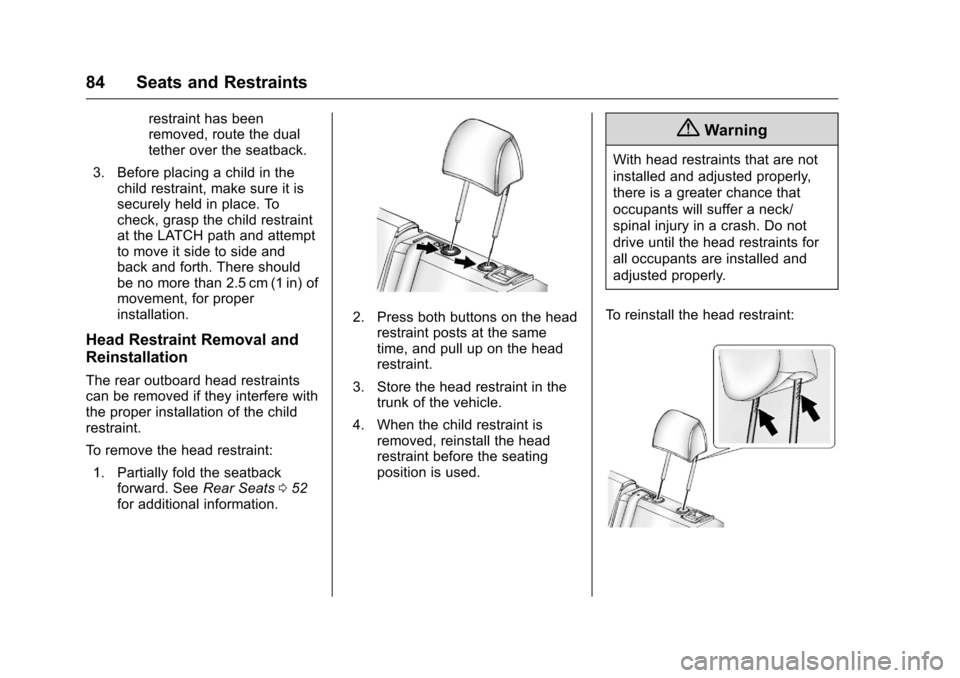
To remove the head restraint:
1. Partially fold the seatback forward. See Rear Seats052
iifor additional information.
2. Press both buttons on the head
restraint posts at the same
time, and pull up on the head
restraint.
3. Store the head restraint in the trunk of the vehicle.
4. When the child restraint is removed, reinstall the head
restraint before the seating
position is used.
{Warning
With head restraints that are not
installed and adjusted properly,
there is a greater chance that
occupants will suffer a neck/
spinal injury in a crash. Do not
drive until the head restraints for
all occupants are installed and
adjusted properly.
To reinstall the head restraint:
Page 181 of 357
Chevrolet Cruze Limited Owner Manual (GMNA-Localizing-U.S./Canada-
9282844) - 2016 - crc - 9/3/15
180 Driving and Operating
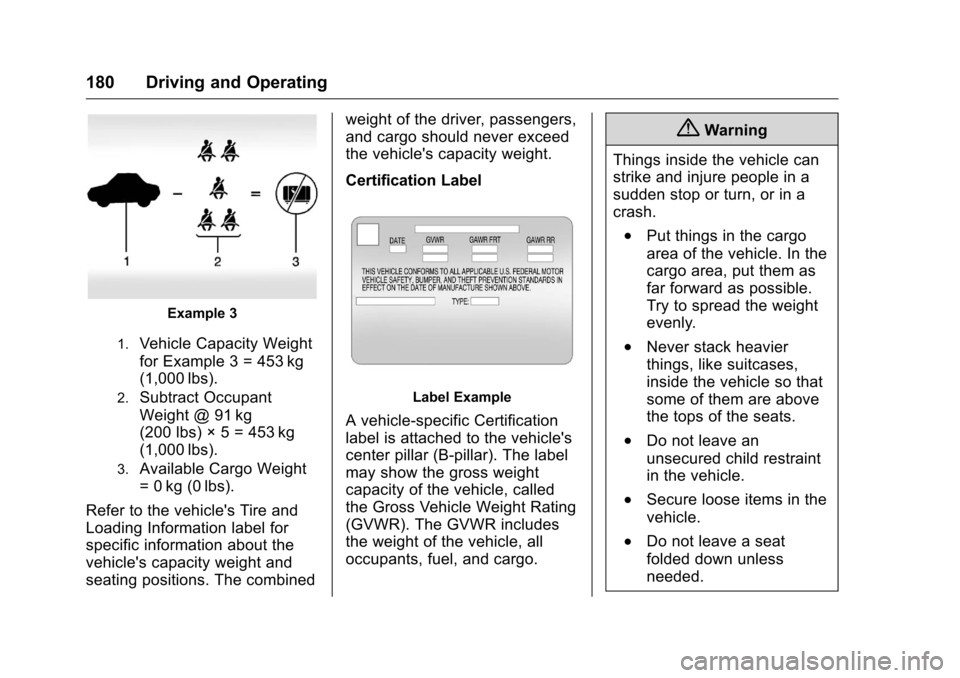
Example 3
1.Vehicle Capacity Weight
for Example 3 = 453 kg
(1,000 lbs).
2.Subtract Occupant
Weight @ 91 kg
(200 lbs) × 5 = 453 kg
(1,000 lbs).
3.Available Cargo Weight
= 0 kg (0 lbs).
Refer to the vehicle's Tire and
Loading Information label for
specific information about the
vehicle's capacity weight and
seating positions. The combined weight of the driver, passengers,
and cargo should never exceed
the vehicle's capacity weight.
Certification Label
Label Example
A vehicle-specific Certification
label is attached to the vehicle's
center pillar (B-pillar). The label
may show the gross weight
capacity of the vehicle, called
the Gross Vehicle Weight Rating
(GVWR). The GVWR includes
the weight of the vehicle, all
occupants, fuel, and cargo.
{Warning
Things inside the vehicle can
strike and injure people in a
sudden stop or turn, or in a
crash.
.Put things in the cargo
area of the vehicle. In the
cargo area, put them as
far forward as possible.
Try to spread the weight
evenly.
.Never stack heavier
things, like suitcases,
inside the vehicle so that
some of them are above
the tops of the seats.
.Do not leave an
unsecured child restraint
in the vehicle.
.Secure loose items in the
vehicle.
.Do not leave a seat
folded down unless
needed.
Page 350 of 357
Chevrolet Cruze Limited Owner Manual (GMNA-Localizing-U.S./Canada-
9282844) - 2016 - crc - 9/3/15
Index 349
Driving (cont'd)For Better Fuel Economy . . . . . . . 22
Hill and Mountain Roads . . . . . . 175
If the Vehicle is Stuck . . . . . . . . . 176
Loss of Control . . . . . . . . . . . . . . . 173
Off-Road Recovery . . . . . . . . . . . 173
Vehicle Load Limits . . . . . . . . . . . 177
Wet Roads . . . . . . . . . . . . . . . . . . . 174
Winter . . . . . . . . . . . . . . . . . . . . . . . . 175
E
Electrical Equipment,
Add-On . . . . . . . . . . . . . . . . . . . . . . . 217
Electrical System
Engine Compartment FuseBlock . . . . . . . . . . . . . . . . . . . . . . . . 250
Fuses and Circuit Breakers . . . 250
Instrument Panel Fuse Block . . . . . . . . . . . . . . . . . . . . . . . . 253
Overload . . . . . . . . . . . . . . . . . . . . . 249
Emergency OnStar
®. . . . . . . . . . . . . . . . . . . . . . 337
Engine Air Cleaner/Filter . . . . . . . . . . . . . 231
Check and Service Engine
Soon Light . . . . . . . . . . . . . . . . . . 104
Compartment Overview . . . . . . . 224
Coolant . . . . . . . . . . . . . . . . . . . . . . . 233 Engine (cont'd)
Coolant Temperature
Gauge . . . . . . . . . . . . . . . . . . . . . . 102
Cooling System . . . . . . . . . . . . . . . 232
Cooling System Messages . . . .116
Drive Belt Routing . . . . . . . . . . . . 322
Exhaust . . . . . . . . . . . . . . . . . . . . . . 191
Heater . . . . . . . . . . . . . . . . . . . . . . . . 186
Oil Life System . . . . . . . . . . . . . . . 229
Oil Messages . . . . . . . . . . . . . . . . . .117
Oil Pressure Light . . . . . . . . . . . . 109
Overheated Protection
Operating Mode . . . . . . . . . . . . . 237
Overheating . . . . . . . . . . . . . . . . . . 236
Power Messages . . . . . . . . . . . . . .117
Reduced Power Light . . . . . . . . . .110
Running While Parked . . . . . . . . 191
Starting . . . . . . . . . . . . . . . . . . . . . . . 185
Entry Lighting . . . . . . . . . . . . . . . . . . . 132
Equipment, Towing . . . . . . . . . . . . . 217
Event Data Recorders . . . . . . . . . . 335
Exit Lighting . . . . . . . . . . . . . . . . . . . . 132
Extender, Safety Belt . . . . . . . . . . . . 58
Exterior Lamp Controls . . . . . . . . . 128
Exterior Lighting Battery Saver . . . . . . . . . . . . . . . . . . . . . . . . . 133
F
Filter,Engine Air Cleaner . . . . . . . . . . . 231
Flash-to-Pass . . . . . . . . . . . . . . . . . . . 129
Flashers, Hazard Warning . . . . . . 130
Flat Tire . . . . . . . . . . . . . . . . . . . . . . . . 274 Changing . . . . . . . . . . . . . . . . . . . . . 283
Floor Mats . . . . . . . . . . . . . . . . . . . . . . 304
Fluid Automatic Transmission . . . . . . 230
Brakes . . . . . . . . . . . . . . . . . . . . . . . . 239
Washer . . . . . . . . . . . . . . . . . . . . . . . 238
Fog Lamps Front . . . . . . . . . . . . . . . . . . . . . . . . . 131
Folding Mirrors . . . . . . . . . . . . . . . . . . 42
Frequency Statement Radio . . . . . . . . . . . . . . . . . . . . . . . . . 333
Front Fog Lamp Light . . . . . . . . . . . . . . . . . . . . . . . . . . . 111
Front Seats Adjustment . . . . . . . . . . . . . . . . . . . . . 48
Heated . . . . . . . . . . . . . . . . . . . . . . . . . 50
Fuel . . . . . . . . . . . . . . . . . . . . . . . . . . . . 209 Additives . . . . . . . . . . . . . . . . . . . . . 210
Economy Driving . . . . . . . . . . . . . . . 22
Filling a Portable Fuel
Container . . . . . . . . . . . . . . . . . . . 212
Filling the Tank . . . . . . . . . . . . . . . 210