2016 CHEVROLET CRUZE LIMITED turn signal
[x] Cancel search: turn signalPage 220 of 357
Chevrolet Cruze Limited Owner Manual (GMNA-Localizing-U.S./Canada-
9282844) - 2016 - crc - 9/3/15
Vehicle Care 219
Vehicle Care
General Information
General Information . . . . . . . . . . 220
California Proposition65 Warning . . . . . . . . . . . . . . . . . 220
California Perchlorate Materials Requirements . . . . . 220
Accessories and Modifications . . . . . . . . . . . . . . . . 220
Vehicle Checks
Doing Your OwnService Work . . . . . . . . . . . . . . . 221
Hood . . . . . . . . . . . . . . . . . . . . . . . . . 222
Engine Compartment Overview . . . . . . . . . . . . . . . . . . . . 224
Engine Oil . . . . . . . . . . . . . . . . . . . . 227
Engine Oil Life System . . . . . . . 229
Automatic Transmission Fluid . . . . . . . . . . . . . . . . . . . . . . . . 230
Manual Transmission Fluid . . . 230
Hydraulic Clutch . . . . . . . . . . . . . . 230
Engine Air Cleaner/Filter . . . . . . 231
Cooling System . . . . . . . . . . . . . . 232
Engine Coolant . . . . . . . . . . . . . . . 233
Engine Overheating . . . . . . . . . . 236
Overheated Engine Protection Operating Mode . . . . . . . . . . . . . 237
Washer Fluid . . . . . . . . . . . . . . . . . 238 Brakes . . . . . . . . . . . . . . . . . . . . . . . 239
Brake Fluid . . . . . . . . . . . . . . . . . . . 239
Battery - North America . . . . . . 241
Starter Switch Check . . . . . . . . . 241
Automatic Transmission Shift
Lock Control Function
Check . . . . . . . . . . . . . . . . . . . . . . . 242
Ignition Transmission Lock Check . . . . . . . . . . . . . . . . . . . . . . . 242
Park Brake and P (Park) Mechanism Check . . . . . . . . . . 242
Wiper Blade Replacement . . . . 243Headlamp Aiming
Headlamp Aiming . . . . . . . . . . . . 244
Bulb Replacement
Bulb Replacement . . . . . . . . . . . . 244
Halogen Bulbs . . . . . . . . . . . . . . . . 244
Headlamps, Front Turn Signal and Parking Lamps . . . . . . . . . 244
Taillamps, Turn Signal, Sidemarker, Stoplamps, and
Back-Up Lamps . . . . . . . . . . . . . 246
License Plate Lamp . . . . . . . . . . 248
Replacement Bulbs . . . . . . . . . . . 249
Electrical System
Electrical System Overload . . . 249
Fuses and Circuit Breakers . . . 250
Engine Compartment Fuse Block . . . . . . . . . . . . . . . . . . . . . . . . 250 Instrument Panel Fuse
Block . . . . . . . . . . . . . . . . . . . . . . . . 253
Wheels and Tires
Tires . . . . . . . . . . . . . . . . . . . . . . . . . . 255
All-Season Tires . . . . . . . . . . . . . . 256
Winter Tires . . . . . . . . . . . . . . . . . . 256
Low-Profile Tires . . . . . . . . . . . . . 257
Tire Sidewall Labeling . . . . . . . . 257
Tire Designations . . . . . . . . . . . . . 259
Tire Terminology andDefinitions . . . . . . . . . . . . . . . . . . 260
Tire Pressure . . . . . . . . . . . . . . . . . 262
Tire Pressure Monitor System . . . . . . . . . . . . . . . . . . . . . . 263
Tire Pressure Monitor Operation . . . . . . . . . . . . . . . . . . . 264
Tire Inspection . . . . . . . . . . . . . . . . 267
Tire Rotation . . . . . . . . . . . . . . . . . 268
When It Is Time for New Tires . . . . . . . . . . . . . . . . . . . . . . . . 269
Buying New Tires . . . . . . . . . . . . . 270
Different Size Tires and Wheels . . . . . . . . . . . . . . . . . . . . . . 271
Uniform Tire Quality Grading . . . . . . . . . . . . . . . . . . . . . 271
Wheel Alignment and Tire Balance . . . . . . . . . . . . . . . . . . . . . 273
Wheel Replacement . . . . . . . . . . 273
Tire Chains . . . . . . . . . . . . . . . . . . . 274
If a Tire Goes Flat . . . . . . . . . . . . 274
Page 245 of 357
Chevrolet Cruze Limited Owner Manual (GMNA-Localizing-U.S./Canada-
9282844) - 2016 - crc - 9/3/15
244 Vehicle Care
Headlamp Aiming
Headlamp aim has been preset and
should need no further adjustment.
If the vehicle is damaged in a crash,
the headlamp aim may be affected.
If adjustment to the headlamps is
necessary, see your dealer.
Bulb Replacement
For the proper type of replacement
bulbs, seeReplacement Bulbs
0 249
ii.
For any bulb-changing procedure
not listed in this section, contact
your dealer.
Halogen Bulbs
{Warning
Halogen bulbs have pressurized
gas inside and can burst if you
drop or scratch the bulb. You or
others could be injured. Be sure
to read and follow the instructions
on the bulb package.
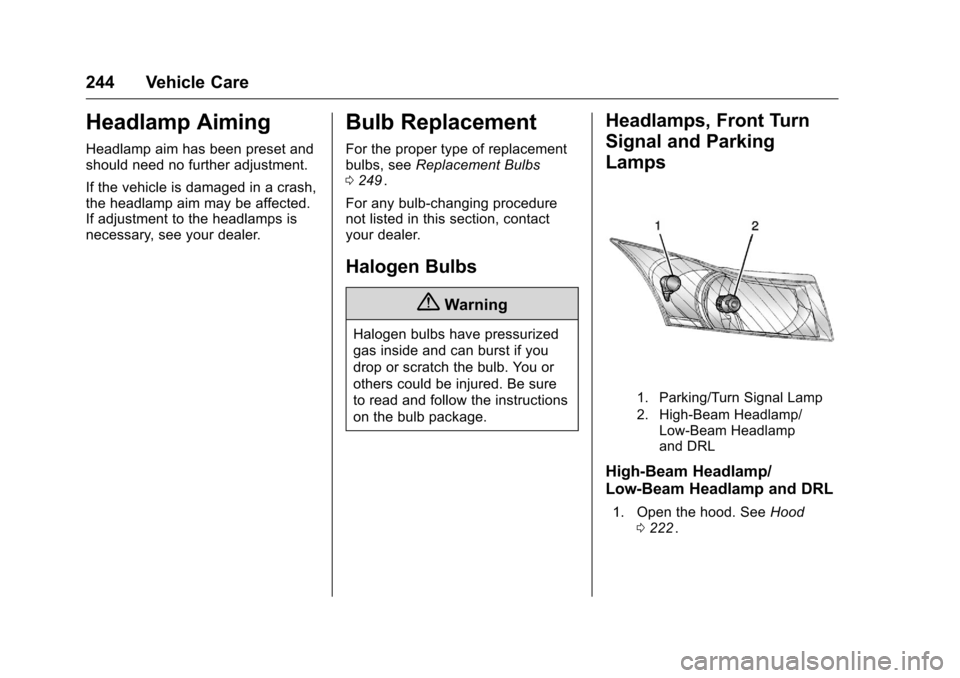
Headlamps, Front Turn
Signal and Parking
Lamps
1. Parking/Turn Signal Lamp
2. High-Beam Headlamp/ Low-Beam Headlamp
and DRL
High-Beam Headlamp/
Low-Beam Headlamp and DRL
1. Open the hood. See Hood
0 222ii.
Page 246 of 357
Chevrolet Cruze Limited Owner Manual (GMNA-Localizing-U.S./Canada-
9282844) - 2016 - crc - 9/3/15
Vehicle Care 245
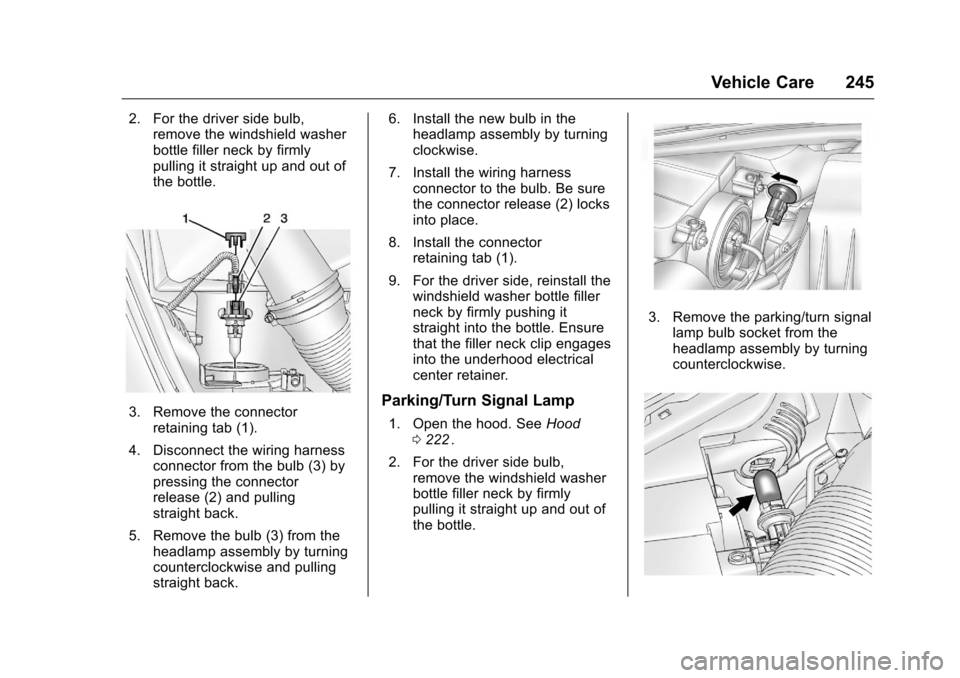
2. For the driver side bulb,remove the windshield washer
bottle filler neck by firmly
pulling it straight up and out of
the bottle.
3. Remove the connector
retaining tab (1).
4. Disconnect the wiring harness connector from the bulb (3) by
pressing the connector
release (2) and pulling
straight back.
5. Remove the bulb (3) from the headlamp assembly by turning
counterclockwise and pulling
straight back. 6. Install the new bulb in the
headlamp assembly by turning
clockwise.
7. Install the wiring harness connector to the bulb. Be sure
the connector release (2) locks
into place.
8. Install the connector retaining tab (1).
9. For the driver side, reinstall the windshield washer bottle filler
neck by firmly pushing it
straight into the bottle. Ensure
that the filler neck clip engages
into the underhood electrical
center retainer.Parking/Turn Signal Lamp
1. Open the hood. See Hood
0 222ii.
2. For the driver side bulb, remove the windshield washer
bottle filler neck by firmly
pulling it straight up and out of
the bottle.
3. Remove the parking/turn signallamp bulb socket from the
headlamp assembly by turning
counterclockwise.
Page 247 of 357
Chevrolet Cruze Limited Owner Manual (GMNA-Localizing-U.S./Canada-
9282844) - 2016 - crc - 9/3/15
246 Vehicle Care
4. Remove the bulb from the bulbsocket.
5. Install the new bulb in the bulb socket.
6. Install the bulb socket into the headlamp assembly by turning
clockwise.
7. For the driver side, reinstall the windshield washer bottle filler
neck by firmly pushing it
straight into the bottle. Ensure
that the filler neck clip engages
into the underhood electrical
center retainer.Taillamps, Turn Signal,
Sidemarker, Stoplamps,
and Back-Up Lamps
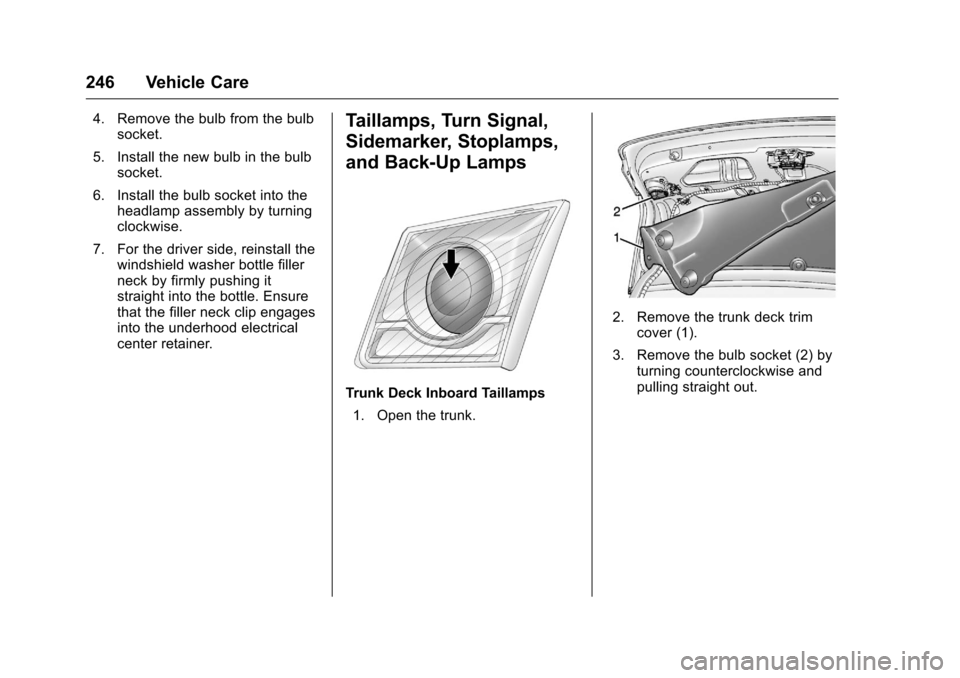
Trunk Deck Inboard Taillamps
1. Open the trunk.
2. Remove the trunk deck trim cover (1).
3. Remove the bulb socket (2) by turning counterclockwise and
pulling straight out.
Page 248 of 357
Chevrolet Cruze Limited Owner Manual (GMNA-Localizing-U.S./Canada-
9282844) - 2016 - crc - 9/3/15
Vehicle Care 247
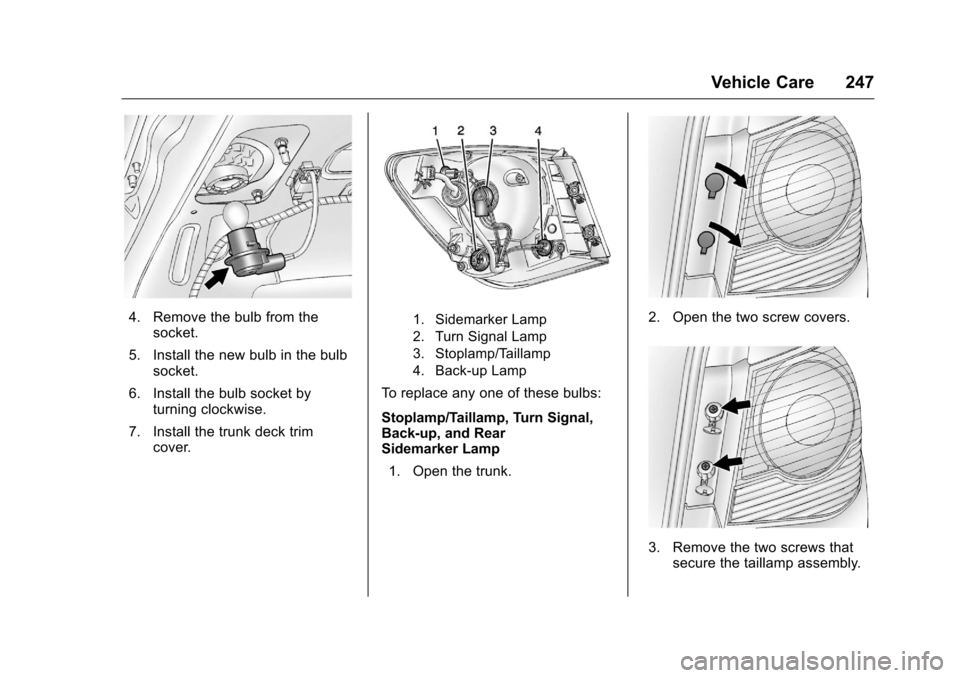
4. Remove the bulb from thesocket.
5. Install the new bulb in the bulb socket.
6. Install the bulb socket by turning clockwise.
7. Install the trunk deck trim cover.1. Sidemarker Lamp
2. Turn Signal Lamp
3. Stoplamp/Taillamp
4. Back-up Lamp
To replace any one of these bulbs:
Stoplamp/Taillamp, Turn Signal,
Back-up, and Rear
Sidemarker Lamp
1. Open the trunk.
2. Open the two screw covers.
3. Remove the two screws that secure the taillamp assembly.
Page 250 of 357
Chevrolet Cruze Limited Owner Manual (GMNA-Localizing-U.S./Canada-
9282844) - 2016 - crc - 9/3/15
Vehicle Care 249
Replacement Bulbs
Exterior LampBulb
Number
Back-Up Lamp 921K
Front and Rear
Sidemarker 194
Front Parking/Turn
Signal Lamp 7444NA
High‐Beam/Low‐
Bean and DRL
Headlamp H13LL
License Plate Lamp W5W LL
Rear Turn
Signal Lamp 7443NA
Stoplamp/Taillamp 3057K LCP
For replacement bulbs not listed
here, contact your dealer.
Electrical System
Electrical System
Overload
The vehicle has fuses and circuit
breakers to protect against an
electrical system overload.
When the current electrical load is
too heavy, the circuit breaker opens
and closes, protecting the circuit
until the current load returns to
normal or the problem is fixed. This
greatly reduces the chance of circuit
overload and fire caused by
electrical problems.
Fuses and circuit breakers protect
power devices in the vehicle.
Replace a bad fuse with a new one
of the identical size and rating.
If there is a problem on the road and
a fuse needs to be replaced, the
same amperage fuse can be
borrowed. Choose some feature of
the vehicle that is not needed to use
and replace it as soon as possible.
Headlamp Wiring
An electrical overload may cause
the lamps to go on and off, or in
some cases to remain off. Have the
headlamp wiring checked right away
if the lamps go on and off or
remain off.
Windshield Wipers
If the wiper motor overheats due to
heavy snow or ice, the windshield
wipers will stop until the motor cools
and will then restart.
Although the circuit is protected
from electrical overload, overload
due to heavy snow or ice may
cause wiper linkage damage.
Always clear ice and heavy snow
from the windshield before using the
windshield wipers.
If the overload is caused by an
electrical problem and not snow or
ice, be sure to get it fixed.
Page 268 of 357
Chevrolet Cruze Limited Owner Manual (GMNA-Localizing-U.S./Canada-
9282844) - 2016 - crc - 9/3/15
Vehicle Care 267
There are two minutes to match the
first tire/wheel position, and
five minutes overall to match all four
tire/wheel positions. If it takes
longer, the matching process stops
and must be restarted.
The TPMS sensor matching
process is:1. Set the parking brake.
2. Turn the ignition to ON/RUN with the engine off or place the
vehicle power mode in ON/
RUN/START. See Ignition
Positions (Keyless Access)
0 181
iior Ignition Positions
(Key Access) 0183ii.
3. Use the MENU button to select the Vehicle Information Menu
in the Driver Information
Center (DIC).
4. Use the thumbwheel to scroll to the Tire Pressure Menu Item
screen.
5. Press the SET/CLR button to begin the sensor matching
process. A message asking if the
process should begin should
appear.
6. Press the SET/CLR button again to confirm the selection.
The horn sounds twice to
signal the receiver is in relearn
mode and the TIRE
LEARNING ACTIVE message
displays on the DIC screen.
7. Start with the driver side front tire.
8. Place the relearn tool against the tire sidewall, near the valve
stem. Then press the button to
activate the TPMS sensor.
A horn chirp confirms that the
sensor identification code has
been matched to this tire and
wheel position.
9. Proceed to the passenger side front tire, and repeat the
procedure in Step 8.
10. Proceed to the passenger side rear tire, and repeat the
procedure in Step 8. 11. Proceed to the driver side rear
tire, and repeat the procedure
in Step 8. The horn sounds two
times to indicate the sensor
identification code has been
matched to the driver side rear
tire, and the TPMS sensor
matching process is no longer
active. The TIRE LEARNING
ACTIVE message on the DIC
display screen goes off.
12. Turn the ignition to LOCK/OFF or press STOP to turn the
ignition off.
13. Set all four tires to the recommended air pressure
level as indicated on the Tire
and Loading Information label.
Tire Inspection
We recommend that the tires,
including the spare tire, if the
vehicle has one, be inspected
for signs of wear or damage at
least once a month.
Page 337 of 357
Chevrolet Cruze Limited Owner Manual (GMNA-Localizing-U.S./Canada-
9282844) - 2016 - crc - 9/3/15
336 OnStar
OnStar
OnStar Overview
OnStar Overview . . . . . . . . . . . . . 336
OnStar Services
Emergency . . . . . . . . . . . . . . . . . . . 337
Security . . . . . . . . . . . . . . . . . . . . . . 337
Navigation . . . . . . . . . . . . . . . . . . . . 337
Connections . . . . . . . . . . . . . . . . . . 338
Diagnostics . . . . . . . . . . . . . . . . . . . 340
OnStar Additional Information
OnStar AdditionalInformation . . . . . . . . . . . . . . . . . . 340
OnStar Overview
=Voice Command Button
QBlue OnStar Button
>Red Emergency Button
This vehicle may be equipped with a
comprehensive, in-vehicle system
that can connect to an OnStar
Advisor for Emergency, Security,
Navigation, Connections, and
Diagnostics Services. OnStar
services may require a paid
subscription and data plan. OnStar
requires the vehicle battery and
electrical system, cellular service,
and GPS satellite signals to be
available and operating. OnStar acts
as a link to existing emergency
service providers. OnStar may
collect information about you and
your vehicle, including location
information. See OnStar ’s Terms &Conditions and Privacy Statement
for more details including system
limitations at www.onstar.com (U.S.)
or www.onstar.ca (Canada).
The OnStar system status light is
next to the OnStar buttons. If the
status light is:
.
Solid Green: System is ready.
. Flashing Green: On a call.
. Red: Indicates a problem.
. Off: System is off. PressQ
twice to speak with an OnStar
Advisor.
Press
Qor call 1-888-4ONSTAR
(1-888-466-7827) to speak to an
Advisor.
Press
=to:
. Make a call, end a call,
or answer an incoming call.
. Give OnStar Hands-Free Calling
voice commands.
. Give OnStar Turn-by-Turn
Navigation voice commands.