2016 CHEVROLET CORVETTE door lock
[x] Cancel search: door lockPage 180 of 351
Chevrolet Corvette Owner Manual (GMNA-Localizing-U.S./Canada/Mexico-
9085364) - 2016 - crc - 9/15/15
Driving and Operating 179
Stopping the Engine
If the vehicle has an automatic
transmission, move the shift lever to
P (Park) and press and hold the
ENGINE START/STOP button on
the instrument panel, until the
engine shuts off. If the shift lever is
not in P (Park), the engine shuts off
and the vehicle goes into the
accessory mode. The DIC displays
SHIFT TO PARK. Once the shift
lever is moved to P (Park), the
vehicle turns off. If the vehicle has a
manual transmission, move the shift
lever to R (Reverse) and set the
parking brake after turning off the
engine by pressing and holding the
ENGINE START/STOP button.
If the RKE transmitter is not
detected inside the vehicle when it
is turned to off, the DIC displays a
message.
SeeKey and Lock Messages 0124.
Retained Accessory
Power (RAP)
These vehicle accessories can be
used for up to 10 minutes after the
engine is turned off:
.
Audio System
. Power Windows
These features continue to work up
to 10 minutes after the engine is
turned off or until either door is
opened. If a door is opened, the
power windows and audio system
will shut off.
Shifting Into Park
1. Hold the brake pedal down and set the parking brake. See
Electric Parking Brake 0190.
2. Move the shift lever into P (Park) by holding in the
button on the lever and
pushing the lever all the way
toward the front of the vehicle.
3. Press the ENGINE START/ STOP button to turn the
engine off.
Leaving the Vehicle with the
Engine Running (Automatic
Transmission)
{Warning
It can be dangerous to leave the
vehicle with the engine running.
It could overheat and catch fire.
It is dangerous to get out of the
vehicle if the shift lever is not fully
in P (Park) with the parking brake
firmly set. The vehicle can roll.
Do not leave the vehicle when the
engine is running. If you have left
the engine running, the vehicle
can move suddenly. You or others
could be injured. To be sure the
vehicle will not move, even when
you are on fairly level ground,
always set the parking brake and
move the shift lever to P (Park).
See Shifting Into Park 0179.
If you have to leave the vehicle with
the engine running, be sure the
vehicle is in P (Park) and the
parking brake is firmly set before
Page 210 of 351

Chevrolet Corvette Owner Manual (GMNA-Localizing-U.S./Canada/Mexico-
9085364) - 2016 - crc - 9/15/15
Driving and Operating 209
To open the fuel door, push and
release the rearward center edge of
the door. The fuel door is locked
when the vehicle doors are locked.
Press
Kon the RKE transmitter to
unlock. The driver door must be
opened before the fuel door will
unlock.
The vehicle has a capless refueling
system and does not have a fuel
cap. The filling nozzle must be fully
inserted and latched prior to starting
fuel flow.
{Warning
Overfilling the fuel tank by more
than three clicks of a standard fill
nozzle may cause:
. Vehicle performance issues,
including engine stalling and
damage to the fuel system.
. Fuel spills.
. Potential fuel fires.
Be careful not to spill fuel. Wait a
few seconds before removing the
nozzle. After initial shutoff, do not
partially remove the nozzle to add
more fuel as this will result in fuel
spillage. Clean fuel from painted
surfaces as soon as possible. See
Exterior Care 0288.
{Warning
If a fire starts while you are
refueling, do not remove the
nozzle. Shut off the flow of fuel by
(Continued)
Warning (Continued)
shutting off the pump or by
notifying the station attendant.
Leave the area immediately.
Filling the Tank With a Portable
Gas Can
If the vehicle runs out of fuel and
must be filled from a portable
gas can:
1. Locate the capless funnel adapter from inside the vehicle.
2. Insert and latch the funnel into the capless fuel system.
Page 252 of 351
Chevrolet Corvette Owner Manual (GMNA-Localizing-U.S./Canada/Mexico-
9085364) - 2016 - crc - 9/15/15
Vehicle Care 251
SPAREFUSES Usage
71 Spare
72 Spare
73 Spare
75 Spare
Rear Compartment Fuse
Block
The rear compartment fuse block is
in the rear of the vehicle, under the
load floor. Lift the carpet and access
door in the center of the load floor to
access the fuses.
Page 255 of 351
Chevrolet Corvette Owner Manual (GMNA-Localizing-U.S./Canada/Mexico-
9085364) - 2016 - crc - 9/15/15
254 Vehicle Care
FusesUsage
41 Spare
42 Spare
43 Spare
44 Spare
Relays Usage
R1 Logistics 2
R2 Rear Window Defogger
R3 Not Used
R4 Front Accessory Power Outlet
R5 Theft (Door Lock Security)Wheels and Tires
Tires
Every new GM vehicle has
high-quality tires made by a
leading tire manufacturer. See
the warranty manual for
information regarding the tire
warranty and where to get
service. For additional
information refer to the tire
manufacturer.
{Warning
.Poorly maintained and
improperly used tires are
dangerous.
.Overloading the tires can
cause overheating as a
result of too much
flexing. There could be a
blowout and a serious
crash. See Vehicle Load
Limits 0171.
(Continued)
Warning (Continued)
.Underinflated tires pose
the same danger as
overloaded tires. The
resulting crash could
cause serious injury.
Check all tires frequently
to maintain the
recommended pressure.
Tire pressure should be
checked when the tires
are cold.
.Overinflated tires are
more likely to be cut,
punctured, or broken by
a sudden impact —such
as when hitting a pothole.
Keep tires at the
recommended pressure.
.Worn or old tires can
cause a crash. If the
tread is badly worn,
replace them.
(Continued)
Page 280 of 351

Chevrolet Corvette Owner Manual (GMNA-Localizing-U.S./Canada/Mexico-
9085364) - 2016 - crc - 9/15/15
Vehicle Care 279
5. Tire Sealant Canister
6. Sealant/Air Hose (Clear)
7. Air Only Hose (Black)
8. Power Plug
9. Canister Release Button(Under Sealant/Air Hose)
When using the tire sealant and
compressor kit during cold
temperatures, warm the kit in a
heated environment for five minutes.
This will help to inflate the tire
faster.
If a tire goes flat, avoid further tire
and wheel damage by driving slowly
to a level place. Turn on the hazard
warning flashers. See Hazard
Warning Flashers 0143.
See If a Tire Goes Flat 0275 for
other important safety warnings.
Do not remove any objects that
have penetrated the tire.
1. Remove the tire sealant and compressor kit from its storage
location. See Storing the Tire
Sealant and Compressor
Kit 0283.
2. Unwrap the sealant/air hose (6) and the power plug (8). 3. Place the kit on the ground.
Make sure the tire valve stem
is positioned close to the
ground so the hose will
reach it.
4. Remove the valve stem cap from the flat tire by turning it
counterclockwise.
5. Attach the sealant/air hose (6) onto the tire valve stem. Turn it
clockwise until it is tight.
6. Plug the power plug (8) into the accessory power outlet in the
vehicle. Unplug all items from
other accessory power outlets.
See Power Outlets 094.
If the vehicle has an accessory
power outlet, do not use the
cigarette lighter.
If the vehicle only has a
cigarette lighter, use the
cigarette lighter.
Do not pinch the power plug
cord in the door or window.
7. Start the vehicle. The vehicle must be running while using
the air compressor. 8. Press and turn the selector
switch (1) counterclockwise to
the Sealant + Air position.
9. Press the on/off button (2) to turn the tire sealant and
compressor kit on.
The compressor will inject
sealant and air into the tire.
The pressure gauge (3) will
initially show a high pressure
while the compressor pushes
the sealant into the tire. Once
the sealant is completely
dispersed into the tire, the
pressure will quickly drop and
start to rise again as the tire
inflates with air only.
10. Inflate the tire to the recommended inflation
pressure using the pressure
gauge (3). The recommended
inflation pressure can be found
on the Tire and Loading
Information label. See Tire
Pressure 0262.
The pressure gauge (3) may
read higher than the actual tire
pressure while the compressor
Page 283 of 351
Chevrolet Corvette Owner Manual (GMNA-Localizing-U.S./Canada/Mexico-
9085364) - 2016 - crc - 9/15/15
282 Vehicle Care
5. Tire Sealant Canister
6. Sealant/Air Hose (Clear)
7. Air Only Hose (Black)
8. Power Plug
9. Canister Release Button(Under Sealant/Air Hose)
If a tire goes flat, avoid further tire
and wheel damage by driving slowly
to a level place. Turn on the hazard
warning flashers. See Hazard
Warning Flashers 0143.
See If a Tire Goes Flat 0275 for
other important safety warnings.
1. Remove the tire sealant and compressor kit from its storage
location. See Storing the Tire
Sealant and Compressor
Kit 0283.
2. Unwrap the air only hose (7) and the power plug (8).
3. Place the kit on the ground. Make sure the tire valve stem
is positioned close to the
ground so the hose will
reach it. 4. Remove the tire valve stem
cap from the flat tire by turning
it counterclockwise.
5. Attach the air only hose (7) onto the tire valve stem by
turning it clockwise until it is
tight.
6. Plug the power plug (8) into the accessory power outlet in the
vehicle. Unplug all items from
other accessory power outlets.
See Power Outlets 094.
If the vehicle has an accessory
power outlet, do not use the
cigarette lighter.
If the vehicle only has a
cigarette lighter, use the
cigarette lighter.
Do not pinch the power plug
cord in the door or window.
7. Start the vehicle. The vehicle must be running while using
the air compressor.
8. Press and turn the selector switch (1) clockwise to the Air
Only position. 9. Press the on/off button (2) to
turn the compressor on.
The compressor will inflate the
tire with air only.
10. Inflate the tire to the recommended inflation
pressure using the pressure
gauge (3). The recommended
inflation pressure can be found
on the Tire and Loading
Information label. See Tire
Pressure 0262.
The pressure gauge (3) may
read higher than the actual tire
pressure while the compressor
is on. Turn the compressor off
to get an accurate reading. The
compressor may be turned on/
off until the correct pressure is
reached.
If you inflate the tire higher
than the recommended
pressure you can adjust the
excess pressure by pressing
the pressure deflation
button (4) until the proper
pressure reading is reached.
Page 309 of 351
Chevrolet Corvette Owner Manual (GMNA-Localizing-U.S./Canada/Mexico-
9085364) - 2016 - crc - 9/15/15
308 Service and Maintenance
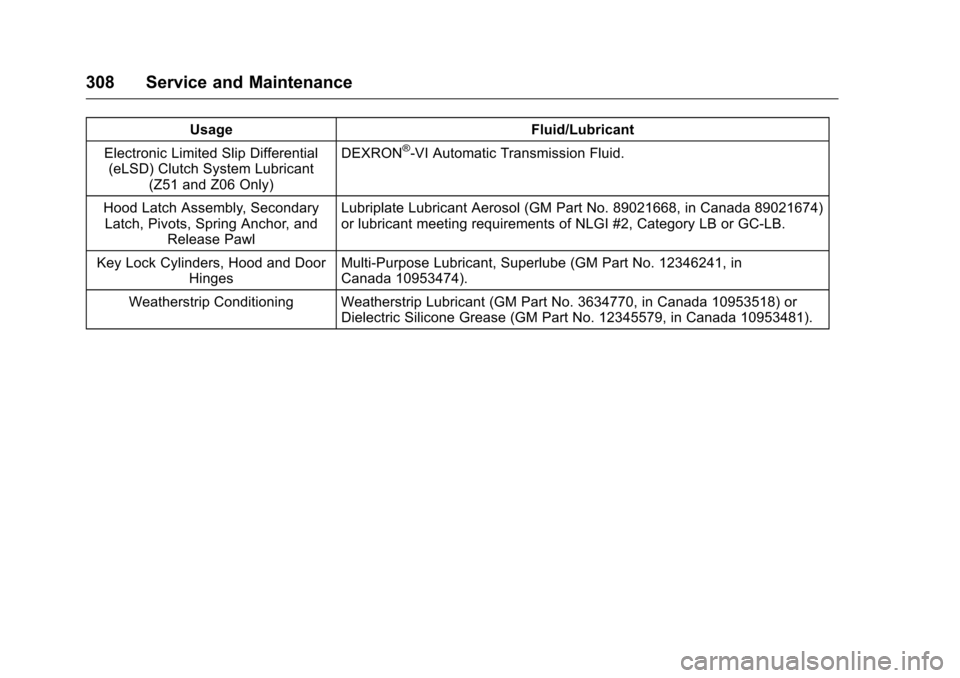
UsageFluid/Lubricant
Electronic Limited Slip Differential (eLSD) Clutch System Lubricant
(Z51 and Z06 Only) DEXRON
®-VI Automatic Transmission Fluid.
Hood Latch Assembly, Secondary Latch, Pivots, Spring Anchor, and
Release Pawl Lubriplate Lubricant Aerosol (GM Part No. 89021668, in Canada 89021674)
or lubricant meeting requirements of NLGI #2, Category LB or GC-LB.
Key Lock Cylinders, Hood and Door Hinges Multi-Purpose Lubricant, Superlube (GM Part No. 12346241, in
Canada 10953474).
Weatherstrip Conditioning Weatherstrip Lubricant (GM Part No. 3634770, in Canada 10953518) or Dielectric Silicone Grease (GM Part No. 12345579, in Canada 10953481).
Page 333 of 351

Chevrolet Corvette Owner Manual (GMNA-Localizing-U.S./Canada/Mexico-
9085364) - 2016 - crc - 9/15/15
332 OnStar
Repeat1. Press
Q. System responds:
“OnStar ready,” then a tone.
2. Say “Repeat.” System
responds with the last direction
given, then responds with
“OnStar ready,” then a tone.
Get My Destination
1. Press
Q. System responds:
“OnStar ready,” then a tone.
2. Say “Get my destination.”
System responds with the
address and distance to the
destination, then responds with
“OnStar ready,” then a tone.
Destination Download
Subscribers can have directions
sent to the vehicle’ s navigation
screen, if equipped.
Press
|then ask the Advisor to
download directions to the vehicle’s
navigation system, if equipped. After
the call ends, the navigation screen
will provide prompts to begin driving
directions. Routes that are sent to the navigation screen can only be
canceled through the navigation
system.
See www.onstar.com (U.S.) or
www.onstar.ca (Canada).
Connections
The following OnStar services help
with staying connected.
For coverage maps, see
www.onstar.com (U.S.) or
www.onstar.ca (Canada).
OnStar Wi-Fi
®Hotspot (If
Equipped)
The vehicle may have a built-in
Wi-Fi hotspot that provides access
to the Internet and web content at
4G LTE speed. Up to seven mobile
devices can be connected. A data
plan is required. Use the in-vehicle
controls only when it is safe to
do so.
1. To retrieve Wi-Fi hotspot information, press
Q, wait for
the prompt, then say “Wi-Fisettings.”
On some vehicles,
touch Wi-Fi Settings on the
screen.
2. The Wi-Fi settings will display the Wi-Fi hotspot name (SSID),
password, and on some
vehicles, the connection type
(no Internet connection, 3G,
4G, 4G LTE), and signal quality
(poor, good, excellent).
3. To change the SSID or password, press
|or call
1-888-4ONSTAR to connect
with an Advisor.
OnStar RemoteLink
®Mobile App
(If Equipped)
Download the OnStar RemoteLink
mobile app to select Apple
®iOS,
Android™, BlackBerry®,
or Windows®mobile devices.
OnStar Subscribers can access the
following services from a mobile
device:
. Remotely start/stop the vehicle,
if factory-equipped.
. Lock/unlock doors, if equipped
with automatic locks.