2016 CHEVROLET CORVETTE remote control
[x] Cancel search: remote controlPage 139 of 351
Chevrolet Corvette Owner Manual (GMNA-Localizing-U.S./Canada/Mexico-
9085364) - 2016 - crc - 9/15/15
138 Instruments and Controls
transmitter was supplied by the
manufacturer of the garage
door opener receiver.
2. At the same time, press and hold both the hand-held
transmitter button and one of
the three Universal Remote
system buttons to be used to
operate the garage door. Do
not release either button until
the indicator light changes from
a slow to a rapid flash. Then
release both buttons.
Some garage door openers
may require substitution of
Step 2 with the procedure
under “Radio Signals for
Canada and Some Gate
Operators” later in this section.
3. Press and hold the newly programmed Universal Remote
system button for five seconds
while watching the indicator
light and garage door
activation.
.If the indicator light stays on
continuously or the garage
door moves when the
button is pressed, then programming is complete.
There is no need to
complete Steps 4–6.
. If the indicator light does
not come on or the garage
door does not move, a
second button press may
be required. For a second
time, press and hold the
newly programmed button
for five seconds. If the light
stays on or the garage door
moves, programming is
complete.
. If the indicator light blinks
rapidly for two seconds,
then changes to a solid light
and the garage door does
not move, continue with
programming Steps 4–6.
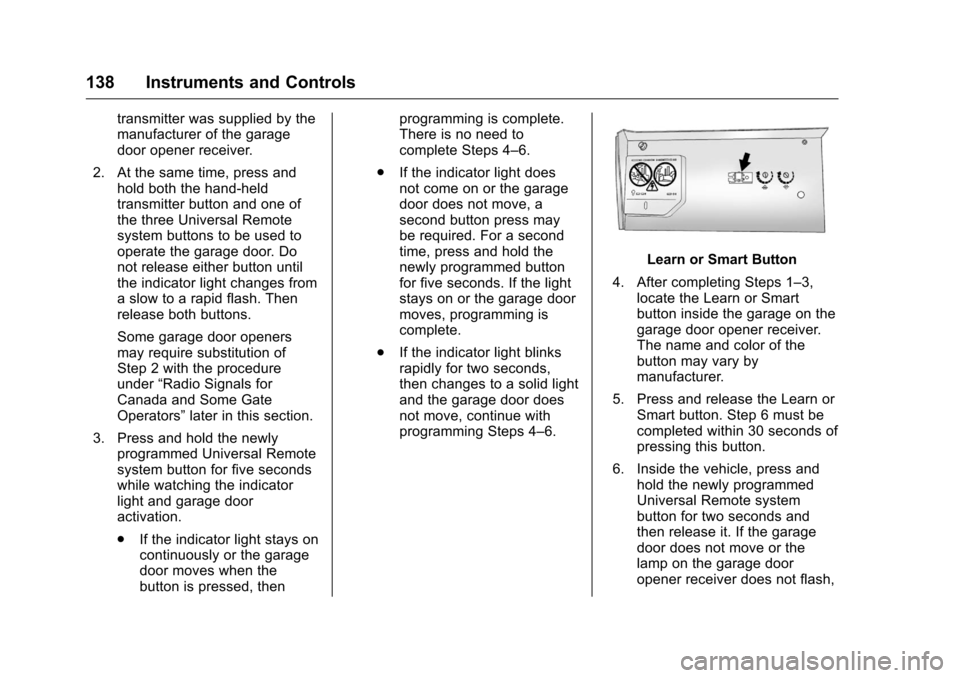
Learn or Smart Button
4. After completing Steps 1–3, locate the Learn or Smart
button inside the garage on the
garage door opener receiver.
The name and color of the
button may vary by
manufacturer.
5. Press and release the Learn or Smart button. Step 6 must be
completed within 30 seconds of
pressing this button.
6. Inside the vehicle, press and hold the newly programmed
Universal Remote system
button for two seconds and
then release it. If the garage
door does not move or the
lamp on the garage door
opener receiver does not flash,
Page 140 of 351
Chevrolet Corvette Owner Manual (GMNA-Localizing-U.S./Canada/Mexico-
9085364) - 2016 - crc - 9/15/15
Instruments and Controls 139
press and hold the same
button a second time for
two seconds, then release it.
Again, if the door does not
move or the garage door lamp
does not flash, press and hold
the same button a third time for
two seconds, then release it.
The Universal Remote system
should now activate the
garage door.
Repeat the process to program the
two remaining buttons.
Radio Signals for Canada and
Some Gate Operators
For questions or programming help
call 1-800-355-3515 or see
www.homelink.com.
Canadian radio-frequency laws and
some U.S. gate operators require
transmitter signals to time out or quit
after several seconds of
transmission. This may not be long
enough for the Universal Remote
system to pick up the signal during
programming. If the programming did not work,
replace Step 2 under
“Programming
the Universal Remote System” with
the following:
Press and hold the Universal
Remote system button while
pressing and releasing the
hand-held transmitter button every
two seconds until the signal has
been successfully accepted by the
Universal Remote system. The
Universal Remote system indicator
light will flash slowly at first and then
rapidly. Proceed with Step 3 under
“Programming the Universal Remote
System” to complete.Universal Remote System
Operation
Using the Universal Remote
System
Press and hold the appropriate
Universal Remote system button for
at least one-half second. The
indicator light will come on while the
signal is being transmitted.
Erasing Universal Remote
System Buttons
Erase all programmed buttons when
vehicle ownership is terminated.
To erase:
1. Press and hold the two outside buttons until the indicator light
begins to flash. This should
take about 10 seconds.
2. Release both buttons.
Reprogramming a Single
Universal Remote System
Button
To reprogram any of the system
buttons: 1. Press and hold any one of the buttons. Do not release the
button.
2. The indicator light will begin to flash after 20 seconds. Without
releasing the button, proceed
with Step 1 under
“Programming the Universal
Remote System.”
Page 145 of 351

Chevrolet Corvette Owner Manual (GMNA-Localizing-U.S./Canada/Mexico-
9085364) - 2016 - crc - 9/15/15
144 Lighting
Interior Lighting
Instrument Panel
Illumination Control
The knob for this feature is on the
left side of the instrument panel.
Turn the knob clockwise or
counterclockwise to brighten or dim
the instrument panel lights at night.
Turn the knob completely clockwise
to turn on the interior lights.
Courtesy Lamps
When any door or the hatch/trunk is
opened, the interior lamps will
come on.The rear compartment lights only
come on when the rear
compartment is opened.
To turn the courtesy lamps on or off,
turn the instrument panel brightness
knob completely clockwise or
counterclockwise.
Reading Lamps
The reading lamps are in the
overhead console. The lamps go on
when a door is opened. When the
doors are closed, press the lamp
buttons to turn on each lamp.
Lighting Features
Entry Lighting
Some exterior lamps turn on briefly
at night, or in areas with limited
lighting, when
Kis pressed on the
Remote Keyless Entry (RKE)
transmitter. When the driver door is
opened, all control lights, Driver
Information Center (DIC) lights, and
door pocket lights turn on. After
about 30 seconds the exterior lamps
turn off, and then the dome and
remaining interior lamps dim to off.
Entry lighting can be disabled
manually by changing the ignition
out of the OFF position, or by
pressing
Qon the RKE transmitter.
This feature can be changed. See
“Vehicle Locator Lights” under
Vehicle Personalization 0130.
Page 156 of 351
Chevrolet Corvette Owner Manual (GMNA-Localizing-U.S./Canada/Mexico-
9085364) - 2016 - crc - 9/15/15
Climate Controls 155
If equipped with heated outside
rearview mirrors, they turn on with
the rear window defogger and help
to clear fog or frost from the surface
of the mirror. SeeHeated
Mirrors 042.
If equipped with a power convertible
top, the rear window defogger and
heated mirrors are automatically
disabled when the power convertible
top is moving or down.
Caution
Using a razor blade or sharp
object on the inside rear window
can damage the antenna or
defogger. Repairs would not be
covered by the vehicle warranty.
Do not stick anything to the rear
window.
z/{(Driver and Passenger
Heated and Ventilated Seats, If
Equipped) : Press to heat or
ventilate the seat. See Heated and
Ventilated Front Seats 059. Remote Start Climate Control
Operation (If Equipped) :
If remote
start is used to start the vehicle, the
climate control system will come on.
The system uses the driver ’s
previous settings to heat or cool the
inside of the vehicle. The rear
window defogger or heated outside
rearview mirrors, if equipped, may
come on based on cold ambient
conditions. The rear defog indicator
light may not come on during a
remote start. The heated or
ventilated seats may turn on if it is
cold or hot outside. See Remote
Vehicle Start 031 and Heated and
Ventilated Front Seats 059,
if equipped.
Sensors
The interior cabin air temperature
and solar sensor on top of the
instrument panel near the
windshield monitors the solar heat
and measures the initial interior
cabin temperature. The climate control system uses the
sensor information to adjust the
temperature, fan speed,
recirculation, and air delivery mode
for best comfort.
The humidity and windshield
temperature sensor is on the
windshield glass inside surface near
the rearview mirror. The automatic
climate control system uses this
sensor to receive information to
determine the need for defogging.
If any of these sensors are blocked
or covered, the automatic climate
control system may not work
properly.
There is also a sensor behind the
front bumper. This sensor reads the
outside air temperature and helps to
maintain the temperature inside the
vehicle. Any cover on the front of
the vehicle could give a false
reading in the temperature.
Page 320 of 351
Chevrolet Corvette Owner Manual (GMNA-Localizing-U.S./Canada/Mexico-
9085364) - 2016 - crc - 9/15/15
Customer Information 319
This program is available to
qualified applicants for cost
reimbursement of eligible
aftermarket adaptive equipment
required for the vehicle, such as
hand controls or a wheelchair/
scooter lift for the vehicle.
For more information on the limited
offer, visit www.gmmobility.com or
call the GM Mobility Assistance
Center at 1-800-323-9935. Text
Telephone (TTY) users, call
1-800-833-9935.
General Motors of Canada also has
a Mobility Program. Visit www.gm.ca
or call 1-800-GM-DRIVE (463-7483)
for details. TTY users call
1-800-263-3830.
Roadside Assistance
Program
For U.S.-purchased vehicles, call
1-800-243-8872. (Text Telephone
(TTY): 1-888-889-2438.)
For Canadian-purchased vehicles,
call 1-800-268-6800.
Service is available 24 hours a day,
365 days a year.
Calling for Assistance
When calling Roadside Assistance,
have the following information
ready:
.Your name, home address, and
home telephone number.
. Telephone number of your
location.
. Location of the vehicle.
. Model, year, color, and license
plate number of the vehicle.
. Odometer reading, Vehicle
Identification Number (VIN), and
delivery date of the vehicle.
. Description of the problem.
Coverage
Services are provided for the
duration of the vehicle’s powertrain
warranty.
In the U.S., anyone driving the
vehicle is covered. In Canada, a
person driving the vehicle without
permission from the owner is not
covered. Roadside Assistance is not a part of
the New Vehicle Limited Warranty.
General Motors North America and
Chevrolet reserve the right to make
any changes or discontinue the
Roadside Assistance program at
any time without notification.
General Motors North America and
Chevrolet reserve the right to limit
services or payment to an owner or
driver if they decide the claims are
made too often, or the same type of
claim is made many times.
Services Provided
.
Emergency Fuel Delivery:
Delivery of enough fuel for the
vehicle to get to the nearest
service station.
. Lock-Out Service: Service to
unlock the vehicle if you are
locked out. A remote unlock may
be available if you have OnStar.
For security reasons, the driver
must present identification
before this service is given.
. Emergency Tow from a Public
Road or Highway: Tow to the
nearest Chevrolet dealer for
Page 333 of 351

Chevrolet Corvette Owner Manual (GMNA-Localizing-U.S./Canada/Mexico-
9085364) - 2016 - crc - 9/15/15
332 OnStar
Repeat1. Press
Q. System responds:
“OnStar ready,” then a tone.
2. Say “Repeat.” System
responds with the last direction
given, then responds with
“OnStar ready,” then a tone.
Get My Destination
1. Press
Q. System responds:
“OnStar ready,” then a tone.
2. Say “Get my destination.”
System responds with the
address and distance to the
destination, then responds with
“OnStar ready,” then a tone.
Destination Download
Subscribers can have directions
sent to the vehicle’ s navigation
screen, if equipped.
Press
|then ask the Advisor to
download directions to the vehicle’s
navigation system, if equipped. After
the call ends, the navigation screen
will provide prompts to begin driving
directions. Routes that are sent to the navigation screen can only be
canceled through the navigation
system.
See www.onstar.com (U.S.) or
www.onstar.ca (Canada).
Connections
The following OnStar services help
with staying connected.
For coverage maps, see
www.onstar.com (U.S.) or
www.onstar.ca (Canada).
OnStar Wi-Fi
®Hotspot (If
Equipped)
The vehicle may have a built-in
Wi-Fi hotspot that provides access
to the Internet and web content at
4G LTE speed. Up to seven mobile
devices can be connected. A data
plan is required. Use the in-vehicle
controls only when it is safe to
do so.
1. To retrieve Wi-Fi hotspot information, press
Q, wait for
the prompt, then say “Wi-Fisettings.”
On some vehicles,
touch Wi-Fi Settings on the
screen.
2. The Wi-Fi settings will display the Wi-Fi hotspot name (SSID),
password, and on some
vehicles, the connection type
(no Internet connection, 3G,
4G, 4G LTE), and signal quality
(poor, good, excellent).
3. To change the SSID or password, press
|or call
1-888-4ONSTAR to connect
with an Advisor.
OnStar RemoteLink
®Mobile App
(If Equipped)
Download the OnStar RemoteLink
mobile app to select Apple
®iOS,
Android™, BlackBerry®,
or Windows®mobile devices.
OnStar Subscribers can access the
following services from a mobile
device:
. Remotely start/stop the vehicle,
if factory-equipped.
. Lock/unlock doors, if equipped
with automatic locks.
Page 336 of 351
Chevrolet Corvette Owner Manual (GMNA-Localizing-U.S./Canada/Mexico-
9085364) - 2016 - crc - 9/15/15
OnStar 335
.Press|to speak with an
Advisor.
OnStar services cannot work unless
the vehicle is in a place where
OnStar has an agreement with a
wireless service provider for service
in that area. The wireless service
provider must also have coverage,
network capacity, reception, and
technology compatible with OnStar
services. Service involving location
information about the vehicle cannot
work unless GPS signals are
available, unobstructed, and
compatible with the OnStar
hardware. OnStar services may not
work if the OnStar equipment is not
properly installed or it has not been
properly maintained. If equipment or
software is added, connected,
or modified, OnStar services may
not work. Other problems beyond
the control of OnStar —such as
hills, tall buildings, tunnels, weather,
electrical system design and
architecture of the vehicle, damage
to the vehicle in a crash, or wireless
phone network congestion or
jamming —may prevent service. See
Radio Frequency
Statement 0325.
Services for People with
Disabilities
Advisors provide services to help
Subscribers with physical disabilities
and medical conditions.
Press
|to help:
. Locate a gas station with an
attendant to pump gas.
. Find a hotel, restaurant, etc.,
that meets accessibility needs.
. Provide directions to the closest
hospital or pharmacy in urgent
situations.
TTY Users
OnStar has the ability to
communicate to deaf,
hard-of-hearing, or speech-impaired
customers while in the vehicle. The
available dealer-installed TTY
system can provide in-vehicle
access to all OnStar services,
except Virtual Advisor and OnStar
Turn-by-Turn Navigation.
OnStar Personal Identification
Number (PIN)
A PIN is needed to access some
OnStar services. The PIN will need
to be changed the first time when
speaking with an Advisor. To
change the OnStar PIN, contact an
OnStar Advisor by pressing
|or
calling 1-888-4ONSTAR.
Warranty
OnStar equipment may be
warranted as part of the vehicle
warranty.
Languages
The vehicle can be programmed to
respond in multiple languages.
Press
|and ask for an Advisor.
Advisors are available in English,
Spanish, and French. Available
languages may vary by country.
Potential Issues
OnStar cannot perform Remote
Door Unlock or Stolen Vehicle
Assistance after the vehicle has
been off continuously for five days
without an ignition cycle. If the
Page 345 of 351
Chevrolet Corvette Owner Manual (GMNA-Localizing-U.S./Canada/Mexico-
9085364) - 2016 - crc - 9/15/15
344 Index
Gauges (cont'd)Speedometer . . . . . . . . . . . . . . . . . 101
Tachometer . . . . . . . . . . . . . . . . . . . 101
Trip Odometer . . . . . . . . . . . . . . . . 101
Warning Lights and
Indicators . . . . . . . . . . . . . . . . . . . . . 95
Gear Shifting Light . . . . . . . . . . . . . . 109
General Information Service and Maintenance . . . . . 297
Towing . . . . . . . . . . . . . . . . . . . . . . . . 210
Vehicle Care . . . . . . . . . . . . . . . . . . 213
Glove Box . . . . . . . . . . . . . . . . . . . . . . . 87
GM Mobility Reimbursement Program . . . . . . . . . . . . . . . . . . . . . . . 318
H
Hatch . . . . . . . . . . . . . . . . . . . . . . . . . . . . 37
Hazard Warning Flashers . . . . . . . 143
Head Restraints . . . . . . . . . . . . . . . . . 55
Head-up Display . . . . . . . . . . . . . . . . 115
Headlamps
Aiming . . . . . . . . . . . . . . . . . . . . . . . . 245
Automatic . . . . . . . . . . . . . . . . . . . . . 142
Bulb Replacement . . . . . . . . . . . . 245
Daytime RunningLamps (DRL) . . . . . . . . . . . . . . . . 141
Flash-to-Pass . . . . . . . . . . . . . . . . . 141
High Intensity Discharge (HID) Lighting . . . . . . . . . . . . . . . 245 Headlamps (cont'd)
High-Beam On Light . . . . . . . . . . .112
High/Low Beam Changer . . . . . 141
Lamps On Reminder . . . . . . . . . .113
Heated and Ventilated Front Seats . . . . . . . . . . . . . . . . . . . . . . . . . . 59
Heated Mirrors . . . . . . . . . . . . . . . . . . . 42
High-Beam On Light . . . . . . . . . . . . 112
High-Speed Operation . . . . . . . . . . 264
Hill and Mountain Roads . . . . . . . . 168
Hill Start Assist (HSA) . . . . . . . . . . 192
Hood . . . . . . . . . . . . . . . . . . . . . . . . . . . 217
Horn . . . . . . . . . . . . . . . . . . . . . . . . . . . . . 92
How to Wear Safety Belts Properly . . . . . . . . . . . . . . . . . . . . . . . . 62
Hydraulic Clutch . . . . . . . . . . . . . . . . 230
I
Ignition Positions . . . . . . . . . . . . . . . 175
Immobilizer . . . . . . . . . . . . . . . . . . . . . . 40
Infants and Young Children, Restraints . . . . . . . . . . . . . . . . . . . . . . 79
Infotainment . . . . . . . . . . . . . . . . . . . . 146
Infotainment System . . . . . . . . . . . . 328
Instrument Cluster . . . . . . . . . . . . . . . 96
Instrument Panel Storage Area . . . . . . . . . . . . . . . . . . . 87
Interior Rearview Mirrors . . . . . . . . . 43
Introduction . . . . . . . . . . . . . . . . . . . . . . . 2
J
Jump Starting - North
America . . . . . . . . . . . . . . . . . . . . . . . 284
K
Key and Lock Messages . . . . . . . . 124
Keyless EntryRemote (RKE) System . . . . . . . . . 26
Keys . . . . . . . . . . . . . . . . . . . . . . . . . . . . . 24
L
Labeling, Tire Sidewall . . . . . . . . . . 258
Lamps Courtesy . . . . . . . . . . . . . . . . . . . . . . 144
Daytime Running (DRL) . . . . . . 141
Exterior Controls . . . . . . . . . . . . . . 140
Exterior Lamps OffReminder . . . . . . . . . . . . . . . . . . . 140
Exterior Lighting Battery Saver . . . . . . . . . . . . . . . . . . . . . . . 145
License Plate . . . . . . . . . . . . . . . . . 246
Malfunction Indicator . . . . . . . . . 106
Messages . . . . . . . . . . . . . . . . . . . . 125
On Reminder . . . . . . . . . . . . . . . . . .113
Reading . . . . . . . . . . . . . . . . . . . . . . 144
Lap-Shoulder Belt . . . . . . . . . . . . . . . 63
LATCH, Lower Anchors and Tethers for Children . . . . . . . . . . . . 83
Latches, Seatback . . . . . . . . . . . . . . . 59