2016 CHEVROLET COLORADO Z71 stop start
[x] Cancel search: stop startPage 235 of 396

Chevrolet Colorado Owner Manual (GMNA-Localizing-U.S/Canada/Mexico-
9159327) - 2016 - crc - 8/28/15
234 Driving and Operating
Set the parking brake by holding the
regular brake pedal down, then
pushing down the parking brake
pedal.
If the ignition is on, the brake
system warning light will come on.
SeeBrake System Warning Light
0 117
ii.
Caution
Driving with the parking brake on
can overheat the brake system
and cause premature wear or
damage to brake system parts.
Make sure that the parking brake
is fully released and the brake
warning light is off before driving.
To release the parking brake, hold
the regular brake pedal down, then
push down momentarily on the
parking brake pedal until you feel
the pedal release. Slowly pull your
foot up off the parking brake pedal.
If the parking brake is not released
when you begin to drive, the brake system warning light will flash and a
chime will sound warning you that
the parking brake is still on.
If you are towing a trailer and are
parking on a hill, see
Driving
Characteristics and Towing Tips
0 249
ii.
Brake Assist
The Brake Assist feature is
designed to assist the driver in
stopping or decreasing vehicle
speed in emergency driving
conditions. This feature uses the
stability system hydraulic brake
control module to supplement the
power brake system under
conditions where the driver has
quickly and forcefully applied the
brake pedal in an attempt to quickly
stop or slow down the vehicle. The
stability system hydraulic brake
control module increases brake
pressure at each corner of the
vehicle until the ABS activates. Minor brake pedal pulsation or
pedal movement during this time is
normal and the driver should
continue to apply the brake pedal as
the driving situation dictates. The
Brake Assist feature will
automatically disengage when the
brake pedal is released or brake
pedal pressure is quickly
decreased.
Hill Start Assist (HSA)
This vehicle has an HSA feature,
which may be useful when the
vehicle is stopped on a grade
sufficient enough to activate HSA.
This feature is designed to prevent
the vehicle from rolling, either
forward or rearward, during vehicle
drive off. After the driver completely
stops and holds the vehicle in a
complete standstill on a grade, HSA
will be automatically activated.
Page 237 of 396
Chevrolet Colorado Owner Manual (GMNA-Localizing-U.S/Canada/Mexico-
9159327) - 2016 - crc - 8/28/15
236 Driving and Operating
instrument cluster. Both traction
control and StabiliTrak are
automatically disabled in this
condition.
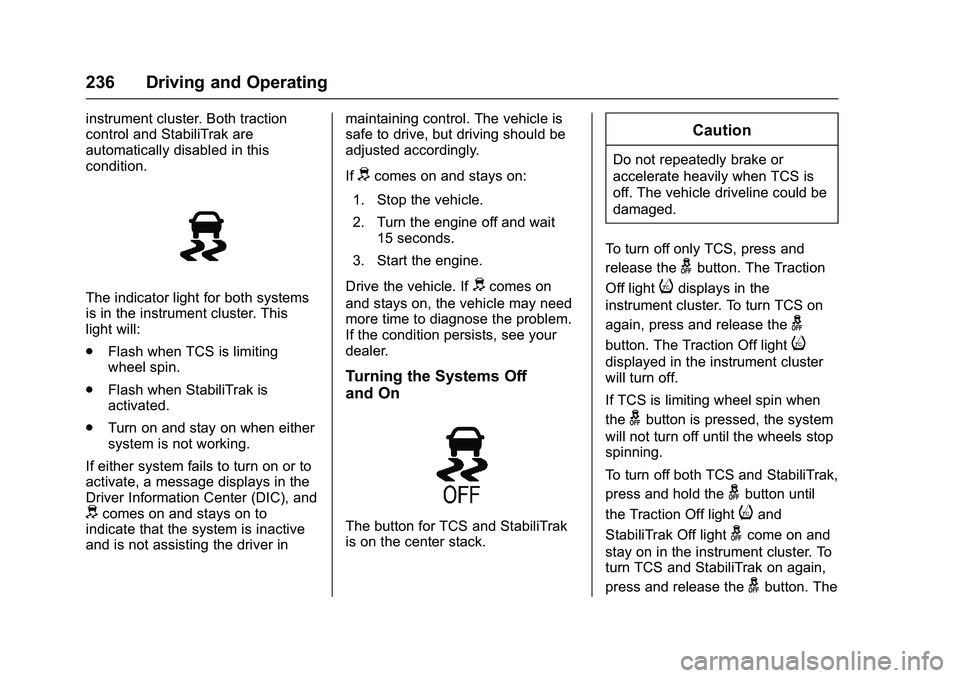
The indicator light for both systems
is in the instrument cluster. This
light will:
.Flash when TCS is limiting
wheel spin.
. Flash when StabiliTrak is
activated.
. Turn on and stay on when either
system is not working.
If either system fails to turn on or to
activate, a message displays in the
Driver Information Center (DIC), and
dcomes on and stays on to
indicate that the system is inactive
and is not assisting the driver in maintaining control. The vehicle is
safe to drive, but driving should be
adjusted accordingly.
If
dcomes on and stays on:
1. Stop the vehicle.
2. Turn the engine off and wait 15 seconds.
3. Start the engine.
Drive the vehicle. If
dcomes on
and stays on, the vehicle may need
more time to diagnose the problem.
If the condition persists, see your
dealer.
Turning the Systems Off
and On
The button for TCS and StabiliTrak
is on the center stack.
Caution
Do not repeatedly brake or
accelerate heavily when TCS is
off. The vehicle driveline could be
damaged.
To turn off only TCS, press and
release the
gbutton. The Traction
Off light
idisplays in the
instrument cluster. To turn TCS on
again, press and release the
g
button. The Traction Off lighti
displayed in the instrument cluster
will turn off.
If TCS is limiting wheel spin when
the
gbutton is pressed, the system
will not turn off until the wheels stop
spinning.
To turn off both TCS and StabiliTrak,
press and hold the
gbutton until
the Traction Off light
iand
StabiliTrak Off light
gcome on and
stay on in the instrument cluster. To
turn TCS and StabiliTrak on again,
press and release the
gbutton. The
Page 252 of 396
Chevrolet Colorado Owner Manual (GMNA-Localizing-U.S/Canada/Mexico-
9159327) - 2016 - crc - 8/28/15
Driving and Operating 251
vehicle may show signs similar to
engine overheating. To avoid this,
let the engine run while parked,
preferably on level ground, with the
transmission in P (Park) for a few
minutes before turning the engine
off. If the overheat warning comes
on, seeEngine Overheating 0274
ii.
Parking on Hills
{Warning
Parking the vehicle on a hill with
the trailer attached can be
dangerous. If something goes
wrong, the rig could start to move.
People can be injured, and both
the vehicle and the trailer can be
damaged. When possible, always
park the rig on a flat surface.
If parking the rig on a hill: 1. Press the brake pedal, but do not shift into P (Park) yet. Turn
the wheels into the curb if
facing downhill or into traffic if
facing uphill. 2. Have someone place chocks
under the trailer wheels.
3. When the wheel chocks are in place, release the regular
brakes until the chocks absorb
the load.
4. Reapply the brake pedal. Then apply the parking brake and
shift into P (Park).
5. Release the brake pedal.Leaving After Parking on a Hill
1. Apply and hold the brake pedal.
2. Start the engine.
3. Shift into a gear.
4. Release the parking brake.
5. Let up on the brake pedal.
6. Drive slowly until the trailer is clear of the chocks.
7. Stop and have someone pick up and store the chocks.
Maintenance when Trailer
Towing
The vehicle needs service more
often when pulling a trailer. See
Maintenance Schedule 0344
ii.
Things that are especially important
in trailer operation are automatic
transmission fluid, engine oil, axle
lubricant, belts, cooling system, and
brake system. It is a good idea to
inspect these before and during
the trip.
Check periodically to see that all
hitch nuts and bolts are tight.
Trailer Towing
Do not tow a trailer during break-in.
See New Vehicle Break-In 0211ii.
{Warning
The driver can lose control when
pulling a trailer if the correct
equipment is not used or the
vehicle is not driven properly. For
example, if the trailer is too
heavy, the brakes may not work
(Continued)
Page 256 of 396
Chevrolet Colorado Owner Manual (GMNA-Localizing-U.S/Canada/Mexico-
9159327) - 2016 - crc - 8/28/15
Driving and Operating 255
manufacturer or by the trailer
manufacturer. Always leave just
enough slack so the combination
can turn. Never allow safety chains
to drag on the ground.
Trailer Brakes
A loaded trailer that weighs more
than 900 kg (2,000 lb) needs to have
its own brake system that is
adequate for the weight of the
trailer. Be sure to read and follow
the instructions for the trailer brakes
so they are installed, adjusted, and
maintained properly.
Trailer Wiring Harness
For vehicles not equipped with
heavy-duty trailering, a harness is
secured underneath the left side of
the vehicle, next to the spare tire.
The harness requires the installation
of a trailer connector, which is
available through your dealer. The
seven-wire harness contains the
following trailer circuits:
.Yellow: Left stop/turn signal
. Green: Right stop/turn signal
. Brown: Taillamps/parking lamps .
Black: Ground
. Gray: Back-up lamps
. Orange: Battery feed
. Blue: Trailer brake
To help charge a remote
(non-vehicle) battery, press the Tow/
Haul Mode button at the end of the
shift lever. If the trailer is too light for
Tow/Haul Mode, turn on the
headlamps to help charge the
battery.
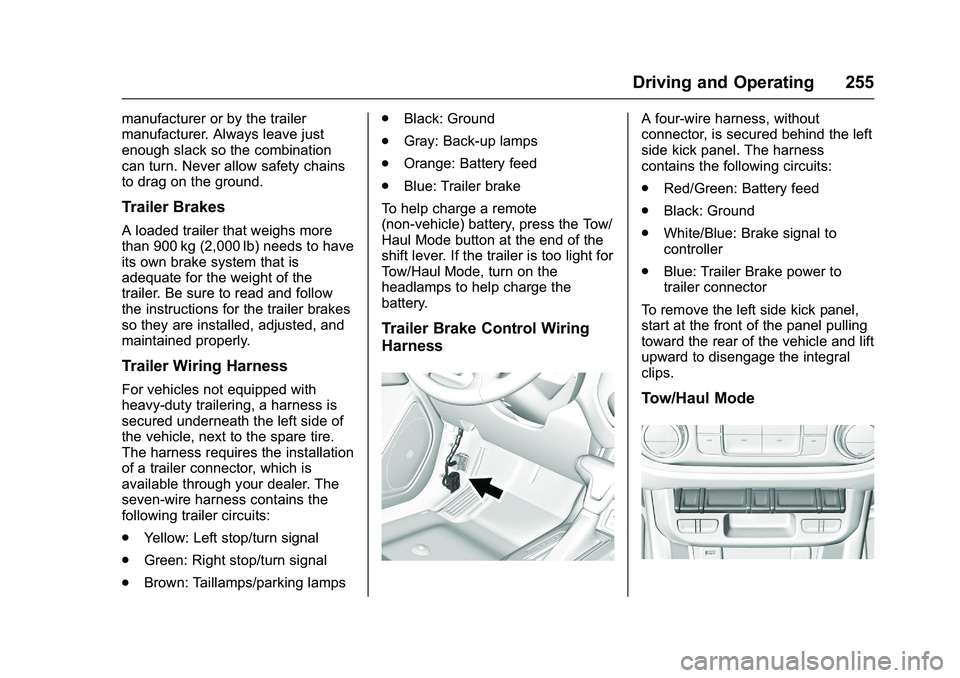
Trailer Brake Control Wiring
Harness
A four-wire harness, without
connector, is secured behind the left
side kick panel. The harness
contains the following circuits:
. Red/Green: Battery feed
. Black: Ground
. White/Blue: Brake signal to
controller
. Blue: Trailer Brake power to
trailer connector
To remove the left side kick panel,
start at the front of the panel pulling
toward the rear of the vehicle and lift
upward to disengage the integral
clips.
Tow/Haul Mode
Page 259 of 396
Chevrolet Colorado Owner Manual (GMNA-Localizing-U.S/Canada/Mexico-
9159327) - 2016 - crc - 8/28/15
258 Vehicle Care
Vehicle Care
General Information
General Information . . . . . . . . . . 259
California Proposition65 Warning . . . . . . . . . . . . . . . . . 259
California Perchlorate Materials Requirements . . . . . 259
Accessories and Modifications . . . . . . . . . . . . . . . . 259
Vehicle Checks
Doing Your OwnService Work . . . . . . . . . . . . . . . 260
Hood . . . . . . . . . . . . . . . . . . . . . . . . . 261
Engine Compartment Overview . . . . . . . . . . . . . . . . . . . . 262
Engine Oil . . . . . . . . . . . . . . . . . . . . 265
Engine Oil Life System . . . . . . . 267
Automatic Transmission Fluid . . . . . . . . . . . . . . . . . . . . . . . . 268
Manual Transmission Fluid . . . 269
Hydraulic Clutch . . . . . . . . . . . . . . 269
Engine Air Cleaner/Filter . . . . . . 269
Cooling System . . . . . . . . . . . . . . 271
Engine Coolant . . . . . . . . . . . . . . . 272
Engine Overheating . . . . . . . . . . 274
Engine Fan . . . . . . . . . . . . . . . . . . . 276
Washer Fluid . . . . . . . . . . . . . . . . . 276
Brakes . . . . . . . . . . . . . . . . . . . . . . . 277 Brake Fluid . . . . . . . . . . . . . . . . . . . 278
Battery - North America . . . . . . 279
Four-Wheel Drive . . . . . . . . . . . . . 279
Front Axle . . . . . . . . . . . . . . . . . . . . 280
Rear Axle . . . . . . . . . . . . . . . . . . . . 280
Starter Switch Check . . . . . . . . . 281
Automatic Transmission Shift
Lock Control Function
Check . . . . . . . . . . . . . . . . . . . . . . . 282
Ignition Transmission Lock Check . . . . . . . . . . . . . . . . . . . . . . . 282
Park Brake and P (Park) Mechanism Check . . . . . . . . . . 282
Wiper Blade Replacement . . . . 283
Headlamp Aiming
Headlamp Aiming . . . . . . . . . . . . 284
Bulb Replacement
Bulb Replacement . . . . . . . . . . . . 284
Halogen Bulbs . . . . . . . . . . . . . . . . 284
Headlamps, Front Turn Signal, Sidemarker, and Parking
Lamps . . . . . . . . . . . . . . . . . . . . . . 284
Taillamps, Turn Signal, Stoplamps, and Back-Up
Lamps . . . . . . . . . . . . . . . . . . . . . . 285
Center High-Mounted Stoplamp (CHMSL) and
Cargo Lamp . . . . . . . . . . . . . . . . . 286
Replacement Bulbs . . . . . . . . . . . 286
Electrical System
Electrical System Overload . . . 287
Fuses . . . . . . . . . . . . . . . . . . . . . . . . 287
Engine Compartment Fuse Block . . . . . . . . . . . . . . . . . . . . . . . . 288
Instrument Panel Fuse
Block . . . . . . . . . . . . . . . . . . . . . . . . 292
Wheels and Tires
Tires . . . . . . . . . . . . . . . . . . . . . . . . . . 295
All-Season Tires . . . . . . . . . . . . . . 296
Winter Tires . . . . . . . . . . . . . . . . . . 296
All-Terrain Tires . . . . . . . . . . . . . . . 297
Tire Sidewall Labeling . . . . . . . . 297
Tire Designations . . . . . . . . . . . . . 299
Tire Terminology andDefinitions . . . . . . . . . . . . . . . . . . 300
Tire Pressure . . . . . . . . . . . . . . . . . 302
Tire Pressure Monitor
System . . . . . . . . . . . . . . . . . . . . . . 303
Tire Pressure Monitor Operation . . . . . . . . . . . . . . . . . . . 304
Tire Inspection . . . . . . . . . . . . . . . . 307
Tire Rotation . . . . . . . . . . . . . . . . . 308
When It Is Time for New Tires . . . . . . . . . . . . . . . . . . . . . . . . 309
Buying New Tires . . . . . . . . . . . . . 310
Different Size Tires and Wheels . . . . . . . . . . . . . . . . . . . . . . 311
Uniform Tire Quality Grading . . . . . . . . . . . . . . . . . . . . . 312
Page 272 of 396
Chevrolet Colorado Owner Manual (GMNA-Localizing-U.S/Canada/Mexico-
9159327) - 2016 - crc - 8/28/15
Vehicle Care 271
4. Lift the filter cover housingaway from the engine air
cleaner/filter housing.
5. Pull out the filter.
6. Inspect or replace the engine air cleaner/filter.
7. Reverse Steps 2-5 to reinstall the filter cover housing.
{Warning
Operating the engine with the air
cleaner/filter off can cause you or
others to be burned. The air
cleaner not only cleans the air; it
helps to stop flames if the engine
backfires. Use caution when
working on the engine and do not
drive with the air cleaner/filter off.
Caution
If the air cleaner/filter is off, dirt
can easily get into the engine,
which could damage it. Always
have the air cleaner/filter in place
when you are driving.
Cooling System
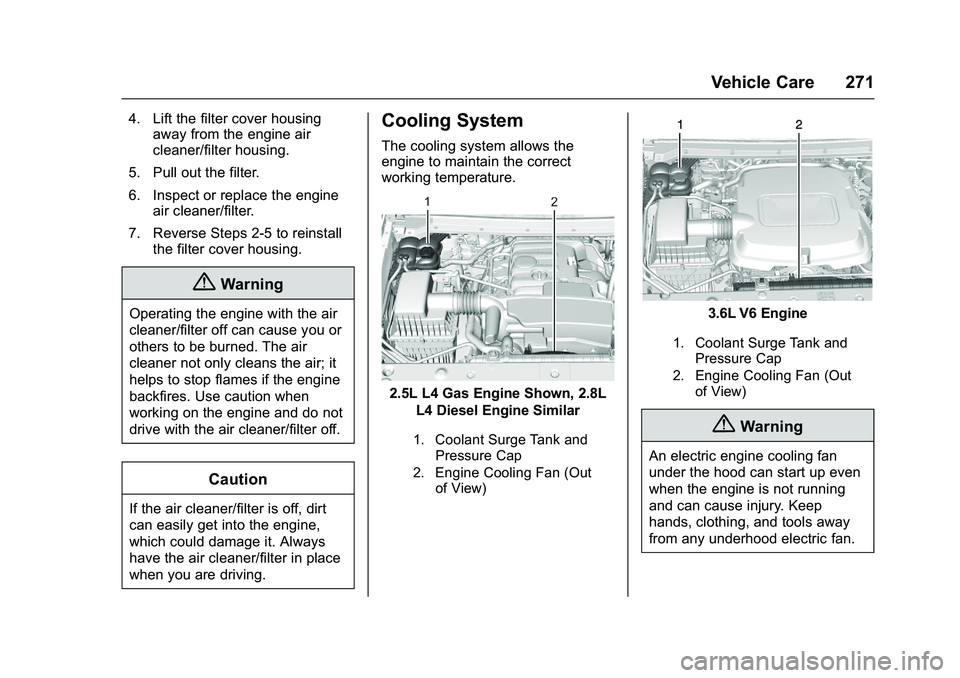
The cooling system allows the
engine to maintain the correct
working temperature.
2.5L L4 Gas Engine Shown, 2.8L
L4 Diesel Engine Similar
1. Coolant Surge Tank andPressure Cap
2. Engine Cooling Fan (Out of View)
3.6L V6 Engine
1. Coolant Surge Tank and
Pressure Cap
2. Engine Cooling Fan (Out of View)
{Warning
An electric engine cooling fan
under the hood can start up even
when the engine is not running
and can cause injury. Keep
hands, clothing, and tools away
from any underhood electric fan.
Page 275 of 396
Chevrolet Colorado Owner Manual (GMNA-Localizing-U.S/Canada/Mexico-
9159327) - 2016 - crc - 8/28/15
274 Vehicle Care
The coolant surge tank pressure
cap can be removed when the
cooling system, including the surge
tank pressure cap and upper
radiator hose, is no longer hot.1. Turn the pressure cap slowly counterclockwise. If a hiss is
heard, wait for that to stop.
A hiss means there is still
some pressure left.
2. Keep turning the cap and remove it.
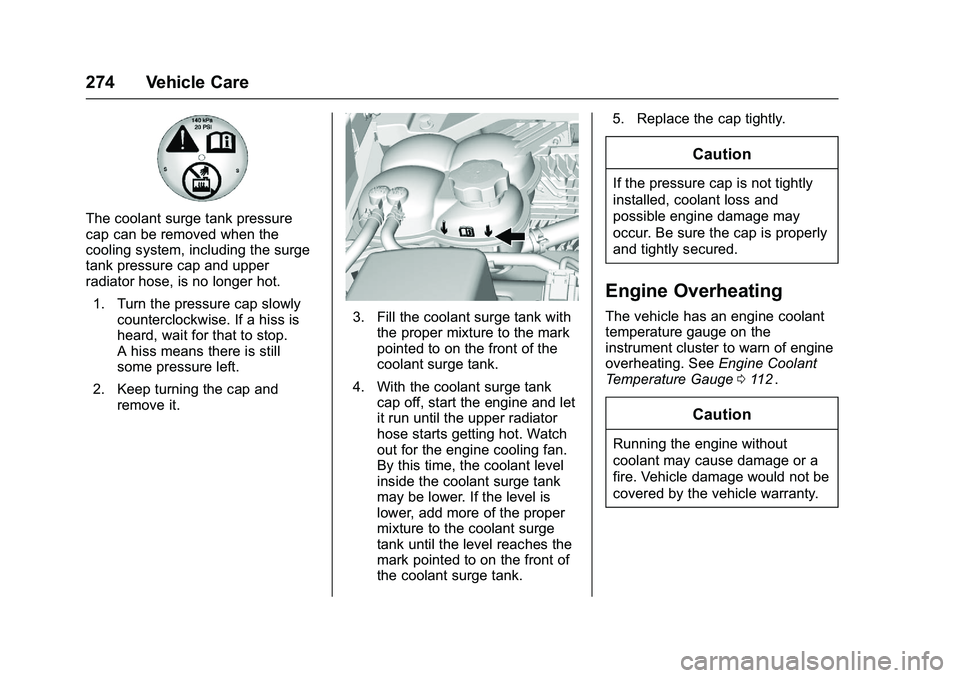
3. Fill the coolant surge tank withthe proper mixture to the mark
pointed to on the front of the
coolant surge tank.
4. With the coolant surge tank cap off, start the engine and let
it run until the upper radiator
hose starts getting hot. Watch
out for the engine cooling fan.
By this time, the coolant level
inside the coolant surge tank
may be lower. If the level is
lower, add more of the proper
mixture to the coolant surge
tank until the level reaches the
mark pointed to on the front of
the coolant surge tank. 5. Replace the cap tightly.
Caution
If the pressure cap is not tightly
installed, coolant loss and
possible engine damage may
occur. Be sure the cap is properly
and tightly secured.
Engine Overheating
The vehicle has an engine coolant
temperature gauge on the
instrument cluster to warn of engine
overheating. See
Engine Coolant
Temperature Gauge 0112
ii.
Caution
Running the engine without
coolant may cause damage or a
fire. Vehicle damage would not be
covered by the vehicle warranty.
Page 288 of 396
Chevrolet Colorado Owner Manual (GMNA-Localizing-U.S/Canada/Mexico-
9159327) - 2016 - crc - 8/28/15
Vehicle Care 287
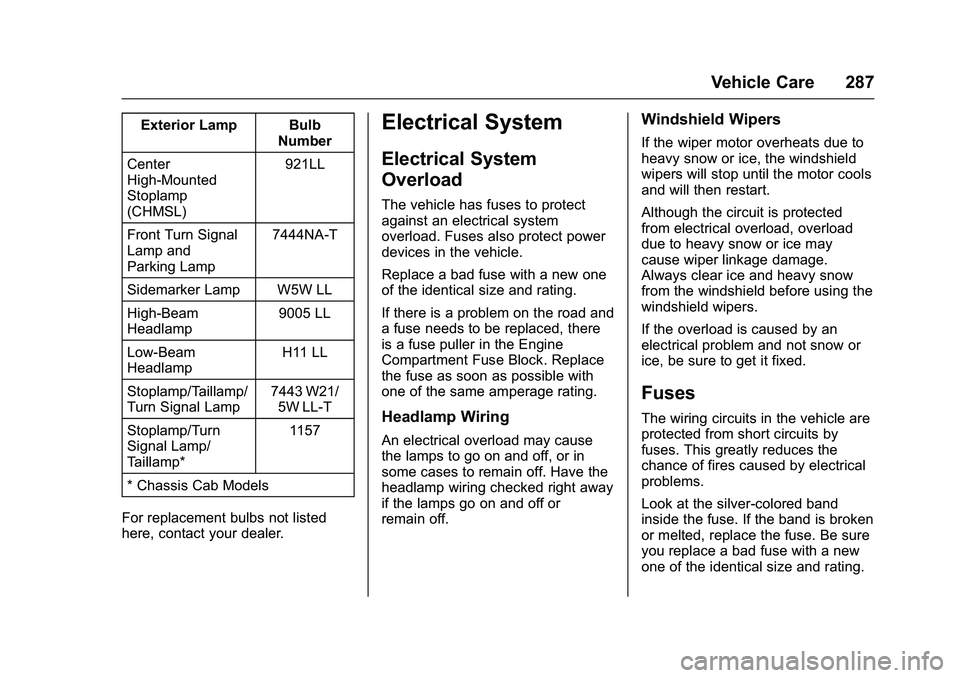
Exterior Lamp BulbNumber
Center
High-Mounted
Stoplamp
(CHMSL) 921LL
Front Turn Signal
Lamp and
Parking Lamp 7444NA-T
Sidemarker Lamp W5W LL
High-Beam
Headlamp 9005 LL
Low-Beam
Headlamp H11 LL
Stoplamp/Taillamp/
Turn Signal Lamp 7443 W21/
5W LL-T
Stoplamp/Turn
Signal Lamp/
Taillamp* 1157
* Chassis Cab Models
For replacement bulbs not listed
here, contact your dealer.Electrical System
Electrical System
Overload
The vehicle has fuses to protect
against an electrical system
overload. Fuses also protect power
devices in the vehicle.
Replace a bad fuse with a new one
of the identical size and rating.
If there is a problem on the road and
a fuse needs to be replaced, there
is a fuse puller in the Engine
Compartment Fuse Block. Replace
the fuse as soon as possible with
one of the same amperage rating.
Headlamp Wiring
An electrical overload may cause
the lamps to go on and off, or in
some cases to remain off. Have the
headlamp wiring checked right away
if the lamps go on and off or
remain off.
Windshield Wipers
If the wiper motor overheats due to
heavy snow or ice, the windshield
wipers will stop until the motor cools
and will then restart.
Although the circuit is protected
from electrical overload, overload
due to heavy snow or ice may
cause wiper linkage damage.
Always clear ice and heavy snow
from the windshield before using the
windshield wipers.
If the overload is caused by an
electrical problem and not snow or
ice, be sure to get it fixed.
Fuses
The wiring circuits in the vehicle are
protected from short circuits by
fuses. This greatly reduces the
chance of fires caused by electrical
problems.
Look at the silver-colored band
inside the fuse. If the band is broken
or melted, replace the fuse. Be sure
you replace a bad fuse with a new
one of the identical size and rating.