2016 CHEVROLET COLORADO battery
[x] Cancel search: batteryPage 29 of 396
Chevrolet Colorado Owner Manual (GMNA-Localizing-U.S/Canada/Mexico-
9159327) - 2016 - crc - 8/28/15
28 Keys, Doors, and Windows
and all previously known keys
will no longer work with the
vehicle.
Remaining keys can be learned by
following the procedure in
“Programming with a
Recognized Key.”
The key has a bar-coded key tag
that the dealer or qualified locksmith
can use to make new keys. Store
this information in a safe place, not
in the vehicle.
See your dealer if a replacement
key or additional key is needed.
If it becomes difficult to turn a key,
inspect the key blade for debris.
Periodically clean with a brush
or pick.
With an active OnStar subscription,
an OnStar Advisor may remotely
unlock the vehicle. See OnStar
Overview 0375
ii.
Remote Keyless Entry
(RKE) System
See Radio Frequency Statement
0 371ii. If there is a decrease in the RKE
operating range:
.
Check the distance. The
transmitter may be too far from
the vehicle.
. Check the location. Other
vehicles or objects may be
blocking the signal.
. Check the transmitter's battery.
See “Battery Replacement” later
in this section.
. If the transmitter is still not
working correctly, see your
dealer or a qualified technician
for service.
Remote Keyless Entry
(RKE) System Operation
The RKE transmitter functions may
work up to 60 m (197 ft) away from
the vehicle.
Other conditions can affect the
performance of the transmitter. See
Remote Keyless Entry (RKE)
System 028
ii.
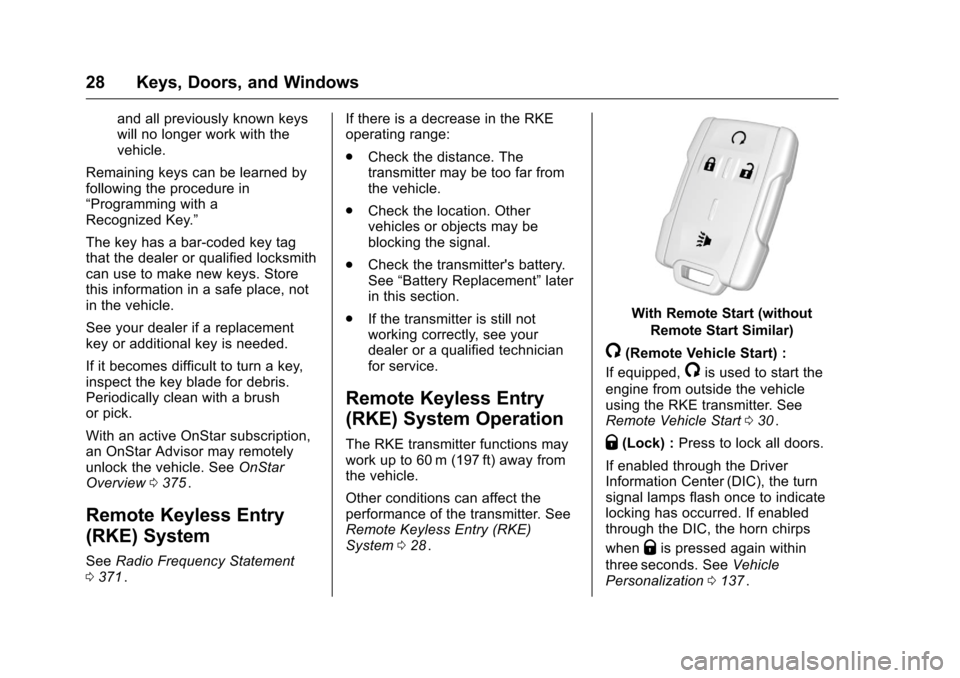
With Remote Start (without
Remote Start Similar)
/(Remote Vehicle Start) :
If equipped,
/is used to start the
engine from outside the vehicle
using the RKE transmitter. See
Remote Vehicle Start 030
ii.
Q(Lock) : Press to lock all doors.
If enabled through the Driver
Information Center (DIC), the turn
signal lamps flash once to indicate
locking has occurred. If enabled
through the DIC, the horn chirps
when
Qis pressed again within
three seconds. See Vehicle
Personalization 0137
ii.
Page 30 of 396
Chevrolet Colorado Owner Manual (GMNA-Localizing-U.S/Canada/Mexico-
9159327) - 2016 - crc - 8/28/15
Keys, Doors, and Windows 29
PressingQarms the vehicle alarm
system. See Vehicle Alarm System
0 34
ii.
K(Unlock) : Press once to unlock
only the driver door. If
Kis pressed
again within three seconds, all
remaining doors unlock. The interior
lamps may come on and stay on for
20 seconds or until the ignition is
turned on.
If enabled through the DIC, the turn
signal lamps flash twice to indicate
unlocking has occurred. See Vehicle
Personalization 0137
ii. If enabled
through the DIC, the exterior lamps
may turn on. See Vehicle
Personalization 0137
ii.
Pressing
Kon the RKE transmitter
disarms the vehicle alarm system.
See Vehicle Alarm System 034
ii.
7(Vehicle Locator/Panic
Alarm) : Press and release one
time to initiate vehicle locator. The
turn signal lamps flash and the horn
sounds three times. Press and hold
7for at least
three seconds to sound the panic
alarm. The turn signal lamps flash
and the horn sounds repeatedly for
30 seconds. The alarm turns off
when the ignition is moved to ON/
RUN or
7is pressed again. The
ignition must be in LOCK/OFF for
the panic alarm to work.
Programming Transmitters to
the Vehicle
Only RKE transmitters programmed
to this vehicle will work. If a
transmitter is lost or stolen, a
replacement can be purchased and
programmed through your dealer.
Each vehicle can have up to
eight transmitters programmed to it.
See your dealer for transmitter
programming.
Battery Replacement
Replace the battery in the
transmitter soon if the REPLACE
BATTERY IN REMOTE KEY
message displays in the DIC.
Caution
When replacing the battery, do
not touch any of the circuitry on
the transmitter. Static from your
body could damage the
transmitter.
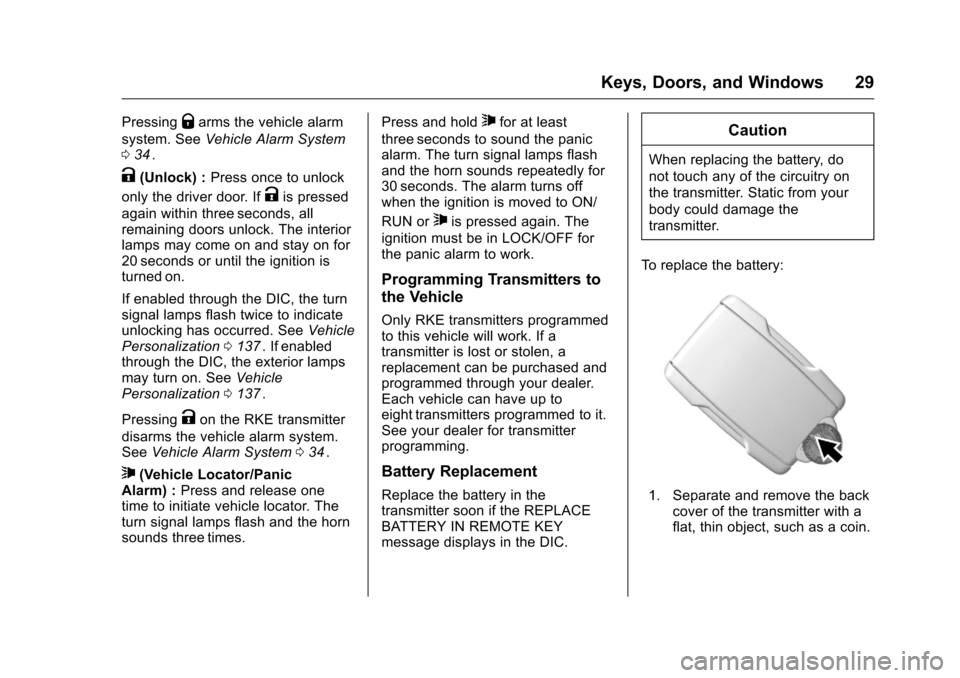
To replace the battery:
1. Separate and remove the back cover of the transmitter with a
flat, thin object, such as a coin.
Page 31 of 396
Chevrolet Colorado Owner Manual (GMNA-Localizing-U.S/Canada/Mexico-
9159327) - 2016 - crc - 8/28/15
30 Keys, Doors, and Windows
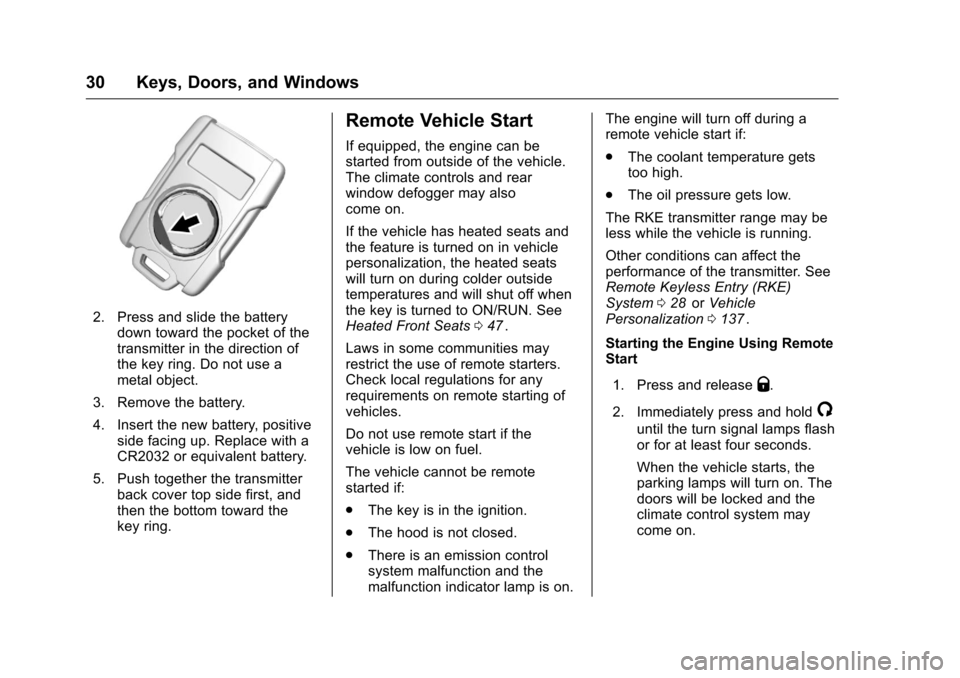
2. Press and slide the batterydown toward the pocket of the
transmitter in the direction of
the key ring. Do not use a
metal object.
3. Remove the battery.
4. Insert the new battery, positive side facing up. Replace with a
CR2032 or equivalent battery.
5. Push together the transmitter back cover top side first, and
then the bottom toward the
key ring.
Remote Vehicle Start
If equipped, the engine can be
started from outside of the vehicle.
The climate controls and rear
window defogger may also
come on.
If the vehicle has heated seats and
the feature is turned on in vehicle
personalization, the heated seats
will turn on during colder outside
temperatures and will shut off when
the key is turned to ON/RUN. See
Heated Front Seats 047
ii.
Laws in some communities may
restrict the use of remote starters.
Check local regulations for any
requirements on remote starting of
vehicles.
Do not use remote start if the
vehicle is low on fuel.
The vehicle cannot be remote
started if:
. The key is in the ignition.
. The hood is not closed.
. There is an emission control
system malfunction and the
malfunction indicator lamp is on. The engine will turn off during a
remote vehicle start if:
.
The coolant temperature gets
too high.
. The oil pressure gets low.
The RKE transmitter range may be
less while the vehicle is running.
Other conditions can affect the
performance of the transmitter. See
Remote Keyless Entry (RKE)
System 028
iior Vehicle
Personalization 0137ii.
Starting the Engine Using Remote
Start
1. Press and release
Q.
2. Immediately press and hold
/
until the turn signal lamps flash
or for at least four seconds.
When the vehicle starts, the
parking lamps will turn on. The
doors will be locked and the
climate control system may
come on.
Page 41 of 396
Chevrolet Colorado Owner Manual (GMNA-Localizing-U.S/Canada/Mexico-
9159327) - 2016 - crc - 8/28/15
40 Keys, Doors, and Windows
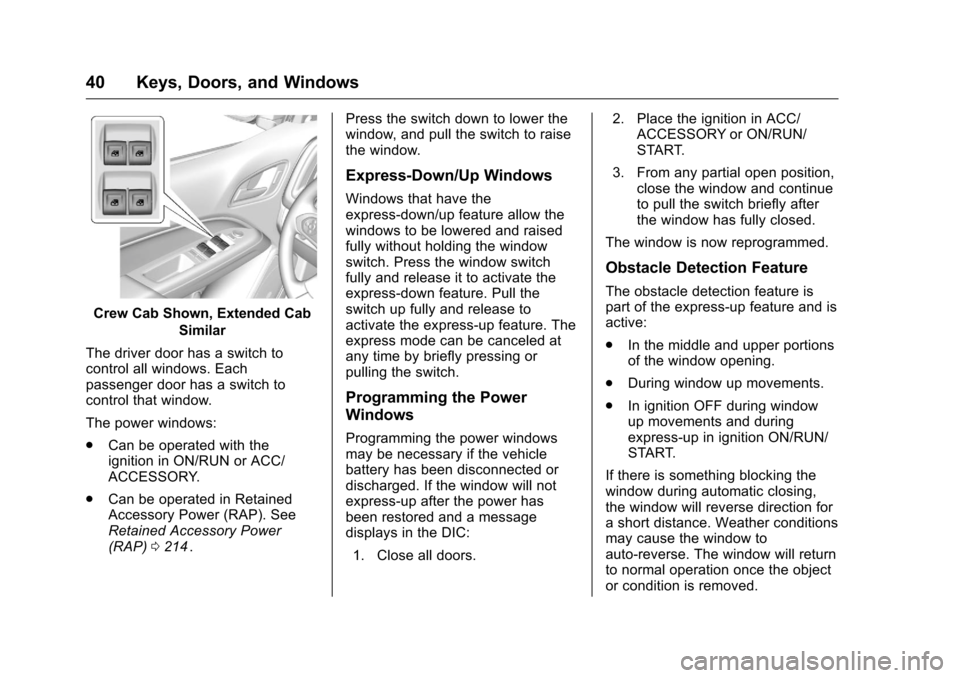
Crew Cab Shown, Extended CabSimilar
The driver door has a switch to
control all windows. Each
passenger door has a switch to
control that window.
The power windows:
. Can be operated with the
ignition in ON/RUN or ACC/
ACCESSORY.
. Can be operated in Retained
Accessory Power (RAP). See
Retained Accessory Power
(RAP) 0214
ii. Press the switch down to lower the
window, and pull the switch to raise
the window.
Express-Down/Up Windows
Windows that have the
express-down/up feature allow the
windows to be lowered and raised
fully without holding the window
switch. Press the window switch
fully and release it to activate the
express-down feature. Pull the
switch up fully and release to
activate the express-up feature. The
express mode can be canceled at
any time by briefly pressing or
pulling the switch.
Programming the Power
Windows
Programming the power windows
may be necessary if the vehicle
battery has been disconnected or
discharged. If the window will not
express-up after the power has
been restored and a message
displays in the DIC:
1. Close all doors. 2. Place the ignition in ACC/
ACCESSORY or ON/RUN/
START.
3. From any partial open position, close the window and continue
to pull the switch briefly after
the window has fully closed.
The window is now reprogrammed.
Obstacle Detection Feature
The obstacle detection feature is
part of the express-up feature and is
active:
. In the middle and upper portions
of the window opening.
. During window up movements.
. In ignition OFF during window
up movements and during
express-up in ignition ON/RUN/
START.
If there is something blocking the
window during automatic closing,
the window will reverse direction for
a short distance. Weather conditions
may cause the window to
auto-reverse. The window will return
to normal operation once the object
or condition is removed.
Page 67 of 396
Chevrolet Colorado Owner Manual (GMNA-Localizing-U.S/Canada/Mexico-
9159327) - 2016 - crc - 8/28/15
66 Seats and Restraints
{Warning
If the front outboard passenger
airbag is turned off for an
adult-sized occupant, the airbag
will not be able to inflate and help
protect that person in a crash,
resulting in an increased risk of
serious injury or even death. An
adult-sized occupant should not
ride in the front outboard
passenger seat, if the passenger
airbag off indicator is lit.
Additional Factors Affecting
System Operation
Safety belts help keep the
passenger in position on the seat
during vehicle maneuvers and
braking, which helps the passenger
sensing system maintain the
passenger airbag status. See
“Safety Belts”and“Child Restraints”
in the Index for additional
information about the importance of
proper restraint use. A thick layer of additional material,
such as a blanket or cushion,
or aftermarket equipment such as
seat covers, seat heaters, and seat
massagers can affect how well the
passenger sensing system
operates. We recommend that you
not use seat covers or other
aftermarket equipment except when
approved by GM for your specific
vehicle. See
Adding Equipment to
the Airbag-Equipped Vehicle 067
iifor more information about
modifications that can affect how
the system operates.
The on indicator may be lit if an
object, such as a briefcase,
handbag, grocery bag, laptop,
or other electronic device, is put on
an unoccupied seat. If this is not
desired remove the object from
the seat.
{Warning
Stowing of articles under the
passenger seat or between the
passenger seat cushion and
(Continued)
Warning (Continued)
seatback may interfere with the
proper operation of the passenger
sensing system.
Servicing the
Airbag-Equipped Vehicle
Airbags affect how the vehicle
should be serviced. There are parts
of the airbag system in several
places around the vehicle. Your
dealer and the service manual have
information about servicing the
vehicle and the airbag system. To
purchase a service manual, see
Service Publications Ordering
Information0370
ii.
{Warning
For up to 10 seconds after the
vehicle is turned off and the
battery is disconnected, an airbag
can still inflate during improper
service. You can be injured if you
(Continued)
Page 102 of 396
Chevrolet Colorado Owner Manual (GMNA-Localizing-U.S/Canada/Mexico-
9159327) - 2016 - crc - 8/28/15
Instruments and Controls 101
Instruments and
Controls
Controls
Steering Wheel Adjustment . . . 102
Steering Wheel Controls . . . . . . 103
Horn . . . . . . . . . . . . . . . . . . . . . . . . . . 103
Windshield Wiper/Washer . . . . 103
Compass . . . . . . . . . . . . . . . . . . . . . 104
Clock . . . . . . . . . . . . . . . . . . . . . . . . . 104
Power Outlets . . . . . . . . . . . . . . . . 105
Warning Lights, Gauges, and
Indicators
Warning Lights, Gauges, andIndicators . . . . . . . . . . . . . . . . . . . 106
Instrument Cluster (Base Level) . . . . . . . . . . . . . . . . . . . . . . . 107
Instrument Cluster (Uplevel) . . . . . . . . . . . . . . . . . . . . 109
Speedometer . . . . . . . . . . . . . . . . . 111
Odometer . . . . . . . . . . . . . . . . . . . . . 111
Trip Odometer . . . . . . . . . . . . . . . . 111
Tachometer . . . . . . . . . . . . . . . . . . . 111
Fuel Gauge . . . . . . . . . . . . . . . . . . . 111
Engine Coolant Temperature
Gauge . . . . . . . . . . . . . . . . . . . . . . 112
Safety Belt Reminders . . . . . . . . 113
Airbag Readiness Light . . . . . . . 114 Passenger Airbag Status
Indicator . . . . . . . . . . . . . . . . . . . . . 114
Charging System Light . . . . . . . 115
Malfunction Indicator Lamp (Check Engine Light) . . . . . . . . 115
Brake System Warning Light . . . . . . . . . . . . . . . . . . . . . . . . 117
Antilock Brake System (ABS) Warning Light . . . . . . . . . . . . . . . 118
Up-Shift Light (Manual Transmission) . . . . . . . . . . . . . . . 118
Tow/Haul Mode Light . . . . . . . . . 118
Hill Descent Control Light . . . . . 118
Lane Departure Warning (LDW) Light . . . . . . . . . . . . . . . . . 119
Vehicle Ahead Indicator . . . . . . . 119
Traction Off Light . . . . . . . . . . . . . 119
StabiliTrak®OFF Light . . . . . . . . 119
Traction Control System (TCS)/ StabiliTrak
®Light . . . . . . . . . . . 120
Tire Pressure Light . . . . . . . . . . . 120
Engine Oil Pressure Light . . . . 121
Low Fuel Warning Light (Base Level) . . . . . . . . . . . . . . . . . . . . . . . 121
Low Fuel Warning Light (Uplevel) . . . . . . . . . . . . . . . . . . . . 121
Security Light . . . . . . . . . . . . . . . . . 122
High-Beam On Light . . . . . . . . . . 122
Front Fog Lamp Light . . . . . . . . . 122
Lamps On Reminder . . . . . . . . . 122
Cruise Control Light . . . . . . . . . . 122 Door Ajar Light (Uplevel
Cluster) . . . . . . . . . . . . . . . . . . . . . 123
Information Displays
Driver Information Center (DIC)(Base Level) . . . . . . . . . . . . . . . . 123
Driver Information Center (DIC) (Uplevel) . . . . . . . . . . . . . . . . . . . . 126
Vehicle Messages
Vehicle Messages . . . . . . . . . . . . 129
Battery Voltage and ChargingMessages . . . . . . . . . . . . . . . . . . . 129
Brake System Messages . . . . . 130
Compass Messages . . . . . . . . . . 130
Door Ajar Messages . . . . . . . . . . 130
Engine Cooling System Messages . . . . . . . . . . . . . . . . . . . 131
Engine Oil Messages . . . . . . . . . 131
Engine Power Messages . . . . . 132
Fuel System Messages . . . . . . . 132
Key and Lock Messages . . . . . 132
Lamp Messages . . . . . . . . . . . . . . 132
Object Detection System Messages . . . . . . . . . . . . . . . . . . . 133
Ride Control System Messages . . . . . . . . . . . . . . . . . . . 133
Airbag System Messages . . . . 134
Safety Belt Messages . . . . . . . . 134
Security Messages . . . . . . . . . . . 134
Page 106 of 396
Chevrolet Colorado Owner Manual (GMNA-Localizing-U.S/Canada/Mexico-
9159327) - 2016 - crc - 8/28/15
Instruments and Controls 105
2. Touch Set Time, then touch«
orªto increase or decrease
hours, minutes, and AM or PM.
Touch 12–24 Hr for 12 or
24 hour clock.
3. Touch
Sto go back to the
previous menu.
Auto Set requires an active
connection to OnStar.
If auto timing is set, the time
displayed on the clock may not
update immediately when driving
into a new time zone.
To set the date: 1. Touch SETTINGS on the Home Page, then touch Time
and Date.
2. Touch Set Date, then touch
«
orªto increase or decrease
month, day, or year.
3. Touch
Sto go back to the
previous menu. To set the clock display:
1. Touch SETTINGS on the Home Page, then touch Time
and Date.
2. Touch Clock Display, then touch Off or On to turn the
clock display off or on.
3. Touch
Sto go back to the
previous menu.
Power Outlets
Accessory power outlets can be
used to plug in electrical equipment,
such as a cell phone, MP3
player, etc.
The vehicle may have accessory
power outlets:
. On the center stack below the
climate control system,
if equipped.
. On the center floor console,
if equipped.
. On the rear of the center storage
console.
Lift the cover to access and replace
when not in use.
{Warning
Power is always supplied to the
outlets. Do not leave electrical
equipment plugged in when the
vehicle is not in use because the
vehicle could catch fire and cause
injury or death.
Caution
Leaving electrical equipment
plugged in for an extended period
of time while the vehicle is off will
drain the battery. Always unplug
electrical equipment when not in
use and do not plug in equipment
that exceeds the maximum
15 amp rating.
Certain power accessory plugs may
not be compatible with the
accessory power outlet and could
overload vehicle or adapter fuses.
If a problem is experienced, see
your dealer.
Page 116 of 396
Chevrolet Colorado Owner Manual (GMNA-Localizing-U.S/Canada/Mexico-
9159327) - 2016 - crc - 8/28/15
Instruments and Controls 115
If the word ON or the on symbol is
lit on the passenger airbag status
indicator, it means that the front
outboard passenger frontal airbag is
allowed to inflate.
If the word OFF or the off symbol is
lit on the airbag status indicator, it
means that the passenger sensing
system has turned off the front
outboard passenger frontal airbag.
If, after several seconds, both status
indicator lights remain on, or if there
are no lights at all, there may be a
problem with the lights or the
passenger sensing system. See
your dealer for service.
{Warning
If the airbag readiness light ever
comes on and stays on, it means
that something may be wrong
with the airbag system. To help
avoid injury to yourself or others,
have the vehicle serviced right
away. SeeAirbag Readiness
Light 0114
iifor more information,
including important safety
information.
Charging System Light
The charging system light comes on
briefly when the ignition is turned
on, but the engine is not running, as
a check to show the light is working.
It should go out when the engine is
started.
If the light stays on or comes on
while driving, there may be a
problem with the electrical charging
system. Have it checked by your
dealer. Driving while this light is on
could drain the battery.
When this light comes on, the Driver
Information Center (DIC) also
displays a message. See Battery
Voltage and Charging Messages
0 129
ii.
If a short distance must be driven
with the light on, be sure to turn off
all accessories, such as the radio
and air conditioner.
Malfunction Indicator
Lamp (Check Engine
Light)
This light is part of the vehicle’s
emission control on-board
diagnostic system. If this light is on
while the engine is running, a
malfunction has been detected and
the vehicle may require service. The
light should come on to show that it
is working when the ignition is in
ON/RUN and the engine is not
running. See Ignition Positions
0 212
ii.
Malfunctions are often indicated by
the system before any problem is
noticeable. Being aware of the light
and seeking service promptly when
it comes on may prevent damage.