2016 CHEVROLET COLORADO ECU
[x] Cancel search: ECUPage 275 of 396
Chevrolet Colorado Owner Manual (GMNA-Localizing-U.S/Canada/Mexico-
9159327) - 2016 - crc - 8/28/15
274 Vehicle Care
The coolant surge tank pressure
cap can be removed when the
cooling system, including the surge
tank pressure cap and upper
radiator hose, is no longer hot.1. Turn the pressure cap slowly counterclockwise. If a hiss is
heard, wait for that to stop.
A hiss means there is still
some pressure left.
2. Keep turning the cap and remove it.
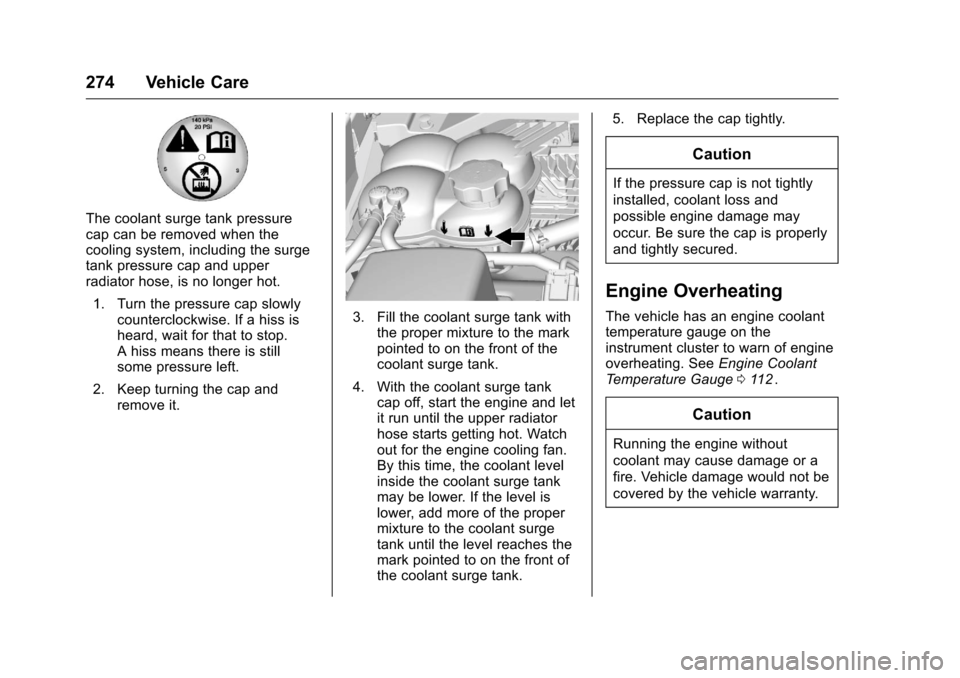
3. Fill the coolant surge tank withthe proper mixture to the mark
pointed to on the front of the
coolant surge tank.
4. With the coolant surge tank cap off, start the engine and let
it run until the upper radiator
hose starts getting hot. Watch
out for the engine cooling fan.
By this time, the coolant level
inside the coolant surge tank
may be lower. If the level is
lower, add more of the proper
mixture to the coolant surge
tank until the level reaches the
mark pointed to on the front of
the coolant surge tank. 5. Replace the cap tightly.
Caution
If the pressure cap is not tightly
installed, coolant loss and
possible engine damage may
occur. Be sure the cap is properly
and tightly secured.
Engine Overheating
The vehicle has an engine coolant
temperature gauge on the
instrument cluster to warn of engine
overheating. See
Engine Coolant
Temperature Gauge 0112
ii.
Caution
Running the engine without
coolant may cause damage or a
fire. Vehicle damage would not be
covered by the vehicle warranty.
Page 316 of 396
Chevrolet Colorado Owner Manual (GMNA-Localizing-U.S/Canada/Mexico-
9159327) - 2016 - crc - 8/28/15
Vehicle Care 315
Caution
If the vehicle has a tire size other
than 255/65R17 AT, 265/60R18,
265/65R17 or 265/70R16, use tire
chains only where legal and only
when you must. Use chains that
are the proper size for the tires.
Install them on the tires of the
rear axle. Do not use chains on
the tires of the front axle. Tighten
them as tightly as possible with
the ends securely fastened. Drive
slowly and follow the chain
manufacturer's instructions. If you
can hear the chains contacting
the vehicle, stop and retighten
them. If the contact continues,
slow down until it stops. Driving
too fast or spinning the wheels
with chains on will damage the
vehicle.
If a Tire Goes Flat
It is unusual for a tire to blowout
while driving, especially if the tires
are maintained properly. If air goes
out of a tire, it is much more likely toleak out slowly. But if there ever is a
blowout, here are a few tips about
what to expect and what to do:
If a front tire fails, the flat tire
creates a drag that pulls the vehicle
toward that side. Take your foot off
the accelerator pedal and grip the
steering wheel firmly. Steer to
maintain lane position, and then
gently brake to a stop, well off the
road, if possible.
A rear blowout, particularly on a
curve, acts much like a skid and
may require the same correction as
used in a skid. Stop pressing the
accelerator pedal and steer to
straighten the vehicle. It may be
very bumpy and noisy. Gently brake
to a stop, well off the road,
if possible.
{Warning
Driving on a flat tire will cause
permanent damage to the tire.
Re-inflating a tire after it has been
driven on while severely
underinflated or flat may cause a
(Continued)
Warning (Continued)
blowout and a serious crash.
Never attempt to re-inflate a tire
that has been driven on while
severely underinflated or flat.
Have your dealer or an authorized
tire service center repair or
replace the flat tire as soon as
possible.
{Warning
Lifting a vehicle and getting under
it to do maintenance or repairs is
dangerous without the
appropriate safety equipment and
training. If a jack is provided with
the vehicle, it is designed only for
changing a flat tire. If it is used for
anything else, you or others could
be badly injured or killed if the
vehicle slips off the jack. If a jack
is provided with the vehicle, only
use it for changing a flat tire.
Page 321 of 396
Chevrolet Colorado Owner Manual (GMNA-Localizing-U.S/Canada/Mexico-
9159327) - 2016 - crc - 8/28/15
320 Vehicle Care
Front Position
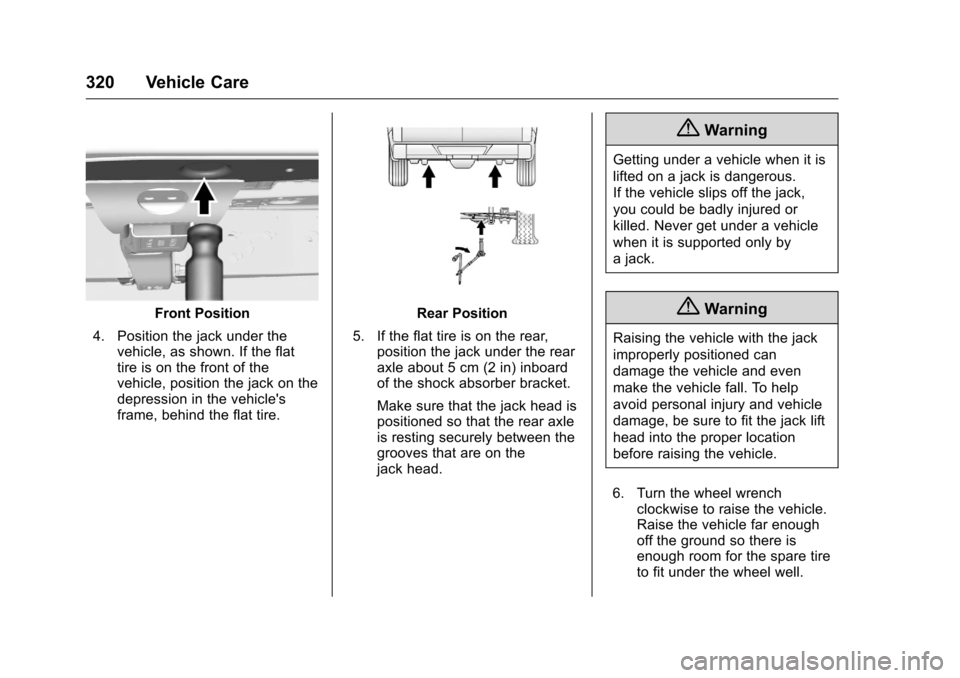
4. Position the jack under the vehicle, as shown. If the flat
tire is on the front of the
vehicle, position the jack on the
depression in the vehicle's
frame, behind the flat tire.Rear Position
5. If the flat tire is on the rear, position the jack under the rear
axle about 5 cm (2 in) inboard
of the shock absorber bracket.
Make sure that the jack head is
positioned so that the rear axle
is resting securely between the
grooves that are on the
jack head.
{Warning
Getting under a vehicle when it is
lifted on a jack is dangerous.
If the vehicle slips off the jack,
you could be badly injured or
killed. Never get under a vehicle
when it is supported only by
a jack.
{Warning
Raising the vehicle with the jack
improperly positioned can
damage the vehicle and even
make the vehicle fall. To help
avoid personal injury and vehicle
damage, be sure to fit the jack lift
head into the proper location
before raising the vehicle.
6. Turn the wheel wrench clockwise to raise the vehicle.
Raise the vehicle far enough
off the ground so there is
enough room for the spare tire
to fit under the wheel well.
Page 325 of 396
Chevrolet Colorado Owner Manual (GMNA-Localizing-U.S/Canada/Mexico-
9159327) - 2016 - crc - 8/28/15
324 Vehicle Care
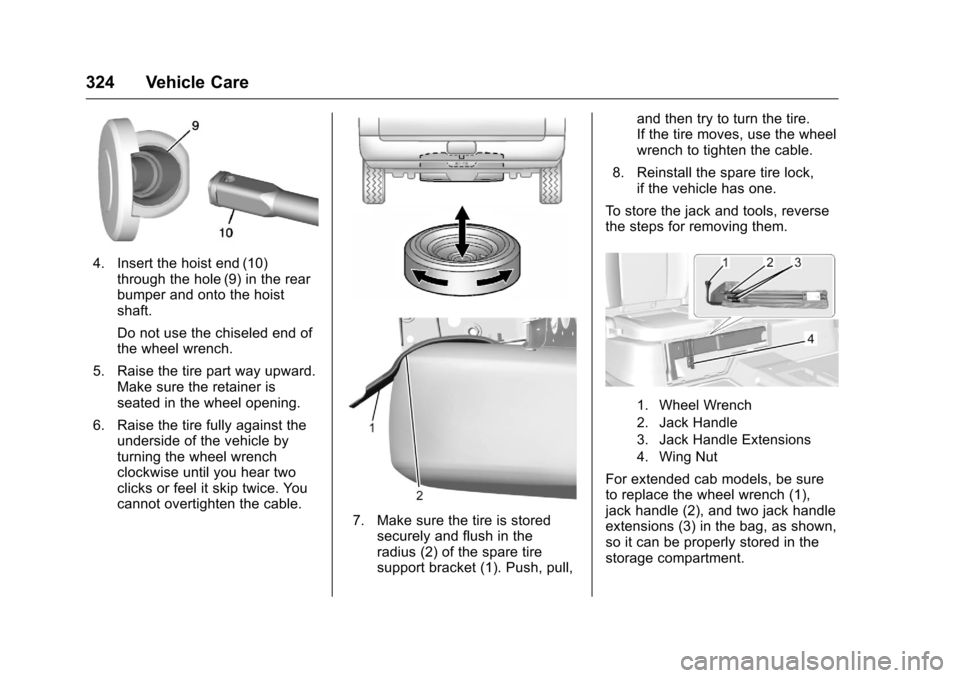
4. Insert the hoist end (10)through the hole (9) in the rear
bumper and onto the hoist
shaft.
Do not use the chiseled end of
the wheel wrench.
5. Raise the tire part way upward. Make sure the retainer is
seated in the wheel opening.
6. Raise the tire fully against the underside of the vehicle by
turning the wheel wrench
clockwise until you hear two
clicks or feel it skip twice. You
cannot overtighten the cable.
7. Make sure the tire is storedsecurely and flush in the
radius (2) of the spare tire
support bracket (1). Push, pull, and then try to turn the tire.
If the tire moves, use the wheel
wrench to tighten the cable.
8. Reinstall the spare tire lock, if the vehicle has one.
To store the jack and tools, reverse
the steps for removing them.
1. Wheel Wrench
2. Jack Handle
3. Jack Handle Extensions
4. Wing Nut
For extended cab models, be sure
to replace the wheel wrench (1),
jack handle (2), and two jack handle
extensions (3) in the bag, as shown,
so it can be properly stored in the
storage compartment.
Page 326 of 396
Chevrolet Colorado Owner Manual (GMNA-Localizing-U.S/Canada/Mexico-
9159327) - 2016 - crc - 8/28/15
Vehicle Care 325
Be sure to fully tighten the wing
nut (4) so the tool bag cover can be
properly and securely closed.
Compact Spare Tire
{Warning
Driving with more than one
compact spare tire at a time could
result in loss of braking and
handling. This could lead to a
crash and you or others could be
injured. Use only one compact
spare tire at a time.
If this vehicle has a compact spare
tire, it was fully inflated when new;
however, it can lose air over time.
Check the inflation pressure
regularly. It should be 420 kPa
(60 psi).
Stop as soon as possible and check
that the spare tire is correctly
inflated after being installed on the
vehicle. The compact spare tire is
designed for temporary use only.
The vehicle will perform differently
with the spare tire installed and it is recommended that the vehicle
speed be limited to 80 km/h
(50 mph). To conserve the tread of
the spare tire, have the standard tire
repaired or replaced as soon as
convenient and return the spare tire
to the storage area.
When using a compact spare tire,
the AWD (if equipped), ABS, and
Traction Control systems may
engage until the spare tire is
recognized by the vehicle,
especially on slippery roads. Adjust
driving to reduce possible
wheel slip.
Caution
When the compact spare is
installed, do not take the vehicle
through an automatic car wash
with guide rails. The compact
spare can get caught on the rails
which can damage the tire, wheel,
and other parts of the vehicle.
Do not use the compact spare on
other vehicles. Do not mix the compact spare tire or
wheel with other wheels or tires.
They will not fit. Keep the spare tire
and its wheel together.
Caution
Tire chains will not fit the compact
spare. Using them can damage
the vehicle and the chains. Do not
use tire chains on the compact
spare.
Caution
If the vehicle has four-wheel drive
and a different size spare tire is
installed, do not drive in
four-wheel drive until the flat tire
is repaired and/or replaced. The
vehicle could be damaged and
the repairs would not be covered
by the warranty. Never use
four-wheel drive when a different
size spare tire is installed on the
vehicle.
Page 330 of 396
Chevrolet Colorado Owner Manual (GMNA-Localizing-U.S/Canada/Mexico-
9159327) - 2016 - crc - 8/28/15
Vehicle Care 329
6. Connect the other end of thered positive (+) cable to the
positive (+) terminal of the good
battery.
7. Connect one end of the black negative (–) cable to the
negative (–) terminal of the
good battery.
8. Connect the other end of the black negative (–) cable to the
negative (–) grounding stud for
the discharged battery.
9. Start the engine in the vehicle with the good battery and run
the engine at idle speed for at
least four minutes.
10. Try to start the vehicle that had the dead battery. If it will not
start after a few tries, it
probably needs service.Caution
If the jumper cables are
connected or removed in the
wrong order, electrical shorting
may occur and damage the
vehicle. The repairs would not be
covered by the vehicle warranty.
Always connect and remove the
jumper cables in the correct order,
making sure that the cables do
not touch each other or other
metal.
Jumper Cable Removal
Reverse the sequence exactly when
removing the jumper cables.
After starting the disabled vehicle
and removing the jumper cables,
allow it to idle for several minutes.
Towing the Vehicle
Caution
Incorrectly towing a disabled
vehicle may cause damage. The
damage would not be covered by
the vehicle warranty.
Do not lash or hook to
suspension components. Use the
proper straps around the tires to
secure the vehicle.
Have the vehicle towed on a flatbed
car carrier or a wheel lift tow truck. If
a wheel lift tow truck is used, the
drive wheels cannot contact the
road while the vehicle is being
towed. A wheel dolly must be used
to lift all drive wheels off the ground.
Consult your dealer or a
professional towing service if the
disabled vehicle must be towed.
Page 332 of 396
Chevrolet Colorado Owner Manual (GMNA-Localizing-U.S/Canada/Mexico-
9159327) - 2016 - crc - 8/28/15
Vehicle Care 331
{Warning
Shifting a four-wheel-drive
vehicle's transfer case into
N (Neutral) can cause the vehicle
to roll even if the transmission is
in P (Park). You or others could
be injured. Set the parking brake
before shifting the transfer case
to N (Neutral).
To dinghy tow: 1. Position the vehicle being towed behind the tow vehicle,
facing forward and on a level
surface.
2. Securely attach the vehicle being towed to the tow vehicle.
3. Apply the parking brake and start the engine.
4. Shift the transfer case to N (Neutral). See “Shifting into
N (Neutral)” underFour-Wheel
Drive 0226
ii. Check that the
vehicle is in N (Neutral) by
shifting the transmission to
R (Reverse) and then to D (Drive). There should be no
movement of the vehicle while
shifting.
5. Shift the transmission into D (Drive). Turn the engine off.
Then shift the transmission into
P (Park).
6. Wait for at least 10 seconds, then restart the engine.
7. Shift the transmission to D (Drive), then turn the engine off
again.
Caution
Failure to disconnect the negative
battery cable or to have it contact
the terminals can cause damage
to the vehicle.
8. Disconnect the negative battery cable at the battery and
secure the nut and bolt. Cover
the negative battery post with a
non-conductive material to
prevent any contact with the
negative battery terminal. 9. Shift the transmission to
P (Park).
Caution
If the steering column is locked,
vehicle damage may occur.
10. Move the steering wheel to make sure the steering column
is unlocked.
11. With a foot on the brake pedal, release the parking brake.
Keep the ignition key in the
towed vehicle in ACC/
ACCESSORY to prevent the
steering column from locking.
Disconnecting the Towed Vehicle
Before disconnecting the towed
vehicle: 1. Park on a level surface.
2. Set the parking brake, then shift the transmission to
P (Park), and move the ignition
key to OFF.
3. Connect the battery.
4. Apply the brake pedal.
Page 334 of 396
Chevrolet Colorado Owner Manual (GMNA-Localizing-U.S/Canada/Mexico-
9159327) - 2016 - crc - 8/28/15
Vehicle Care 333
1. Attach the dolly to the towvehicle following the dolly
manufacturer's instructions.
2. Drive the front wheels onto the dolly.
3. Shift the transmission to P (Park).
4. Set the parking brake.
{Warning
Shifting a four-wheel-drive
vehicle's transfer case into
N (Neutral) can cause the vehicle
to roll even if the transmission is
in P (Park). You or others could
be injured. Set the parking brake
before shifting the transfer case
to N (Neutral).
5. Use a clamping device designed for towing to ensure
that the front wheels are locked
into the straight position.
6. Secure the vehicle to the dolly following the manufacturer's
instructions. 7. Shift the transfer case to
N (Neutral). See “Shifting into
N (Neutral)” underFour-Wheel
Drive 0226
iifor the proper
procedure.
8. Release the parking brake only after the vehicle being towed is
firmly attached to the tow
vehicle.
9. Turn the ignition to LOCK/OFF.
Rear Towing (Rear Wheels Off
the Ground)
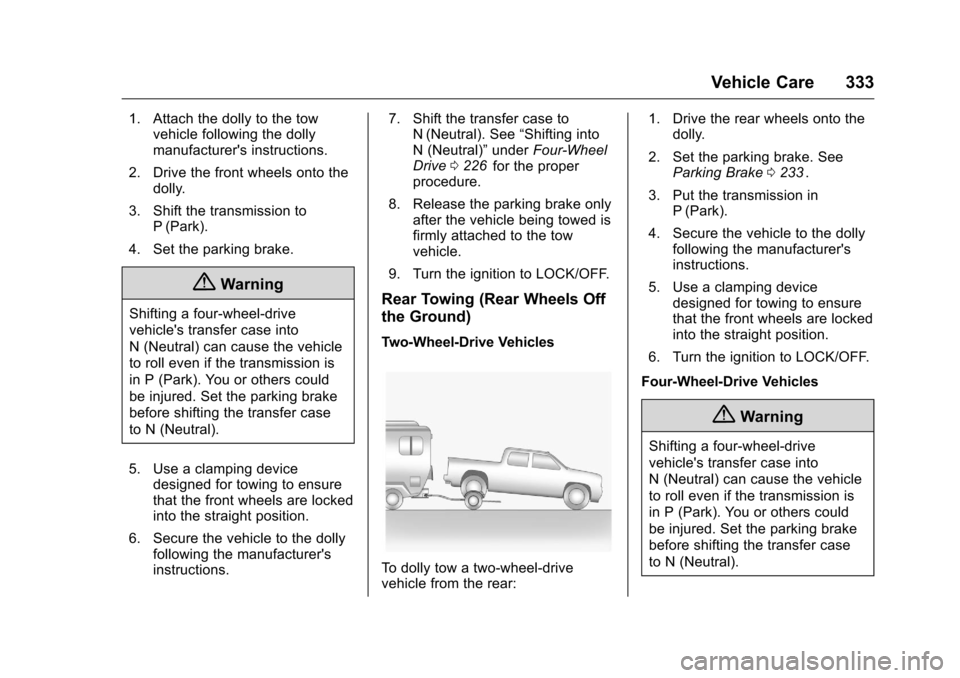
Two-Wheel-Drive Vehicles
To dolly tow a two-wheel-drive
vehicle from the rear: 1. Drive the rear wheels onto the
dolly.
2. Set the parking brake. See Parking Brake 0233
ii.
3. Put the transmission in P (Park).
4. Secure the vehicle to the dolly following the manufacturer's
instructions.
5. Use a clamping device designed for towing to ensure
that the front wheels are locked
into the straight position.
6. Turn the ignition to LOCK/OFF.
Four-Wheel-Drive Vehicles
{Warning
Shifting a four-wheel-drive
vehicle's transfer case into
N (Neutral) can cause the vehicle
to roll even if the transmission is
in P (Park). You or others could
be injured. Set the parking brake
before shifting the transfer case
to N (Neutral).