2016 CHEVROLET COLORADO steering wheel
[x] Cancel search: steering wheelPage 244 of 396
Chevrolet Colorado Owner Manual (GMNA-Localizing-U.S/Canada/Mexico-
9159327) - 2016 - crc - 8/28/15
Driving and Operating 243
Warning (Continued)
or ice, or if the windshield is
damaged. It may also not detect a
vehicle on winding or hilly roads,
or in conditions that can limit
visibility such as fog, rain,
or snow, or if the headlamps or
windshield are not cleaned or in
proper condition. Keep the
windshield, headlamps, and FCA
sensors clean and in good repair.
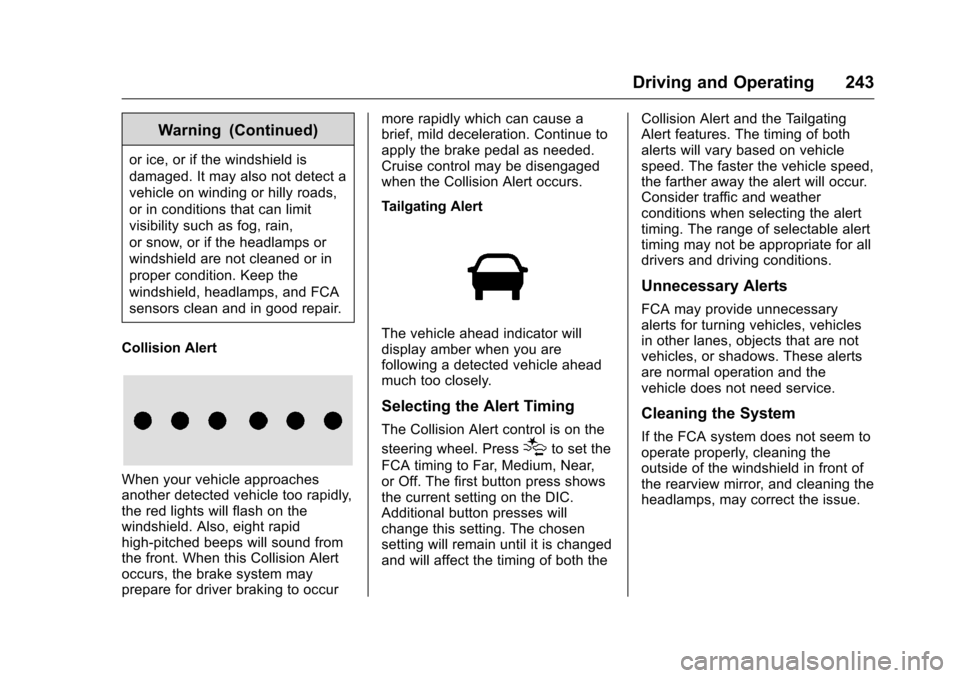
Collision Alert
When your vehicle approaches
another detected vehicle too rapidly,
the red lights will flash on the
windshield. Also, eight rapid
high-pitched beeps will sound from
the front. When this Collision Alert
occurs, the brake system may
prepare for driver braking to occur more rapidly which can cause a
brief, mild deceleration. Continue to
apply the brake pedal as needed.
Cruise control may be disengaged
when the Collision Alert occurs.
Tailgating Alert
The vehicle ahead indicator will
display amber when you are
following a detected vehicle ahead
much too closely.
Selecting the Alert Timing
The Collision Alert control is on the
steering wheel. Press
[to set the
FCA timing to Far, Medium, Near,
or Off. The first button press shows
the current setting on the DIC.
Additional button presses will
change this setting. The chosen
setting will remain until it is changed
and will affect the timing of both the Collision Alert and the Tailgating
Alert features. The timing of both
alerts will vary based on vehicle
speed. The faster the vehicle speed,
the farther away the alert will occur.
Consider traffic and weather
conditions when selecting the alert
timing. The range of selectable alert
timing may not be appropriate for all
drivers and driving conditions.
Unnecessary Alerts
FCA may provide unnecessary
alerts for turning vehicles, vehicles
in other lanes, objects that are not
vehicles, or shadows. These alerts
are normal operation and the
vehicle does not need service.
Cleaning the System
If the FCA system does not seem to
operate properly, cleaning the
outside of the windshield in front of
the rearview mirror, and cleaning the
headlamps, may correct the issue.
Page 251 of 396
Chevrolet Colorado Owner Manual (GMNA-Localizing-U.S/Canada/Mexico-
9159327) - 2016 - crc - 8/28/15
250 Driving and Operating
Before starting, check all trailer hitch
parts and attachments, safety
chains, electrical connectors, lamps,
tires, and mirrors. If the trailer has
electric brakes, start the
combination moving and then apply
the trailer brake controller by hand
to be sure the brakes work.
During the trip, check occasionally
to be sure that the load is secure
and the lamps and any trailer
brakes still work.
Following Distance
Stay at least twice as far behind the
vehicle ahead as you would when
driving the vehicle without a trailer.
This can help to avoid heavy
braking and sudden turns.
Passing
More passing distance is needed
when towing a trailer. The
combination will not accelerate as
quickly and is longer so it is
necessary to go much farther
beyond the passed vehicle before
returning to the lane.
Backing Up
Hold the bottom of the steering
wheel with one hand. To move the
trailer to the left, move that hand to
the left. To move the trailer to the
right, move your hand to the right.
Always back up slowly and,
if possible, have someone
guide you.
Making TurnsCaution
Making very sharp turns while
trailering could cause the trailer to
come in contact with the vehicle.
The vehicle could be damaged.
Avoid making very sharp turns
while trailering.
When turning with a trailer, make
wider turns than normal. Do this so
the trailer will not strike soft
shoulders, curbs, road signs, trees,
or other objects. Avoid jerky or
sudden maneuvers. Signal well in
advance. If the trailer turn signal bulbs burn
out, the arrows on the instrument
cluster will still flash for turns. It is
important to check occasionally to
be sure the trailer bulbs are still
working.
Driving on Grades
Reduce speed and shift to a lower
gear
before starting down a long or
steep downgrade. If the
transmission is not shifted down, the
brakes might get hot and no longer
work well.
Vehicles can tow in D (Drive). Shift
the transmission to a lower gear if
the transmission shifts too often
under heavy loads and/or hilly
conditions.
The Tow/Haul Mode may be used if
the transmission shifts too often.
See Tow/Haul Mode 0224
ii.
When towing at high altitude on
steep uphill grades, consider the
following: Engine coolant will boil at
a lower temperature than at normal
altitudes. If the engine is turned off
immediately after towing at high
altitude on steep uphill grades, the
Page 262 of 396
Chevrolet Colorado Owner Manual (GMNA-Localizing-U.S/Canada/Mexico-
9159327) - 2016 - crc - 8/28/15
Vehicle Care 261
Keep a record with all parts receipts
and list the mileage and the date of
any service work performed. See
Maintenance Records0356
ii.
Caution
Even small amounts of
contamination can cause damage
to vehicle systems. Do not allow
contaminants to contact the fluids,
reservoir caps, or dipsticks.
Hood
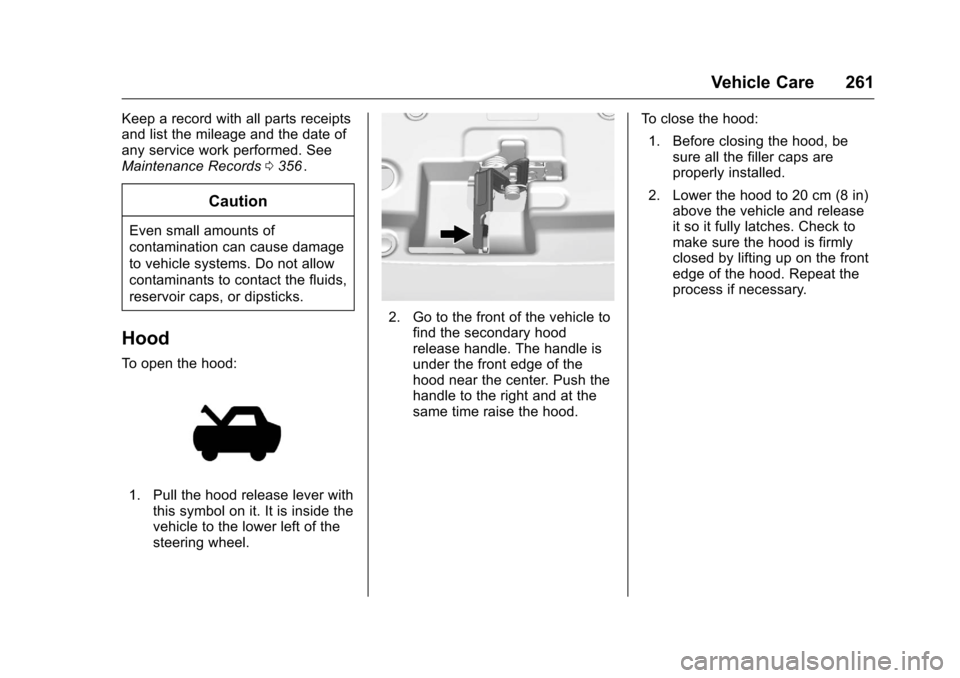
To open the hood:
1. Pull the hood release lever with
this symbol on it. It is inside the
vehicle to the lower left of the
steering wheel.
2. Go to the front of the vehicle tofind the secondary hood
release handle. The handle is
under the front edge of the
hood near the center. Push the
handle to the right and at the
same time raise the hood. To close the hood:
1. Before closing the hood, be sure all the filler caps are
properly installed.
2. Lower the hood to 20 cm (8 in) above the vehicle and release
it so it fully latches. Check to
make sure the hood is firmly
closed by lifting up on the front
edge of the hood. Repeat the
process if necessary.
Page 294 of 396
Chevrolet Colorado Owner Manual (GMNA-Localizing-U.S/Canada/Mexico-
9159327) - 2016 - crc - 8/28/15
Vehicle Care 293
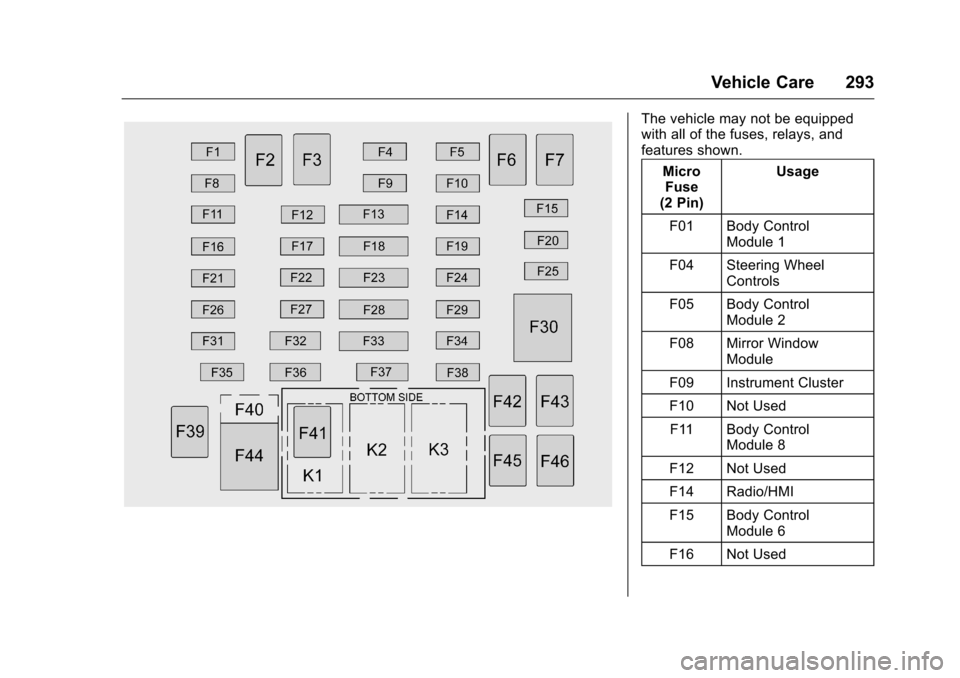
The vehicle may not be equipped
with all of the fuses, relays, and
features shown.MicroFuse
(2 Pin) Usage
F01 Body Control Module 1
F04 Steering Wheel Controls
F05 Body Control Module 2
F08 Mirror Window Module
F09 Instrument Cluster
F10 Not Used F11 Body Control Module 8
F12 Not Used
F14 Radio/HMI
F15 Body Control Module 6
F16 Not Used
Page 295 of 396
Chevrolet Colorado Owner Manual (GMNA-Localizing-U.S/Canada/Mexico-
9159327) - 2016 - crc - 8/28/15
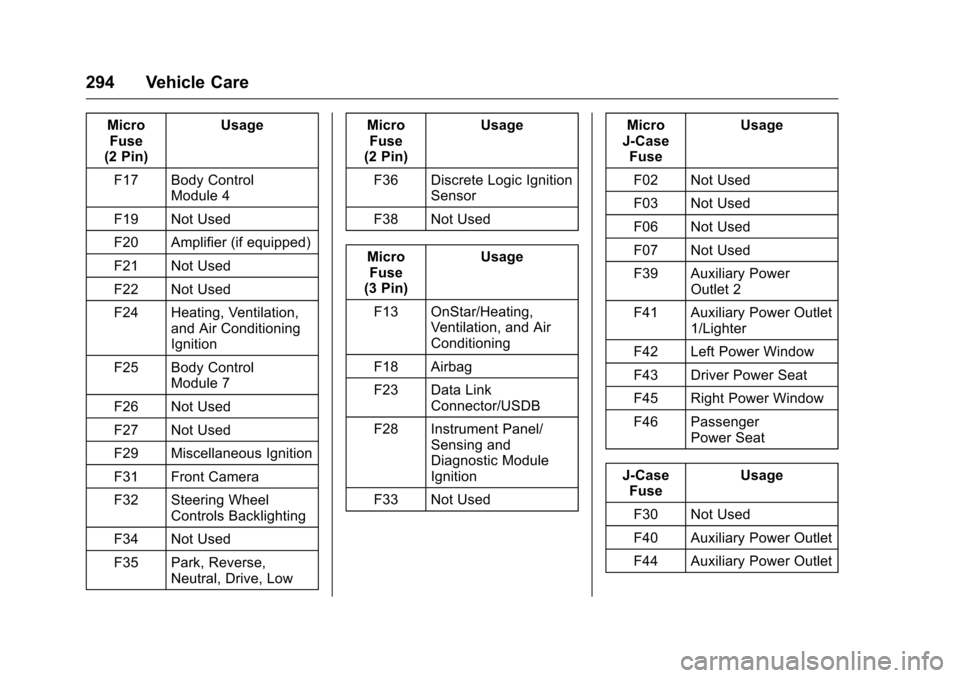
294 Vehicle Care
MicroFuse
(2 Pin) Usage
F17 Body Control Module 4
F19 Not Used
F20 Amplifier (if equipped)
F21 Not Used
F22 Not Used
F24 Heating, Ventilation, and Air Conditioning
Ignition
F25 Body Control Module 7
F26 Not Used
F27 Not Used
F29 Miscellaneous Ignition
F31 Front Camera
F32 Steering Wheel Controls Backlighting
F34 Not Used
F35 Park, Reverse, Neutral, Drive, Low Micro
Fuse
(2 Pin) Usage
F36 Discrete Logic Ignition Sensor
F38 Not Used
Micro Fuse
(3 Pin) Usage
F13 OnStar/Heating, Ventilation, and Air
Conditioning
F18 Airbag
F23 Data Link Connector/USDB
F28 Instrument Panel/ Sensing and
Diagnostic Module
Ignition
F33 Not Used Micro
J-Case Fuse Usage
F02 Not Used
F03 Not Used
F06 Not Used
F07 Not Used
F39 Auxiliary Power Outlet 2
F41 Auxiliary Power Outlet 1/Lighter
F42 Left Power Window
F43 Driver Power Seat
F45 Right Power Window
F46 Passenger Power Seat
J-Case Fuse Usage
F30 Not Used
F40 Auxiliary Power Outlet
F44 Auxiliary Power Outlet
Page 308 of 396
Chevrolet Colorado Owner Manual (GMNA-Localizing-U.S/Canada/Mexico-
9159327) - 2016 - crc - 8/28/15
Vehicle Care 307
SeeDriver Information Center
(DIC) (Base Level) 0123iior
Driver Information Center (DIC)
(Uplevel) 0126
ii.
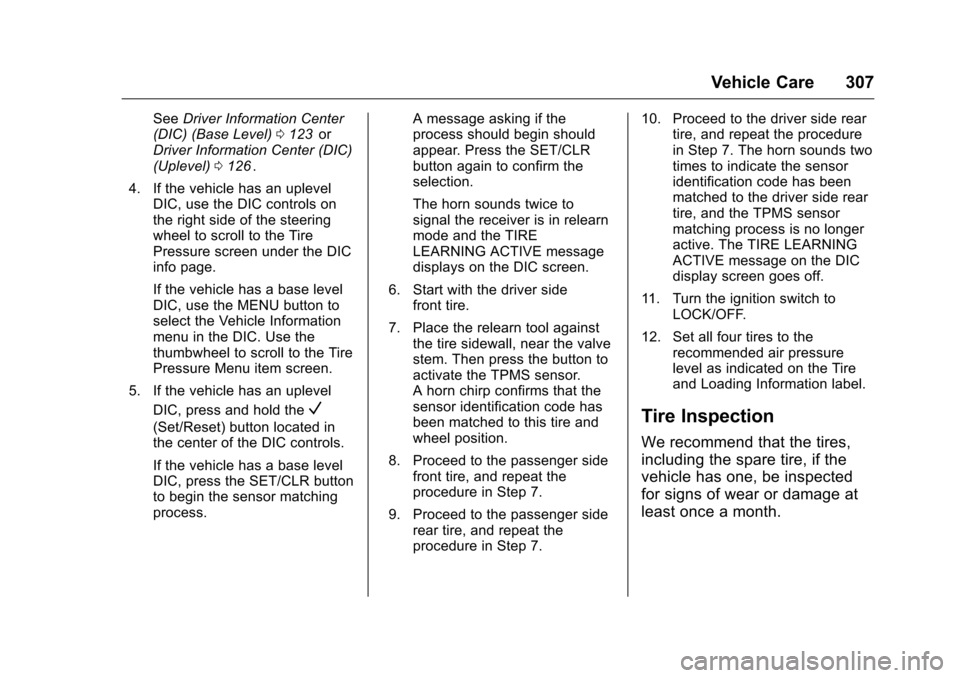
4. If the vehicle has an uplevel DIC, use the DIC controls on
the right side of the steering
wheel to scroll to the Tire
Pressure screen under the DIC
info page.
If the vehicle has a base level
DIC, use the MENU button to
select the Vehicle Information
menu in the DIC. Use the
thumbwheel to scroll to the Tire
Pressure Menu item screen.
5. If the vehicle has an uplevel DIC, press and hold the
V
(Set/Reset) button located in
the center of the DIC controls.
If the vehicle has a base level
DIC, press the SET/CLR button
to begin the sensor matching
process. A message asking if the
process should begin should
appear. Press the SET/CLR
button again to confirm the
selection.
The horn sounds twice to
signal the receiver is in relearn
mode and the TIRE
LEARNING ACTIVE message
displays on the DIC screen.
6. Start with the driver side front tire.
7. Place the relearn tool against the tire sidewall, near the valve
stem. Then press the button to
activate the TPMS sensor.
A horn chirp confirms that the
sensor identification code has
been matched to this tire and
wheel position.
8. Proceed to the passenger side front tire, and repeat the
procedure in Step 7.
9. Proceed to the passenger side rear tire, and repeat the
procedure in Step 7. 10. Proceed to the driver side rear
tire, and repeat the procedure
in Step 7. The horn sounds two
times to indicate the sensor
identification code has been
matched to the driver side rear
tire, and the TPMS sensor
matching process is no longer
active. The TIRE LEARNING
ACTIVE message on the DIC
display screen goes off.
11. Turn the ignition switch to LOCK/OFF.
12. Set all four tires to the recommended air pressure
level as indicated on the Tire
and Loading Information label.Tire Inspection
We recommend that the tires,
including the spare tire, if the
vehicle has one, be inspected
for signs of wear or damage at
least once a month.
Page 316 of 396
Chevrolet Colorado Owner Manual (GMNA-Localizing-U.S/Canada/Mexico-
9159327) - 2016 - crc - 8/28/15
Vehicle Care 315
Caution
If the vehicle has a tire size other
than 255/65R17 AT, 265/60R18,
265/65R17 or 265/70R16, use tire
chains only where legal and only
when you must. Use chains that
are the proper size for the tires.
Install them on the tires of the
rear axle. Do not use chains on
the tires of the front axle. Tighten
them as tightly as possible with
the ends securely fastened. Drive
slowly and follow the chain
manufacturer's instructions. If you
can hear the chains contacting
the vehicle, stop and retighten
them. If the contact continues,
slow down until it stops. Driving
too fast or spinning the wheels
with chains on will damage the
vehicle.
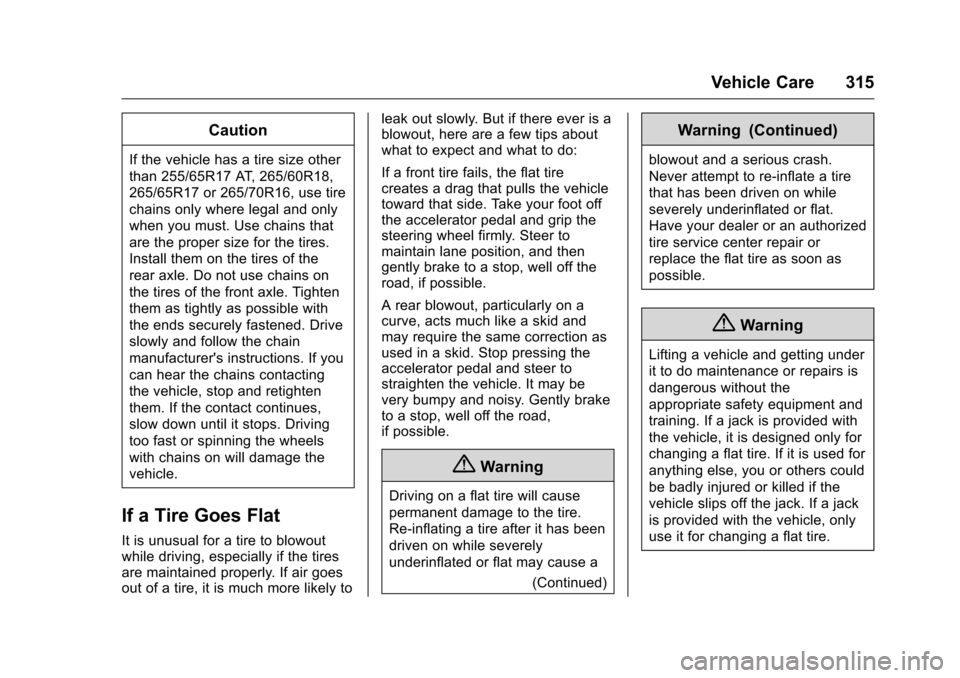
If a Tire Goes Flat
It is unusual for a tire to blowout
while driving, especially if the tires
are maintained properly. If air goes
out of a tire, it is much more likely toleak out slowly. But if there ever is a
blowout, here are a few tips about
what to expect and what to do:
If a front tire fails, the flat tire
creates a drag that pulls the vehicle
toward that side. Take your foot off
the accelerator pedal and grip the
steering wheel firmly. Steer to
maintain lane position, and then
gently brake to a stop, well off the
road, if possible.
A rear blowout, particularly on a
curve, acts much like a skid and
may require the same correction as
used in a skid. Stop pressing the
accelerator pedal and steer to
straighten the vehicle. It may be
very bumpy and noisy. Gently brake
to a stop, well off the road,
if possible.
{Warning
Driving on a flat tire will cause
permanent damage to the tire.
Re-inflating a tire after it has been
driven on while severely
underinflated or flat may cause a
(Continued)
Warning (Continued)
blowout and a serious crash.
Never attempt to re-inflate a tire
that has been driven on while
severely underinflated or flat.
Have your dealer or an authorized
tire service center repair or
replace the flat tire as soon as
possible.
{Warning
Lifting a vehicle and getting under
it to do maintenance or repairs is
dangerous without the
appropriate safety equipment and
training. If a jack is provided with
the vehicle, it is designed only for
changing a flat tire. If it is used for
anything else, you or others could
be badly injured or killed if the
vehicle slips off the jack. If a jack
is provided with the vehicle, only
use it for changing a flat tire.
Page 332 of 396
Chevrolet Colorado Owner Manual (GMNA-Localizing-U.S/Canada/Mexico-
9159327) - 2016 - crc - 8/28/15
Vehicle Care 331
{Warning
Shifting a four-wheel-drive
vehicle's transfer case into
N (Neutral) can cause the vehicle
to roll even if the transmission is
in P (Park). You or others could
be injured. Set the parking brake
before shifting the transfer case
to N (Neutral).
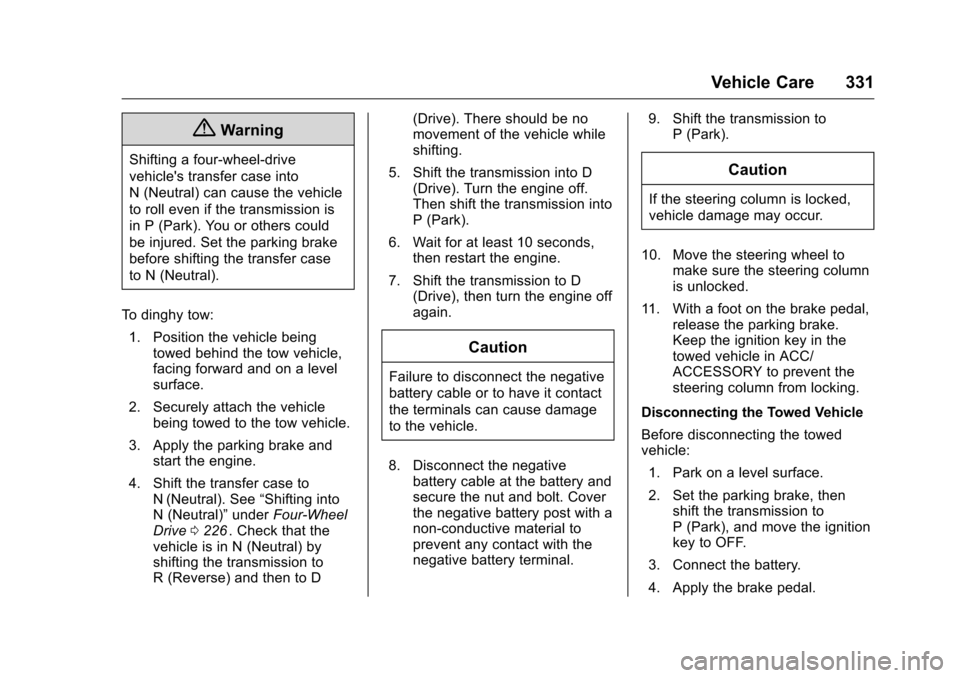
To dinghy tow: 1. Position the vehicle being towed behind the tow vehicle,
facing forward and on a level
surface.
2. Securely attach the vehicle being towed to the tow vehicle.
3. Apply the parking brake and start the engine.
4. Shift the transfer case to N (Neutral). See “Shifting into
N (Neutral)” underFour-Wheel
Drive 0226
ii. Check that the
vehicle is in N (Neutral) by
shifting the transmission to
R (Reverse) and then to D (Drive). There should be no
movement of the vehicle while
shifting.
5. Shift the transmission into D (Drive). Turn the engine off.
Then shift the transmission into
P (Park).
6. Wait for at least 10 seconds, then restart the engine.
7. Shift the transmission to D (Drive), then turn the engine off
again.
Caution
Failure to disconnect the negative
battery cable or to have it contact
the terminals can cause damage
to the vehicle.
8. Disconnect the negative battery cable at the battery and
secure the nut and bolt. Cover
the negative battery post with a
non-conductive material to
prevent any contact with the
negative battery terminal. 9. Shift the transmission to
P (Park).
Caution
If the steering column is locked,
vehicle damage may occur.
10. Move the steering wheel to make sure the steering column
is unlocked.
11. With a foot on the brake pedal, release the parking brake.
Keep the ignition key in the
towed vehicle in ACC/
ACCESSORY to prevent the
steering column from locking.
Disconnecting the Towed Vehicle
Before disconnecting the towed
vehicle: 1. Park on a level surface.
2. Set the parking brake, then shift the transmission to
P (Park), and move the ignition
key to OFF.
3. Connect the battery.
4. Apply the brake pedal.