2016 CHEVROLET CITY EXPRESS CARGO VAN door lock
[x] Cancel search: door lockPage 51 of 297
Black plate (12,1)Chevrolet City Express Owner Manual (GMNA-Localizing-U.S./Canada-
7707496) - 2015 - CRC - 11/26/14
3-12 Seats and Restraints
To unlatch the belt, push the button
on the buckle. The belt should
return to its stowed position.
Before a door is closed, be sure the
safety belt is out of the way. If a
door is slammed against a safety
belt, damage can occur to both the
safety belt and the vehicle.
Shoulder Belt Height Adjuster
The vehicle has a shoulder belt
height adjuster for the driver.
Adjust the height so the shoulder
portion of the belt is on the shoulder
and not falling off of it. The beltshould be close to, but not
contacting, the neck. Improper
shoulder belt height adjustment
could reduce the effectiveness of
the safety belt in a crash. See
How
to Wear Safety Belts Properly on
page 3-9.
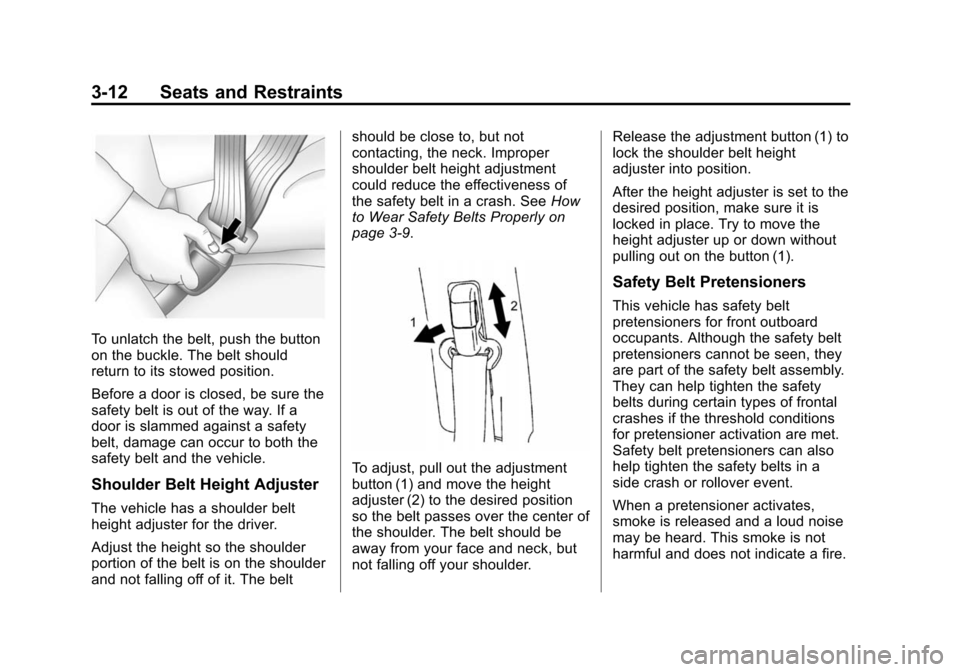
To adjust, pull out the adjustment
button (1) and move the height
adjuster (2) to the desired position
so the belt passes over the center of
the shoulder. The belt should be
away from your face and neck, but
not falling off your shoulder. Release the adjustment button (1) to
lock the shoulder belt height
adjuster into position.
After the height adjuster is set to the
desired position, make sure it is
locked in place. Try to move the
height adjuster up or down without
pulling out on the button (1).
Safety Belt Pretensioners
This vehicle has safety belt
pretensioners for front outboard
occupants. Although the safety belt
pretensioners cannot be seen, they
are part of the safety belt assembly.
They can help tighten the safety
belts during certain types of frontal
crashes if the threshold conditions
for pretensioner activation are met.
Safety belt pretensioners can also
help tighten the safety belts in a
side crash or rollover event.
When a pretensioner activates,
smoke is released and a loud noise
may be heard. This smoke is not
harmful and does not indicate a fire.
Page 56 of 297
Black plate (17,1)Chevrolet City Express Owner Manual (GMNA-Localizing-U.S./Canada-
7707496) - 2015 - CRC - 11/26/14
Seats and Restraints 3-17
Where Are the Airbags?
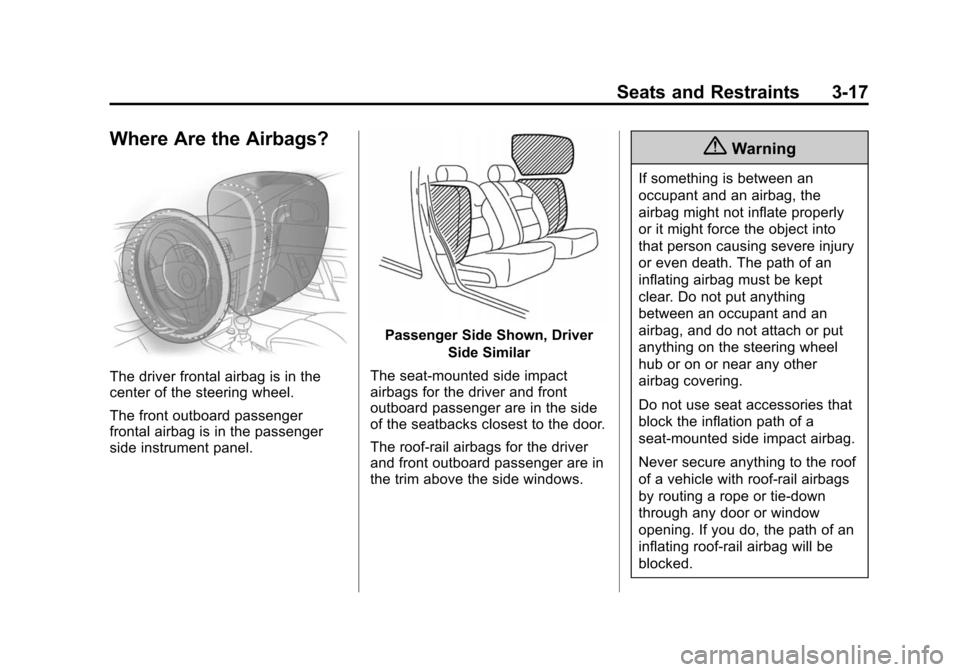
The driver frontal airbag is in the
center of the steering wheel.
The front outboard passenger
frontal airbag is in the passenger
side instrument panel.
Passenger Side Shown, DriverSide Similar
The seat-mounted side impact
airbags for the driver and front
outboard passenger are in the side
of the seatbacks closest to the door.
The roof-rail airbags for the driver
and front outboard passenger are in
the trim above the side windows.
{Warning
If something is between an
occupant and an airbag, the
airbag might not inflate properly
or it might force the object into
that person causing severe injury
or even death. The path of an
inflating airbag must be kept
clear. Do not put anything
between an occupant and an
airbag, and do not attach or put
anything on the steering wheel
hub or on or near any other
airbag covering.
Do not use seat accessories that
block the inflation path of a
seat-mounted side impact airbag.
Never secure anything to the roof
of a vehicle with roof-rail airbags
by routing a rope or tie‐down
through any door or window
opening. If you do, the path of an
inflating roof-rail airbag will be
blocked.
Page 88 of 297
Black plate (1,1)Chevrolet City Express Owner Manual (GMNA-Localizing-U.S./Canada-
7707496) - 2015 - CRC - 11/26/14
Instruments and Controls 5-1
Instruments and
Controls
Controls
Steering Wheel Controls . . . . . . 5-2
Horn . . . . . . . . . . . . . . . . . . . . . . . . . . 5-2
Windshield Wiper/Washer . . . . . 5-2
Clock . . . . . . . . . . . . . . . . . . . . . . . . . 5-3
Power Outlets . . . . . . . . . . . . . . . . . 5-4
Cigarette Lighter . . . . . . . . . . . . . . 5-5
Ashtrays . . . . . . . . . . . . . . . . . . . . . . 5-5
Warning Lights, Gauges, and
Indicators
Warning Lights, Gauges, andIndicators . . . . . . . . . . . . . . . . . . . . 5-6
Instrument Cluster . . . . . . . . . . . . 5-7
Speedometer . . . . . . . . . . . . . . . . . 5-8
Odometer . . . . . . . . . . . . . . . . . . . . . 5-8
Trip Odometer . . . . . . . . . . . . . . . . . 5-8 Tachometer . . . . . . . . . . . . . . . . . . . 5-8
Fuel Gauge . . . . . . . . . . . . . . . . . . . 5-8
Safety Belt Reminders . . . . . . . . 5-9
Airbag Readiness Light . . . . . . . 5-9
Passenger Airbag Status
Indicator . . . . . . . . . . . . . . . . . . . . 5-10
Charging System Light . . . . . . . 5-11
Malfunction Indicator Lamp . . . . . . . . . . . . . 5-11
Brake System Warning Light . . . . . . . . . . . . . . . . . . . . . . . 5-14
Antilock Brake System (ABS) Warning Light . . . . . . . . . . . . . . 5-15
Overdrive Off Light . . . . . . . . . . 5-15
Power Steering Warning Light . . . . . . . . . . . . . . . . . . . . . . . 5-15
Traction Control System (TCS)/Electronic Stability
Control Light . . . . . . . . . . . . . . . 5-16
Electronic Stability Control (ESC) Off Light . . . . . . . . . . . . . 5-16 Engine Coolant Temperature
Warning Light . . . . . . . . . . . . . . 5-17
Tire Pressure Light . . . . . . . . . . 5-17
Engine Oil Pressure Light . . . . 5-18
Low Fuel Warning Light . . . . . . 5-18
Security Light . . . . . . . . . . . . . . . . 5-19
High-Beam On Light . . . . . . . . . 5-19
Low Washer Fluid Warning Light . . . . . . . . . . . . . . . . . . . . . . . 5-19
Cruise Control Light . . . . . . . . . 5-19
Door Ajar Light . . . . . . . . . . . . . . 5-19
Vehicle Messages
Fuel System Messages . . . . . . 5-20
Tire Messages . . . . . . . . . . . . . . . 5-20
Trip Computer
Trip Computer . . . . . . . . . . . . . . . 5-20
Vehicle Personalization
Vehicle Personalization (Radio with Touchscreen Only) . . . . 5-21
Page 115 of 297
Black plate (4,1)Chevrolet City Express Owner Manual (GMNA-Localizing-U.S./Canada-
7707496) - 2015 - CRC - 11/26/14
6-4 Lighting
Cargo Lamp
The interior light switch has two
positions and operates in any
ignition switch position.
ON:Turns the interior light on in
any door position. The light turns off
automatically after a period of time
unless the ignition switch is turned
to ACC/ACCESSORY or ON.
OFF: Turns the interior light off and
it will not come on regardless of the
door position.
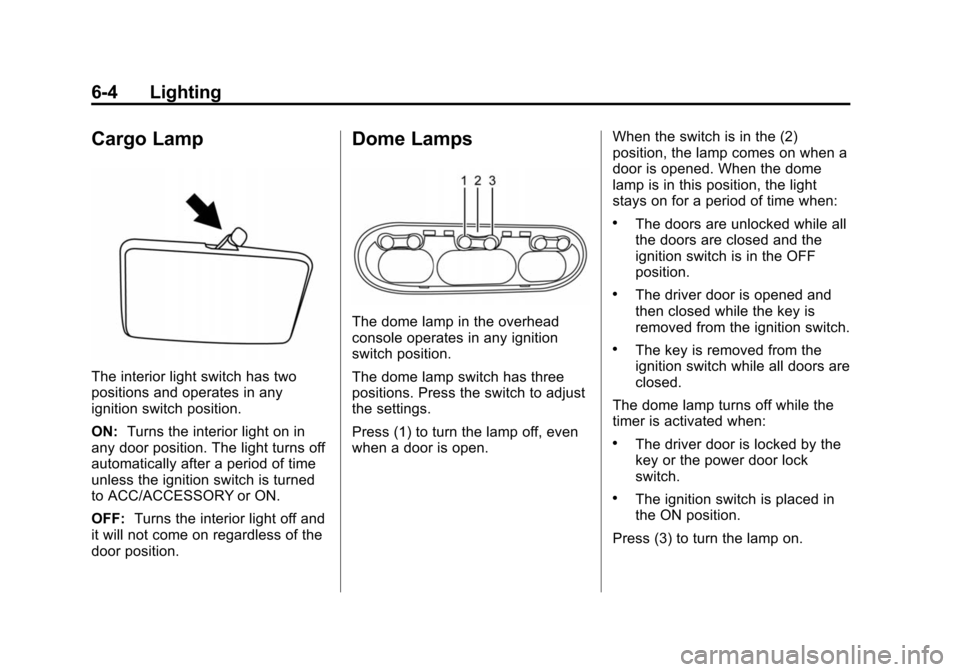
Dome Lamps
The dome lamp in the overhead
console operates in any ignition
switch position.
The dome lamp switch has three
positions. Press the switch to adjust
the settings.
Press (1) to turn the lamp off, even
when a door is open. When the switch is in the (2)
position, the lamp comes on when a
door is opened. When the dome
lamp is in this position, the light
stays on for a period of time when:
.The doors are unlocked while all
the doors are closed and the
ignition switch is in the OFF
position.
.The driver door is opened and
then closed while the key is
removed from the ignition switch.
.The key is removed from the
ignition switch while all doors are
closed.
The dome lamp turns off while the
timer is activated when:
.The driver door is locked by the
key or the power door lock
switch.
.The ignition switch is placed in
the ON position.
Press (3) to turn the lamp on.
Page 151 of 297
Black plate (10,1)Chevrolet City Express Owner Manual (GMNA-Localizing-U.S./Canada-
7707496) - 2015 - CRC - 11/26/14
9-10 Driving and Operating
pillar (B-pillar). With the driver
door open, you will find the label
attached near the door lock
post. The Tire and Loading
Information label shows the
number of occupant seating
positions (1), and the maximum
vehicle capacity weight (2) in
kilograms and pounds.
The Tire and Loading
Information label also shows the
tire size of the original
equipment tires (3) and the
recommended cold tire inflation
pressures (4). For more
information on tires and inflation,
seeTires on page 10-26 and
Tire Pressure on page 10-35.
There is also important loading
information on the Certification
label. It tells you the Gross
Vehicle Weight Rating (GVWR)
and the Gross Axle Weight Rating (GAWR) for the front and
rear axle. See
“Certification
Label” later in this section.
“Steps for Determining Correct
Load Limit–
1.Locate the statement "The
combined weight of
occupants and cargo should
never exceed XXX kg or
XXX lbs." on your vehicle’s
placard.
2.Determine the combined
weight of the driver and
passengers that will be riding
in your vehicle.
3.Subtract the combined
weight of the driver and
passengers from XXX kg or
XXX lbs.
4.The resulting figure equals
the available amount of cargo
and luggage load capacity.
For example, if the "XXX"
amount equals 1400 lbs. and there will be five 150 lb
passengers in your vehicle,
the amount of available cargo
and luggage load capacity is
650 lbs. (1400-750 (5 x 150)
= 650 lbs.)
5.Determine the combined
weight of luggage and cargo
being loaded on the vehicle.
That weight may not safely
exceed the available cargo
and luggage load capacity
calculated in Step 4.
6.If your vehicle will be towing
a trailer, load from your trailer
will be transferred to your
vehicle. Consult this manual
to determine how this
reduces the available cargo
and luggage load capacity of
your vehicle.”
Page 180 of 297
Black plate (39,1)Chevrolet City Express Owner Manual (GMNA-Localizing-U.S./Canada-
7707496) - 2015 - CRC - 11/26/14
Driving and Operating 9-39
Filling the Tank
{Warning
Fuel vapors and fuel fires burn
violently and can cause injury or
death.
.To help avoid injuries to you
and others, read and follow
all the instructions on the fuel
pump island.
.Turn off the engine when
refueling.
.Keep sparks, flames, and
smoking materials away
from fuel.
.Do not leave the fuel pump
unattended.
.Do not reenter the vehicle
while pumping fuel.
.Keep children away from the
fuel pump and never let
children pump fuel.(Continued)
Warning (Continued)
.Fuel can spray out if the fuel
cap is opened too quickly.
This spray can happen if the
tank is nearly full, and is
more likely in hot weather.
Open the fuel cap slowly and
wait for any hiss noise to stop
then unscrew the cap all
the way.
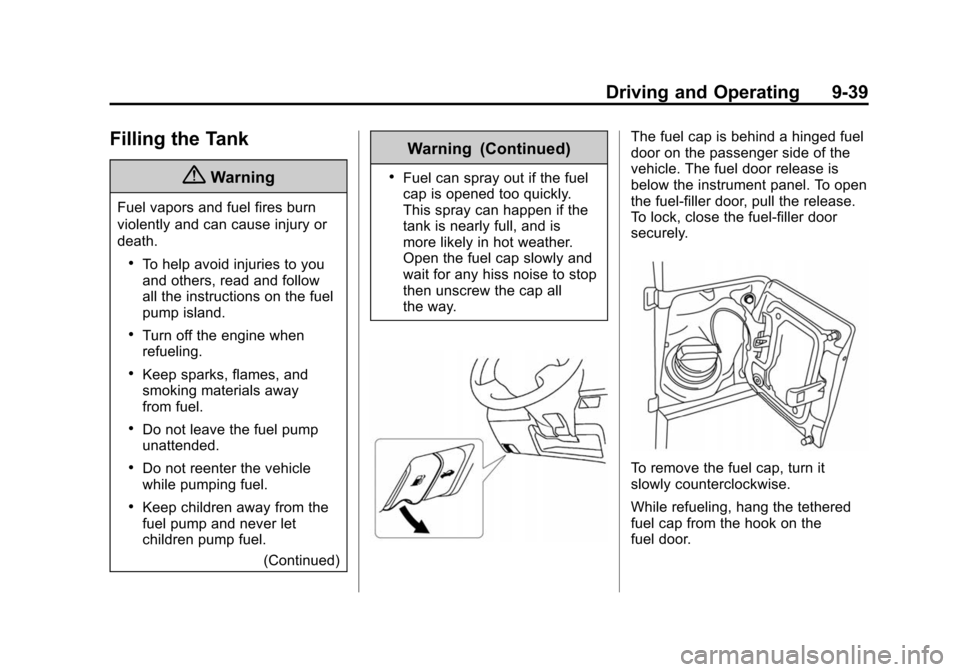
The fuel cap is behind a hinged fuel
door on the passenger side of the
vehicle. The fuel door release is
below the instrument panel. To open
the fuel-filler door, pull the release.
To lock, close the fuel-filler door
securely.
To remove the fuel cap, turn it
slowly counterclockwise.
While refueling, hang the tethered
fuel cap from the hook on the
fuel door.
Page 232 of 297
Black plate (49,1)Chevrolet City Express Owner Manual (GMNA-Localizing-U.S./Canada-
7707496) - 2015 - CRC - 11/26/14
Vehicle Care 10-49
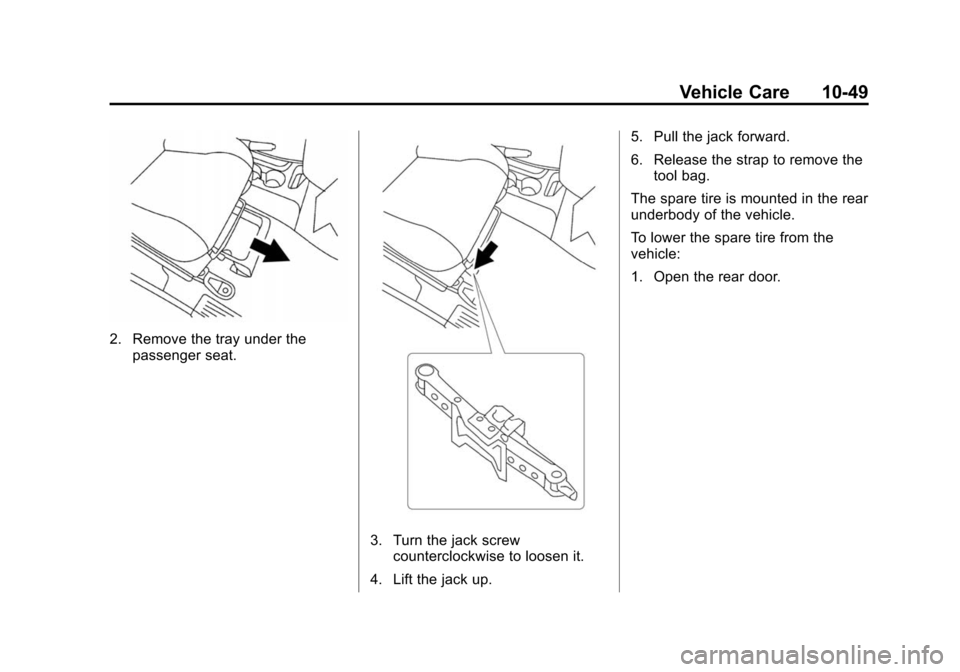
2. Remove the tray under thepassenger seat.
3. Turn the jack screwcounterclockwise to loosen it.
4. Lift the jack up. 5. Pull the jack forward.
6. Release the strap to remove the
tool bag.
The spare tire is mounted in the rear
underbody of the vehicle.
To lower the spare tire from the
vehicle:
1. Open the rear door.
Page 248 of 297
Black plate (65,1)Chevrolet City Express Owner Manual (GMNA-Localizing-U.S./Canada-
7707496) - 2015 - CRC - 11/26/14
Vehicle Care 10-65
Brake System
Visually inspect brake lines and
hoses for proper hook-up, binding,
leaks, cracks, chafing, etc. Inspect
disc brake pads for wear and rotors
for surface condition. Inspect drum
brake linings/shoes for wear or
cracks. Inspect other brake parts,
including drums, wheel cylinders,
calipers, parking brake, master
cylinder, brake fluid reservoir,
vacuum pipes, electric vacuum
pump including bracket and vent
hose, if equipped.
Steering, Suspension, and
Chassis Components
Visually inspect steering,
suspension, and chassis
components for damaged, loose,
or missing parts or signs of wear at
least once a year.
Inspect power steering for proper
hook-up, binding, leaks, cracks,
chafing, etc.
Visually check constant velocity joint
boots and axle seals for leaks.
Body Component Lubrication
Lubricate all key lock cylinders,
hood hinges, liftgate hinges, steel
fuel door hinge, unless the
components are plastic. Applying
silicone grease on weatherstrips
with a clean cloth will make them
last longer, seal better, and not stick
or squeak.
Underbody Maintenance
At least twice a year, spring and fall
use plain water to flush any
corrosive materials from the
underbody. Take care to thoroughly
clean any areas where mud and
other debris can collect.
Sheet Metal Damage
If the vehicle is damaged and
requires sheet metal repair or
replacement, make sure the body
repair shop applies anti-corrosion
material to parts repaired or
replaced to restore corrosion
protection.Original manufacturer replacement
parts will provide the corrosion
protection while maintaining the
vehicle warranty.
Finish Damage
Quickly repair minor chips and
scratches with touch-up materials
available from your dealer to avoid
corrosion. Larger areas of finish
damage can be corrected in your
dealer's body and paint shop.
Chemical Paint Spotting
Airborne pollutants can fall upon
and attack painted vehicle surfaces
causing blotchy, ring-shaped
discolorations, and small, irregular
dark spots etched into the paint
surface. See
“Finish Care”
previously in this section.
Interior Care
To prevent dirt particle abrasions,
regularly clean the vehicle's interior.
Immediately remove any soils. Note
that newspapers or dark garments
that can transfer color to home