2016 BUICK LACROSSE run flat
[x] Cancel search: run flatPage 95 of 367
Buick LaCrosse Owner Manual (GMNA-Localizing-U.S./Canada/Mexico-
9159288) - 2016 - CRC - 10/5/15
94 Seats and Restraints
{Warning
A child in a rear-facing child
restraint can be seriously injured
or killed if the front outboard
passenger frontal airbag inflates.
This is because the back of the
rear-facing child restraint would
be very close to the inflating
airbag. A child in a forward-facing
child restraint can be seriously
injured or killed if the front
outboard passenger frontal airbag
inflates and the passenger seat is
in a forward position.
Even if the passenger sensing
system has turned off the front
outboard passenger frontal
airbag, no system is fail-safe. No
one can guarantee that an airbag
will not deploy under some
unusual circumstance, even
though it is turned off.
Secure rear-facing child restraints
in a rear seat, even if the airbag
is off. If you secure a(Continued)
Warning (Continued)
forward-facing child restraint in
the front seat, always move the
front passenger seat as far back
as it will go. It is better to secure
the child restraint in a rear seat.
SeePassenger Sensing System
0 71 for additional information.
If the child restraint uses a top
tether, see Lower Anchors and
Tethers for Children (LATCH
System) 084 for top tether anchor
locations.
Do not secure a child seat in a
position without a top tether anchor
if a national or local law requires
that the top tether be anchored, or if
the instructions that come with the
child restraint say that the top strap
must be anchored.
In Canada, the law requires that
forward-facing child restraints have
a top tether, and that the tether be
attached. When using the lap-shoulder belt to
secure the child restraint in this
position, follow the instructions that
came with the child restraint and the
following instructions:
1. Move the seat as far back as it will go before securing the
forward-facing child restraint.
When the passenger sensing
system has turned off the front
outboard passenger frontal
airbag, the off indicator on the
passenger airbag status
indicator should light and stay
lit when the vehicle is started.
See Passenger Airbag Status
Indicator 0112.
2. Put the child restraint on the seat.
3. Pick up the latch plate, and run the lap and shoulder portions
of the vehicle's safety belt
through or around the restraint.
The child restraint instructions
will show you how.
Page 114 of 367

Buick LaCrosse Owner Manual (GMNA-Localizing-U.S./Canada/Mexico-
9159288) - 2016 - CRC - 10/5/15
Instruments and Controls 113
United States
Canada and Mexico
When the vehicle is started, the
passenger airbag status indicator
will light ON and OFF, or the symbol
for on and off, for several seconds
as a system check. Then, after
several more seconds, the status
indicator will light either ON or OFF,
or either the on or off symbol, to let
you know the status of the front
outboard passenger frontal airbag. If the word ON or the on symbol is
lit on the passenger airbag status
indicator, it means that the front
outboard passenger frontal airbag is
allowed to inflate.
If the word OFF or the off symbol is
lit on the airbag status indicator, it
means that the passenger sensing
system has turned off the front
outboard passenger frontal airbag.
If, after several seconds, both status
indicator lights remain on, or if there
are no lights at all, there may be a
problem with the lights or the
passenger sensing system. See
your dealer for service.
{Warning
If the airbag readiness light ever
comes on and stays on, it means
that something may be wrong
with the airbag system. To help
avoid injury to yourself or others,
have the vehicle serviced right
away. See
Airbag Readiness
Light 0112 for more information,
including important safety
information.
Charging System Light
The charging system light comes on
briefly when the ignition is turned
on, but the engine is not running, as
a check to show the light is working.
The light turns off when the engine
is started. If it does not, have the
vehicle serviced by your dealer.
If the light stays on, or comes on
while driving, there could be a
problem with the electrical charging
system. Have it checked by your
dealer. Driving while this light is on
could drain the battery.
If a short distance must be driven
with the light on, be sure to turn off
all accessories, such as the radio
and air conditioner.
Page 223 of 367

Buick LaCrosse Owner Manual (GMNA-Localizing-U.S./Canada/Mexico-
9159288) - 2016 - CRC - 10/5/15
222 Driving and Operating
vehicle may show signs similar to
engine overheating. To avoid this,
let the engine run while parked,
preferably on level ground, with the
automatic transmission in P (Park)
for a few minutes before turning the
engine off. If the overheat warning
comes on, seeEngine
Overheating 0245.
Parking on Hills
{Warning
Parking the vehicle on a hill with
the trailer attached can be
dangerous. If something goes
wrong, the rig could start to move.
People can be injured, and both
the vehicle and the trailer can be
damaged. When possible, always
park the rig on a flat surface.
If parking the rig on a hill: 1. Press the brake pedal, but do not shift into P (Park) yet. Turn
the wheels into the curb if
facing downhill or into traffic if
facing uphill. 2. Have someone place chocks
under the trailer wheels.
3. When the wheel chocks are in place, release the regular
brakes until the chocks absorb
the load.
4. Reapply the brake pedal. Then apply the parking brake and
shift into P (Park).
5. Release the brake pedal.
Leaving After Parking on a Hill
1. Apply and hold the brake pedal.
2. Start the engine.
3. Shift into a gear.
4. Release the parking brake.
5. Let up on the brake pedal.
6. Drive slowly until the trailer is clear of the chocks.
7. Stop and have someone pick up and store the chocks.
Maintenance when Trailer
Towing
The vehicle needs service more
often when pulling a trailer. See
Maintenance Schedule 0314.
Things that are especially important
in trailer operation are automatic
transmission fluid, engine oil, axle
lubricant, belts, cooling system, and
brake system. It is a good idea to
inspect these before and during
the trip.
Check periodically to see that all
hitch nuts and bolts are tight.
Trailer Towing (Except
eAssist)
Before pulling a trailer, three
important considerations have to do
with weight:
. Weight of the trailer.
. Weight of the trailer tongue.
. Total weight on your vehicle's
tires.
Page 286 of 367
Buick LaCrosse Owner Manual (GMNA-Localizing-U.S./Canada/Mexico-
9159288) - 2016 - CRC - 10/5/15
Vehicle Care 285
Warning (Continued)
2. Put an automatictransmission in P (Park) or a
manual transmission in
1 (First) or R (Reverse).
3. Turn off the engine and do not restart while the vehicle
is raised.
4. Do not allow passengers to remain in the vehicle.
5. Place wheel blocks, if equipped, on both sides of
the tire at the opposite
corner of the tire being
changed.
This vehicle may come with a jack
and spare tire or a tire sealant and
compressor kit. To use the jacking
equipment to change a spare tire
safely, follow the instructions below.
Then see Tire Changing 0291. To
use the tire sealant and compressor
kit, see Tire Sealant and
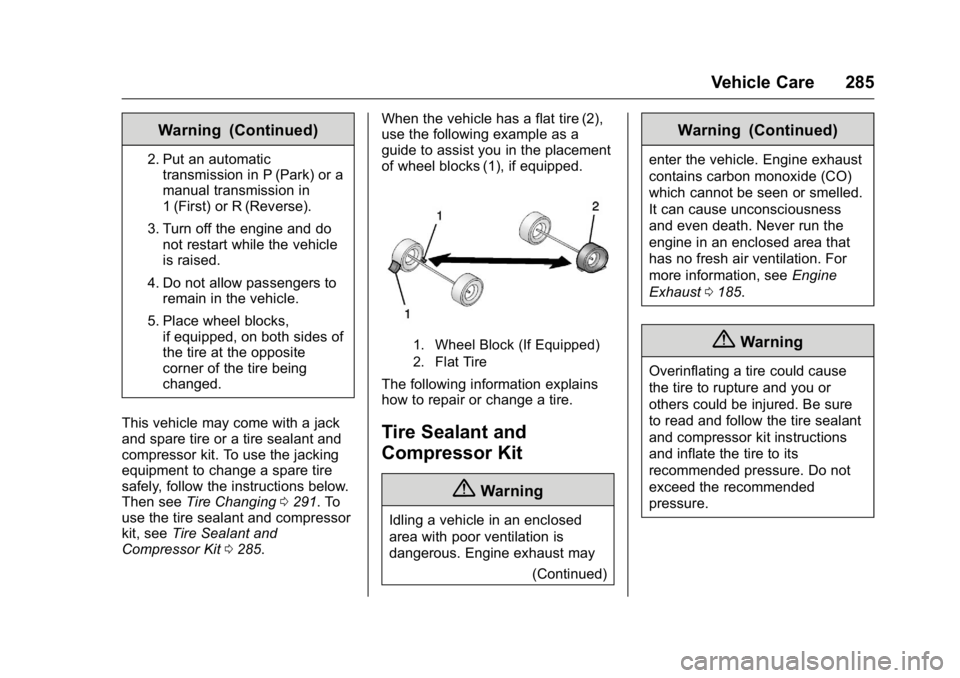
Compressor Kit 0285. When the vehicle has a flat tire (2),
use the following example as a
guide to assist you in the placement
of wheel blocks (1), if equipped.
1. Wheel Block (If Equipped)
2. Flat Tire
The following information explains
how to repair or change a tire.
Tire Sealant and
Compressor Kit
{Warning
Idling a vehicle in an enclosed
area with poor ventilation is
dangerous. Engine exhaust may
(Continued)
Warning (Continued)
enter the vehicle. Engine exhaust
contains carbon monoxide (CO)
which cannot be seen or smelled.
It can cause unconsciousness
and even death. Never run the
engine in an enclosed area that
has no fresh air ventilation. For
more information, seeEngine
Exhaust 0185.
{Warning
Overinflating a tire could cause
the tire to rupture and you or
others could be injured. Be sure
to read and follow the tire sealant
and compressor kit instructions
and inflate the tire to its
recommended pressure. Do not
exceed the recommended
pressure.
Page 288 of 367
Buick LaCrosse Owner Manual (GMNA-Localizing-U.S./Canada/Mexico-
9159288) - 2016 - CRC - 10/5/15
Vehicle Care 287
When using the tire sealant and
compressor kit during cold
temperatures, warm the kit in a
heated environment for five minutes.
This will help to inflate the tire
faster.
If a tire goes flat, avoid further tire
and wheel damage by driving slowly
to a level place. Turn on the hazard
warning flashers. SeeHazard
Warning Flashers 0151.
See If a Tire Goes Flat 0284 for
other important safety warnings.
Do not remove any objects that
have penetrated the tire. 1. Remove the tire sealant and
compressor kit from its storage
location. See Storing the Tire
Sealant and Compressor
Kit 0291.
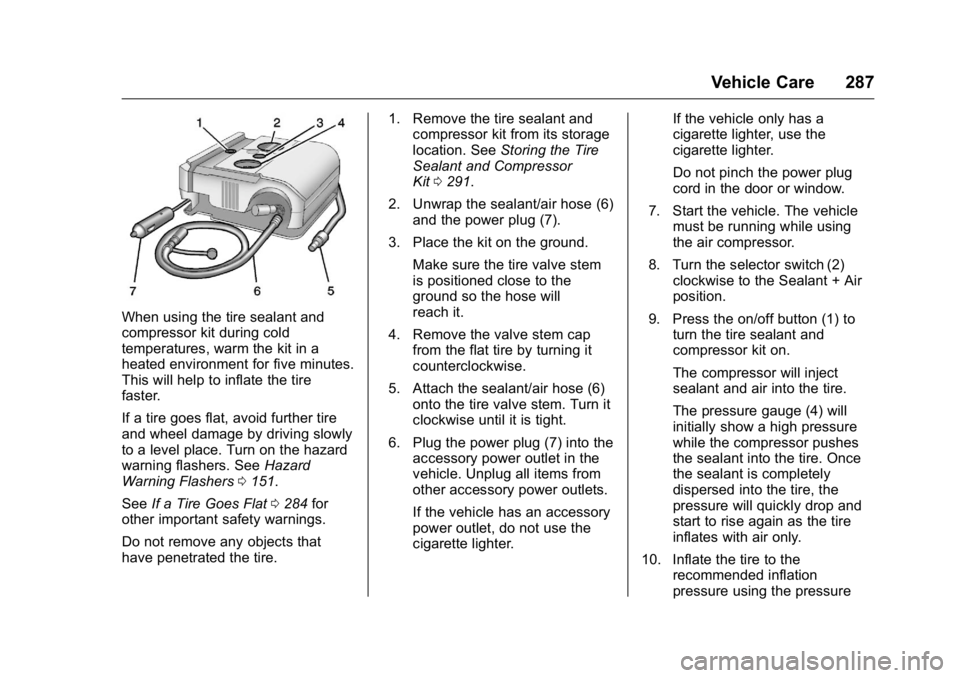
2. Unwrap the sealant/air hose (6) and the power plug (7).
3. Place the kit on the ground. Make sure the tire valve stem
is positioned close to the
ground so the hose will
reach it.
4. Remove the valve stem cap from the flat tire by turning it
counterclockwise.
5. Attach the sealant/air hose (6) onto the tire valve stem. Turn it
clockwise until it is tight.
6. Plug the power plug (7) into the accessory power outlet in the
vehicle. Unplug all items from
other accessory power outlets.
If the vehicle has an accessory
power outlet, do not use the
cigarette lighter. If the vehicle only has a
cigarette lighter, use the
cigarette lighter.
Do not pinch the power plug
cord in the door or window.
7. Start the vehicle. The vehicle must be running while using
the air compressor.
8. Turn the selector switch (2) clockwise to the Sealant + Air
position.
9. Press the on/off button (1) to turn the tire sealant and
compressor kit on.
The compressor will inject
sealant and air into the tire.
The pressure gauge (4) will
initially show a high pressure
while the compressor pushes
the sealant into the tire. Once
the sealant is completely
dispersed into the tire, the
pressure will quickly drop and
start to rise again as the tire
inflates with air only.
10. Inflate the tire to the recommended inflation
pressure using the pressure
Page 291 of 367
Buick LaCrosse Owner Manual (GMNA-Localizing-U.S./Canada/Mexico-
9159288) - 2016 - CRC - 10/5/15
290 Vehicle Care
If the vehicle has an accessory
power outlet, do not use the
cigarette lighter.
If the vehicle only has a
cigarette lighter, use the
cigarette lighter.
Do not pinch the power plug
cord in the door or window.
7. Start the vehicle. The vehicle must be running while using
the air compressor.
8. Turn the selector switch (2) counterclockwise to the Air
Only position.
9. Press the on/off button (1) to turn the compressor on.
The compressor will inflate the
tire with air only.
10. Inflate the tire to the recommended inflation
pressure using the pressure
gauge (4). The recommended
inflation pressure can be found
on the Tire and Loading
Information label. See Tire
Pressure 0271. The pressure gauge (4) may
read higher than the actual tire
pressure while the compressor
is on. Turn the compressor off
to get an accurate reading. The
compressor may be turned on/
off until the correct pressure is
reached. If the tire is inflated
higher than the recommended
pressure, press the pressure
relief button (3), if equipped,
until the proper pressure
reading is reached. This option
is only functional when using
the air only hose (5).
11. Press the on/off button (1) to turn the tire sealant and
compressor kit off.
Be careful while handling the
tire sealant and compressor kit
as it could be warm after
usage.
12. Unplug the power plug (7) from the accessory power outlet in
the vehicle. 13. Disconnect the air only
hose (5) from the tire valve
stem, by turning it
counterclockwise, and replace
the tire valve stem cap.
14. Return the air only hose (5) and the power plug (7) back to
their original locations.
15. Return the equipment to its original storage location in the
vehicle.
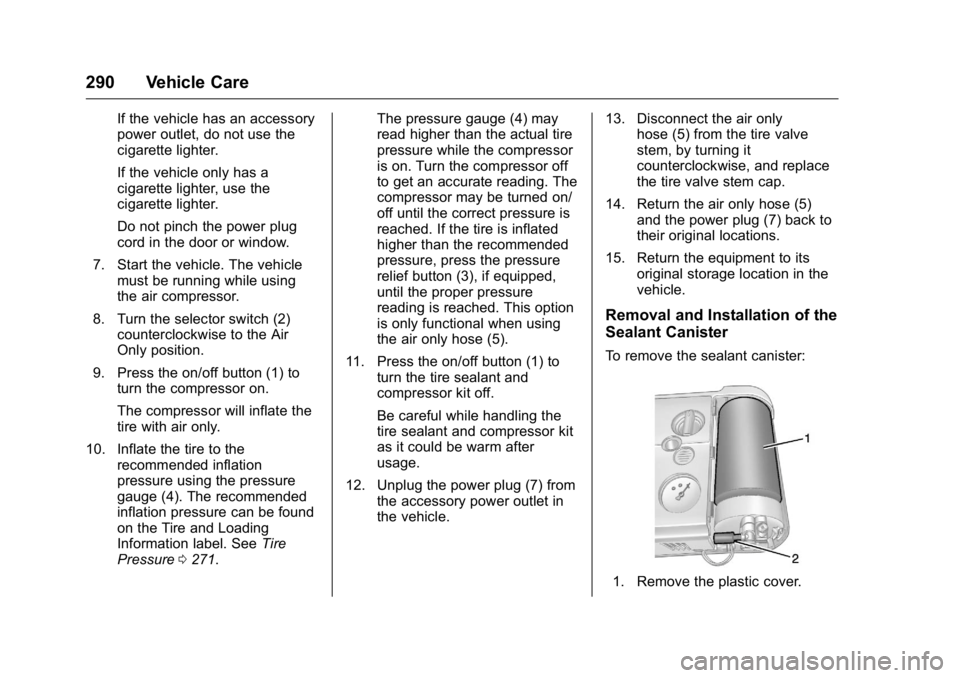
Removal and Installation of the
Sealant Canister
To remove the sealant canister:
1. Remove the plastic cover.
Page 293 of 367
Buick LaCrosse Owner Manual (GMNA-Localizing-U.S./Canada/Mexico-
9159288) - 2016 - CRC - 10/5/15
292 Vehicle Care
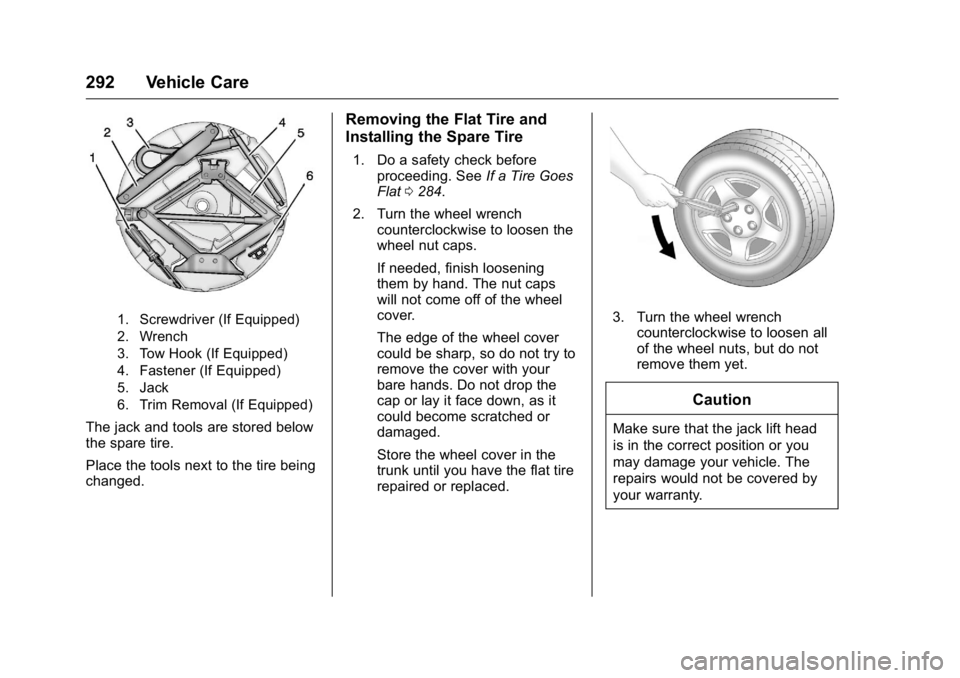
1. Screwdriver (If Equipped)
2. Wrench
3. Tow Hook (If Equipped)
4. Fastener (If Equipped)
5. Jack
6. Trim Removal (If Equipped)
The jack and tools are stored below
the spare tire.
Place the tools next to the tire being
changed.
Removing the Flat Tire and
Installing the Spare Tire
1. Do a safety check beforeproceeding. See If a Tire Goes
Flat 0284.
2. Turn the wheel wrench counterclockwise to loosen the
wheel nut caps.
If needed, finish loosening
them by hand. The nut caps
will not come off of the wheel
cover.
The edge of the wheel cover
could be sharp, so do not try to
remove the cover with your
bare hands. Do not drop the
cap or lay it face down, as it
could become scratched or
damaged.
Store the wheel cover in the
trunk until you have the flat tire
repaired or replaced.
3. Turn the wheel wrenchcounterclockwise to loosen all
of the wheel nuts, but do not
remove them yet.
Caution
Make sure that the jack lift head
is in the correct position or you
may damage your vehicle. The
repairs would not be covered by
your warranty.
Page 359 of 367

Buick LaCrosse Owner Manual (GMNA-Localizing-U.S./Canada/Mexico-
9159288) - 2016 - CRC - 10/5/15
358 Index
Driving (cont'd)Winter . . . . . . . . . . . . . . . . . . . . . . . . 169
Dual Automatic Climate Control System . . . . . . . . . . . . . . . . 157
E
E85 or FlexFuel . . . . . . . . . . . . . . . . 217
Electric Parking Brake Light . . . . 116
Electrical Equipment,Add-On . . . . . . . . . . . . . . . . . . . . . . . 225
Electrical System Engine Compartment FuseBlock . . . . . . . . . . . . . . . . . . . . . . . . 259
Fuses and Circuit Breakers . . . 258
Instrument Panel Fuse
Block . . . . . . . . . . . . . . . . . . . . . . . . 262
Overload . . . . . . . . . . . . . . . . . . . . . 257
Emergency OnStar
®. . . . . . . . . . . . . . . . . . . . . . 346
Energy Information . . . . . . . . . . . . . 123
Engine Air Cleaner/Filter . . . . . . . . . . . . . 239
Check and Service EngineSoon Light . . . . . . . . . . . . . . . . . . .114
Compartment Overview . . . . . . . 231
Coolant . . . . . . . . . . . . . . . . . . . . . . . 243
Coolant Temperature Gauge . . . . . . . . . . . . . . . . . . . . . . . 111 Engine (cont'd)
Coolant Temperature
Warning Light . . . . . . . . . . . . . . . .118
Cooling System . . . . . . . . . . . . . . . 242
Cooling System Messages . . . 132
Drive Belt Routing . . . . . . . . . . . . 329
Exhaust . . . . . . . . . . . . . . . . . . . . . . 185
Heater . . . . . . . . . . . . . . . . . . . . . . . . 181
Oil Life System . . . . . . . . . . . . . . . 238
Oil Messages . . . . . . . . . . . . . . . . . 133
Oil Pressure Light . . . . . . . . . . . . .119
Overheated Protection
Operating Mode . . . . . . . . . . . . . 246
Overheating . . . . . . . . . . . . . . . . . . 245
Power Messages . . . . . . . . . . . . . 133
Running While Parked . . . . . . . . 186
Starting . . . . . . . . . . . . . . . . . . . . . . . 178
Entry Lighting . . . . . . . . . . . . . . . . . . . 153
Equipment, Towing . . . . . . . . . . . . . 224
Event Data Recorders . . . . . . . . . . 343
Exit Lighting . . . . . . . . . . . . . . . . . . . . 154
Extender, Safety Belt . . . . . . . . . . . . 64
Exterior Lamp Controls . . . . . . . . . 148
Exterior Lamps Off Reminder . . . 149
F
Features
Memory . . . . . . . . . . . . . . . . . . . . . . . . . 12
Filter, Engine Air Cleaner . . . . . . . . . . . 239
Flash-to-Pass . . . . . . . . . . . . . . . . . . . 149
Flashers, Hazard Warning . . . . . . 151
Flat Tire . . . . . . . . . . . . . . . . . . . . . . . . 284 Changing . . . . . . . . . . . . . . . . . . . . . 291
FlexFuel
E85 . . . . . . . . . . . . . . . . . . . . . . . . . . . 217
Floor Mats . . . . . . . . . . . . . . . . . . . . . . 311
Fluid Automatic Transmission . . . . . . 239
Brakes . . . . . . . . . . . . . . . . . . . . . . . . 249
Power Steering . . . . . . . . . . . . . . . 247
Washer . . . . . . . . . . . . . . . . . . . . . . . 247
Fog Lamps Bulb Replacement . . . . . . . . . . . . 151
Folding Mirrors . . . . . . . . . . . . . . . . . . 44
Forward Collision Alert (FCA) System . . . . . . . . . . . . . . . . . 208
Frequency Statement Radio . . . . . . . . . . . . . . . . . . . . . . . . . 341
Front Automatic Braking (FAB) System . . . . . . . . . . . . . . . . . 210
Front Fog Lamp Light . . . . . . . . . . . . . . . . . . . . . . . . . . 121