2016 BUICK LACROSSE counter
[x] Cancel search: counterPage 129 of 367

Buick LaCrosse Owner Manual (GMNA-Localizing-U.S./Canada/Mexico-
9159288) - 2016 - CRC - 10/5/15
128 Instruments and Controls
Image Brightness :Turn the
dimming knob clockwise or
counterclockwise to brighten or dim
the display.
The HUD image will automatically
dim and brighten to compensate for
outside lighting. The HUD
brightness control can also be
adjusted as needed.
The HUD image can temporarily
light up depending on the angle and
position of the sunlight on the HUD
display. This is normal.
Polarized sunglasses could make
the HUD image harder to see.
PAGE : Press to select the display
view. Release the PAGE button
when the desired display is shown
on the HUD. If vehicle messages
are displayed, pressing PAGE may
clear the message.
OFF : To turn HUD off, turn the
HUD dimming knob fully
counterclockwise until the HUD
display turns off. HUD Views
There are four views in the HUD.
Some vehicle information and
vehicle messages or alerts may be
displayed in any view.
Metric
English
Speed View : This display gives the
speedometer reading (in English or
metric units), Adaptive Cruise
Control speed, Lane Departure
Warning, and Vehicle Ahead
indicator. Some information only
appears on vehicles that have these
features, and when they are active.
Metric
English
Audio/Phone View : This display
includes the information in speed
view along with audio/phone
information. The current radio
station, media type, and incoming
calls will be displayed.
All HUD views may briefly display
audio information when the driver
uses the steering wheel controls to
adjust the audio settings appearing
in the instrument cluster.
Incoming phone calls appearing in
the instrument cluster, may also
display in any HUD view.
Page 219 of 367

Buick LaCrosse Owner Manual (GMNA-Localizing-U.S./Canada/Mexico-
9159288) - 2016 - CRC - 10/5/15
218 Driving and Operating
Warning (Continued)
.Do not leave the fuel pump
unattended.
. Do not use a cell phone
while refueling.
. Do not re-enter the vehicle
while pumping fuel.
. Keep children away from
the fuel pump and never let
children pump fuel.
. Fuel can spray out if the fuel
cap is opened too quickly.
This spray can happen if the
tank is nearly full, and is
more likely in hot weather.
Open the fuel cap slowly
and wait for any hiss noise
to stop, then unscrew the
cap all the way.
The fuel cap is behind a hinged fuel
door on the passenger side of the
vehicle. To open the fuel door, push
and release the rearward center
edge of the door. If equipped, the
fuel door is locked when the vehicle
doors are locked. Press
Kon the
RKE transmitter to unlock.
Turn the fuel cap counterclockwise
to remove. While refueling, hang the
fuel cap from the hook on the fuel
door. Reinstall the cap by turning it
clockwise until it clicks.
{Warning
Overfilling the fuel tank by more
than three clicks of a standard fill
nozzle may cause:
. Vehicle performance issues,
including engine stalling and
damage to the fuel system.
. Fuel spills.
. Potential fuel fires.
Be careful not to spill fuel. Wait a
few seconds after you have finished
pumping before removing the
nozzle. Clean fuel from painted
surfaces as soon as possible. See
Exterior Care 0304.
Page 246 of 367

Buick LaCrosse Owner Manual (GMNA-Localizing-U.S./Canada/Mexico-
9159288) - 2016 - CRC - 10/5/15
Vehicle Care 245
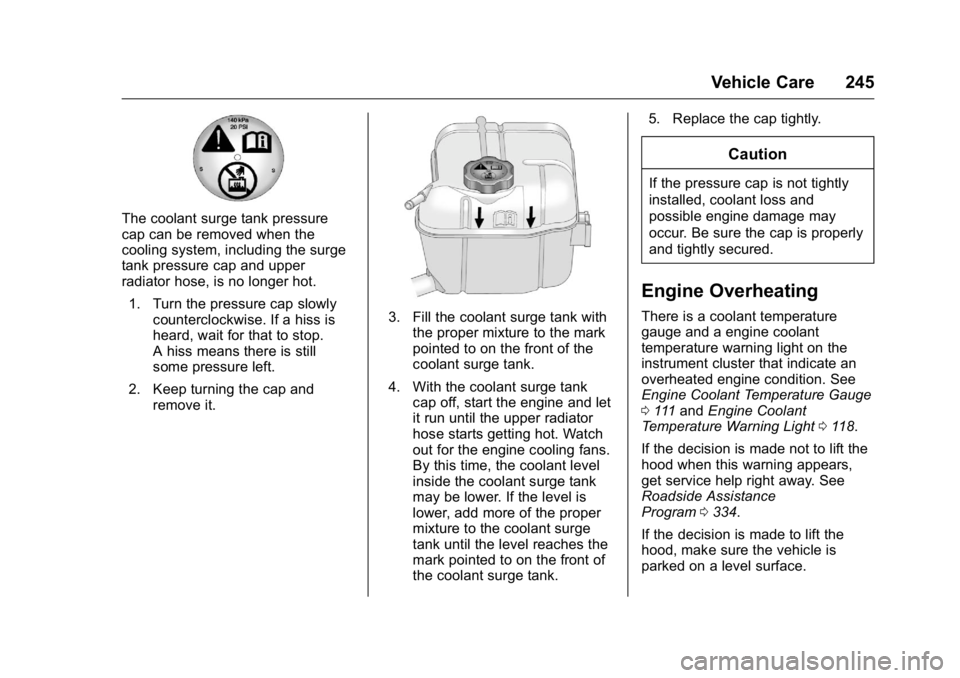
The coolant surge tank pressure
cap can be removed when the
cooling system, including the surge
tank pressure cap and upper
radiator hose, is no longer hot.1. Turn the pressure cap slowly counterclockwise. If a hiss is
heard, wait for that to stop.
A hiss means there is still
some pressure left.
2. Keep turning the cap and remove it.
3. Fill the coolant surge tank withthe proper mixture to the mark
pointed to on the front of the
coolant surge tank.
4. With the coolant surge tank cap off, start the engine and let
it run until the upper radiator
hose starts getting hot. Watch
out for the engine cooling fans.
By this time, the coolant level
inside the coolant surge tank
may be lower. If the level is
lower, add more of the proper
mixture to the coolant surge
tank until the level reaches the
mark pointed to on the front of
the coolant surge tank. 5. Replace the cap tightly.
Caution
If the pressure cap is not tightly
installed, coolant loss and
possible engine damage may
occur. Be sure the cap is properly
and tightly secured.
Engine Overheating
There is a coolant temperature
gauge and a engine coolant
temperature warning light on the
instrument cluster that indicate an
overheated engine condition. See
Engine Coolant Temperature Gauge
0
111 and Engine Coolant
Temperature Warning Light 0118.
If the decision is made not to lift the
hood when this warning appears,
get service help right away. See
Roadside Assistance
Program 0334.
If the decision is made to lift the
hood, make sure the vehicle is
parked on a level surface.
Page 256 of 367

Buick LaCrosse Owner Manual (GMNA-Localizing-U.S./Canada/Mexico-
9159288) - 2016 - CRC - 10/5/15
Vehicle Care 255
Headlamps, Front Turn
Signal and Parking
Lamps
Base Headlamp Assembly
The base model vehicle has a
halogen high/low-beam headlamp,
parking lamp, and a turn signal lamp
on the headlamp assembly.
For replacement of the turn signal
lamp bulb on an eAssist vehicle,
contact your dealer.
1. Headlamp
2. Turn Signal Lamp
To replace one of these bulbs:1. Open the hood. See Hood 0230.
2. If replacing a headlamp bulb, remove the dust cover from the
back of the headlamp housing
by turning counterclockwise
one-quarter turn.
3. If replacing a turn signal lamp bulb on a non-eAssist vehicle,
remove the close out panel
push pins and close out panel
covering the bulb socket.
4. Remove the bulb socket from the headlamp by turning
counterclockwise
one-quarter turn.
5. Remove the bulb from the socket. If replacing the high/
low-beam bulb, pry the two
clips on either end of the bulb
and pull straight out.
6. Reverse Steps 1–5 to install.
Uplevel Headlamp Assembly
The uplevel model vehicle has a
high intensity discharge (HID) high/
low beam, DRL/parking lamp, and a turn signal lamp on the headlamp
assembly. See
High Intensity
Discharge (HID) Lighting 0254.
To replace the turn signal bulb:
1. Open the hood. See Hood 0230.
2. Turn the bulb socket counterclockwise to remove it
from the headlamp assembly.
3. Pull the bulb straight out from the socket.
4. Reverse Steps 1–3 to install.
Page 257 of 367

Buick LaCrosse Owner Manual (GMNA-Localizing-U.S./Canada/Mexico-
9159288) - 2016 - CRC - 10/5/15
256 Vehicle Care
Taillamps, Turn Signal,
Stoplamps, and Back-Up
Lamps
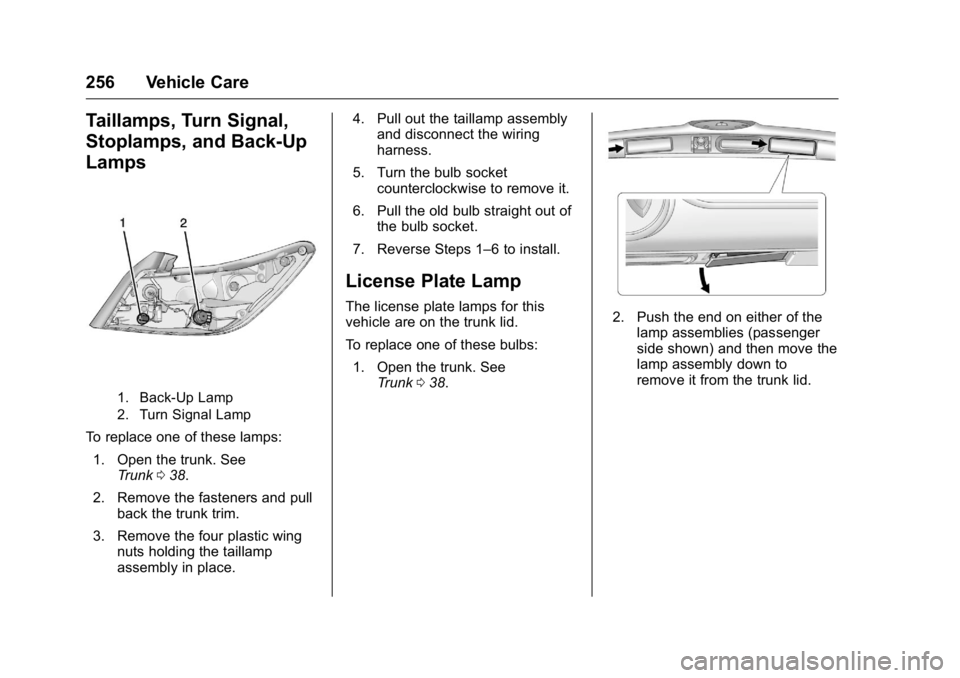
1. Back-Up Lamp
2. Turn Signal Lamp
To replace one of these lamps:1. Open the trunk. See Trunk 038.
2. Remove the fasteners and pull back the trunk trim.
3. Remove the four plastic wing nuts holding the taillamp
assembly in place. 4. Pull out the taillamp assembly
and disconnect the wiring
harness.
5. Turn the bulb socket counterclockwise to remove it.
6. Pull the old bulb straight out of the bulb socket.
7. Reverse Steps 1–6 to install.
License Plate Lamp
The license plate lamps for this
vehicle are on the trunk lid.
To replace one of these bulbs: 1. Open the trunk. See Trunk 038.2. Push the end on either of the
lamp assemblies (passenger
side shown) and then move the
lamp assembly down to
remove it from the trunk lid.
Page 258 of 367

Buick LaCrosse Owner Manual (GMNA-Localizing-U.S./Canada/Mexico-
9159288) - 2016 - CRC - 10/5/15
Vehicle Care 257
3. Turn the bulb socket (1)counterclockwise to remove it
from the lamp assembly (3).
4. Pull the bulb (2) straight out of the bulb socket.
5. Push the replacement bulb straight into the bulb socket
and turn the bulb socket
clockwise to install it into the
lamp assembly.
6. Move the lamp assembly into the trunk lid, engaging the clip
side first.
7. Push on the lamp side opposite the clip until the lamp assembly
snaps into place.
Replacement Bulbs
Exterior Lamp Bulb
Number
Back-Up Lamp 921LL (W16W)
Front Turn
Signal Lamp 7444NA
Headlamp High
Beam (Base) HIR2
Headlamp Low
Beam (Base) HIR2
License Plate Lamp W5WLL
Rear Turn Signal 7443NA (WY21W)
For replacement bulbs not listed
here, contact your dealer.
Electrical System
High Voltage Devices and
Wiring
{Warning
Exposure to high voltage can
cause shock, burns, and even
death. The high voltage
components in the vehicle can
only be serviced by technicians
with special training.
High voltage components are
identified by labels. Do not
remove, open, take apart,
or modify these components.
High voltage cable or wiring has
orange covering or labels. Do not
probe, tamper with, cut, or modify
high voltage cable or wiring.
Electrical System
Overload
The vehicle has fuses and circuit
breakers to protect against an
electrical system overload.
Page 288 of 367

Buick LaCrosse Owner Manual (GMNA-Localizing-U.S./Canada/Mexico-
9159288) - 2016 - CRC - 10/5/15
Vehicle Care 287
When using the tire sealant and
compressor kit during cold
temperatures, warm the kit in a
heated environment for five minutes.
This will help to inflate the tire
faster.
If a tire goes flat, avoid further tire
and wheel damage by driving slowly
to a level place. Turn on the hazard
warning flashers. SeeHazard
Warning Flashers 0151.
See If a Tire Goes Flat 0284 for
other important safety warnings.
Do not remove any objects that
have penetrated the tire. 1. Remove the tire sealant and
compressor kit from its storage
location. See Storing the Tire
Sealant and Compressor
Kit 0291.
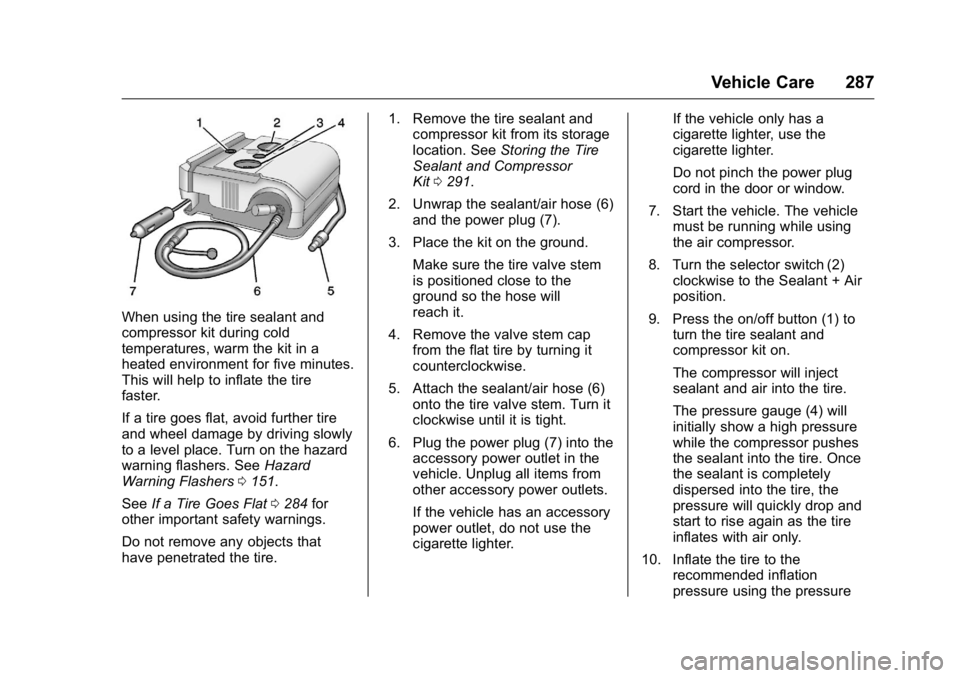
2. Unwrap the sealant/air hose (6) and the power plug (7).
3. Place the kit on the ground. Make sure the tire valve stem
is positioned close to the
ground so the hose will
reach it.
4. Remove the valve stem cap from the flat tire by turning it
counterclockwise.
5. Attach the sealant/air hose (6) onto the tire valve stem. Turn it
clockwise until it is tight.
6. Plug the power plug (7) into the accessory power outlet in the
vehicle. Unplug all items from
other accessory power outlets.
If the vehicle has an accessory
power outlet, do not use the
cigarette lighter. If the vehicle only has a
cigarette lighter, use the
cigarette lighter.
Do not pinch the power plug
cord in the door or window.
7. Start the vehicle. The vehicle must be running while using
the air compressor.
8. Turn the selector switch (2) clockwise to the Sealant + Air
position.
9. Press the on/off button (1) to turn the tire sealant and
compressor kit on.
The compressor will inject
sealant and air into the tire.
The pressure gauge (4) will
initially show a high pressure
while the compressor pushes
the sealant into the tire. Once
the sealant is completely
dispersed into the tire, the
pressure will quickly drop and
start to rise again as the tire
inflates with air only.
10. Inflate the tire to the recommended inflation
pressure using the pressure
Page 289 of 367

Buick LaCrosse Owner Manual (GMNA-Localizing-U.S./Canada/Mexico-
9159288) - 2016 - CRC - 10/5/15
288 Vehicle Care
gauge (4). The recommended
inflation pressure can be found
on the Tire and Loading
Information label. SeeTire
Pressure 0271.
The pressure gauge (4) may
read higher than the actual tire
pressure while the compressor
is on. Turn the compressor off
to get an accurate pressure
reading. The compressor may
be turned on/off until the
correct pressure is reached.
Caution
If the recommended pressure
cannot be reached after
approximately 25 minutes, the
vehicle should not be driven
farther. The tire is too severely
damaged and the tire sealant and
compressor kit cannot inflate the
tire. Remove the power plug from
the accessory power outlet and
unscrew the inflating hose from
the tire valve. See Roadside
Assistance Program 0334. 11. Press the on/off button (1) to
turn the tire sealant and
compressor kit off.
The tire is not sealed and will
continue to leak air until the
vehicle is driven and the
sealant is distributed in the tire;
therefore, Steps 12–18 must be
done immediately after
Step 11.
Be careful while handling the
tire sealant and compressor kit
as it could be warm after
usage.
12. Unplug the power plug (7) from the accessory power outlet in
the vehicle.
13. Turn the sealant/air hose (6) counterclockwise to remove it
from the tire valve stem.
14. Replace the tire valve stem cap.
15. Return the sealant/air hose (6) and the power plug (7) back in
their original locations.
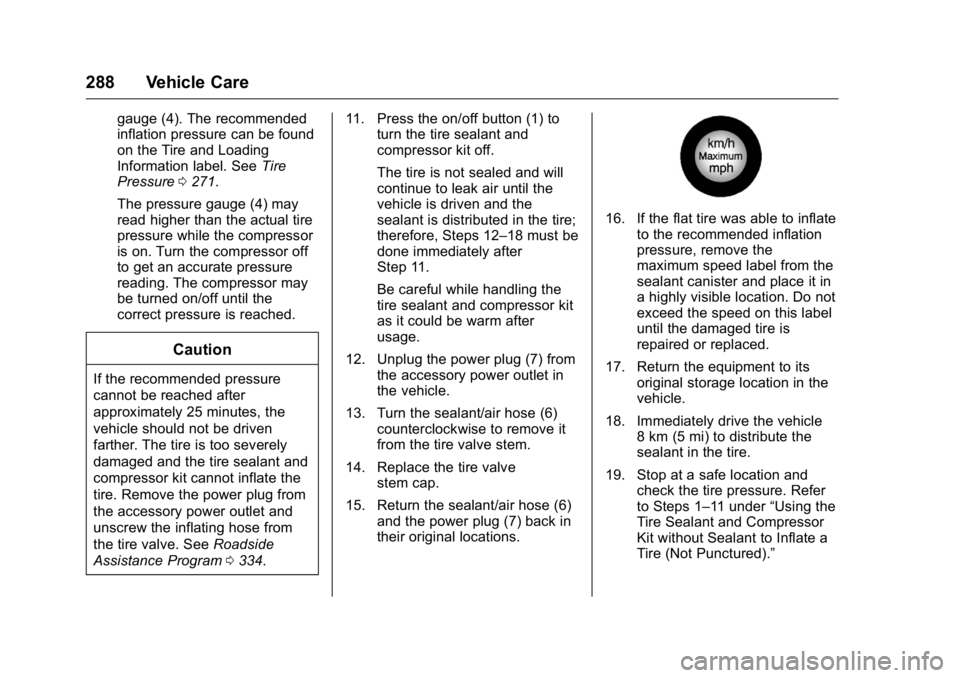
16. If the flat tire was able to inflate
to the recommended inflation
pressure, remove the
maximum speed label from the
sealant canister and place it in
a highly visible location. Do not
exceed the speed on this label
until the damaged tire is
repaired or replaced.
17. Return the equipment to its original storage location in the
vehicle.
18. Immediately drive the vehicle 8 km (5 mi) to distribute the
sealant in the tire.
19. Stop at a safe location and check the tire pressure. Refer
to Steps 1–11 under “Using the
Tire Sealant and Compressor
Kit without Sealant to Inflate a
Tire (Not Punctured).”