2016 BUICK ENVISION turn signal
[x] Cancel search: turn signalPage 2 of 20

2
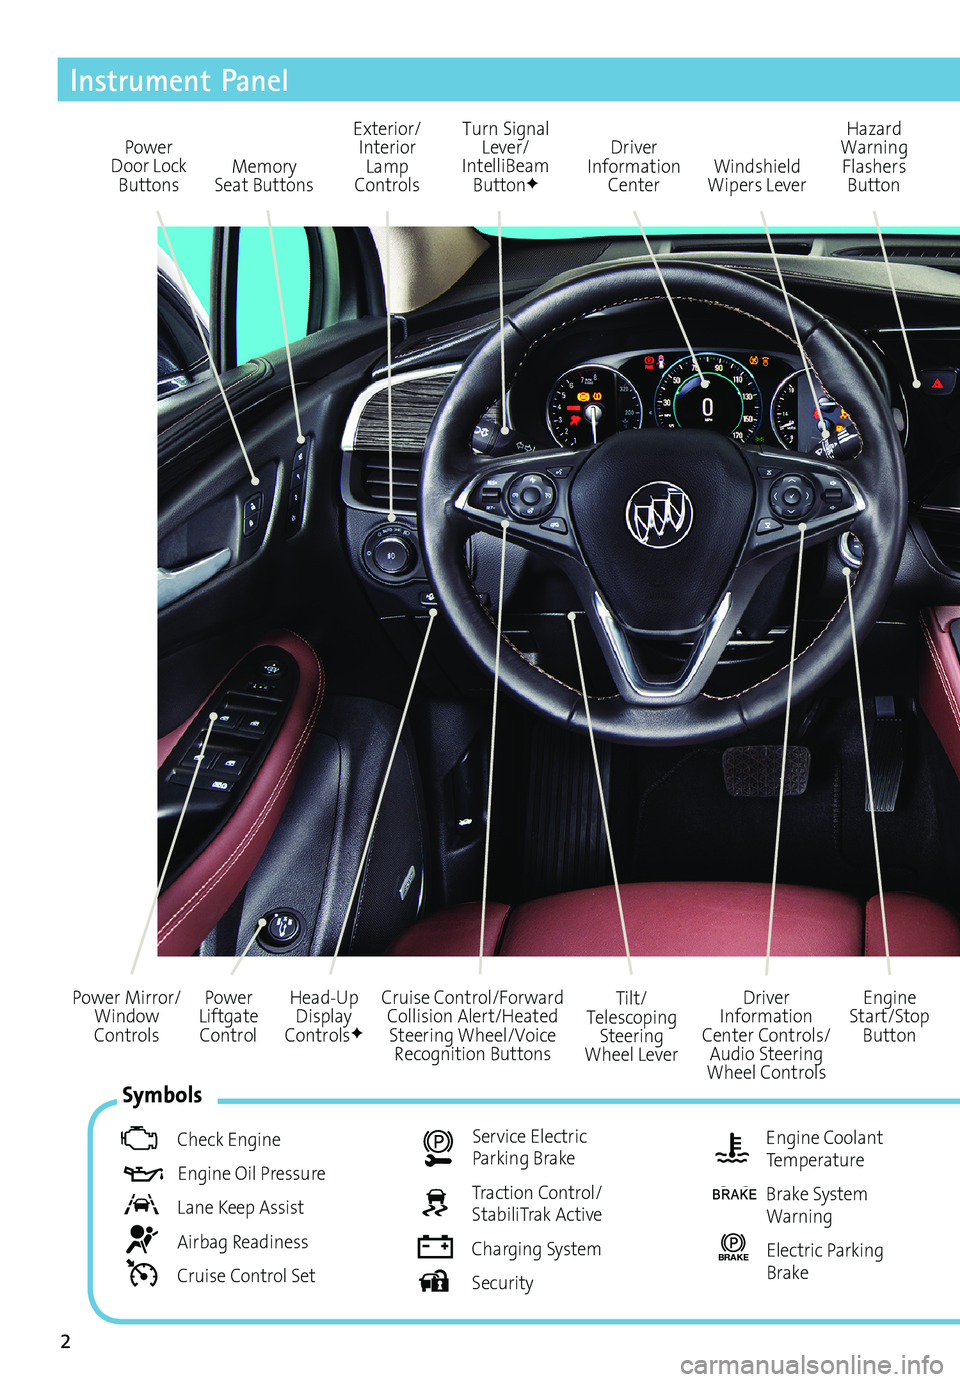
Power
Liftgate Control
Power Mirror/
Window
Controls
Instrument Panel
Driver
Information
Center Controls/ Audio Steering
Wheel Controls Engine
Start/Stop Button
Cruise Control/Forward
Collision Alert/Heated Steering Wheel/Voice Recognition Buttons Tilt/
Telescoping Steering
Wheel Lever
Head-Up
Display
Controls
F
Symbols
Check Engine
Engine Oil Pressure
Lane Keep Assist
Airbag Readiness
Cruise Control Set
Service Electric Parking Brake
Traction Control/
StabiliTrak Active
Charging System
Security
Engine Coolant
Temperature
Brake System
Warning
BRAKE Electric Parking
Brake
Power
Door Lock Buttons Turn Signal
Lever/
IntelliBeam Button
F
Driver
Information Center Hazard
Warning Flashers Button
Windshield
Wipers Lever
Memory
Seat Buttons Exterior/
Interior Lamp
Controls
Page 4 of 20

4
Remote Keyless Entry Transmitter
Keyless Access System
F Optional equipment
Unlock
Press to unlock the
driver’s door. Press
again to unlock all
doors.
Power Liftgate
Press twice to open or
close the liftgate. Press
once to stop power liftgate operation.
Lock
Press to lock all doors.
Vehicle Locator/Panic Alarm
Press and release to locate your vehicle.
The exterior lamps will flash and the horn
will sound.
Press and hold to activate the alarm. Press
it again to cancel the alarm.
Note: To change the remote lock, unlock, and
remote start settings, go to Remote Lock, Unlock,
Start in the Vehicle Settings menu.
Remote Vehicle Start
Press and release the
Lock button and
then immediately press and hold the
button until the turn signal lamps flash to
start the engine from outside the vehicle.
After entering the vehicle, turn on the
ignition.
• During a remote start, the engine will
run for 10 minutes. Repeat these steps
to run the engine for an additional 10
minutes. A remote start can be extend
-ed once.
• Press and hold the
button until
the parking lamps turn off to cancel a
remote start.
Remote Start and Heated Seats: Select
the remote start heated seat option in the
Vehicle Settings to have the heated seats
turn on during a remote start. The heated
seat button indicators do not illuminate
and the temperature of the unoccupied
seat may be reduced during a remote start.
See Keys, Doors and Windows in your Owner Manual.
The Keyless Access System enables operation of the doors, igni-tion and liftgate without removing the Remote Keyless Entry
transmitter from your pocket or purse. The transmitter must be within 3 feet of the door being unlocked or the liftgate.
Keyless Unlocking
With the transmitter within range:
Press the lock button on the driver’s door handle to unlock
the driver’s door; press it again within 5 seconds to unlock all doors.
Press the lock button on a passenger door handle to unlock all doors.
Press the touchpad on the liftgate handle to open the liftgate.
Keyless Locking
With the ignition off, the transmitter removed from the vehicle, and all doors closed:
Press the lock button on any door handle to lock all doors immediately.
If Passive Locking is turned on, all doors will lock automatically after a short delay.
Note: To change the Keyless Locking and Unlocking settings, go to Remote Lock, Unlock, Start in the
Vehicle Settings menu.
See Keys, Doors and Windows in your Owner Manual.
Page 7 of 20

7
Rear Seat Adjustment
To slide the seat forward or rearward, lift
the bar (A) under the seat cushion and
slide the seat.
Reclining the Seatback
To recline the seat cushion, pull the lever
(B) on the side of the seatback and move
the seatback to the desired position.
Release the lever.
Folding the Seatback
1. Press the button on the side of the head
restraint. It will fold automatically.
2. Pull the lever (B) on the side of the seat
cushion and fold the seatback forward or
pull the release lever located on the side of
the cargo area.
To raise the seatback, pull the lever on the
side of the seat cushion and push the
seatback rearward until it locks in the
upright position. Adjust the seatback.
See Seats and Restraints in your Owner Manual.
F Optional equipment
Rear Seats
Power Liftgate
Open/Close the Power Liftgate
Press the Power Liftgate button on the RKE transmitter twice.
Press the Power Liftgate knob on the driver’s door.
Press the touchpad on the liftgate handle to open the liftgate.
Press the button next to the liftgate pull to close the liftgate.
Programming the Liftgate Height
1. Turn the Power Liftgate knob to the 3/4 mode position.
2. Open the liftgate.
3. Adjust the liftgate manually to the desired height.
4. To save the setting, press and hold the button next to the liftgate pull for 3 seconds.
The turn signals will flash when the setting is saved.
Hands-Free Operation
To open or close the liftgate hands-free, kick your foot under the left side of the rear
bumper. The RKE transmitter must be within 3 feet of the liftgate.
See Keys, Doors and Windows in your Owner Manual.
A
B
Page 15 of 20

15
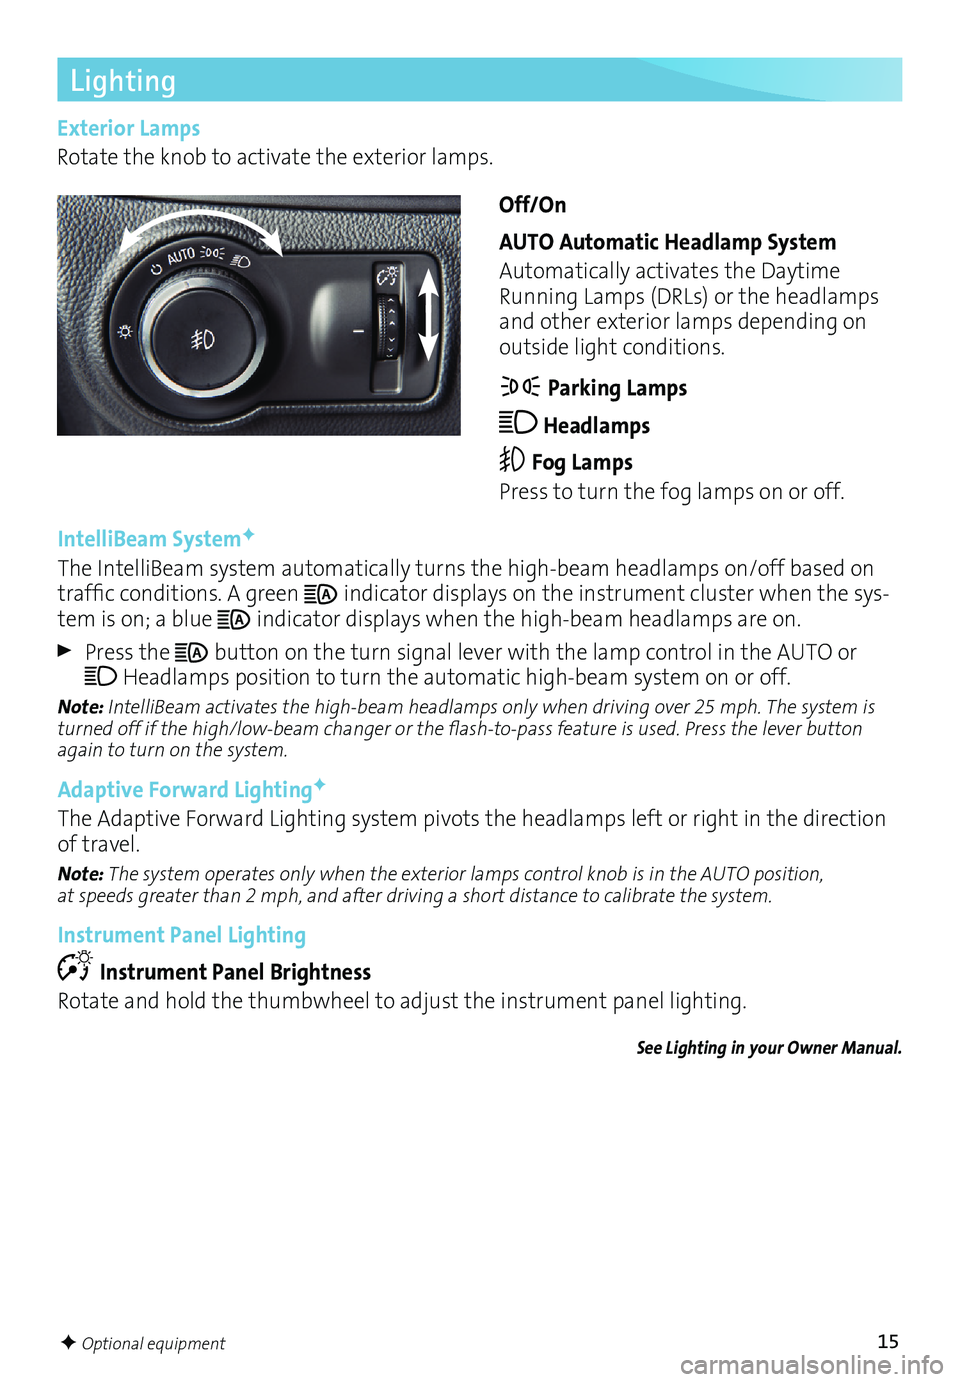
Lighting
IntelliBeam SystemF
The IntelliBeam system automatically turns the high-beam headlamps on/off based on
traffic conditions. A green
indicator displays on the instrument cluster when the sys-tem is on; a blue indicator displays when the high-beam headlamps are on.
Press the button on the turn signal lever with the lamp control in the AUTO or
Headlamps position to turn the automatic high-beam system on or off.
Note: IntelliBeam activates the high-beam headlamps only when driving over 25 mph. The system is
turned off if the high/low-beam changer or the flash-to-pass feature is used. Press the lever button
again to turn on the system.
Adaptive Forward LightingF
The Adaptive Forward Lighting system pivots the headlamps left or right in the direction
of travel.
Note: The system operates only when the exterior lamps control knob is in the AUTO position,
at speeds greater than 2 mph, and after driving a short distance to calibrate the system.
Instrument Panel Lighting
Instrument Panel Brightness
Rotate and hold the thumbwheel to adjust the instrument panel lighting.
See Lighting in your Owner Manual.
F Optional equipment
Exterior Lamps
Rotate the knob to activate the exterior lamps.
Off/On
AUTO Automatic Headlamp System
Automatically activates the Daytime
Running Lamps (DRLs) or the headlamps
and other exterior lamps depending on
outside light conditions.
Parking Lamps
Headlamps
Fog Lamps
Press to turn the fog lamps on or off.
Page 18 of 20

18
Driving Assistance Systems
Safety Alert Seat
The driver’s seat pulses — left side, right side or simultaneously — to alert the driver of
potential hazards.
Audible alerts or seat pulsing alerts may be selected. To change the alert settings, go to
Settings > Vehicle > Collision/Detection > Alert Type.
Lane Change Alert with Side Blind Zone Alert
While driving, the system displays a
warning symbol on the left or right side mirror
when a vehicle is detected in that side blind zone area or rapidly approaching that area.
The warning symbol flashes if a turn signal is activated when a vehicle has been detected.
To turn the system on or off, go to Settings > Vehicle > Collision/Detection > Lane
Change Alert.
Lane Keep Assist with Lane Departure Warning
The
Lane Keep Assist indicator illumi-nates in green on the instrument cluster
when a lane marking is detected. If your
vehicle approaches a detected lane marking
without using a turn signal in that direc
-tion, the system may assist by gently turn-ing the steering wheel and provide a Lane
Departure Warning alert by flashing an
amber
and pulsing the Safety Alert Seat.
To turn the system on or off, press the Lane Keep Assist button on the
center of the instrument panel.
Forward Collision Alert
The
Vehicle Ahead indicator illuminates in green on the instrument cluster when a
vehicle is detected and illuminates in amber when following a vehicle ahead too closely.
If your vehicle approaches another vehicle
too rapidly, the
flashes, a visual alert
flashes on the windshield and the Safety
Alert Seat pulses.
Press the Collision Alert button on
the steering wheel to set the alert timing
to Far, Medium, or Near. This is also the
Adaptive Cruise Control Following Gap
setting.
See Driving and Operating in your Owner Manual.