2016 BMW X4 Daytime running lights
[x] Cancel search: Daytime running lightsPage 14 of 253

CockpitVehicle features and options
This chapter describes all standard, country-
specific and optional features offered with the
series. It also describes features that are not
necessarily available in your car, e. g., due tothe selected options or country versions. This
also applies to safety-related functions and
systems. The respectively applicable country
provisions must be observed when using the
respective features and systems.
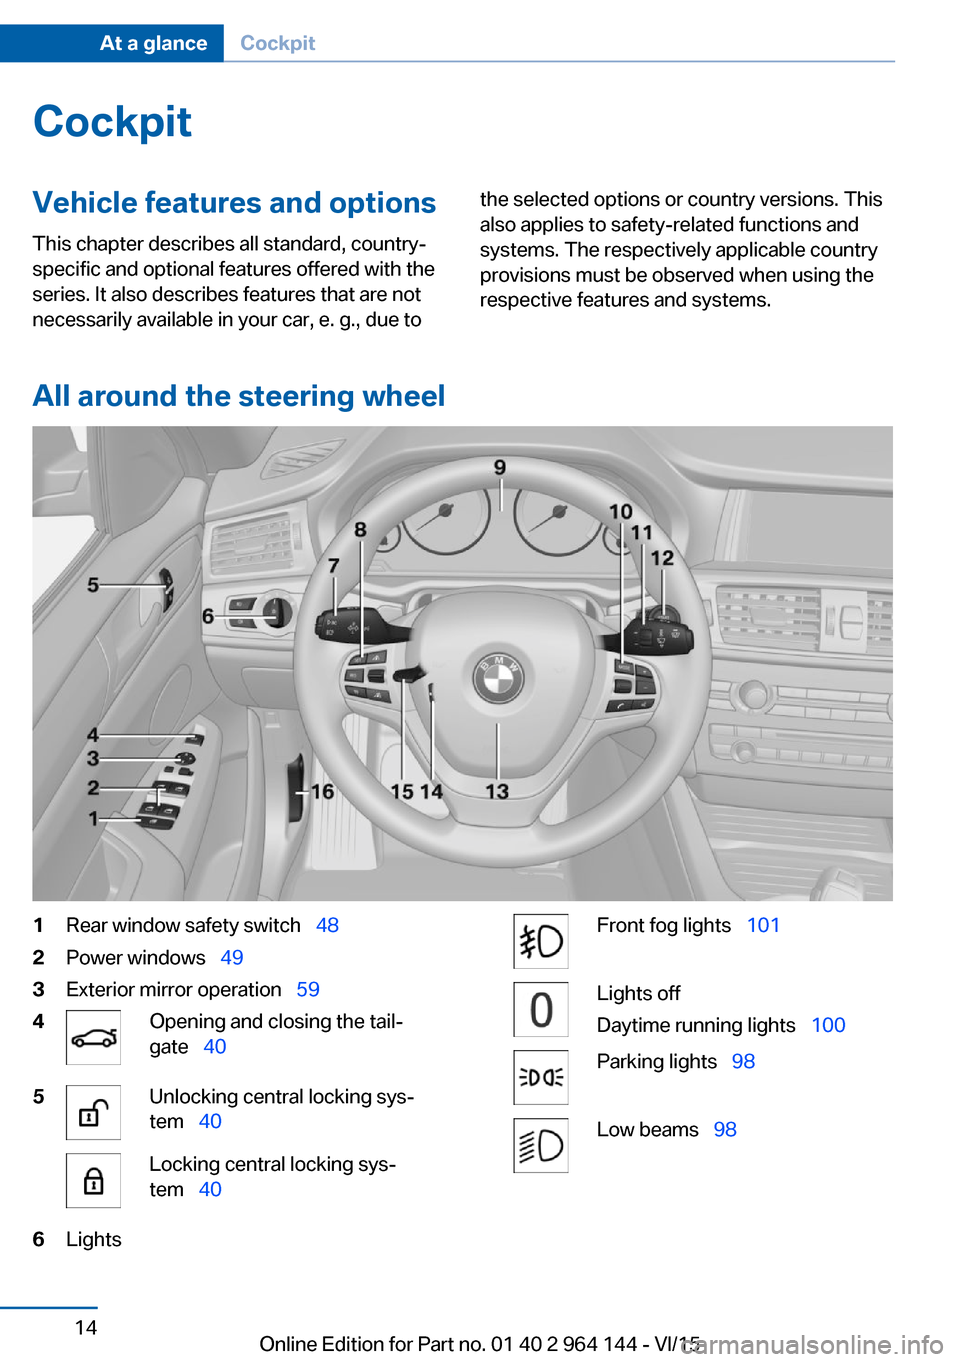
All around the steering wheel
1Rear window safety switch 482Power windows 493Exterior mirror operation 594Opening and closing the tail‐
gate 405Unlocking central locking sys‐
tem 40Locking central locking sys‐
tem 406LightsFront fog lights 101Lights off
Daytime running lights 100Parking lights 98Low beams 98Seite 14At a glanceCockpit14
Online Edition for Part no. 01 40 2 964 144 - VI/15
Page 46 of 253

Automatic lockingThe settings are saved in the active profile, re‐fer to page 35.1."Settings"2."Doors/key"3.Select the desired function:▷"Lock if no door is opened"
The vehicle locks automatically after a
short period of time if no door is
opened.▷"Lock after start driving"
The vehicle locks automatically after
you drive off.
Retrieving the seat and mirror settings
The driver's seat and exterior mirror positions
used last are stored for the remote control cur‐
rently used.
When the vehicle is unlocked, these positions
are automatically retrieved if this function was
activated.
WARNING
There is risk of jamming when moving
the seats. There is risk of injuries or risk of
property damage. Make sure that the area of
movement of the seat is clear prior to any ad‐
justment.◀
The adjustment procedure is interrupted:
▷When a seat position switch is pressed.▷When a button of the seat and mirror mem‐
ory is pressed.
Activating the setting
1."Settings"2."Doors/key"3."Last seat position autom."Alarm system
The conceptWhen the vehicle is locked, the vehicle alarm
system responds to:▷Opening a door, the hood or the tailgate.▷Movements in the interior.▷Changes in the vehicle tilt, e. g., during at‐
tempts at stealing a wheel or when towing
the car.▷Disconnected battery voltage.
The alarm system briefly signals tampering:
▷By sounding an acoustic alarm.▷By switching on the hazard warning sys‐
tem.▷By flashing the daytime running lights.
Arming and disarming the alarm
system
When you unlock or lock the vehicle, either
with the remote control or via the Comfort Ac‐
cess, the alarm system is disarmed or armed at
the same time.
Door lock and armed alarm systemThe alarm system is triggered when the door is
opened, when the vehicle is unlocked via the
door lock.
Tailgate and armed alarm system
The tailgate can be opened even when the
alarm system is armed.
After the tailgate is closed, it is locked and
monitored again when the doors are locked.
The hazard warning system flashes once.
Panic mode You can trigger the alarm system if you find
yourself in a dangerous situation.
Press button on the remote control for
at least 3 seconds.
Seite 46ControlsOpening and closing46
Online Edition for Part no. 01 40 2 964 144 - VI/15
Page 68 of 253

The radio-ready state remains active if, e.g.,
the ignition is automatically switched off for the
following reasons:▷Opening or closing the driver's door.▷Unfastening of the driver's safety belt.▷When automatically switching from low
beams to parking lights.
If the engine is switched off and the ignition is
switched on, the system automatically
switches to the radio-ready state if the lights
are turned off or, if correspondingly equipped,
the daytime running lights are activated.
Starting the engine
Information DANGER
If the exhaust pipe is blocked or ventila‐
tion is insufficient, harmful exhaust gases can
enter into the vehicle. The exhaust gases con‐
tain carbon monoxide, an odorless and color‐
less but highly toxic gas. In enclosed areas, ex‐
haust gases can also accumulate outside of
the vehicle. There is danger to life. Keep the
exhaust pipe free and ensure sufficient ventila‐
tion.◀
WARNING
An unsecured vehicle can put itself into
motion and roll away. There is risk of an acci‐
dent. Before exiting, secure the vehicle against
rolling.
In order to ensure that the vehicle is secured
against rolling away, observe the following:
▷Set the parking brake.▷On uphill grades or on a slope, turn the
front wheels in the direction of the curb.▷On uphill grades or on a slope, also secure
the vehicle, e.g. with a wheel chock.◀CAUTION
In the case of repeated starting attempts
or repeated starting in quick succession, the
fuel is not burned or is inadequately burned.
The catalytic converter can overheat. There is
risk of property damage. Avoid repeated start‐
ing in quick succession.◀
Steptronic transmission
Starting the engine1.Depress the brake pedal.2.Press the Start/Stop button.
The ignition is activated automatically for a
certain time and is stopped as soon as the en‐
gine starts.
Engine stop
Information WARNING
Unattended children or animals can
move the vehicle and endanger themselves
and traffic, e.g. with the following actions:
▷Pressing the Start/Stop button.▷Releasing the parking brake.▷Opening and closing of doors or windows.▷Shifting the selector lever into neutral.▷Using vehicle equipment.
There is risk of accidents or injuries. Do not
leave children or animals unattended in the ve‐
hicle. Carry remote control along when exiting
and lock the vehicle.◀
WARNING
An unsecured vehicle can put itself into
motion and roll away. There is risk of an acci‐
dent. Before exiting, secure the vehicle against
rolling.
In order to ensure that the vehicle is secured
against rolling away, observe the following:
Seite 68ControlsDriving68
Online Edition for Part no. 01 40 2 964 144 - VI/15
Page 98 of 253

LightsVehicle features and optionsThis chapter describes all standard, country-
specific and optional features offered with the
series. It also describes features that are not
necessarily available in your car, e. g., due to
the selected options or country versions. This
also applies to safety-related functions and
systems. The respectively applicable country
provisions must be observed when using the
respective features and systems.
Overview Switches in the vehicle
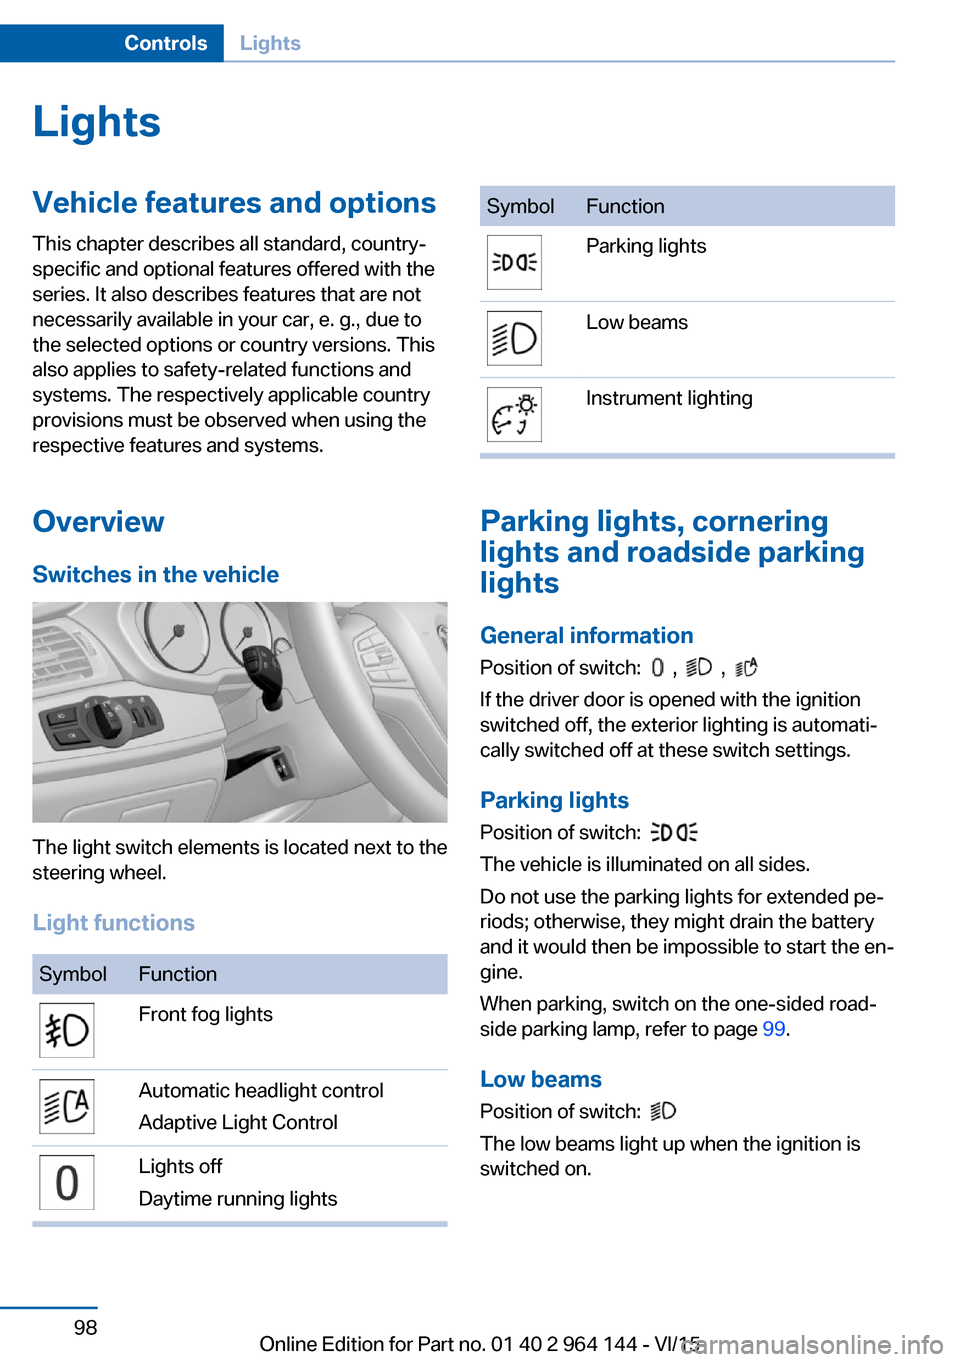
The light switch elements is located next to the
steering wheel.
Light functions
SymbolFunctionFront fog lightsAutomatic headlight control
Adaptive Light ControlLights off
Daytime running lightsSymbolFunctionParking lightsLow beamsInstrument lighting
Parking lights, cornering
lights and roadside parking
lights
General information Position of switch:
, ,
If the driver door is opened with the ignition
switched off, the exterior lighting is automati‐
cally switched off at these switch settings.
Parking lights
Position of switch:
The vehicle is illuminated on all sides.
Do not use the parking lights for extended pe‐
riods; otherwise, they might drain the battery
and it would then be impossible to start the en‐
gine.
When parking, switch on the one-sided road‐
side parking lamp, refer to page 99.
Low beams Position of switch:
The low beams light up when the ignition is
switched on.
Seite 98ControlsLights98
Online Edition for Part no. 01 40 2 964 144 - VI/15
Page 100 of 253

E. g. the sensors are unable to detect fog or
hazy weather. To avoid safety risks under
these conditions, you should always switch on
the lights manually.
Daytime running lights Position of switch:
, ,
The daytime running lights light up when the
ignition is switched on. After the ignition is
switched off, the parking lights light up in posi‐
tion
.
Activating/deactivating In some countries, daytime running lights are
mandatory, so it may not be possible to deacti‐
vate the daytime running lights.
On the Control Display:
1."Settings"2."Lighting"3."Daytime running lamps"
Settings are stored for the profile currently
used.
Adaptive Light Control
The concept Adaptive Light Control is a variable headlight
control system that enables dynamic illumina‐
tion of the road surface.
Depending on the steering angle and other pa‐
rameters, the light from the headlight follows
the course of the road.
Activating Position of switch
with the ignition
switched on.
To avoid blinding oncoming traffic, the Adap‐
tive Light Control does not swivel to the driv‐
er's side when the vehicle is at a standstill.
The turning lights are automatically switched
on depending on the steering angle or the use
of turn signals.
When driving in reverse, the turning lights may
be automatically switched on regardless of the
steering angle.
Self-leveling headlights The self-leveling headlights compensate for
acceleration and braking operations in order
not to blind the oncoming traffic and to achieve
optimum illumination of the roadway.
Malfunction A Check Control message is displayed.
Adaptive Light Control is malfunctioning or has
failed. Have the system checked as soon as
possible.
High-beam Assistant
The concept When the low beams are activated, this system
automatically switches the high beams on and
off or suppresses the light in the areas that
blind oncoming traffic. The procedure is con‐
trolled by a camera on the front of the interior
rearview mirror. The assistant ensures that the
high beams are activated whenever the traffic
situation allows. The driver can intervene at
any time and switch the high beams on and off
as usual. In the low speed range, the high
beams are not switched on by the system.Seite 100ControlsLights100
Online Edition for Part no. 01 40 2 964 144 - VI/15
Page 219 of 253

3Turn signal/side marker light4Parking lights5Daytime running lights
Accessing the low beams and parking
lights
Follow general instructions, refer to page 217.
1.Open the hood, refer to page 207.2.Turn the cover counterclockwise and re‐
move.3.The upper bulb is the low beam and the
lower bulb is the parking lamp.
Low beams
55-watt bulb, H7.
1.Tip the connector with the bulb down
slightly and pull out carefully.2.Pull the bulb off the connector and insert
the new bulb.3.Install the new bulb in reverse order of re‐
moval.4.Place the cover according to the arrow
markings on the headlight housing.5.Close the headlight housing with the lid.
Parking lights
5-watt bulb, W5W.
1.Remove the bulb holder.2.Carefully remove the bulb from the socket.3.Install the new bulb in reverse order of re‐
moval.4.Place the cover according to the arrow
markings on the headlight housing.5.Close the headlight housing with the lid.
Accessing the high beams/headlight
flasher and daytime running lights
Follow general instructions, refer to page 217.
1.Open the hood, refer to page 207.2.Turn the cover counterclockwise and re‐
move.3.The upper bulb is the high beam/headlight
flasher and the lower bulb is the daytime
running lights.
High beams/headlight flasher
55-watt bulb, H7.
1.Tip the connector with the bulb up slightly
and pull out carefully.2.Pull the bulb off the connector and insert
the new bulb.3.Install the new bulb in reverse order of re‐
moval.4.Place the cover according to the arrow
markings on the headlight housing.5.Close the headlight housing with the lid.
Daytime running lights
21-watt bulb, W21W.
1.Turn the bulb holder counterclockwise and
remove.2.Carefully remove the bulb from the socket.Seite 219Replacing componentsMobility219
Online Edition for Part no. 01 40 2 964 144 - VI/15
Page 220 of 253

3.Install the new bulb in reverse order of re‐
moval.4.Place the cover according to the arrow
markings on the headlight housing.5.Close the headlight housing with the lid.
Xenon headlights
Information
Because of the long service life of these bulbs,
the likelihood of failure is very low. Switching
the lights on and off frequently shortens their
service life.
If a bulb fails, turn on the front fog lights and
continue the trip with great care. Comply with
local regulations.
DANGER
There can be high voltage in the lighting
system. There is danger to life. The manufac‐
turer of your vehicle recommends that the
work on the lighting system including bulb re‐
placement be performed by a dealer’s service
center or another qualified service center or re‐
pair shop.◀
For checking and adjusting headlamp aim,
contact a dealer’s service center or another
qualified service center or repair shop.
Overview
1Parking lights / daytime running lights2Low beams/high beams/headlight flasher3Turn signal/side marker lightXenon headlights
Low beams and high beams are designed with
xenon technology.
The parking lights and daylight running lights
are made using LED technology.
Contact a dealer’s service center or another
qualified service center or repair shop in the
event of a malfunction.
LED headlights Light-emitting diodes (LEDs)
With LED headlights, all front lights and side
indicators are designed with LED technology.
If an LED fails, switch on the front fog lamps
and continue the trip with great care. Comply with local regulations.
Contact a dealer’s service center or another
qualified service center or repair shop in the
event of a malfunction.
Front fog lights
Follow general instructions, refer to page 217.
35-watt bulb, H8.1.Insert the screwdriver from the onboard
vehicle tool kit, with the flat side on the clip,
arrow 1.2.Turn the screwdriver by 90°, arrow 2.3.Remove the front fog lamp toward the
front.Seite 220MobilityReplacing components220
Online Edition for Part no. 01 40 2 964 144 - VI/15
Page 244 of 253

Control systems, driving sta‐bility 126
Convenient opening with the remote control 38
Coolant 213
Coolant temperature 87
Cooling function 156, 159
Cooling, maximum 159
Cooling system 213
Cornering light 100
Corrosion on brake discs 178
Cosmetic mirror 165
Courtesy lamps during un‐ locking 37
Courtesy lamps with the vehi‐ cle locked 38
Cruise control 139
Cruise control, active with Stop & Go 133
Cruising range 88
Cupholder 171
Current fuel consumption 88
D
Damage, tires 201
Damping control, dy‐ namic 129
Data, technical 238
Date 88
Daytime running lights 100
Daytime running lights, bulb replacement 219
Defrosting, see Windows, de‐ frosting 157, 160
Dehumidifying, air 156, 159
Deleting personal data 25
Deletion of personal data 25
Destination distance 93
Digital clock 87
Dimensions 238
Dimmable exterior mirrors 61
Dimmable interior rearview mirror 61
Direction indicator, see Turn signals 73 Display, electronic, instru‐
ment cluster 82
Display in windshield 95
Display lighting, see Instru‐ ment lighting 102
Displays, cleaning 234
Disposal, coolant 214
Disposal, vehicle battery 225
Distance control, see PDC 142
Distance to destination 93
Divided screen view, split screen 23
Door lock 39
Door lock, see Remote con‐ trol 34
Downhill control 128
Drive-off assistant 132
Drive-off assistant, see DSC 126
Driving Dynamics Con‐ trol 130
Driving instructions, break- in 176
Driving mode 130
Driving notes, general 177
Driving on bad roads 176
Driving stability control sys‐ tems 126
Driving tips 177
DSC Dynamic Stability Con‐ trol 126
DTC Dynamic Traction Con‐ trol 127
Dynamic Damping Con‐ trol 129
Dynamic Stability Control DSC 126
Dynamic Traction Control DTC 127
E ECO PRO 184
ECO PRO, bonus range 185
ECO PRO display 184 ECO PRO driving mode 184
ECO PRO mode 184
ECO PRO Tip - driving in‐ struction 186
EfficientDynamics 186
Electronic displays, instru‐ ment cluster 82
Electronic oil measure‐ ment 209
Electronic Stability Program ESP, see DSC 126
Emergency detection, remote control 35
Emergency release, fuel filler flap 192
Emergency Request 226
Emergency start function, en‐ gine start 35
Emergency unlocking, tail‐ gate 42
Emergency unlocking, trans‐ mission lock 80
Energy Control 88
Energy recovery 88
Engine, automatic Start/Stop function 69
Engine, automatic switch- off 69
Engine compartment 207
Engine compartment, work‐ ing in 207
Engine coolant 213
Engine idling when driving, coasting 187
Engine oil 209
Engine oil, adding 210
Engine oil additives 211
Engine oil change 211
Engine oil filler neck 210
Engine oil temperature 87
Engine oil types, alterna‐ tive 211
Engine oil types, suitable 211
Engine start during malfunc‐ tion 35 Seite 244ReferenceEverything from A to Z244
Online Edition for Part no. 01 40 2 964 144 - VI/15