2016 BMW X1 Manual operation
[x] Cancel search: Manual operationPage 3 of 242

X1Owner's Manual for Vehicle
Thank you for choosing a BMW.
The more familiar you are with your vehicle, the better control
you will have on the road. We therefore strongly suggest:
Read this Owner's Manual before starting off in your new BMW.
Also use the Integrated Owner's Manual in your vehicle. It con‐
tains important information on vehicle operation that will help
you make full use of the technical features available in your
BMW. The manual also contains information designed to en‐
hance operating reliability and road safety, and to contribute to
maintaining the value of your BMW.
Any updates made after the editorial deadline can be found in
the appendix of the printed Owner's Handbook for Vehicle.
Supplementary information can be found in the additional bro‐
chures in the onboard literature.
We wish you a safe and enjoyable ride
BMW AG
The Owner's Manual is available in many countries as an app.
Additional information on the Internet:
www.bmw.com/bmw_drivers_guide
Online Edition for Part no. 01 40 2 964 303 - VI/15
Page 42 of 242

ClosingWARNING
Body parts can be jammed when operat‐
ing the tailgate. There is risk of injuries. Make sure that the area of movement of the tailgate
is clear during opening and closing.◀
CAUTION
Sharp-edged or pointed objects can hit
the rear window and heat conductors while
driving. There is risk of property damage.
Cover the edges and ensure that pointed ob‐
jects do not hit the rear window.◀
Without Comfort Access:▷Press button on the inside of the tailgate.
With Comfort Access:
▷Press button, arrow 1, on the inside of the
tailgate.
Pressing the button again stops the mo‐
tion.▷Press button, arrow 2.
The vehicle will be locked after closing the
tailgate. The driver's door must be closed
for this purpose and the remote controlmust be outside of the vehicle in the area
of the tailgate.
To avoid locking it into the vehicle, do not
place the remote control in the cargo area.
Pressing the button again stops the mo‐
tion.▷Press button on tailgate's exterior.
Pressing the button again stops the mo‐
tion.▷Press button in the driver's door
and keep it pressed. Releasing the
button stops window/roof movement.
The remote control must be located in the
interior for this function.
An acoustic signal sounds and the tailgate
closes.
The closing operation is interrupted:
▷When starting the engine.▷The vehicle starts off with jerks.
Manual operation
WARNING
With manual operation of a blocked tail‐
gate, it can loosen itself unexpectedly from the
blockage. There is risk of injuries or risk of
property damage. Do not operate the tailgate
manually if it is blocked. Have checked by a
dealer’s service center or another qualified
service center or repair shop.◀
In the event of an electrical malfunction, oper‐
ate the unlocked tailgate manually with a slow
and smooth motion.
Seite 42ControlsOpening and closing42
Online Edition for Part no. 01 40 2 964 303 - VI/15
Page 62 of 242

Automatic dimming featureBoth exterior mirrors are automatically dim‐
med. Photocells are used to control the Interior
rearview mirror, refer to page 62.
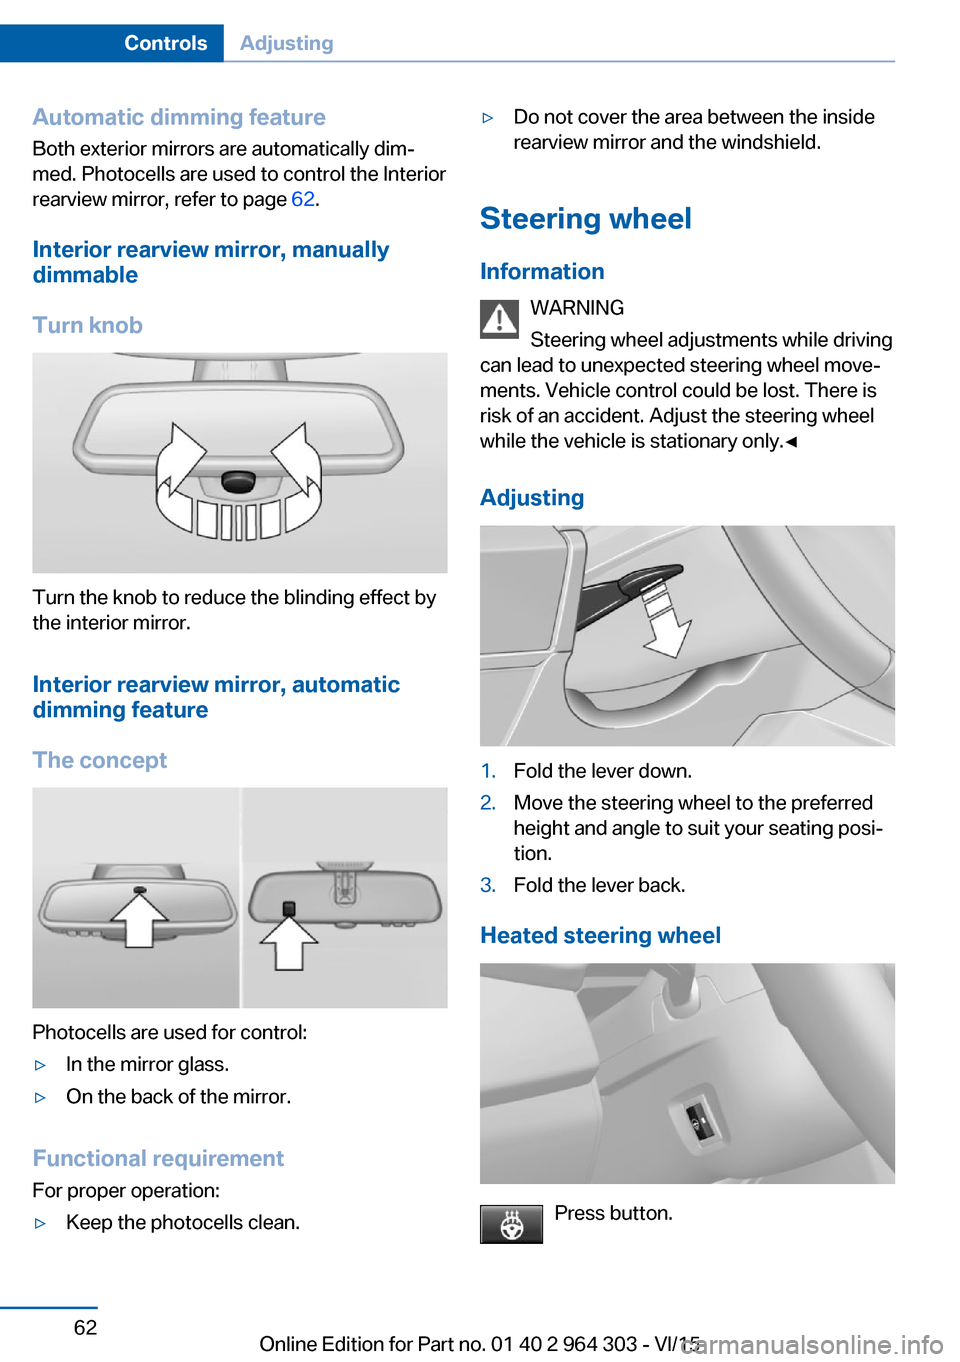
Interior rearview mirror, manually
dimmable
Turn knob
Turn the knob to reduce the blinding effect by
the interior mirror.
Interior rearview mirror, automaticdimming feature
The concept
Photocells are used for control:
▷In the mirror glass.▷On the back of the mirror.
Functional requirement For proper operation:
▷Keep the photocells clean.▷Do not cover the area between the inside
rearview mirror and the windshield.
Steering wheel
Information WARNING
Steering wheel adjustments while driving
can lead to unexpected steering wheel move‐
ments. Vehicle control could be lost. There is
risk of an accident. Adjust the steering wheel
while the vehicle is stationary only.◀
Adjusting
1.Fold the lever down.2.Move the steering wheel to the preferred
height and angle to suit your seating posi‐
tion.3.Fold the lever back.
Heated steering wheel
Press button.
Seite 62ControlsAdjusting62
Online Edition for Part no. 01 40 2 964 303 - VI/15
Page 73 of 242

Steptronic transmission: Press the
switch while the brake is pressed or se‐
lector lever position P is set.
The LED and indicator lamp go out.
The parking brake is released.
Automatic release in cars with
Steptronic transmission
For automatic release, step on the accelerator
pedal.
The LED and indicator lamp go out.
The parking brake is automatically released
when you step on the accelerator:▷Engine on.▷Drive mode engaged.▷Driver buckled in and doors closed.
Malfunction
In the event of a failure or malfunction of the
parking brake, secure the vehicle against roll‐
ing using a wheel chock, e.g., when leaving it.
After a power failure
Putting the parking brake into
operation
1.Switch on the ignition.2. Press the switch while stepping on
the brake pedal or selector lever position P
is set.
It may take several seconds for the brake to be
put into operation. Any sounds associated with
this are normal.
The indicator lamp in the instrument
cluster goes out as soon as the parking
brake is ready for operation.
Turn signal, high beams,
headlight flasher
Turn signal
Turn signal in exterior mirror
When driving and during operation of the turn
signals or hazard warning system, do not fold
in the exterior mirrors, so that the signal lights on the exterior mirror are easy to see.
Using turn signals
Press the lever beyond the resistance point.
The turn signal lever returns into is starting po‐
sition after actuation.
To switch off manually, slightly tap the lever to
the resistance point.
Triple turn signal activation
Slightly tap lever.
The turn signal flashes three times.
The function can be activated or deactivated.
On the Control Display:
1."Settings"2."Lighting"3."Triple turn signal"
Settings are stored for the profile currently
used.
Seite 73DrivingControls73
Online Edition for Part no. 01 40 2 964 303 - VI/15
Page 159 of 242

the backrest engages into the locking after
folding it back.◀
WARNING
Unexpected movements of the backrest
while driving may occur due to unintentional
unlocking of the rear backrests by the loops.
There is risk of injuries. Do not fasten any ob‐
jects to the loops for unlocking the rear back‐
rests.◀
CAUTION
Vehicle parts can be damaged when
folding down the rear backrest. There is risk of
property damage. Make sure that the area of
movement of the rear backrest including head
restraint is clear when folding down.◀
Loading position
The concept
To expand the trunk, the rear seat backrest
can be moved into a vertical position.
The seat backrests can be individually ad‐
justed in several angles of incline.
Adjusting the loading position
Pull the strap and relieve pressure on the back‐
rest as necessary.
Manually folding down rear seat
backrest
Pull the strap. The backrest folds forward.
Electrically folding back the rear seat
backrest
Pull the switch inside the trunk.
Left switch: left and center backrest fold for‐
ward together.
Right switch: right backrest folds forward.
Folding back the backrestFold the backrest all the way back and until it
engages.
Ski and snowboard bag General information
The ski and snowboard bag is contained in a
protective jacket in the trunk.
Follow the installation and operation instruc‐
tions included in the protective jacket.
Seite 159Interior equipmentControls159
Online Edition for Part no. 01 40 2 964 303 - VI/15
Page 237 of 242

Manual air distribu‐tion 145, 148
Manual air flow 145, 148
Manual brake, see Parking brake 72
Manual mode, Steptronic transmission 78
Manual operation, door lock 39
Manual operation, exterior mirrors 61
Manual operation, fuel filler flap 182
Manual operation, Park Dis‐ tance Control PDC 136
Manual operation, rearview camera 138
Marking, run-flat tires 192
Master key, see Remote con‐ trol 34
Maximum cooling 147
Maximum speed, display 88
Maximum speed, winter tires 191
Measurement, units of 94
Medical kit 218
Memory, seat, mirror 59
Menu in instrument clus‐ ter 90
Menus, operating, iDrive 18
Menus, refer to iDrive operat‐ ing concept 20
Messages, see Check Con‐ trol 82
Microfilter 146, 148
Minimum tread, tires 190
Mirror 60
Mirror memory 59
Mobile communication devi‐ ces in the vehicle 169
Mobility System 192
Modifications, technical, see Own Safety 7
Moisture in headlight 207
Monitor, see Control Dis‐ play 18 Mounting of child restraint
systems 65
Multifunction steering wheel, buttons 14
Multimedia 6
N
Navigation 6
Neck restraints, front, see Head restraints 58
Neck restraints, rear, see Head restraints 59
Neutral cleaner, see wheel cleaner 224
New wheels and tires 190
Nylon rope for tow-starting/ towing 220
O OBD Onboard Diagnosis 205
OBD, see OBD Onboard Di‐ agnosis 205
Obstacle marking, rearview camera 139
Octane rating, see Recom‐ mended fuel grade 184
Odometer 86
Office 6
Offroad trips 168
Oil 199
Oil, adding 200
Oil additives 201
Oil change 201
Oil change interval, service requirements 87
Oil filler neck 200
Oil types, alternative 201
Oil types, suitable 201
Old batteries, disposal 216
On-board computer 90
On-board computer, refer to On-board computer 90
Onboard monitor, see Control Display 18 Onboard vehicle tool kit 206
Opening/closing via door lock 39
Opening and closing 34
Opening and closing, without remote control 39
Opening and closing, with re‐ mote control 37
Opening the tailgate with no- touch activation 44
Operating concept, iDrive 18
Optional equipment, standard equipment 7
Outside air, refer to Auto‐ matic recirculated-air con‐
trol 147
Own Safety 7
P Paint, vehicle 223
Panoramic glass sunroof 49
Parallel parking assistant 140
Park Distance Control PDC 135
Parked-car ventilation 149
Parked vehicle, condensa‐ tion 171
Parking aid, see PDC 135
Parking assistant 140
Parking brake 72
Parking lights 97
Parts and accessories 7
Passenger side mirror, tilting downward 61
Pathway lines, rearview cam‐ era 139
PDC Park Distance Con‐ trol 135
Pedestrian warning with city braking function 114
Performance Control 122
Personal Profile 35
Personal Profile, exporting profiles 36 Seite 237Everything from A to ZReference237
Online Edition for Part no. 01 40 2 964 303 - VI/15