2016 BMW M4 CONVERTIBLE interior lights
[x] Cancel search: interior lightsPage 150 of 226

NoteThe total load of all sockets must not exceed
140 watts at 12 volts.
Do not damage the socket by using unsuitable
connectors.
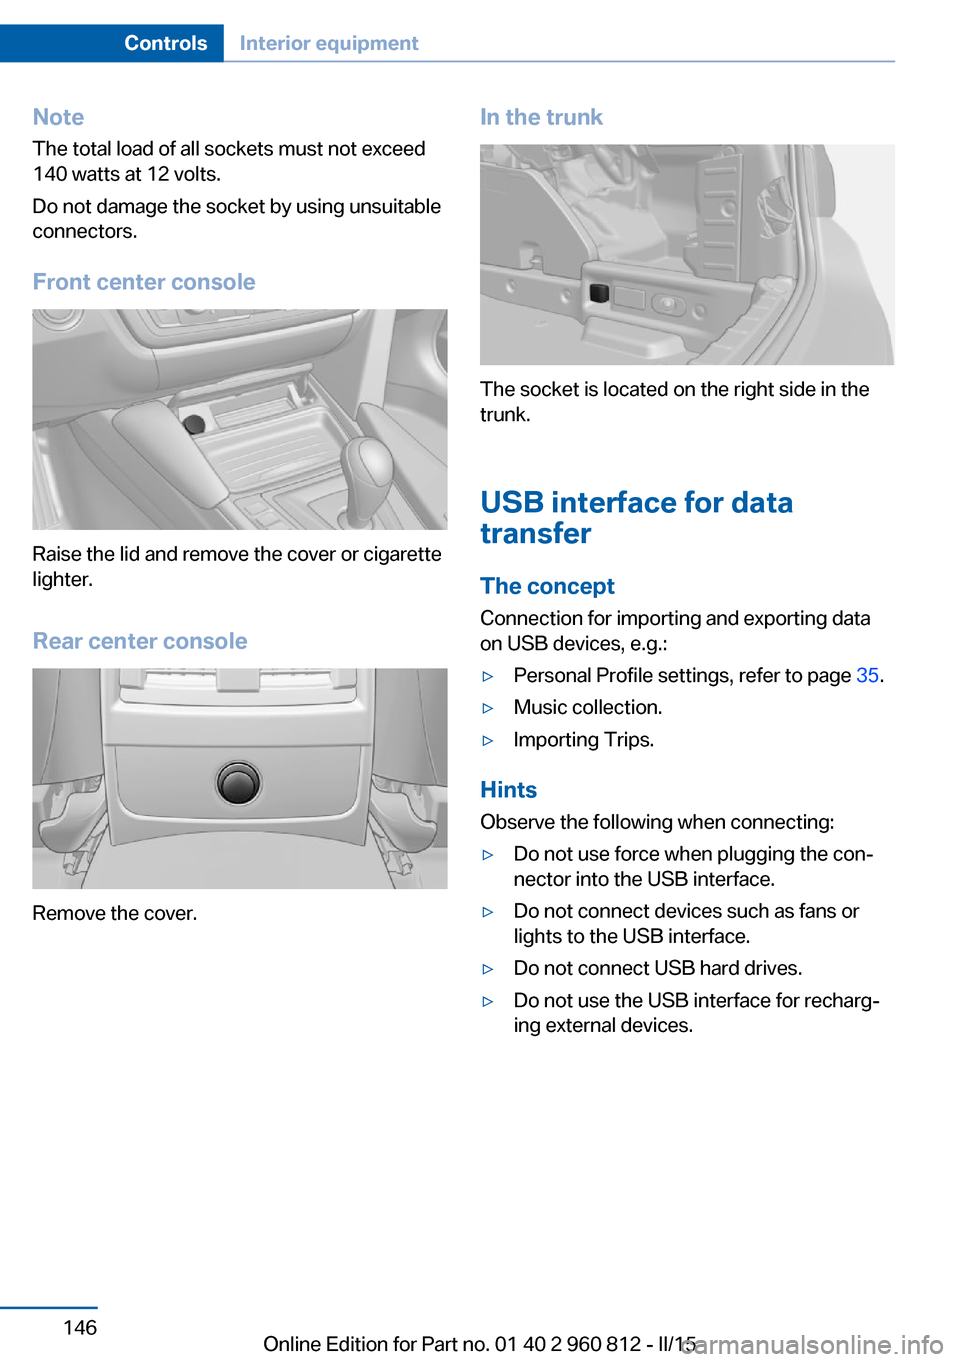
Front center console
Raise the lid and remove the cover or cigarette
lighter.
Rear center console
Remove the cover.
In the trunk
The socket is located on the right side in the
trunk.
USB interface for data
transfer
The concept
Connection for importing and exporting data
on USB devices, e.g.:
▷Personal Profile settings, refer to page 35.▷Music collection.▷Importing Trips.
Hints
Observe the following when connecting:
▷Do not use force when plugging the con‐
nector into the USB interface.▷Do not connect devices such as fans or
lights to the USB interface.▷Do not connect USB hard drives.▷Do not use the USB interface for recharg‐
ing external devices.Seite 146ControlsInterior equipment146
Online Edition for Part no. 01 40 2 960 812 - II/15
Page 152 of 226

Expanding cargo area volume
With the hardtop closed, the cargo area vol‐
ume can be expanded. To do this, push the
cargo area partition upward.
Loading aid
Hints Operation of the loading aid
Before operating the loading aid, make
sure that the movement area of the loading aid
is clear. During the lowering or raising of the
loading aid, do not reach into the mechanism.
Keep persons away from the area of move‐
ment of the loading aid. Otherwise, damages
or personal injuries may result.◀
Raised loading aid
Do not drive with the loading aid raised.
Before driving off, make sure that the loading
aid is completely lowered and the trunk lid is
closed. Otherwise, damage may result.◀
Functional requirements
▷Vehicle at a standstill.▷Vehicle is on a level surface.▷Hardtop fully open.▷Trunk lid fully open.▷Cargo area partition latched in the lower
position.▷External temperature not below +14 ℉/–
10 ℃.Controls
Open trunk lid all the way.
Press left button: loading aid is
raised.
Press right button: loading aid is
lowered.
The movement is executed at
different speeds depending on the external
temperature.
The movement stops with the release of the
button.
LED in button:
▷Lights up continuously: loading aid in the
respective limit position.▷Flashes fast: loading aid not in the respec‐
tive end position.▷Flashes slowly: functional requirements
not met.
A Check Control message is displayed.
After switching off the ignition, the raised load‐
ing aid can be lowered within approx. 10 mi‐
nutes. After that, the ignition must be switched
on for lowering.
Use the loading aid only for loading and un‐
loading the trunk.
Always move the loading aid into the limit posi‐
tions.
Do not park the vehicle with the loading aid
raised.
The trunk lid can only be closed when the
loading aid is fully lowered.
Seite 148ControlsInterior equipment148
Online Edition for Part no. 01 40 2 960 812 - II/15
Page 209 of 226

Manual transmission:1.Drive into the car wash.2.Shift to neutral.3.Switch the engine off.4.Switch on the ignition.
M double-clutch transmission:
1.Drive into the car wash.2.Engage selector lever position N.3.Switch the engine off.
In this way, the ignition remains switched
on, and a Check-Control message is dis‐
played.
The vehicle cannot be locked from the outside
when in selector lever position N. A signal
sounds when an attempt is made to lock the
vehicle.
To start the engine with manual transmission:
1.Press on the clutch pedal.2.Press the Start/Stop button.
To start the engine with a M double clutch
transmission:
1.Depress the brake pedal.2.Press the Start/Stop button.
Pressing the Start/Stop button without step‐
ping on the brake turns the ignition off.
Transmission position
Transmission position P is engaged automati‐
cally:
▷When the ignition is switched off.▷After approx. 15 minutes.
Headlights
▷Do not rub dry and do not use abrasive or
acidic cleansers.▷Soak areas that have been dirtied e. g.,
from insects, with shampoo and wash off
with water.▷Thaw ice with de-icing spray; do not use an
ice scraper.
Lowerable hardtop
When the wet hardtop is opened, water drop‐
lets can run into the trunk. Remove any objects
in the trunk beforehand to prevent water spot‐
ting or soiling.
After washing the vehicle
After washing the vehicle, apply the brakes
briefly to dry them; otherwise, braking action
can be reduced and corrosion of the brake
discs can occur.
Completely remove all residues on the win‐
dows, to minimize loss of visibility due to
smearing and to reduce wiper noises and
wiper blade wear.
Vehicle care
Car care products BMW recommends using care and cleaning
products from BMW, since these have been
tested and approved.
Car care and cleaning products
Follow the instructions on the container.
When cleaning the interior, open the doors or
windows.
Only use products intended for cleaning vehi‐
cles.
Cleansers can contain substances that are
dangerous and harmful to your health.◀
Vehicle paint
Regular care contributes to driving safety and
value retention. Environmental influences in
areas with elevated air pollution or natural con‐
taminants, such as tree resin or pollen can af‐
fect the vehicle's paintwork. Tailor the fre‐
quency and extent of your car care to these
influences.
Seite 205CareMobility205
Online Edition for Part no. 01 40 2 960 812 - II/15
Page 218 of 226

Courtesy lamps with the vehi‐cle locked 38
Cruise control 122
Cruising range 83
Cupholders 153
Current fuel consumption 83
D
Damage, tires 175
Damping control 119
Data, technical 210
Date 82
Daytime running lights 95
Defrosting, refer to Windows, defrosting 138
Dehumidifying, air 137
Deleting personal data 25
Deletion of personal data 25
Destination distance 88
Differential lock 119
Digital clock 82
Digital compass 143
Digital speed 82
Digital tachometer 82
Dimensions 210
Dimmable exterior mirrors 58
Dimmable interior rearview mirror 58
Direction indicator, refer to Turn signals 68
Display EfficientDynamics 84
Display, electronic, instru‐ ment cluster 77
Display in windshield 91
Display lighting, refer to In‐ strument lighting 97
Displays, cleaning 207
Disposal, coolant 187
Disposal, vehicle battery 196
Distance control, refer to PDC 124
Distance to destination 88
Divided screen view, split screen 23
Door lock 39 Door lock, refer to Remote
control 34
Double-clutch transmis‐ sion 71
Drivelogic 73
Drive mode 72
Drive-off assistant 120
Drive-off assistant, refer to DSC 117
Driver assistance, refer to In‐ telligent Safety 106
Driving Assistant, refer to In‐ telligent Safety 106
Driving Dynamics Control 75
Driving instructions, break- in 158
Driving notes, general 159
Driving on racetracks 157
Driving program, refer to Drivelogic 73
Driving stability control sys‐ tems 116
Driving tips 159
DSC Dynamic Stability Con‐ trol 117
Dynamic driving systems 84
Dynamic driving, system states 84
Dynamic Stability Control DSC 117
E EfficientDynamics 84
Electronic displays, instru‐ ment cluster 77
Electronic oil measure‐ ment 183
Electronic Stability Program ESP, refer to DSC 117
Emergency detection, remote control 35
Emergency release, fuel filler flap 168
Emergency Request 198 Emergency start function, en‐
gine start 35
Emergency unlocking, trunk lid 41
Energy Control 83
Energy recovery 83
Engine, automatic Start/Stop function 65
Engine, automatic switch- off 65
Engine compartment 181
Engine compartment, work‐ ing in 181
Engine coolant 186
Engine oil 183
Engine oil, adding 184
Engine oil additives 185
Engine oil change 185
Engine oil filler neck 184
Engine oil temperature 81
Engine oil types, alterna‐ tive 185
Engine oil types, ap‐ proved 185
Engine start during malfunc‐ tion 35
Engine start, jump-start‐ ing 199
Engine start, refer to Starting the engine 64
Engine stop 64
Engine temperature 81
Entering a car wash 204
Equipment, interior 141
Error displays, see Check Control 78
ESP Electronic Stability Pro‐ gram, refer to DSC 117
Exchanging wheels/tires 176
Exhaust system 159
Exterior mirror, automatic dimming feature 58
Exterior mirrors 57
External start 199
External temperature dis‐ play 82 Seite 214ReferenceEverything from A to Z214
Online Edition for Part no. 01 40 2 960 812 - II/15
Page 220 of 226

Individual settings, refer toPersonal Profile 35
Inflation pressure, tires 172
Info display, refer to On- Board computer 87
Initialize, Tire Pressure Moni‐ tor TPM 104
Instrument cluster 77
Instrument cluster, electronic displays 77
Instrument lighting 97
Integrated key 34
Integrated Owner's Manual in the vehicle 30
Intelligent Emergency Re‐ quest 198
Intelligent Safety 106
Intensity, AUTO pro‐ gram 137
Interior equipment 141
Interior lights 97
Interior lights during unlock‐ ing 37
Interior lights with the vehicle locked 38
Interior motion sensor 45
Interior rearview mirror, auto‐ matic dimming feature 58
Interior rearview mirror, com‐ pass 143
Internet page 6
Interval display, service re‐ quirements 84
Interval mode 69
J Jacking points for the vehicle jack 195
Jump-starting 199
K
Key/remote control 34
Keyless Go, refer to Comfort Access 41 Key Memory, refer to Per‐
sonal Profile 35
Knee airbag 99
L Lamp replacement 190
Lamp replacement, front 191
Lamp replacement, rear 193
Lane departure warning 112
Lane margin, warning 112
Language on Control Dis‐ play 90
Lashing eyes, securing cargo 163
LATCH child restraint sys‐ tem 62
Launch Control 74
Leather, care 206
LED light, bulb replace‐ ment 192
LEDs, light-emitting di‐ odes 191
Length, vehicle 210
Letters and numbers, enter‐ ing 25
Light alloy wheels, care 206
Light control 95
Light-emitting diodes, LEDs 191
Lighter 145
Lighting 94
Lights 94
Lights and bulbs 190
Light switch 94
Load 163
Loading 162
Loading aid 147
Loading, see interior equip‐ ment 147
Lock, door 39
Locking/unlocking via door lock 39
Locking/unlocking with re‐ mote control 37
Locking, automatic 43 Locking, settings 43
Locking via trunk lid 41
Low beams 94
Low beams, automatic, refer to High-beam Assistant 96
Lower back support 53
Low Speed Assistant 72
Lumbar support 53
M
Maintenance 188
Maintenance require‐ ments 188
Maintenance, service require‐ ments 84
Maintenance system, BMW 188
Make-up mirror 145
Malfunction displays, see Check Control 78
Manual air distribution 138
Manual air flow 138
Manual operation, door lock 39
Manual operation, exterior mirrors 58
Manual operation, fuel filler flap 168
Manual operation, Park Dis‐ tance Control PDC 125
Manual operation, rearview camera 127
Manual operation, Side View 130
Manual operation, Top View 131
Manual transmission 71
Marking on approved tires 176
Master key, refer to Remote control 34
Maximum cooling 137
Maximum speed, display 86
Maximum speed, winter tires 177 Seite 216ReferenceEverything from A to Z216
Online Edition for Part no. 01 40 2 960 812 - II/15