2016 BMW M2 COUPE brake light
[x] Cancel search: brake lightPage 112 of 220
▷On: the LED lights up.▷Off: the LED goes out.
Settings are stored for the profile currently
used.
Display in the instrument cluster
▷Lines: system is activated.▷Arrows: at least one lane marking
was detected and warnings can be
issued.
Issued warning
If you leave the lane and if a lane marking has
been detected, the steering wheel begins vi‐
brating.
If the turn signal is set before changing the
lane, a warning is not issued.
End of warning
The warning is canceled in the following situa‐
tions:
▷Automatically after approx. 3 seconds.▷When returning to your own lane.▷When braking hard.▷When using the turn signal.
System limits
Information WARNING
The system can react incorrectly or not
at all due to the system limits. There is risk of
accidents or risk of property damage. Observe
the information regarding the system limits
and actively intervene, if needed.◀
Functional limitations
The system may not be fully functional in the
following situations:
▷In heavy fog, rain or snowfall.▷In the event of missing, worn, poorly visi‐
ble, merging, diverging, or multiple lane
markings such as in construction areas.▷When lane markings are covered in snow,
ice, dirt or water.▷In tight curves or on narrow lanes.▷When the lane markings are covered by
objects.▷When driving very close to the vehicle in
front of you.▷When driving toward bright lights.▷When the windshield in front of the interior
mirror is fogged over, dirty or covered with
stickers, etc.▷During calibration of the camera immedi‐
ately after vehicle delivery.
Brake force display
The concept
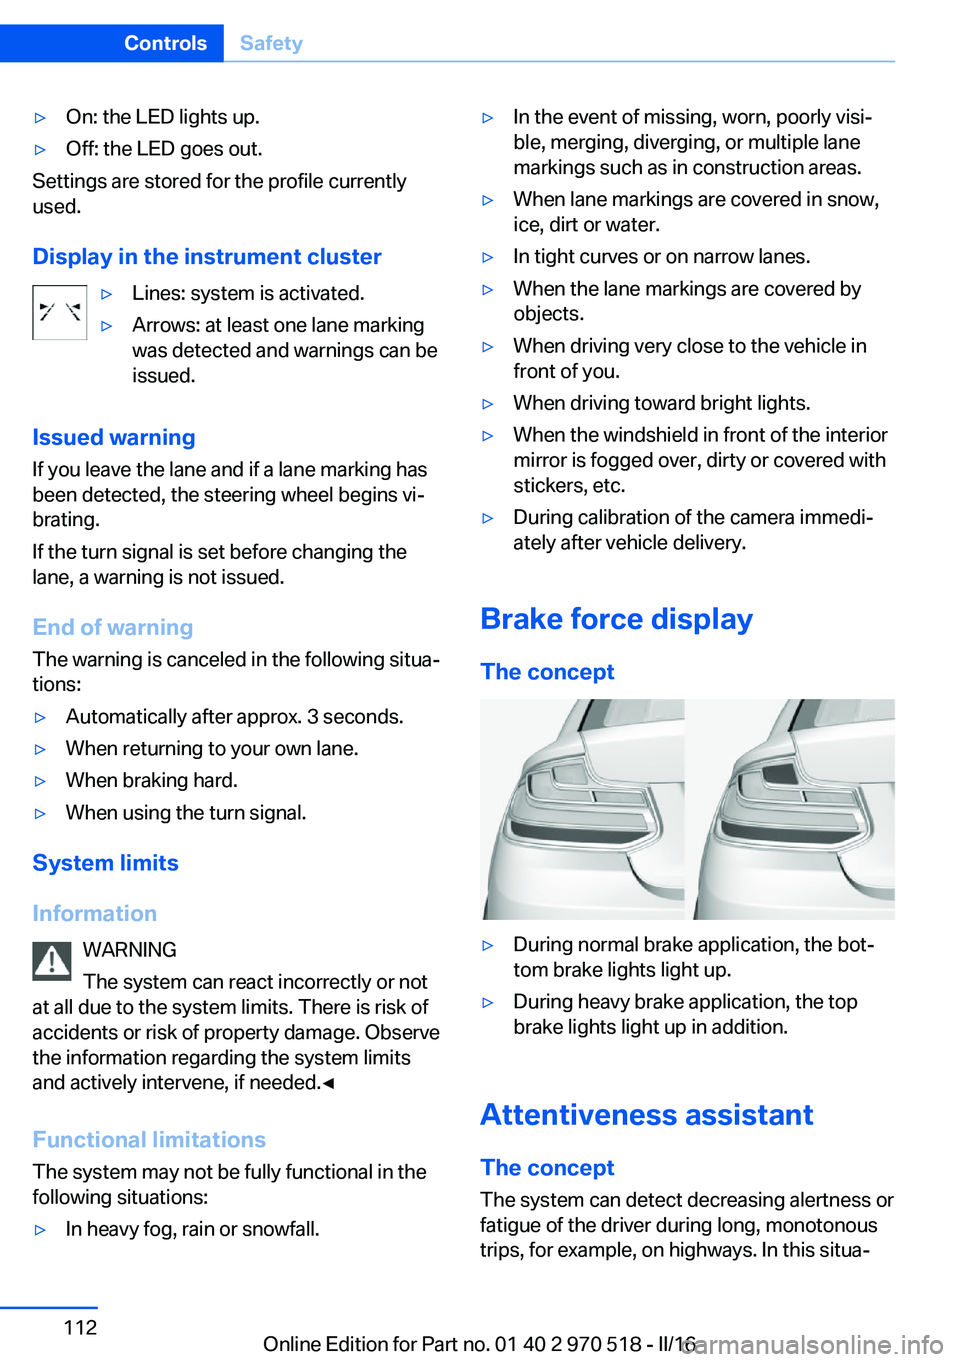
▷During normal brake application, the bot‐
tom brake lights light up.▷During heavy brake application, the top
brake lights light up in addition.
Attentiveness assistant
The concept The system can detect decreasing alertness or
fatigue of the driver during long, monotonous
trips, for example, on highways. In this situa‐
Seite 112ControlsSafety112
Online Edition for Part no. 01 40 2 970 518 - II/16
Page 116 of 220
Activating MDMPress button briefly.
The DSC OFF indicator lamp is illumi‐
nated and TRACTION is displayed in the in‐
strument cluster.
Deactivating MDM Press button.
DSC OFF indicator lamp and TRACTION
indicator are no longer illuminated.
Indicator/warning lights Indicator lamp is illuminated and
TRACTION is displayed in the instru‐
ment cluster:
M Dynamic Mode is activated.
DSC indicator lamp also flashes:
M Dynamic Mode controls the drive
forces and brake forces.
Indicator lights light up:
M Dynamic Mode or DSC has failed.
Active M differential The concept The active M differential assures continuously
variable locking of the rear axle differential de‐
pending on the driving situation. This prevents individual rear wheels from spinning even
when DSC is switched off and in M Dynamic
Mode, so that optimum traction is always as‐
sured in all driving situations.
The driver is responsible adapting his or her
driving behavior to the situation.Servotronic
The concept
The Servotronic varies the steering force re‐
quired to turn the wheels in accordance with
the vehicle speed. At low speeds, the steering
force is strongly supported, i. e. during steer‐
ing, low force is required. As the speed in‐
creases, the assistance of the steering force is
reduced.
Furthermore, the steering force adapts accord‐
ing to the driving program, so that a direct,
sporty feel and/or comfortable steering is con‐
veyed.
Programs Steering force setting options:▷COMFORT: low.▷SPORT: high.▷SPORT+: high.
Selecting a channel
The desired channel is selected using the Driv‐
ing Dynamics Control, refer to page 116.
Driving Dynamics Control The conceptThe Driving Dynamics Control helps to fine-
tune the vehicle's settings and features. Vari‐
ous programs can be selected for this purpose.
The Driving Dynamics Control and the DSC
OFF buttons can each be used to activate a
program.
Seite 116ControlsDriving stability control systems116
Online Edition for Part no. 01 40 2 970 518 - II/16
Page 118 of 220
▷"Configure SPORT"▷Configuring the SPORT driving mode.
SPORT can also be configured before it is acti‐
vated:
1."Settings"2."Driving mode"3."Configure SPORT"4.Configure driving mode.
This configuration is retrieved when the
SPORT driving mode is activated.
COMFORT For a balanced tuning with maximum driving
stabilization.
Activating COMFORT Press button repeatedly until COM‐
FORT is displayed in the instrument
cluster.
In certain situations, the system automatically
changes to the NORMAL program, automatic
program change, refer to page 117.
Displays
Program selection Pressing the button displays a
list of the selectable programs.
Depending on your vehicle's op‐
tional features, the list in the in‐ strument cluster can differ from
the illustration shown.
Selected program The instrument cluster displays
the selected program.
Display on the Control Display
Program changes can be displayed on the
Control Display.1."Settings"2."Control display"3."Driving mode info"
Drive-off assistant
The concept This system supports driving off on inclines.
The parking brake is not required.
Driving off with the drive-off assistant
1.Hold the vehicle in place with the foot
brake.2.Release the foot brake and drive off with‐
out delay.
After the foot brake is released, the vehicle is
held in place for approx. 2 seconds.
Depending on the vehicle load, the vehicle may
roll back slightly.
Seite 118ControlsDriving stability control systems118
Online Edition for Part no. 01 40 2 970 518 - II/16
Page 150 of 220
BMW M2 TechnologyVehicle features and options
This chapter describes all standard, country-
specific and optional features offered with the
series. It also describes features that are not
necessarily available in your car, e. g., due to
the selected options or country versions. This
also applies to safety-related functions and
systems. The respectively applicable country
provisions must be observed when using the
respective features and systems.
High-performance engine General information
With a displacement of 3 liters, the high-per‐
formance engine generates a maximum power
of 365 hp and a maximum torque of
343 lb ft/465 Nm with Overboost
369 lb ft/500 Nm. With its spontaneous re‐
sponse behavior, a speed range of wide utility
results. The maximum engine speed is
7,000 rpm and is electronically controlled. Be‐
cause of the high engine dynamics, the maxi‐
mum engine speed with the vehicle stationary
is reduced.
Warm-up
During the engine warm-up phase, the high-
performance engine has a somewhat rougher
running behavior because of the emission con‐
trols.
When the engine is cold, the exhaust system
has a slightly metallic undertone due to the na‐
ture of the system.
Overboost
Overboost temporarily increases the maximum
torque to 369 lb ft/500 Nm, for example when
passing.For this purpose, fully depress the accelerator
pedal.
Compound brake
The high-performance braking system has
perforated compound brake discs.
Because of particular structural characteristics,
there may be operation-related noises during
braking. However, this has no effect on per‐
formance, operational reliability and reliability
of the brake.
Correct brakingTo keep the brake system in optimum condi‐
tion, it is expedient to apply them at regular in‐
tervals corresponding to the vehicle character.
Drivetrain With this vehicle, particular value was placed
on the direct connection from engine to the
drivetrain. Due to the torsionally rigid design of
the drivetrain, as is typical in a sports car, the
transmission of the torque also gives acoustic
feedback.
When there are load changes, this may result
in clicking noises. The do not cause any im‐
pairment of the operation or the service life of
the components.
Driving on racetracks Higher mechanical and thermal loads during
racetrack operation lead to increased wear.
This wear is not covered by the warranty. The
vehicle is not designed for motorsports com‐
petitive use.Seite 150Driving tipsBMW M2 Technology150
Online Edition for Part no. 01 40 2 970 518 - II/16
Page 154 of 220
In certain braking situations, the perforated
brake discs can emit functional noises. How‐
ever, this has no effect on the performance and
operational reliability of the brake.
Objects in the movement area around
pedals and floor area
WARNING
Objects in the driver's floor area can limit
the pedal distance or block a depressed pedal.
There is risk of an accident. Stow objects in
the vehicle such that they are secured and
cannot enter into the driver's floor area. Use
floor mats that are suitable for the vehicle and
can be safely attached to the floor. Do not use
loose floor mats and do not layer several floor
mats. Make sure that there is sufficient clear‐
ance for the pedals. Ensure that the floor mats
are securely fastened again after they were re‐
moved, e.g., for cleaning.◀
Driving in wet conditionsWhen roads are wet, salted, or in heavy rain,
press brake pedal ever so gently every few
miles.
Ensure that this action does not endanger
other traffic.
The heat generated in this process helps dry
the brake discs and pads.
In this way braking efficiency will be available
when you need it.
Hills WARNING
Light but consistent brake pressure can
lead to high temperatures, brakes wearing out
and possibly even brake failure. There is risk of
an accident. Avoid placing excessive stress on
the brake system.◀
WARNING
In idle state or with the engine switched
off, safety-relevant functions are restricted or
not available anymore, e.g., braking effect ofthe engine or braking force and steering sup‐
port. There is risk of an accident. Do not drive
in idle state or with the engine switched off.◀
Drive long or steep downhill gradients in the
gear that requires least braking efforts. Other‐
wise the brakes may overheat and reduce
brake efficiency.
Manual transmission:
You can increase the engine's braking effect
by shifting down, going all the way to first gear,
if needed.
M double-clutch transmission:
You can increase the engine's braking effect
by shifting down in sequential mode, refer to
page 76.
Brake disc corrosion
Corrosion on the brake discs and contamina‐
tion on the brake pads are furthered by the fol‐
lowing circumstances:▷Low mileage.▷Extended periods when the vehicle is not
used at all.▷Infrequent use of the brakes.
Corrosion will built up when the maximum
pressure applied to the brake pads during
braking is not reached - thus discs don't get
cleaned.
Corrosion buildup on the brake discs will cause
a pulsating effect on the brakes in their re‐
sponse - generally that cannot be corrected.
Condensation under the parked
vehicle
When using the automatic climate control,
condensation water develops collecting under‐
neath the vehicle.
Seite 154Driving tipsThings to remember when driving154
Online Edition for Part no. 01 40 2 970 518 - II/16
Page 189 of 220
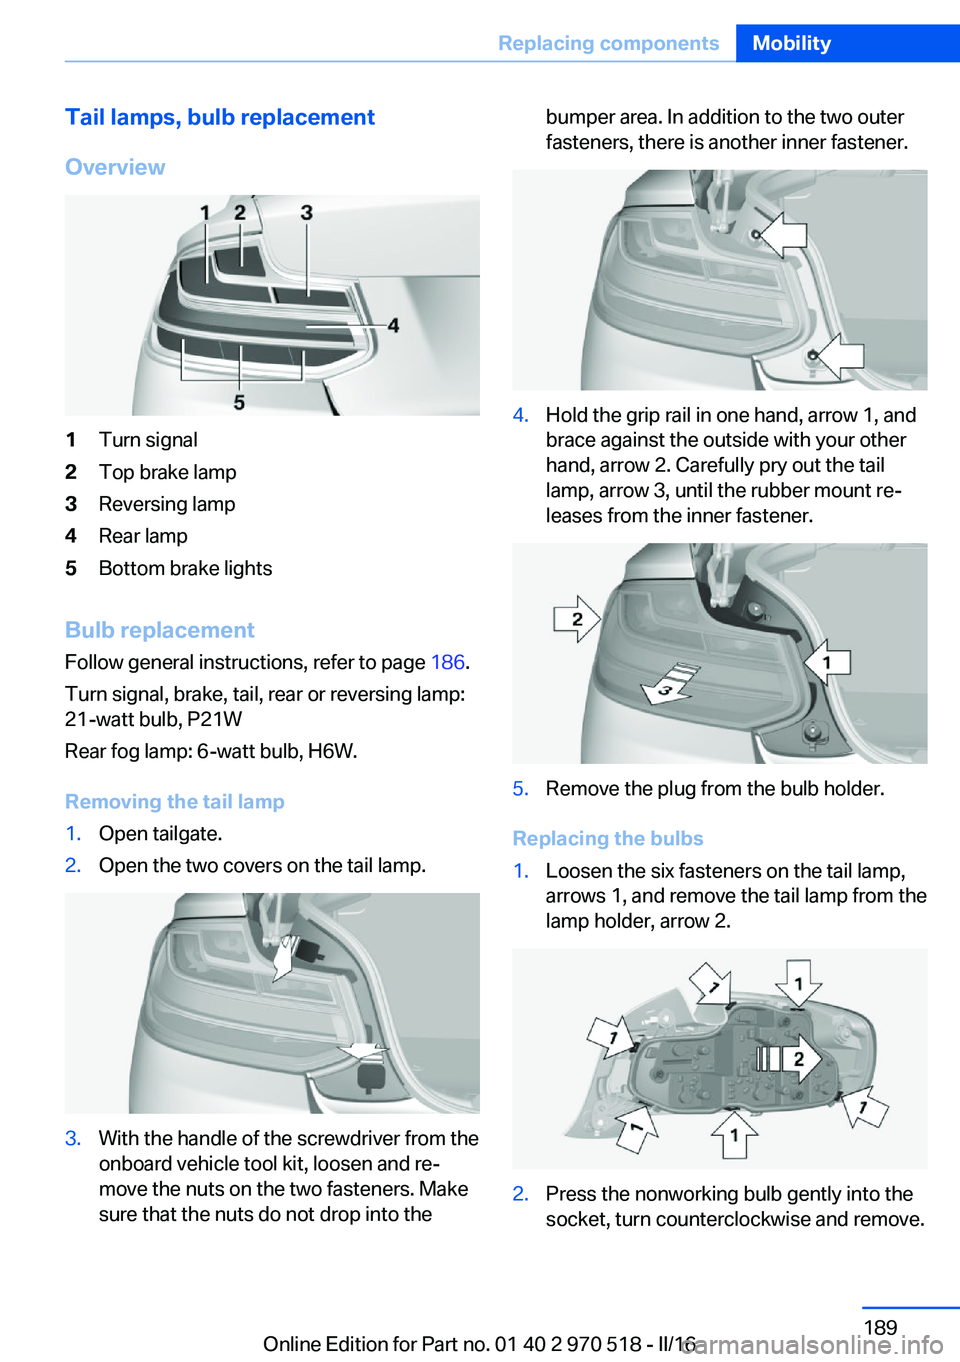
Tail lamps, bulb replacement
Overview1Turn signal2Top brake lamp3Reversing lamp4Rear lamp5Bottom brake lights
Bulb replacement Follow general instructions, refer to page 186.
Turn signal, brake, tail, rear or reversing lamp:
21-watt bulb, P21W
Rear fog lamp: 6-watt bulb, H6W.
Removing the tail lamp
1.Open tailgate.2.Open the two covers on the tail lamp.3.With the handle of the screwdriver from the
onboard vehicle tool kit, loosen and re‐
move the nuts on the two fasteners. Make
sure that the nuts do not drop into thebumper area. In addition to the two outer
fasteners, there is another inner fastener.4.Hold the grip rail in one hand, arrow 1, and
brace against the outside with your other
hand, arrow 2. Carefully pry out the tail
lamp, arrow 3, until the rubber mount re‐
leases from the inner fastener.5.Remove the plug from the bulb holder.
Replacing the bulbs
1.Loosen the six fasteners on the tail lamp,
arrows 1, and remove the tail lamp from the
lamp holder, arrow 2.2.Press the nonworking bulb gently into the
socket, turn counterclockwise and remove.Seite 189Replacing componentsMobility189
Online Edition for Part no. 01 40 2 970 518 - II/16
Page 190 of 220
3.Proceed in the reverse order to insert the
new bulb and attach the bulb holder to the
tail lamp. Make sure that the bulb holder
engages in all fasteners.
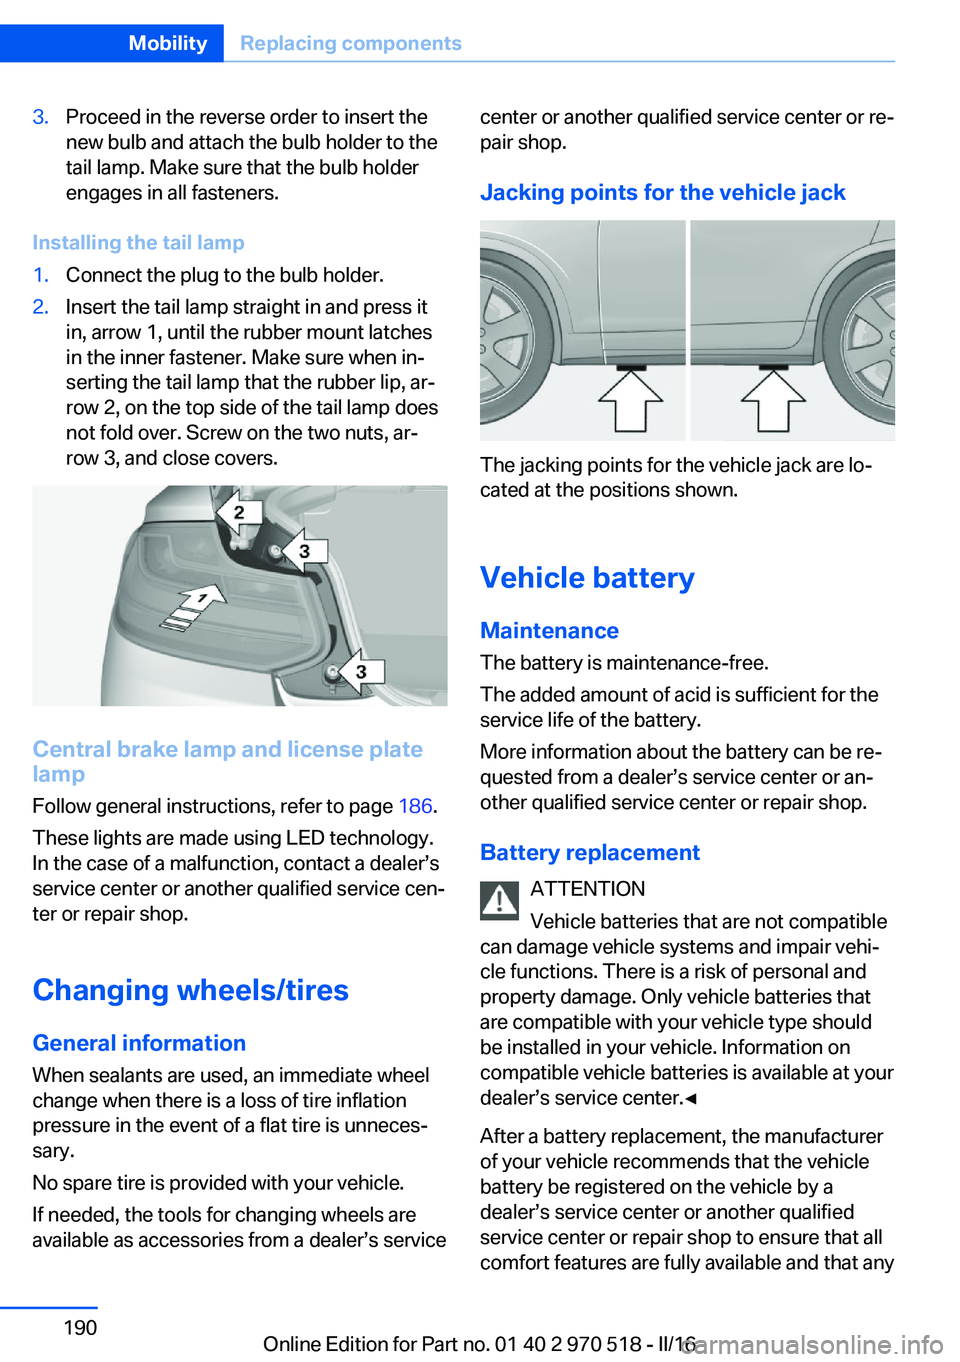
Installing the tail lamp
1.Connect the plug to the bulb holder.2.Insert the tail lamp straight in and press it
in, arrow 1, until the rubber mount latches
in the inner fastener. Make sure when in‐
serting the tail lamp that the rubber lip, ar‐
row 2, on the top side of the tail lamp does
not fold over. Screw on the two nuts, ar‐
row 3, and close covers.
Central brake lamp and license plate
lamp
Follow general instructions, refer to page 186.
These lights are made using LED technology.
In the case of a malfunction, contact a dealer’s
service center or another qualified service cen‐
ter or repair shop.
Changing wheels/tires General information
When sealants are used, an immediate wheel
change when there is a loss of tire inflation
pressure in the event of a flat tire is unneces‐
sary.
No spare tire is provided with your vehicle.
If needed, the tools for changing wheels are
available as accessories from a dealer’s service
center or another qualified service center or re‐
pair shop.
Jacking points for the vehicle jack
The jacking points for the vehicle jack are lo‐
cated at the positions shown.
Vehicle battery Maintenance
The battery is maintenance-free.
The added amount of acid is sufficient for the
service life of the battery.
More information about the battery can be re‐
quested from a dealer’s service center or an‐
other qualified service center or repair shop.
Battery replacement ATTENTION
Vehicle batteries that are not compatible
can damage vehicle systems and impair vehi‐
cle functions. There is a risk of personal and
property damage. Only vehicle batteries that
are compatible with your vehicle type should
be installed in your vehicle. Information on
compatible vehicle batteries is available at your
dealer’s service center.◀
After a battery replacement, the manufacturer
of your vehicle recommends that the vehicle
battery be registered on the vehicle by a
dealer’s service center or another qualified
service center or repair shop to ensure that all
comfort features are fully available and that any
Seite 190MobilityReplacing components190
Online Edition for Part no. 01 40 2 970 518 - II/16
Page 200 of 220
Manual transmission:1.Drive into the car wash.2.Shift to neutral.3.Switch the engine off.4.Switch on the ignition.
M double-clutch transmission:
1.Drive into the car wash.2.Engage selector lever position N.3.Switch the engine off.
In this way, the ignition remains switched
on, and a Check-Control message is dis‐
played.
CAUTION
Selector lever position P is automati‐
cally engaged when the ignition is
switched off. There is a risk of property
damage. Do not switch ignition off in car
washes.◀
The vehicle cannot be locked from the outside
when in selector lever position N. A signal
sounds when an attempt is made to lock the
vehicle.
To start the engine with manual transmission:
1.Press on the clutch pedal.2.Press the Start/Stop button.
To start the engine with a M double clutch
transmission:
1.Depress the brake pedal.2.Press the Start/Stop button.
Pressing the Start/Stop button without step‐
ping on the brake turns the ignition off.
Transmission position
Transmission position P is engaged automati‐
cally:
▷When the ignition is switched off.▷After approx. 15 minutes.Headlights▷Do not rub dry and do not use abrasive or
acidic cleansers.▷Soak areas that have been dirtied e. g.,
from insects, with shampoo and wash off
with water.▷Thaw ice with de-icing spray; do not use an
ice scraper.
After washing the vehicle
After washing the vehicle, apply the brakes
briefly to dry them; otherwise, braking action
can be reduced and corrosion of the brake
discs can occur.
Completely remove all residues on the win‐
dows, to minimize loss of visibility due to
smearing and to reduce wiper noises and
wiper blade wear.
Vehicle care
Vehicle care products BMW recommends using vehicle care and
cleaning products from BMW.
WARNING
Cleansers can contain substances that
are dangerous and harmful to your health. There is a risk of injury. When cleaning the in‐
terior, open the doors or windows. Only use
products intended for cleaning vehicles. Fol‐
low the instructions on the container.◀
Vehicle paint
Regular care contributes to driving safety and
value retention. Environmental influences in
areas with elevated air pollution or natural con‐
taminants, such as tree resin or pollen can af‐
fect the vehicle's paintwork. Tailor the fre‐
quency and extent of your vehicle care to
these influences.
Aggressive substances such as spilled fuel, oil,
grease or bird droppings, must be removed im‐
Seite 200MobilityCare200
Online Edition for Part no. 01 40 2 970 518 - II/16