2016 BMW 428I CONVERTIBLE ad blue
[x] Cancel search: ad bluePage 27 of 247

6.Turn the controller to set the hours and
press the controller.7.Turn the controller to set the minutes and
press the controller.
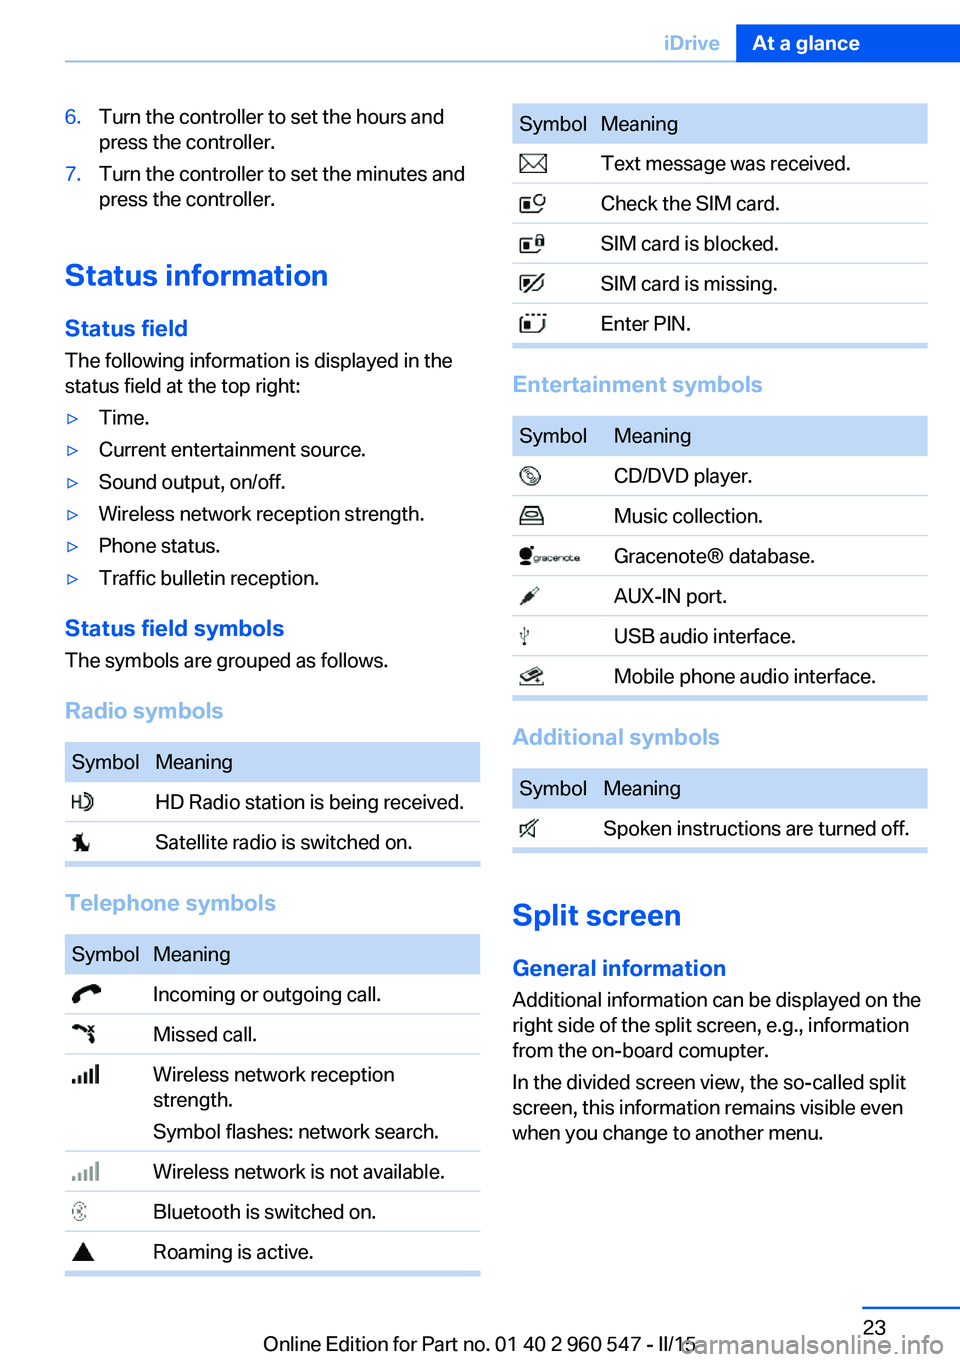
Status information
Status field The following information is displayed in the
status field at the top right:
▷Time.▷Current entertainment source.▷Sound output, on/off.▷Wireless network reception strength.▷Phone status.▷Traffic bulletin reception.
Status field symbols
The symbols are grouped as follows.
Radio symbols
SymbolMeaning HD Radio station is being received. Satellite radio is switched on.
Telephone symbols
SymbolMeaning Incoming or outgoing call. Missed call. Wireless network reception
strength.
Symbol flashes: network search. Wireless network is not available. Bluetooth is switched on. Roaming is active.SymbolMeaning Text message was received. Check the SIM card. SIM card is blocked. SIM card is missing. Enter PIN.
Entertainment symbols
SymbolMeaning CD/DVD player. Music collection. Gracenote® database. AUX-IN port. USB audio interface. Mobile phone audio interface.
Additional symbols
SymbolMeaning Spoken instructions are turned off.
Split screen
General information Additional information can be displayed on the
right side of the split screen, e.g., information
from the on-board comupter.
In the divided screen view, the so-called split
screen, this information remains visible even when you change to another menu.
Seite 23iDriveAt a glance23
Online Edition for Part no. 01 40 2 960 547 - II/15
Page 83 of 247

For more information, see Tire Pressure Moni‐
tor, refer to page 100.
Steering system Steering system in some cases defec‐
tive.
Have the steering system checked by
the service center.
Engine functions Have the vehicle checked by the serv‐ice center.
For additional information, refer to On-
board Diagnostics socket, refer to page 206.
Lane departure warning System is switched on and under cer‐
tain circumstances warns if a detected
lane is left without flashing beforehand.
For additional information, refer to Lane depar‐
ture warning, refer to page 114.
Green lights Turn signal Turn signal on.
Unusually rapid flashing of the indicator
lamp indicates that a turn signal bulb
has failed.
For additional information, refer to Turn signal,
refer to page 68.
Parking lights, headlight control Parking lights or headlights are acti‐
vated.
For additional information, refer to
Parking lights/low beams, headlight control, re‐
fer to page 91.Front fog lights
Front fog lights are activated.
For additional information, refer to
Front fog lights, refer to page 94.
High-beam Assistant High-beam Assistant is switched on.
High beams are activated and off auto‐
matically as a function of the traffic sit‐
uation.
For additional information, refer to High-beam
Assistant, refer to page 93.
Cruise control The system is switched on. It maintains
the speed that was set using the con‐
trol elements on the steering wheel.
Blue lights
High beams High beams are activated.
For additional information, refer to High
beams, refer to page 69.
General lamps
Check Control At least one Check Control message is
displayed or is stored. The symbol is
shown in the display of the instrument
cluster.
Text messagesText messages in combination with a symbol
in the instrument cluster explain a Check Con‐ trol message and the meaning of the indicator
and warning lights.Seite 79DisplaysControls79
Online Edition for Part no. 01 40 2 960 547 - II/15
Page 96 of 247

Headlight courtesy delay featureThe low beams stay lit for a short while if the
headlight flasher is switched on after the radio-
ready state is switched off.
Setting the duration
On the Control Display:1."Settings"2."Lighting"3."Pathway lighting:"4.Set length of time.
Settings are stored for the profile currently in
use.
Automatic headlight control
Position of switch
: the low beams are acti‐
vated and off automatically, e.g., in tunnels, in
twilight or if there is precipitation. The indicator
lamp in the instrument cluster lights up.
When emerging from a tunnel during the day,
the low beams are not switched off immedi‐
ately but instead only after approx. 2 minutes.
A blue sky with the sun low on the horizon can
cause the lights to be switched on.
The low beams always stay on when the fog
lights are activated.
Personal responsibility
The automatic headlight control cannot
serve as a substitute for your personal judg‐
ment in determining when to turn the lights on
in response to ambient lighting conditions.
E. g. the sensors are unable to detect fog or
hazy weather. To avoid safety risks under
these conditions, you should always switch on
the lights manually.◀
Daytime running lights With the ignition switched on, the daytime run‐
ning lights light up in position
, or
. After the ignition is switched off, the park‐
ing lights light up in position
.
Activating/deactivating
In some countries, daytime running lights are
mandatory, so it may not be possible to deacti‐
vate the daytime running lights.
On the Control Display:1."Settings"2."Lighting"3."Daytime running lamps"
Settings are stored for the profile currently in
use.
Roadside parking lights
The vehicle can be illuminated on one side.
Switching on With the ignition switched off, press the lever
either up or down past the resistance point for
approx. 2 seconds.
Switch off Briefly press the lever to the resistance point in
the opposite direction.
Adaptive Light Control The concept
Adaptive Light Control is a variable headlight
control system that enables dynamic illumina‐
tion of the road surface.
Depending on the steering angle and other pa‐ rameters, the light from the headlight follows
the course of the road.
Seite 92ControlsLights92
Online Edition for Part no. 01 40 2 960 547 - II/15
Page 97 of 247

In tight curves, e.g., on mountainous roads or
when turning, one of the two front fog lights is
switched on as a turning lamp. As a result the
inside of the curve is better lighted.
ActivatingPosition of switch
with the ignition
switched on.
To avoid blinding oncoming traffic, the Adap‐
tive Light Control does not swivel to the driv‐
er's side when the vehicle is at a standstill.
The turning lights are automatically switched
on depending on the steering angle or the use
of turn signals.
When driving in reverse, the turning lights may
be automatically switched on regardless of the
steering angle.
Malfunction A Check Control message is displayed.
Adaptive Light Control is malfunctioning or has
failed. Have the system checked as soon as
possible.
High-beam Assistant
The concept When the low beams are activated, this system
automatically switches the high beams on and
off or suppresses the light in the areas that
blind oncoming traffic. The procedure is con‐
trolled by a camera on the front of the interior
rearview mirror. The assistant ensures that the
high beams are activated whenever the traffic
situation allows. The driver can intervene at
any time and switch the high beams non and
off as usual.
Note Personal responsibility
The High-beam Assistant cannot serve
as a substitute for the driver's personal judg‐
ment of when to use the high beams. There‐
fore, manually reel off the high beams in situa‐
tions where required to avoid a safety risk.◀
Activating1.Depending on the equipment, turn the light
switch into position
or .
2.Press button on the turn signal lever, ar‐
row.
The indicator lamp in the instrument
cluster lights up.
When the low beams are on, the lights are au‐
tomatically brightened or dimmed.
The system responds to light from oncoming
traffic and traffic driving ahead of you, and to
adequate illumination, e.g., in towns and cities.
The blue indicator lamp in the instru‐
ment cluster lights up when the system
switches on the high beams. Depend‐
ing on the version of the system in the vehicle, the high beams may not switch off for oncom‐
ing vehicles, but may only be dimmed in the
areas that blind oncoming traffic. In this case,
the blue indicator light will stay on.
Seite 93LightsControls93
Online Edition for Part no. 01 40 2 960 547 - II/15
Page 155 of 247

This filter should be replaced during scheduled
maintenance, refer to page 205, of your vehi‐
cle.
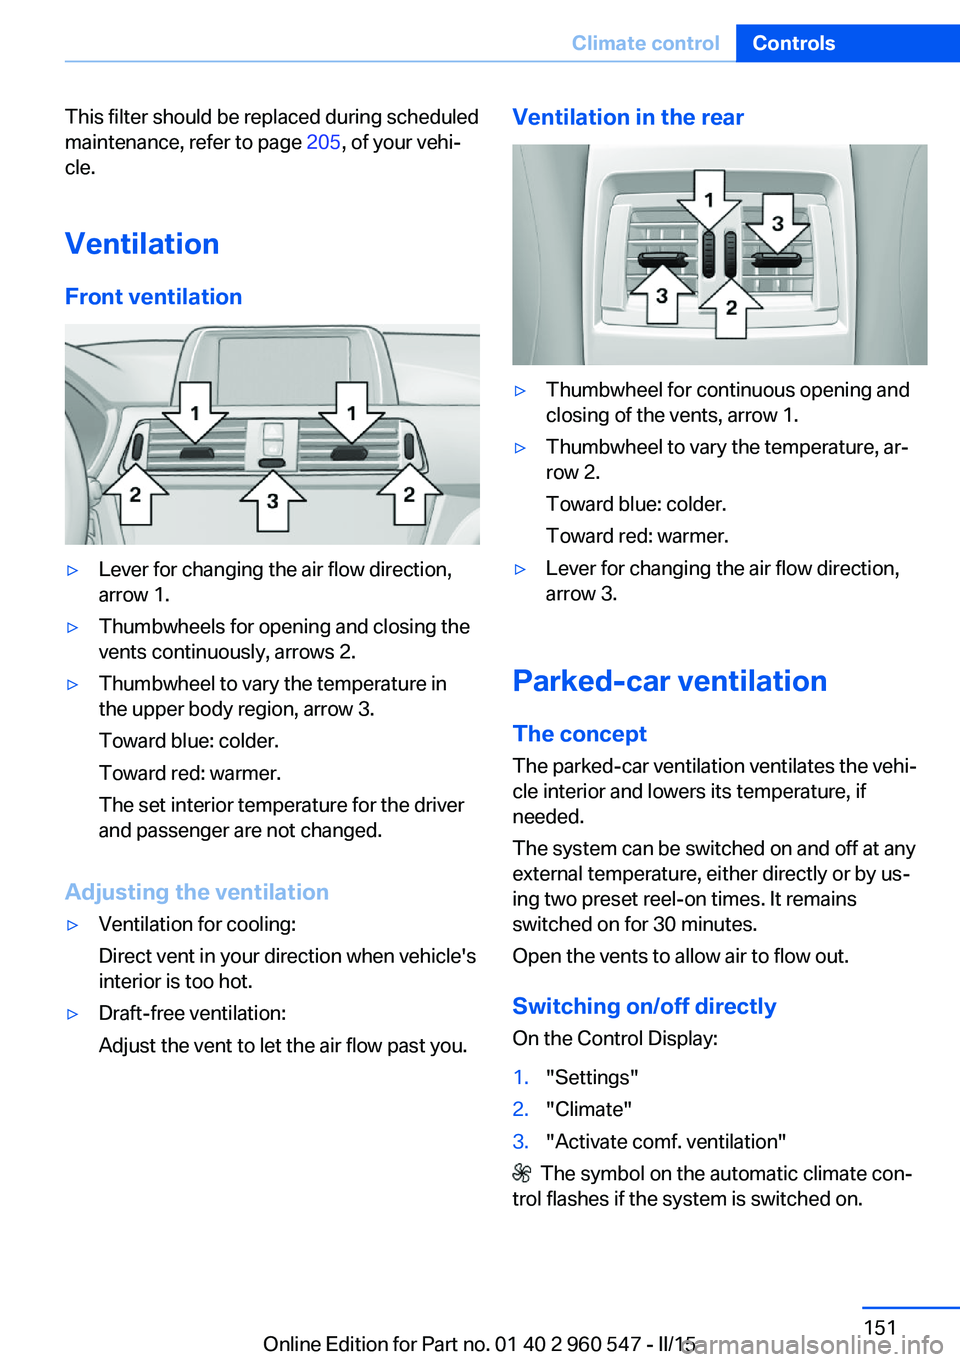
Ventilation
Front ventilation▷Lever for changing the air flow direction,
arrow 1.▷Thumbwheels for opening and closing the
vents continuously, arrows 2.▷Thumbwheel to vary the temperature in
the upper body region, arrow 3.
Toward blue: colder.
Toward red: warmer.
The set interior temperature for the driver
and passenger are not changed.
Adjusting the ventilation
▷Ventilation for cooling:
Direct vent in your direction when vehicle's
interior is too hot.▷Draft-free ventilation:
Adjust the vent to let the air flow past you.Ventilation in the rear▷Thumbwheel for continuous opening and
closing of the vents, arrow 1.▷Thumbwheel to vary the temperature, ar‐
row 2.
Toward blue: colder.
Toward red: warmer.▷Lever for changing the air flow direction,
arrow 3.
Parked-car ventilation
The concept The parked-car ventilation ventilates the vehi‐
cle interior and lowers its temperature, if
needed.
The system can be switched on and off at any
external temperature, either directly or by us‐
ing two preset reel-on times. It remains
switched on for 30 minutes.
Open the vents to allow air to flow out.
Switching on/off directly
On the Control Display:
1."Settings"2."Climate"3."Activate comf. ventilation"
The symbol on the automatic climate con‐
trol flashes if the system is switched on.
Seite 151Climate controlControls151
Online Edition for Part no. 01 40 2 960 547 - II/15
Page 180 of 247

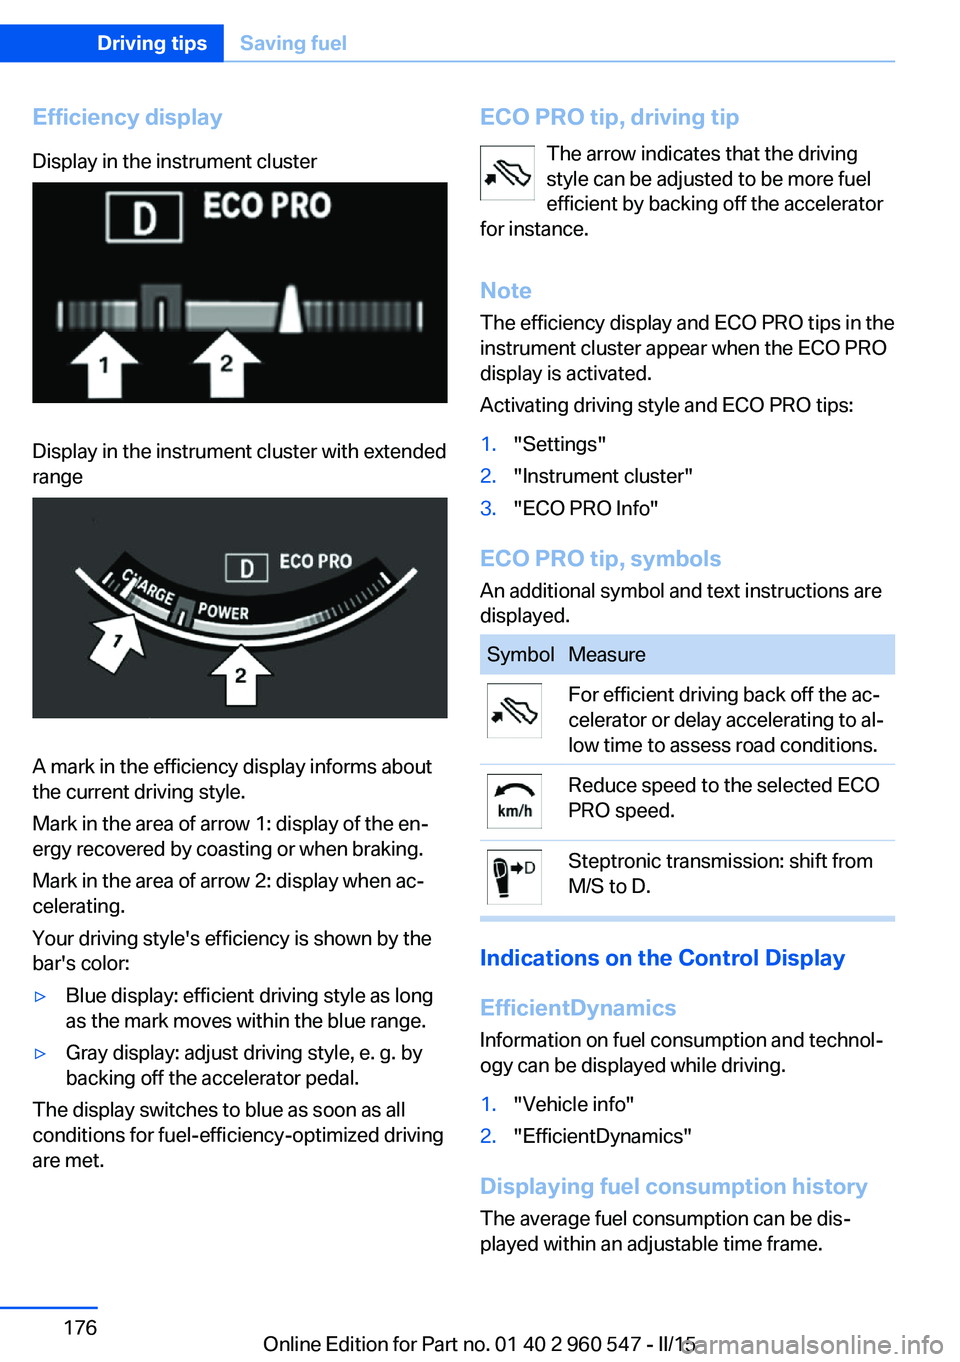
Efficiency displayDisplay in the instrument clusterDisplay in the instrument cluster with extended
range
A mark in the efficiency display informs about
the current driving style.
Mark in the area of arrow 1: display of the en‐
ergy recovered by coasting or when braking.
Mark in the area of arrow 2: display when ac‐
celerating.
Your driving style's efficiency is shown by the
bar's color:
▷Blue display: efficient driving style as long
as the mark moves within the blue range.▷Gray display: adjust driving style, e. g. by
backing off the accelerator pedal.
The display switches to blue as soon as all
conditions for fuel-efficiency-optimized driving
are met.
ECO PRO tip, driving tip
The arrow indicates that the driving
style can be adjusted to be more fuel
efficient by backing off the accelerator
for instance.
Note The efficiency display and ECO PRO tips in the
instrument cluster appear when the ECO PRO
display is activated.
Activating driving style and ECO PRO tips:1."Settings"2."Instrument cluster"3."ECO PRO Info"
ECO PRO tip, symbols
An additional symbol and text instructions are
displayed.
SymbolMeasureFor efficient driving back off the ac‐
celerator or delay accelerating to al‐
low time to assess road conditions.Reduce speed to the selected ECO
PRO speed.Steptronic transmission: shift from
M/S to D.
Indications on the Control Display
EfficientDynamics Information on fuel consumption and technol‐
ogy can be displayed while driving.
1."Vehicle info"2."EfficientDynamics"
Displaying fuel consumption history
The average fuel consumption can be dis‐
played within an adjustable time frame.
Seite 176Driving tipsSaving fuel176
Online Edition for Part no. 01 40 2 960 547 - II/15
Page 182 of 247

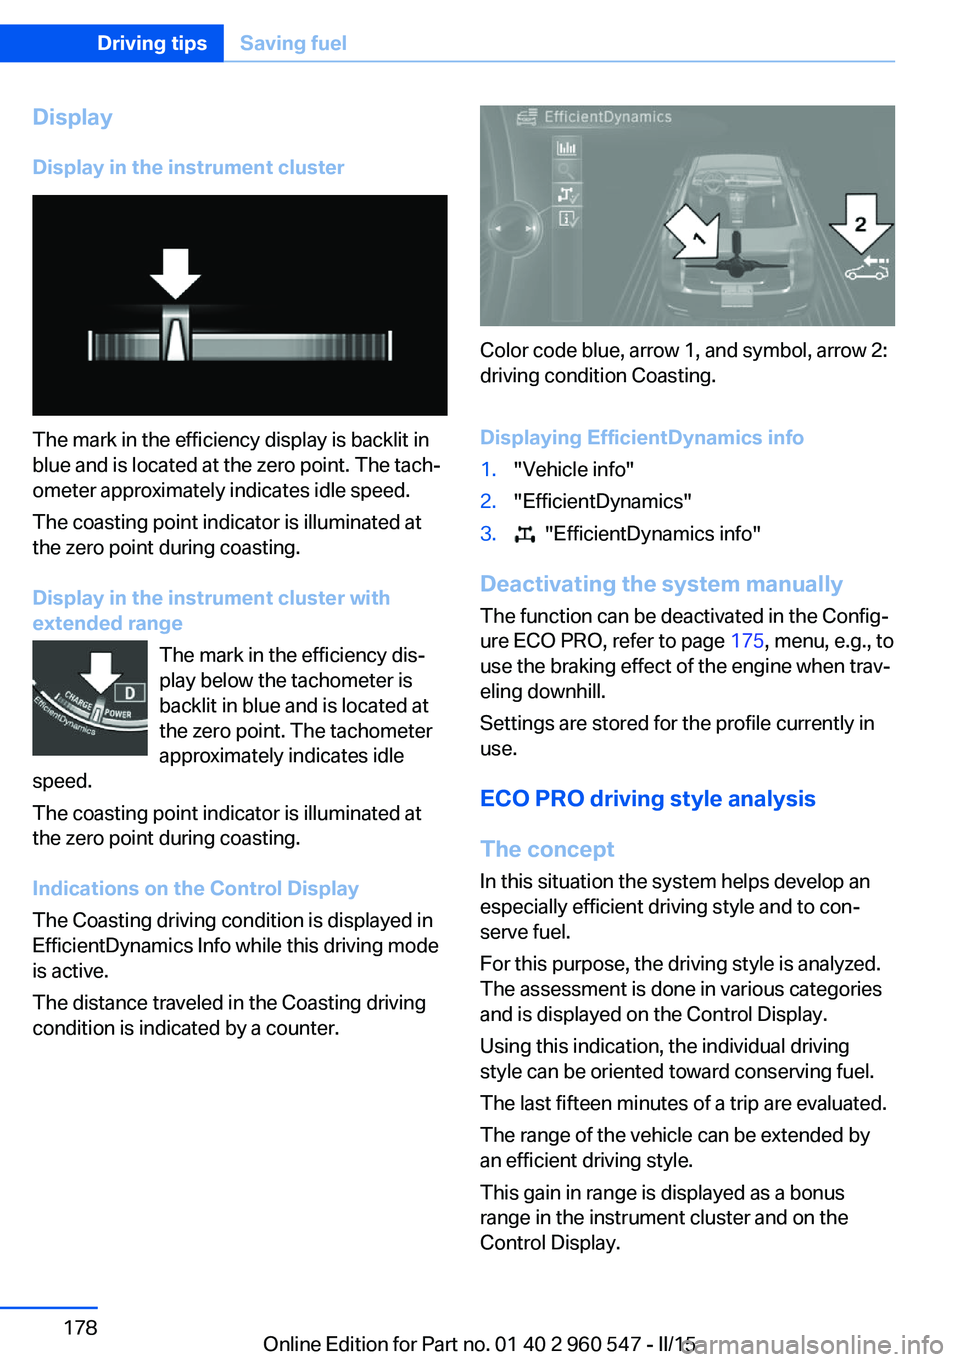
Display
Display in the instrument cluster
The mark in the efficiency display is backlit in
blue and is located at the zero point. The tach‐
ometer approximately indicates idle speed.
The coasting point indicator is illuminated at
the zero point during coasting.
Display in the instrument cluster with
extended range
The mark in the efficiency dis‐
play below the tachometer is
backlit in blue and is located at
the zero point. The tachometer
approximately indicates idle
speed.
The coasting point indicator is illuminated at
the zero point during coasting.
Indications on the Control Display
The Coasting driving condition is displayed in
EfficientDynamics Info while this driving mode
is active.
The distance traveled in the Coasting driving
condition is indicated by a counter.
Color code blue, arrow 1, and symbol, arrow 2:
driving condition Coasting.
Displaying EfficientDynamics info
1."Vehicle info"2."EfficientDynamics"3. "EfficientDynamics info"
Deactivating the system manually The function can be deactivated in the Config‐
ure ECO PRO, refer to page 175, menu, e.g., to
use the braking effect of the engine when trav‐
eling downhill.
Settings are stored for the profile currently in
use.
ECO PRO driving style analysis
The concept
In this situation the system helps develop an
especially efficient driving style and to con‐
serve fuel.
For this purpose, the driving style is analyzed.
The assessment is done in various categories
and is displayed on the Control Display.
Using this indication, the individual driving
style can be oriented toward conserving fuel.
The last fifteen minutes of a trip are evaluated.
The range of the vehicle can be extended by
an efficient driving style.
This gain in range is displayed as a bonus
range in the instrument cluster and on the
Control Display.
Seite 178Driving tipsSaving fuel178
Online Edition for Part no. 01 40 2 960 547 - II/15