2016 BMW 428I CONVERTIBLE wheel
[x] Cancel search: wheelPage 202 of 247

▷225/45 R 18.
Follow the snow chain manufacturer's instruc‐
tions.
Make sure that the snow chains are always
sufficiently tight. Retighten as needed accord‐
ing to the chain manufacturer's instructions.
Do not initialize the Flat Tire Monitor after
mounting snow chains, as doing so may result
in incorrect readings.
Do not initialize the Tire Pressure Monitor after
mounting snow chains, as doing so may result
in incorrect readings.
When driving with snow chains, briefly activate
Dynamic Traction Control if needed.
Maximum speed with snow chains Do not exceed a speed of 30 mph/50 km/hwhen using snow chains.
Seite 198MobilityWheels and tires198
Online Edition for Part no. 01 40 2 960 547 - II/15
Page 213 of 247

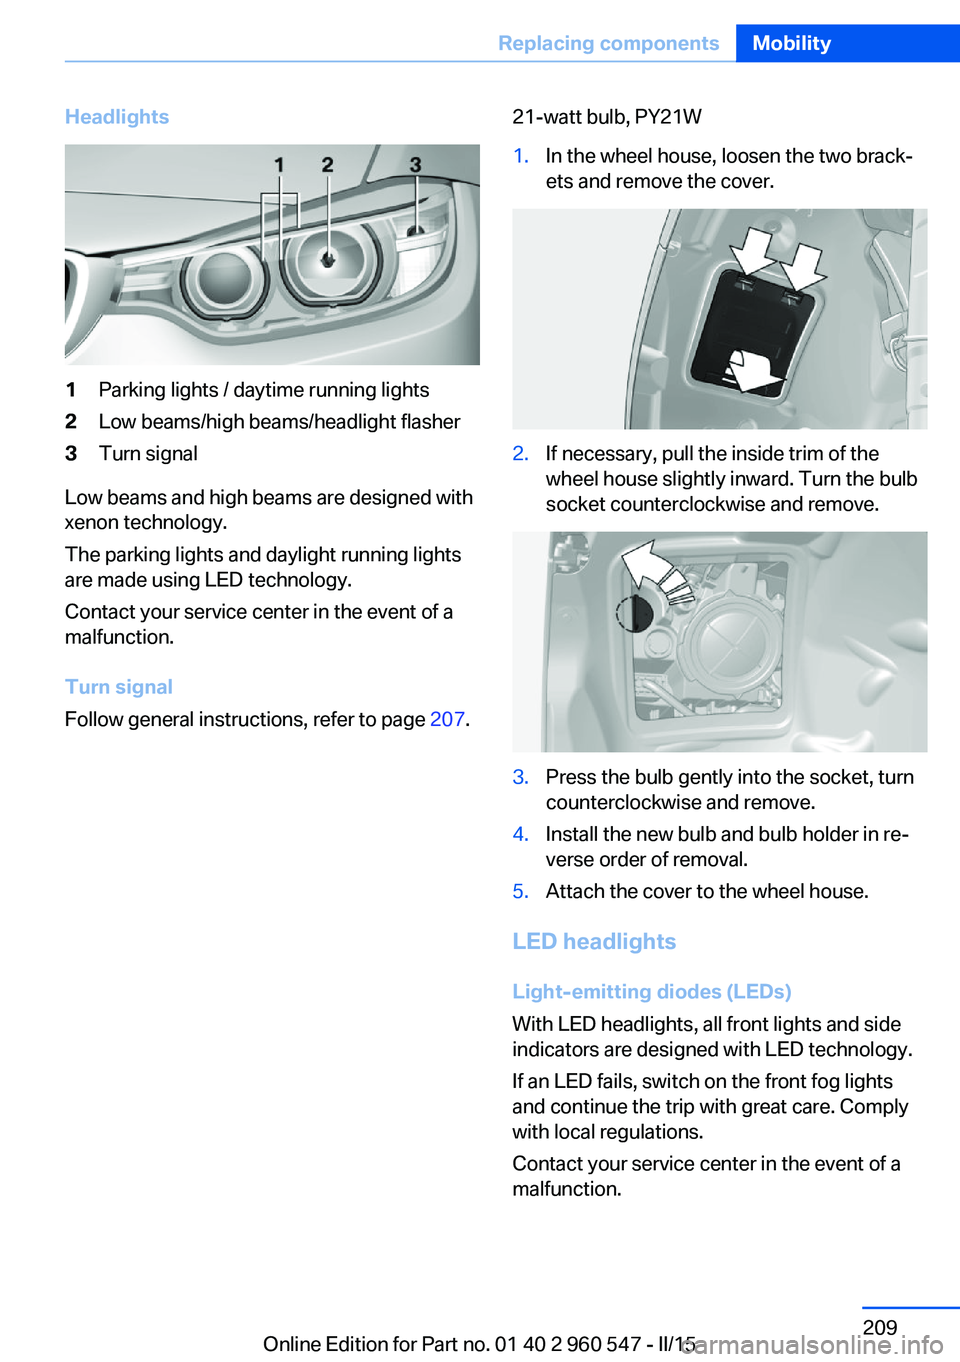
Headlights1Parking lights / daytime running lights2Low beams/high beams/headlight flasher3Turn signal
Low beams and high beams are designed with
xenon technology.
The parking lights and daylight running lights
are made using LED technology.
Contact your service center in the event of a
malfunction.
Turn signal
Follow general instructions, refer to page 207.
21-watt bulb, PY21W1.In the wheel house, loosen the two brack‐
ets and remove the cover.2.If necessary, pull the inside trim of the
wheel house slightly inward. Turn the bulb
socket counterclockwise and remove.3.Press the bulb gently into the socket, turn
counterclockwise and remove.4.Install the new bulb and bulb holder in re‐
verse order of removal.5.Attach the cover to the wheel house.
LED headlights
Light-emitting diodes (LEDs)
With LED headlights, all front lights and side
indicators are designed with LED technology.
If an LED fails, switch on the front fog lights
and continue the trip with great care. Comply
with local regulations.
Contact your service center in the event of a
malfunction.
Seite 209Replacing componentsMobility209
Online Edition for Part no. 01 40 2 960 547 - II/15
Page 214 of 247

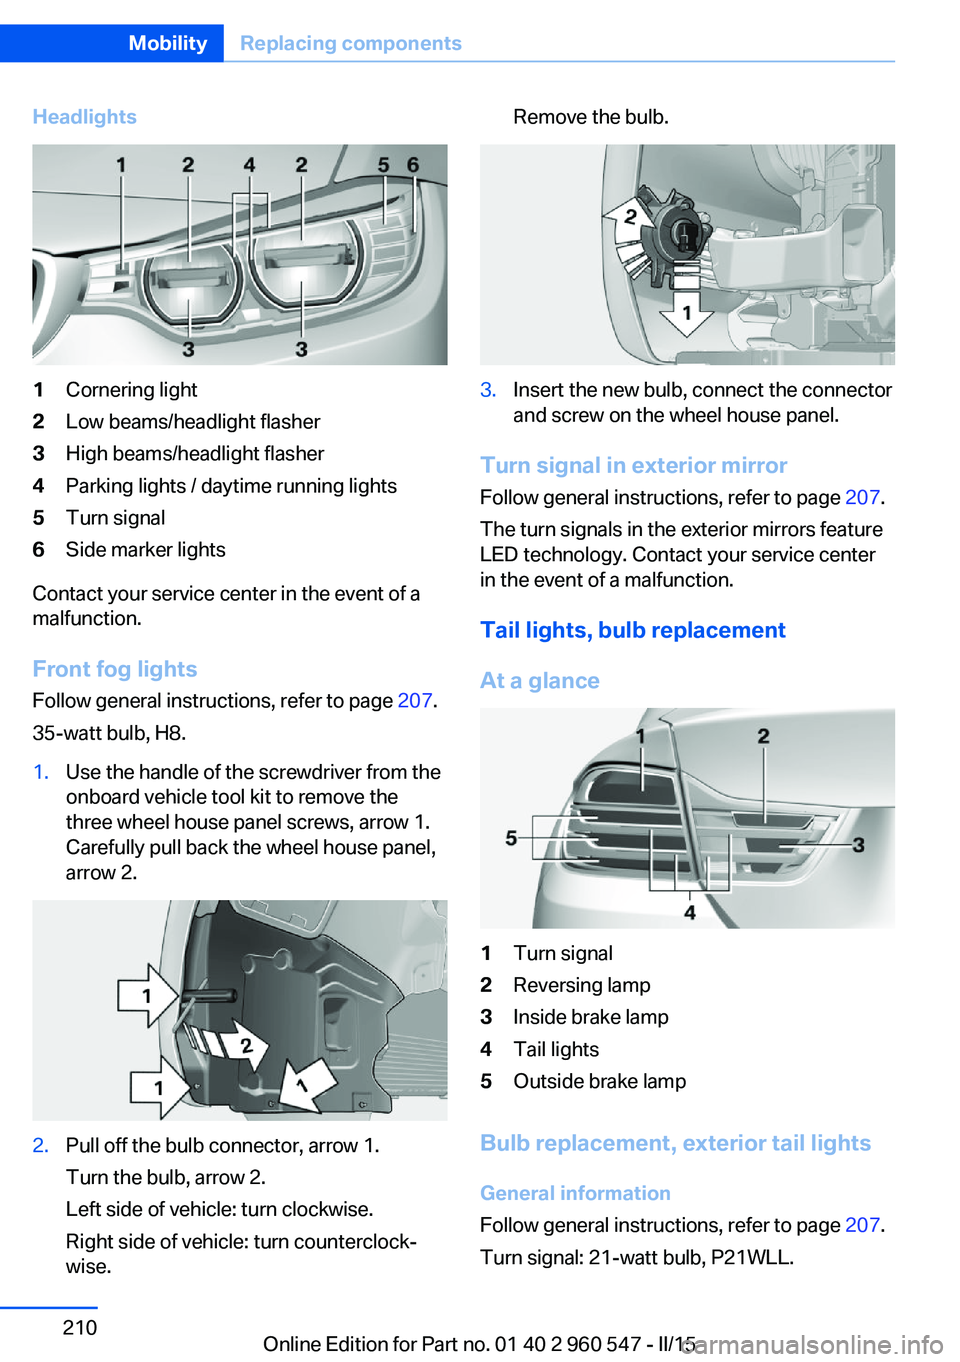
Headlights1Cornering light2Low beams/headlight flasher3High beams/headlight flasher4Parking lights / daytime running lights5Turn signal6Side marker lights
Contact your service center in the event of a
malfunction.
Front fog lights
Follow general instructions, refer to page 207.
35-watt bulb, H8.
1.Use the handle of the screwdriver from the
onboard vehicle tool kit to remove the
three wheel house panel screws, arrow 1.
Carefully pull back the wheel house panel,
arrow 2.2.Pull off the bulb connector, arrow 1.
Turn the bulb, arrow 2.
Left side of vehicle: turn clockwise.
Right side of vehicle: turn counterclock‐
wise.Remove the bulb.3.Insert the new bulb, connect the connector
and screw on the wheel house panel.
Turn signal in exterior mirror
Follow general instructions, refer to page 207.
The turn signals in the exterior mirrors feature
LED technology. Contact your service center
in the event of a malfunction.
Tail lights, bulb replacement
At a glance
1Turn signal2Reversing lamp3Inside brake lamp4Tail lights5Outside brake lamp
Bulb replacement, exterior tail lights General information
Follow general instructions, refer to page 207.
Turn signal: 21-watt bulb, P21WLL.
Seite 210MobilityReplacing components210
Online Edition for Part no. 01 40 2 960 547 - II/15
Page 217 of 247

These lights are made using LED technology.
Contact your service center in the event of a
malfunction.
Changing wheels
Hints When using run-flat tires or sealants, a tire
does not need to be changed immediately in
the event of pressure loss due to a flat tire.
Which is why no spare tire is available.
The tools for changing wheels are available as
accessories from your service center.
Jacking points for the vehicle jack
The jacking points for the vehicle jack are lo‐
cated at the positions shown.
Vehicle battery Maintenance
The battery is maintenance-free.
The added amount of acid is sufficient for the
service life of the battery.
Further information about the battery can be
obtained from your service center.
Battery replacement
Use approved vehicle batteries only
Only use vehicle batteries that have been
approved for your vehicle by the manufacturer;
otherwise, the vehicle could be damaged and
systems or functions may not be fully availa‐
ble.◀
After a battery replacement, have the battery registered on the vehicle by the service center
to ensure that all comfort features are fully
available and that any Check Control mes‐
sages of these comfort features are no longer
displayed.
Charging the battery
General information Make sure that the battery is always suffi‐
ciently charged to guarantee that the battery
remains usable for its full service life.
The battery may need to be charged in the fol‐
lowing cases:▷When making frequent short-distance
drives.▷If the vehicle is not used for prolonged pe‐
riods, longer than a month.
Hints
Do not connect charging devices to the
12 volt socket in the vehicle
Do not connect battery chargers to the fac‐
tory-installed 12 volt sockets in the vehicle as
this may damage the vehicle battery due to an
increased power consumption.◀
Starting aid terminals
In the vehicle, only charge the battery via the
starting aid terminals, refer to page 218, in the
engine compartment with the engine off.
Seite 213Replacing componentsMobility213
Online Edition for Part no. 01 40 2 960 547 - II/15
Page 225 of 247

CareVehicle features and optionsThis chapter describes all standard, country-
specific and optional features offered with the
series. It also describes features that are not
necessarily available in your car, e. g., due to
the selected options or country versions. This
also applies to safety-related functions and
systems. The respectively applicable country
provisions must be observed when using the
respective features and systems.
Car washes General information
Regularly remove foreign objects such as
leaves in the area below the windshield when
the hood is raised.
Wash your vehicle frequently, particularly in
winter. Intense soiling and road salt can dam‐
age the vehicle.
Hints Steam jets or high-pressure washers
When using steam jets or high-pressure
washers, hold them a sufficient distance away
and use a maximum temperature of
140 ℉/60 ℃.
Holding them too close or using excessively
high pressures or temperatures can cause
damage or preliminary damage that may then lead to long-term damage.
Follow the user's manual for the high-pressure
washer.◀
Cleaning sensors/cameras/hardtop with
high-pressure washers
When using high-pressure washers, do not
spray the seals of the lowerable hardtop, sen‐
sors and cameras external to the vehicle, e.g.,Park Distance Control, for extended periods of
time and only from a distance of at least
12 in/30 cm.◀
Automatic car washes
Hints Do not use high pressure washing sys‐
tems
With washing systems operating at high pres‐
sures and nozzle positions close to the win‐
dows, drops of water can penetrate.◀▷Give preference to cloth car washes or
those that use soft brushes in order to
avoid paint damage.▷Make sure that the wheels and tires are not
damaged by the transport mechanisms.▷Fold in the exterior mirrors; otherwise, they
may be damaged, depending on the width
of the vehicle.▷Deactivate the rain sensor, refer to
page 70, to avoid unintentional wiper acti‐
vation.▷In some cases, an unintentional alarm can
be triggered by the interior motion sensor
of the alarm system. Follow the instruc‐
tions on avoiding an unintentional alarm,
refer to page 45.
Guide rails in car washes
Avoid car washes with guide rails higher
than 4 in/10 cm; otherwise, the vehicle body
could be damaged.◀
Before driving into a car wash In order to ensure that the vehicle can roll in a
car wash, take the following steps:
Steptronic transmission:
1.Drive into the car wash.Seite 221CareMobility221
Online Edition for Part no. 01 40 2 960 547 - II/15
Page 227 of 247

Otherwise, particles of dust and road grime
chafe in pores and folds, and lead to increased
wear and premature degradation of the leather
surface.
To guard against discoloration, such as from
clothing, provide leather care roughly every
two months.
Clean light-colored leather more frequently be‐
cause soiling on such surfaces is substantially
more visible.
Use leather care products; otherwise, dirt and
grease will gradually break down the protective
layer of the leather surface.
Suitable care products are available from the
service center.
Upholstery material care Vacuum regularly with a vacuum cleaner.
If upholstery is very dirty, e.g., with beverage
stains, use a soft sponge or microfiber cloth
with a suitable interior cleaner.
Clean the upholstery down to the seams using
large sweeping motions. Avoid rubbing the
material vigorously.
Damage from Velcro® fasteners
Open Velcro® fasteners on pants or
other articles of clothing can damage the seat
covers. Ensure that any Velcro® fasteners are
closed.◀
Caring for special components
Light-alloy wheels When cleaning the vehicle, use only neutral
wheel cleaners having a pH value from 5 to 9.
Do not use abrasive cleaning agents or steam
jets above 140 ℉/60 ℃. Follow the manufac‐
turer's instructions.
Aggressive, acidic or alkaline cleaning agents
can destroy the protective layer of adjacent
components, such as the brake disk.Chrome surfaces
Carefully clean components such as the radia‐
tor grille or door handles with an ample supply
of water, possibly with shampoo added, partic‐
ularly when they have been exposed to road
salt.
Rubber components
Aside from water, treat only with rubber
cleansers.
When cleaning rubber seals, do not use any
silicon-containing car care products in order to
avoid damage or noises.
Fine wood partsClean fine wood facing and fine wood compo‐
nents only with a moist rag. Then dry with a
soft cloth.
Plastic components
These include:▷Imitation leather surfaces.▷Roofliner.▷Lamp lenses.▷Instrument cluster cover.▷Matt black spray-coated components.▷Painted parts in the interior.
Clean with a microfiber cloth.
Dampen cloth lightly with water.
Do not soak the roofliner.
No cleansers that contain alcohol or sol‐
vents
Do not use cleansers that contain alcohol or
solvents, such as lacquer thinners, heavy-duty
grease removers, fuel, or such; this could lead
to surface damage.◀
Safety belts
Dirty belt straps impede the reeling action and
thus have a negative impact on safety.
Seite 223CareMobility223
Online Edition for Part no. 01 40 2 960 547 - II/15
Page 232 of 247

Technical dataVehicle features and options
This chapter describes all standard, country-
specific and optional features offered with the
series. It also describes features that are not
necessarily available in your car, e. g., due tothe selected options or country versions. This
also applies to safety-related functions and
systems. The respectively applicable country
provisions must be observed when using the
respective features and systems.
Note
The technical data and specifications in this
Owner's Manual are used as guidance values.
The vehicle-specific data can deviate from this,
for example, due to the selected special equip‐
ment, country version or country-specific
measurement method. Detailed values can befound in the approval documents, on informa‐
tion signs on the vehicle or can be obtained
from the service center.
The information in the vehicle documents al‐
ways has priority.
Dimensions
The dimensions can vary depending on the
model version, equipment or country-specific
measurement method.
The specified heights do not take into account
attached parts, for example, a roof antenna,roof racks or spoiler. The heights can deviate,
for example, due to the selected special equip‐
ment, tires, load and chassis version. BMW 4 Series ConvertibleWidth with mirrorsinches/mm79.4/2,017Width without mirrorsinches/mm71.9/1,825Heightinches/mm54.5–55.1/1,384–
1,399Lengthinches/mm182.6/4,639Wheelbaseinches/mm110.6/2,810Smallest turning radius diam.ft/m37.1–38.7/11.3–11.8Seite 228ReferenceTechnical data228
Online Edition for Part no. 01 40 2 960 547 - II/15
Page 236 of 247

Everything from A to Z
IndexA ABS, Antilock Brake Sys‐ tem 119
ACC, Active Cruise Control with Stop & Go 124
Acceleration Assistant, refer to Launch Control 74
Accessories and parts 7
Activated-charcoal filter 150
Active Blind Spot Detec‐ tion 116
Active Cruise Control with Stop & Go, ACC 124
Adaptive brake lights, refer to Brake force display 118
Adaptive Light Control 92
Additives, oil 202
Adjustments, seats/head re‐ straints 52
After washing vehicle 222
Airbags 96
Airbags, indicator/warning light 97
Air circulation, refer to Recir‐ culated-air mode 147, 149
Air, dehumidifying, refer to Cooling function 146, 149
Air distribution, manual 146, 150
Air flow, air conditioner 146
Air flow, automatic climate control 150
Air pressure, tires 186
Air vents, refer to Ventila‐ tion 151
Alarm system 44
Alarm, unintentional 45
All around the center con‐ sole 16
All around the roofliner 17 All around the steering
wheel 14
All-season tires, refer to Win‐ ter tires 193
All-wheel-drive 120
Alternating-code hand-held transmitter 154
Alternative oil types 203
Ambient light 95
Antifreeze, washer fluid 71
Antilock Brake System, ABS 119
Anti-slip control, refer to DSC 119
Anti-theft protection, see through-loading sys‐
tem 161
Approved axle load 229
Approved engine oils, see Suitable engine oil
types 203
Arrival time 86
Ash tray 157
Assistance when driving off 123
Assist system information, on Control Display 89
Attentiveness assistant 118
AUTO intensity 149
Automatic car wash 221
Automatic climate con‐ trol 145
Automatic climate control with enhanced features 148
Automatic Cruise Control with Stop & Go 124
Automatic Curb Monitor 58
Automatic deactivation, front- seat passenger airbags 98
Automatic headlight con‐ trol 92 Automatic locking 43
Automatic recirculated-air control 149
Automatic transmission, see Steptronic transmission 71
AUTO program, automatic cli‐ mate control 149
AUTO program, climate con‐ trol 146
AUTO program, intensity 149
Auto Start/Stop function 66
Average fuel consumption 86
Average speed 86
Axle loads, weights 229
B Backrest curvature, refer to Lumbar support 53
Backrest, width 53
Band-aids, refer to First aid kit 217
Bar for tow-starting/ towing 219
Battery replacement, vehicle battery 213
Battery replacement, vehicle remote control 35
Battery, vehicle 213
Belts, safety belts 55
Beverage holder, cu‐ pholder 165
BMW Assist, see user's manual for Navigation, En‐
tertainment and Communi‐
cation
BMW Driver’s Guide App 6
BMW Homepage 6
BMW Internet page 6
BMW maintenance sys‐ tem 205 Seite 232ReferenceEverything from A to Z232
Online Edition for Part no. 01 40 2 960 547 - II/15