2016 BMW 4 SERIES GRAN COUPE Cover
[x] Cancel search: CoverPage 224 of 249

PreparationBodywork contact between vehicles
Make sure that there is no contact be‐
tween the bodywork of the two vehicles; other‐
wise, there is a danger of short circuits.◀1.Check whether the battery of the other ve‐
hicle has a voltage of 12 volts. This infor‐
mation can be found on the battery.2.Switch off the engine of the assisting vehi‐
cle.3.Switch off any electronic systems/power
consumers in both vehicles.
Starting aid terminals
Connecting order
Connect the jumper cables in the correct
order to prevent risk of injury from arcing.◀
The so-called starting aid terminal in the en‐
gine compartment acts as the battery's posi‐
tive terminal.
Open the cover of the starting aid terminal.
The body ground or a special nut acts as the
battery negative terminal.
Connecting the cables1.Open the cover of the BMW starting aid
terminal.2.Attach one terminal clamp of the positive
jumper cable to the positive terminal of the
battery, or to the corresponding starting
aid terminal of the vehicle providing assis‐
tance.3.Attach the terminal clamp on the other end
of the cable to the positive terminal of the
battery, or to the corresponding starting
aid terminal of the vehicle to be started.4.Attach one terminal clamp of the negative
jumper cable to the negative terminal of
the battery, or to the corresponding engine
or body ground of assisting vehicle.5.Attach the second terminal clamp to the
negative terminal of the battery, or to the
corresponding engine or body ground of
the vehicle to be started.
Starting the engine
Never use spray fluids to start the engine.
1.Start the engine of the assisting vehicle
and let it run for several minutes at an in‐
creased idle speed.2.Start the engine of the vehicle that is to be
started in the usual way.
If the first starting attempt is not success‐
ful, wait a few minutes before making an‐
other attempt in order to allow the dis‐
charged battery to recharge.3.Let both engines run for several minutes.4.Disconnect the jumper cables in the re‐
verse order.
Check the battery and recharge if needed.
Seite 220MobilityBreakdown assistance220
Online Edition for Part no. 01 40 2 960 707 - II/15
Page 227 of 249

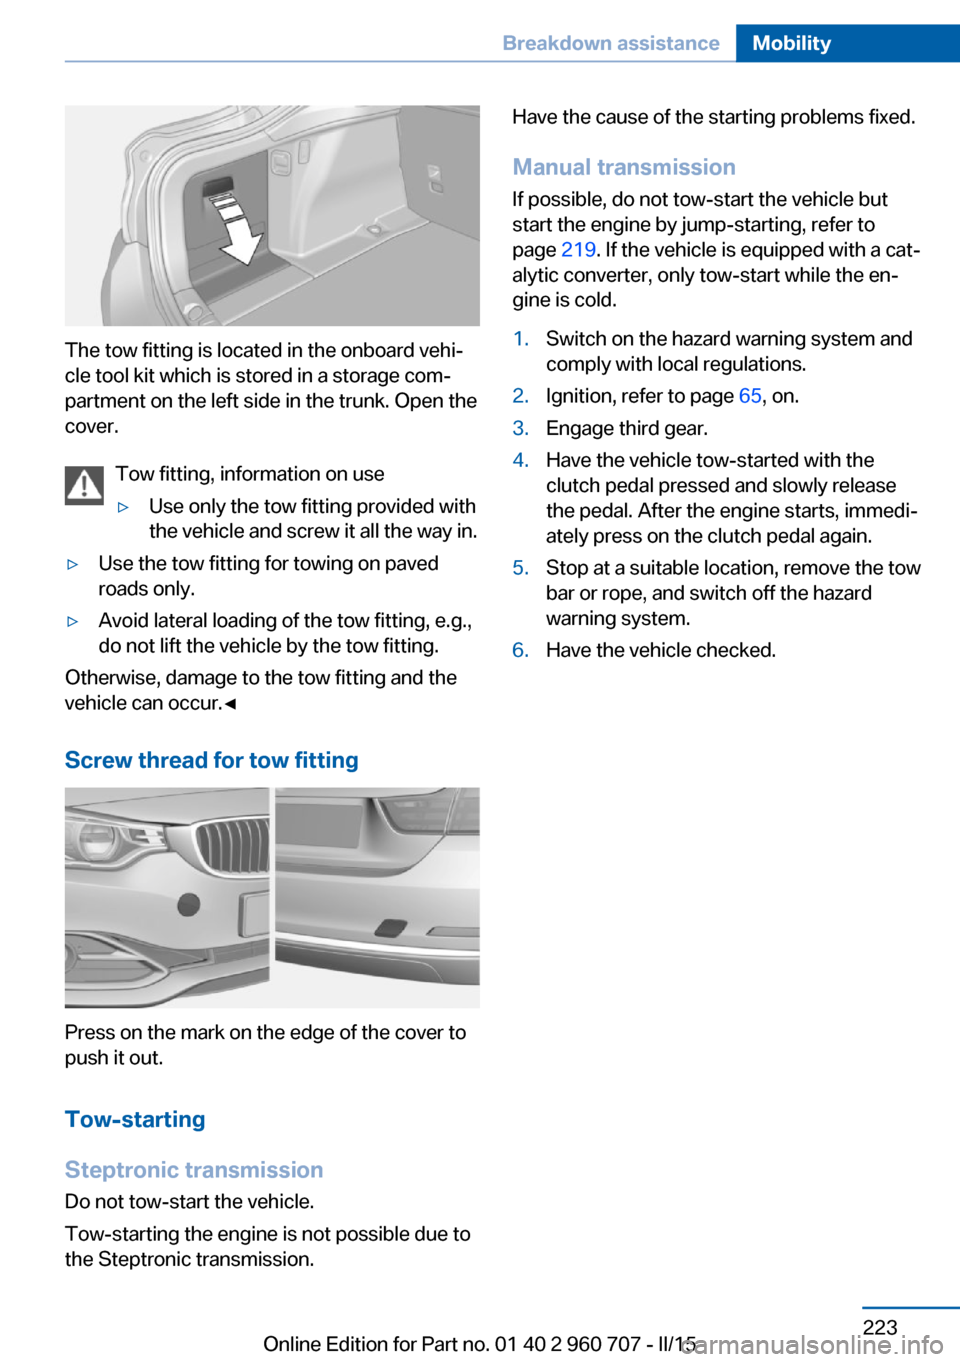
The tow fitting is located in the onboard vehi‐
cle tool kit which is stored in a storage com‐
partment on the left side in the trunk. Open the
cover.
Tow fitting, information on use
▷Use only the tow fitting provided with
the vehicle and screw it all the way in.▷Use the tow fitting for towing on paved
roads only.▷Avoid lateral loading of the tow fitting, e.g.,
do not lift the vehicle by the tow fitting.
Otherwise, damage to the tow fitting and the
vehicle can occur.◀
Screw thread for tow fitting
Press on the mark on the edge of the cover to
push it out.
Tow-starting
Steptronic transmission
Do not tow-start the vehicle.
Tow-starting the engine is not possible due to
the Steptronic transmission.
Have the cause of the starting problems fixed.
Manual transmission If possible, do not tow-start the vehicle but
start the engine by jump-starting, refer to
page 219. If the vehicle is equipped with a cat‐
alytic converter, only tow-start while the en‐
gine is cold.1.Switch on the hazard warning system and
comply with local regulations.2.Ignition, refer to page 65, on.3.Engage third gear.4.Have the vehicle tow-started with the
clutch pedal pressed and slowly release
the pedal. After the engine starts, immedi‐
ately press on the clutch pedal again.5.Stop at a suitable location, remove the tow
bar or rope, and switch off the hazard
warning system.6.Have the vehicle checked.Seite 223Breakdown assistanceMobility223
Online Edition for Part no. 01 40 2 960 707 - II/15
Page 230 of 249

Aggressive substances such as spilled fuel, oil,
grease or bird droppings, must be removed im‐
mediately to prevent the finish from being al‐
tered or discolored.
Only use respectively approved cleaning and
care products for vehicles with matte finish.
Suitable care products for matte finishes are
available from the service center.
Leather care
Remove dust from the leather often, using a
cloth or vacuum cleaner.
Otherwise, particles of dust and road grime
chafe in pores and folds, and lead to increased
wear and premature degradation of the leather
surface.
To guard against discoloration, such as from
clothing, provide leather care roughly every
two months.
Clean light-colored leather more frequently be‐
cause soiling on such surfaces is substantially
more visible.
Use leather care products; otherwise, dirt and
grease will gradually break down the protective
layer of the leather surface.
Suitable care products are available from the
service center.
Upholstery material care Vacuum regularly with a vacuum cleaner.
If upholstery is very dirty, e.g., with beverage
stains, use a soft sponge or microfiber cloth
with a suitable interior cleaner.
Clean the upholstery down to the seams using
large sweeping motions. Avoid rubbing the
material vigorously.
Damage from Velcro® fasteners
Open Velcro® fasteners on pants or
other articles of clothing can damage the seat
covers. Ensure that any Velcro® fasteners are
closed.◀Caring for special components
Light-alloy wheels When cleaning the vehicle, use only neutral
wheel cleaners having a pH value from 5 to 9.
Do not use abrasive cleaning agents or steam
jets above 140 ℉/60 ℃. Follow the manufac‐
turer's instructions.
Aggressive, acidic or alkaline cleaning agents
can destroy the protective layer of adjacent
components, such as the brake disk.
Chrome surfaces Carefully clean components such as the radia‐
tor grille or door handles with an ample supply of water, possibly with shampoo added, partic‐
ularly when they have been exposed to road
salt.
Rubber components Aside from water, treat only with rubber
cleansers.
When cleaning rubber seals, do not use any
silicon-containing car care products in order to
avoid damage or noises.
Fine wood parts
Clean fine wood facing and fine wood compo‐ nents only with a moist rag. Then dry with a
soft cloth.
Plastic components These include:▷Imitation leather surfaces.▷Roofliner.▷Lamp lenses.▷Instrument cluster cover.▷Matt black spray-coated components.▷Painted parts in the interior.
Clean with a microfiber cloth.
Dampen cloth lightly with water.
Do not soak the roofliner.
Seite 226MobilityCare226
Online Edition for Part no. 01 40 2 960 707 - II/15
Page 239 of 249

Bottle holder, refer to Cu‐pholders 163
Brake assistant 120
Brake discs, break-in 168
Brake force display 119
Brake lights, adaptive 119
Brake lights, brake force dis‐ play 119
Brake pads, break-in 168
Braking, hints 169
Breakdown assistance 218
Break-in 168
Brightness of Control Dis‐ play 91
Bulb replacement 209
Bulb replacement, front 210
Bulb replacement, LED head‐ lights 211
Bulb replacement, rear 212
Bulb replacement, xenon headlights 210
Bulbs and lights 209
Button, RES 128
Button, Start/Stop 65
Bypassing, refer to Jump- starting 219
C
California Proposition 65 Warning 7
Camera lenses, care 227
Camera, rearview cam‐ era 136
Camera, Side View 139
Camera, Top View 140
Can holder, refer to Cuphold‐ ers 163
Car battery 215
Car care products 225
Care, displays 227
Care, vehicle 225
Cargo 171
Cargo area 159
Cargo area, enlarging 159 Cargo area, storage compart‐
ments 163
Cargo cover 159
Cargo, securing 172
Cargo straps, securing cargo 172
Car key, refer to Remote con‐ trol 34
Carpet, care 227
Car wash 224
Catalytic converter, refer to Hot exhaust system 169
CBS Condition Based Serv‐ ice 207
CD/Multimedia, see user's manual for Navigation, En‐
tertainment and Communi‐
cation
Center armrest 162
Center console 16
Central locking system 40
Central screen, refer to Con‐ trol Display 18
Changes, technical, refer to Safety 7
Changing parts 209
Changing wheels 215
Changing wheels/tires 194
Chassis number, see vehicle identification number 9
Check Control 79
Checking the engine oil level electronically 203
Checking the oil level elec‐ tronically 203
Children, seating position 61
Children, transporting safely 61
Child restraint fixing sys‐ tem 61
Child restraint fixing system LATCH 63
Child restraint fixing systems, mounting 61
Child safety locks 64
Child seat, mounting 61 Child seats 61
Chrome parts, care 226
Cigarette lighter 157
Cleaning displays 227
Climate control 146, 148
Clock 83
Closing/opening via door lock 39
Closing/opening with remote control 37
Closing the tailgate with no- touch activation 44
Clothes hooks 163
Coasting 178
Coasting with engine decou‐ pled, coasting 178
Coasting with idling en‐ gine 178
Cockpit 14
Combination reel, refer to Turn signals 69
Combination switch, refer to Wiper system 70
Comfort Access 42
COMFORT program, Dy‐ namic Driving Control 123
Compartments in the doors 162
Compass 155
Compressor 196
Computer, refer to On-board computer 87
Condensation on win‐ dows 151
Condensation under the vehi‐ cle 170
Condition Based Service CBS 207
Configuring driving pro‐ gram 124
Confirmation signal 45
ConnectedDrive, see user's manual for Navigation, En‐
tertainment and Communi‐
cation
ConnectedDrive Services Seite 235Everything from A to ZReference235
Online Edition for Part no. 01 40 2 960 707 - II/15
Page 240 of 249

Connecting electrical devi‐ces 157
Continued driving with a flat tire 103 , 106
Control Display 18
Control Display, settings 90
Controller 18, 19
Control systems, driving sta‐ bility 120
Convenient opening with the remote control 37
Coolant 206
Coolant level 206
Coolant temperature 83
Cooling function 147, 150
Cooling, maximum 149
Cooling system 206
Cornering light 94
Corrosion on brake discs 170
Cosmetic mirror 157
Courtesy lamps during un‐ locking 37
Courtesy lamps with the vehi‐ cle locked 38
Cruise control 131
Cruise control, active with Stop & Go 125
Cruising range 83
Cupholders 163
Current fuel consumption 84
D
Damage, tires 194
Damping control, dy‐ namic 122
Data, technical 230
Date 83
Daytime running lights 94
Defrosting, refer to defrosting the windows 147
Defrosting, refer to Windows, defrosting 151
Defrosting the windows 147
Dehumidifying, air 147, 150
Deleting personal data 25 Deletion of personal data 25
Destination distance 88
Digital clock 83
Digital compass 155
Dimensions 230
Dimmable exterior mirrors 59
Dimmable interior rearview mirror 59
Direction indicator, refer to Turn signals 69
Display, electronic, instru‐ ment cluster 78
Display in windshield 91
Display lighting, refer to In‐ strument lighting 96
Displays, cleaning 227
Disposal, coolant 206
Disposal, vehicle battery 216
Distance control, refer to PDC 133
Distance to destination 88
Divided screen view, split screen 23
Door lock 39
Door lock, refer to Remote control 34
Drive-off assistant 124
Drive-off assistant, refer to DSC 120
Driver assistance, refer to In‐ telligent Safety 107
Driving Assistant, refer to In‐ telligent Safety 107
Driving Dynamics Con‐ trol 122
Driving instructions, break- in 168
Driving mode 122
Driving notes, general 168
Driving stability control sys‐ tems 120
Driving style analysis 179
Driving tips 168
DSC Dynamic Stability Con‐ trol 120 DTC Dynamic Traction Con‐
trol 121
Dynamic Damping Con‐ trol 122
Dynamic Stability Control DSC 120
Dynamic Traction Control DTC 121
E
ECO PRO 175
ECO PRO, bonus range 176
ECO PRO display 175
ECO PRO driving mode 175
ECO PRO driving style analy‐ sis 179
ECO PRO mode 175
ECO PRO Tip - driving in‐ struction 177
EfficientDynamics 178
Electronic displays, instru‐ ment cluster 78
Electronic oil measure‐ ment 203
Electronic Stability Program ESP, refer to DSC 120
Emergency detection, remote control 35
Emergency release, fuel filler flap 184
Emergency Request 218
Emergency start function, en‐ gine start 35
Emergency unlocking, tail‐ gate 42
Emergency unlocking, trans‐ mission lock 76
Energy Control 84
Energy recovery 84
Engine, automatic Start/Stop function 67
Engine, automatic switch- off 67
Engine compartment 201 Seite 236ReferenceEverything from A to Z236
Online Edition for Part no. 01 40 2 960 707 - II/15