2016 BMW 3 SERIES SPORTS WAGON Mobility system
[x] Cancel search: Mobility systemPage 231 of 255

Tow-starting and towingNote Tow-starting and towing
For tow-starting or towing, switch off the
Intelligent Safety systems; otherwise malfunc‐
tions of the individual braking systems might
lead to accidents.◀
Manual transmission Gearshift lever in neutral position.
Towing Follow the towing instructions
Follow all towing instructions; otherwise,
vehicle damage or accidents may occur.◀▷Make sure that the ignition is switched on;
otherwise, the low beams, tail lights, turn
signals, and wipers may be unavailable.▷Do not tow the vehicle with the rear axle
tilted, as the front wheels could turn.▷When the engine is stopped, there is no
power assist. Consequently, more force
needs to be applied when braking and
steering.▷Larger steering wheel movements are re‐
quired.▷The towing vehicle must not be lighter
than the vehicle being towed; otherwise,
it will not be possible to control the vehi‐
cle's response.Tow truck
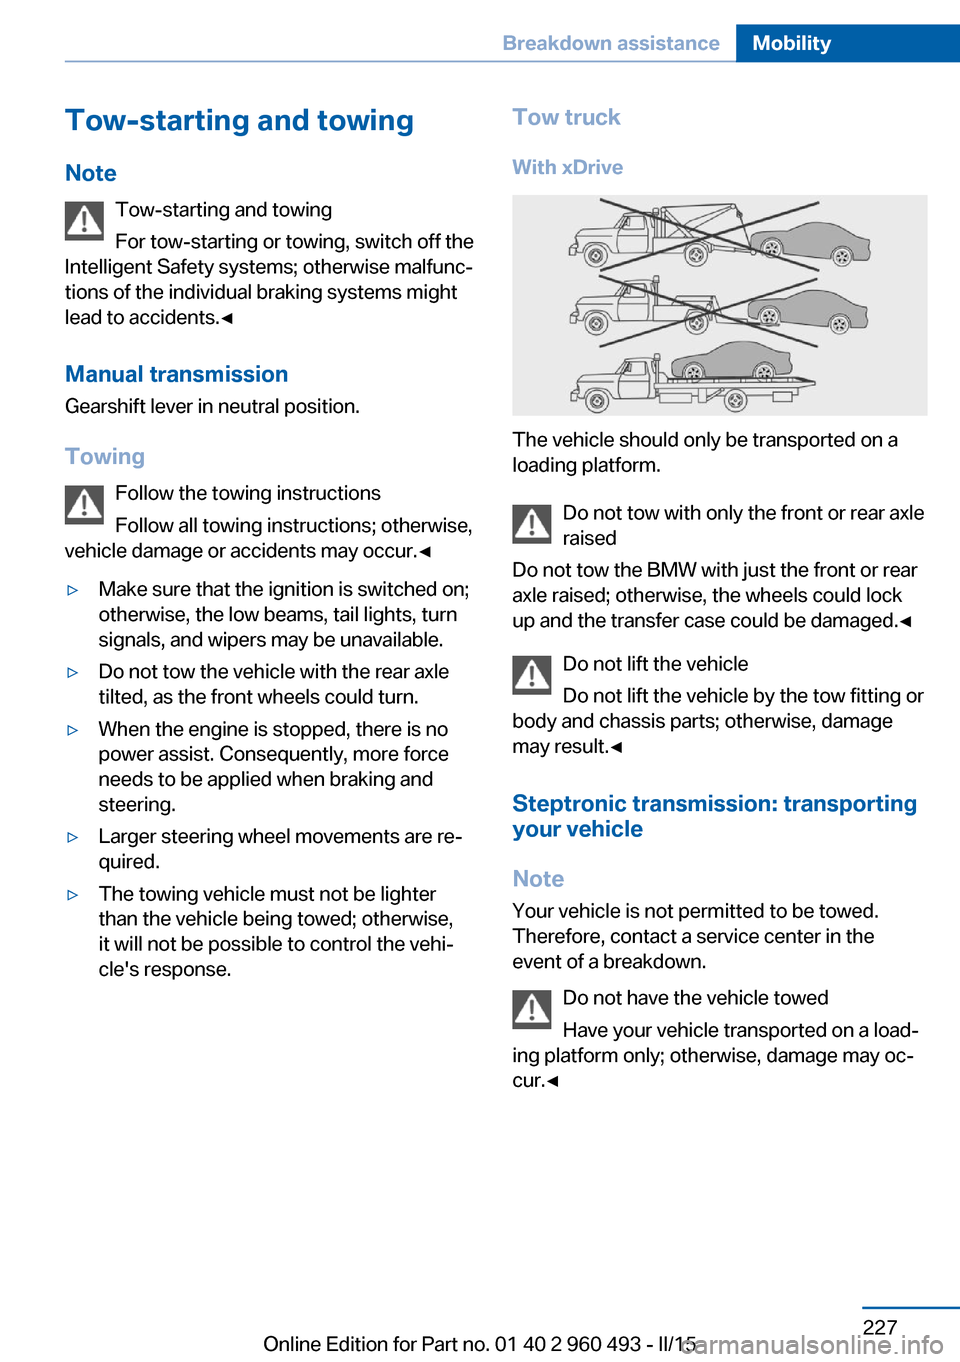
With xDrive
The vehicle should only be transported on a
loading platform.
Do not tow with only the front or rear axle
raised
Do not tow the BMW with just the front or rear
axle raised; otherwise, the wheels could lock
up and the transfer case could be damaged.◀
Do not lift the vehicle
Do not lift the vehicle by the tow fitting or
body and chassis parts; otherwise, damage
may result.◀
Steptronic transmission: transporting
your vehicle
Note Your vehicle is not permitted to be towed.
Therefore, contact a service center in the
event of a breakdown.
Do not have the vehicle towedHave your vehicle transported on a load‐
ing platform only; otherwise, damage may oc‐
cur.◀
Seite 227Breakdown assistanceMobility227
Online Edition for Part no. 01 40 2 960 493 - II/15
Page 232 of 255

Tow truck
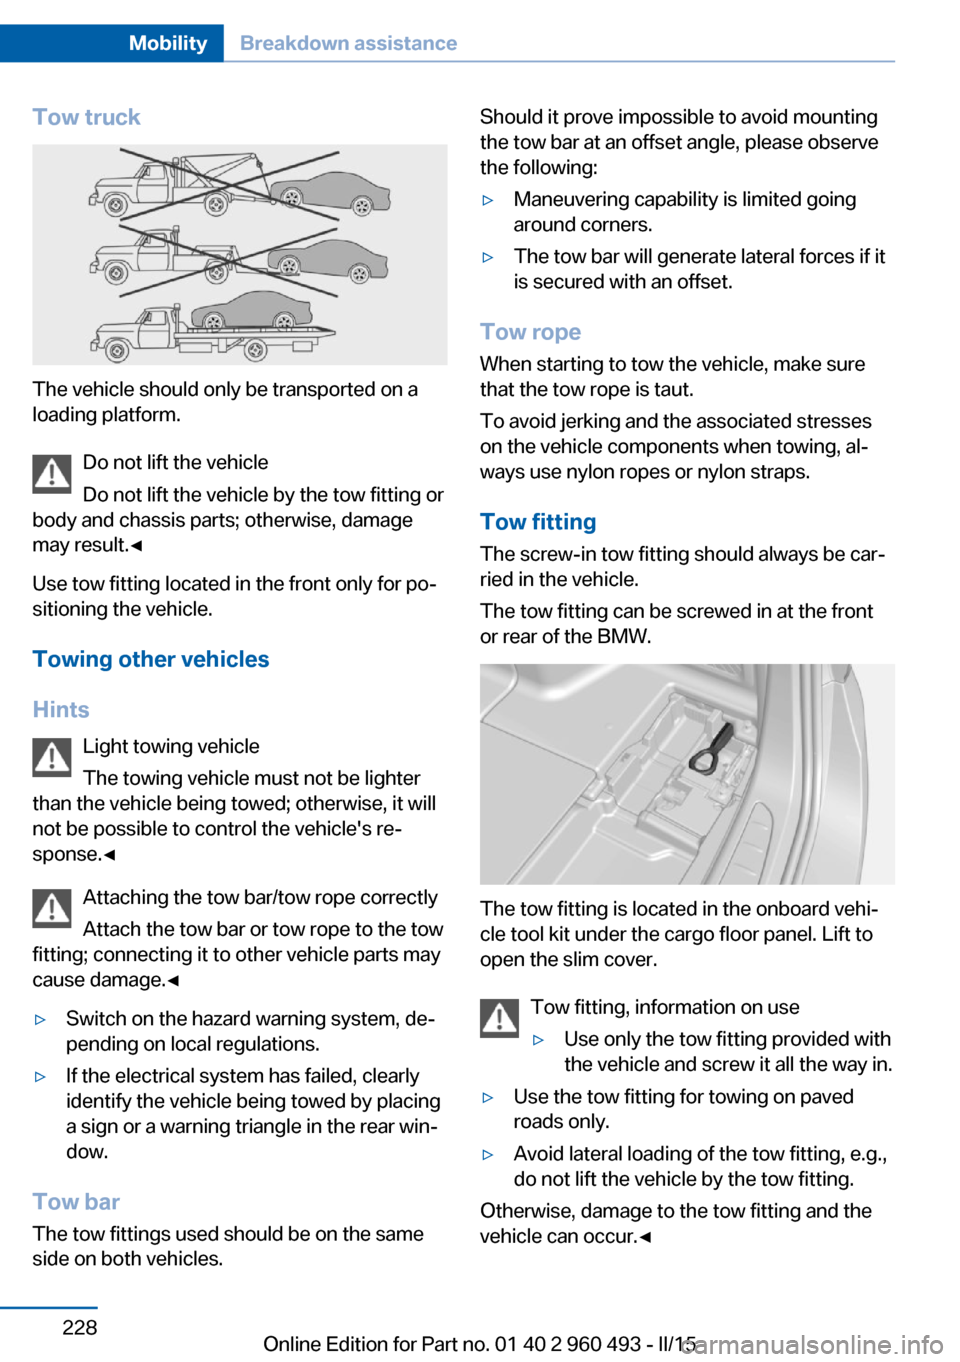
The vehicle should only be transported on a
loading platform.
Do not lift the vehicle
Do not lift the vehicle by the tow fitting or
body and chassis parts; otherwise, damage
may result.◀
Use tow fitting located in the front only for po‐
sitioning the vehicle.
Towing other vehicles
Hints Light towing vehicle
The towing vehicle must not be lighter
than the vehicle being towed; otherwise, it will
not be possible to control the vehicle's re‐
sponse.◀
Attaching the tow bar/tow rope correctly
Attach the tow bar or tow rope to the tow
fitting; connecting it to other vehicle parts may
cause damage.◀
▷Switch on the hazard warning system, de‐
pending on local regulations.▷If the electrical system has failed, clearly
identify the vehicle being towed by placing
a sign or a warning triangle in the rear win‐
dow.
Tow bar
The tow fittings used should be on the same
side on both vehicles.
Should it prove impossible to avoid mounting
the tow bar at an offset angle, please observe
the following:▷Maneuvering capability is limited going
around corners.▷The tow bar will generate lateral forces if it
is secured with an offset.
Tow rope
When starting to tow the vehicle, make sure
that the tow rope is taut.
To avoid jerking and the associated stresses
on the vehicle components when towing, al‐
ways use nylon ropes or nylon straps.
Tow fitting
The screw-in tow fitting should always be car‐
ried in the vehicle.
The tow fitting can be screwed in at the front
or rear of the BMW.
The tow fitting is located in the onboard vehi‐
cle tool kit under the cargo floor panel. Lift to
open the slim cover.
Tow fitting, information on use
▷Use only the tow fitting provided with
the vehicle and screw it all the way in.▷Use the tow fitting for towing on paved
roads only.▷Avoid lateral loading of the tow fitting, e.g.,
do not lift the vehicle by the tow fitting.
Otherwise, damage to the tow fitting and the
vehicle can occur.◀
Seite 228MobilityBreakdown assistance228
Online Edition for Part no. 01 40 2 960 493 - II/15
Page 233 of 255

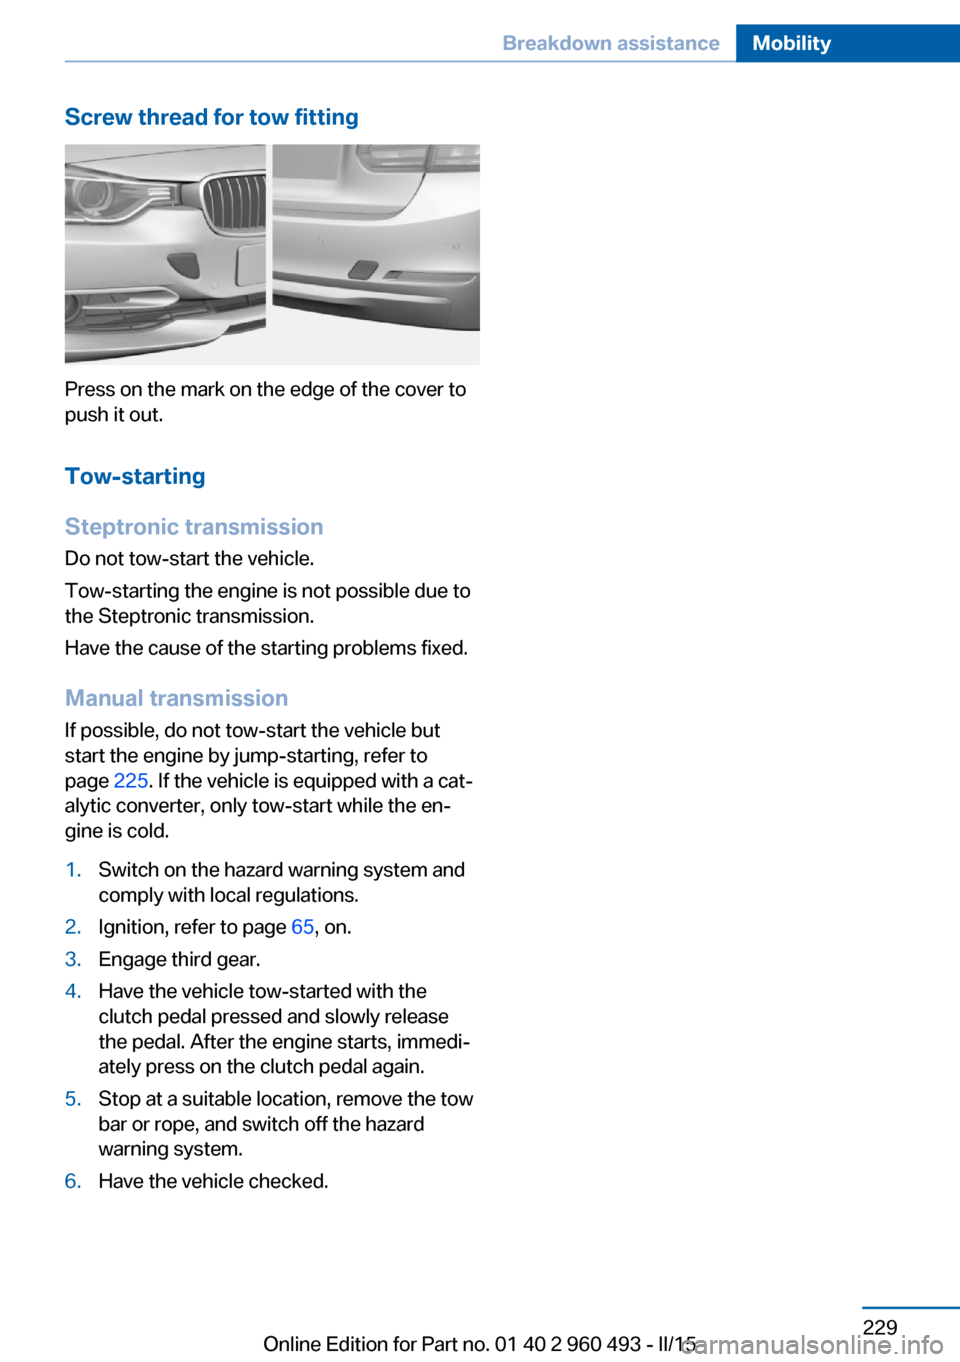
Screw thread for tow fitting
Press on the mark on the edge of the cover to
push it out.
Tow-starting
Steptronic transmission
Do not tow-start the vehicle.
Tow-starting the engine is not possible due to
the Steptronic transmission.
Have the cause of the starting problems fixed.
Manual transmission If possible, do not tow-start the vehicle but
start the engine by jump-starting, refer to
page 225. If the vehicle is equipped with a cat‐
alytic converter, only tow-start while the en‐
gine is cold.
1.Switch on the hazard warning system and
comply with local regulations.2.Ignition, refer to page 65, on.3.Engage third gear.4.Have the vehicle tow-started with the
clutch pedal pressed and slowly release
the pedal. After the engine starts, immedi‐
ately press on the clutch pedal again.5.Stop at a suitable location, remove the tow
bar or rope, and switch off the hazard
warning system.6.Have the vehicle checked.Seite 229Breakdown assistanceMobility229
Online Edition for Part no. 01 40 2 960 493 - II/15
Page 234 of 255

CareVehicle features and optionsThis chapter describes all standard, country-
specific and optional features offered with the
series. It also describes features that are not
necessarily available in your car, e. g., due to
the selected options or country versions. This
also applies to safety-related functions and
systems. The respectively applicable country
provisions must be observed when using the
respective features and systems.
Car washes General information
Regularly remove foreign objects such as
leaves in the area below the windshield when
the hood is raised.
Wash your vehicle frequently, particularly in
winter. Intense soiling and road salt can dam‐
age the vehicle.
Hints Steam jets or high-pressure washers
When using steam jets or high-pressure
washers, hold them a sufficient distance away
and use a maximum temperature of
140 ℉/60 ℃.
If the vehicle has a glass sunroof, ensure that a
distance of at least 31.5 inches/80 cm is main‐
tained. Holding them too close or using exces‐
sively high pressures or temperatures can
cause damage or preliminary damage that may
then lead to long-term damage.
Follow the user's manual for the high-pressure
washer.◀Cleaning sensors/camera lenses with
high-pressure washers
When using high-pressure washers, do not
spray the sensors and camera lenses on the
outside of the vehicle for long periods and
maintain a distance of at least 12 in/30 cm.◀
Automatic car washes
Hints▷Give preference to cloth car washes or
those that use soft brushes in order to
avoid paint damage.▷Make sure that the wheels and tires are not
damaged by the transport mechanisms.▷Fold in the exterior mirrors; otherwise, they
may be damaged, depending on the width
of the vehicle.▷Deactivate the rain sensor, refer to
page 71, to avoid unintentional wiper acti‐
vation.▷In some cases, an unintentional alarm can
be triggered by the interior motion sensor
of the alarm system. Follow the instruc‐
tions on avoiding an unintentional alarm,
refer to page 47.
Guide rails in car washes
Avoid car washes with guide rails higher
than 4 in/10 cm; otherwise, the vehicle body
could be damaged.◀
Before driving into a car wash In order to ensure that the vehicle can roll in a
car wash, take the following steps:
Manual transmission:
1.Drive into the car wash.2.Shift to neutral.Seite 230MobilityCare230
Online Edition for Part no. 01 40 2 960 493 - II/15
Page 249 of 255

Lights and bulbs 213
Light switch 93
Load 174
Loading 173
Lock, door 39
Locking/unlocking via door lock 39
Locking/unlocking with re‐ mote control 37
Locking, automatic 45
Locking, settings 45
Lock, power window 48
Locks, doors, and win‐ dows 64
Low beams 93
Low beams, automatic, refer to High-beam Assistant 95
Lower back support 53
Low-Sulfur Diesel 189
Luggage rack, see Roof- mounted luggage rack 175
Lumbar support 53
M
Maintenance 210
Maintenance require‐ ments 210
Maintenance, service require‐ ments 84
Maintenance system, BMW 210
Make-up mirror 157
Malfunction displays, see Check Control 79
Manual air distribu‐ tion 147, 150
Manual air flow 147, 150
Manual mode, Steptronic transmission 75
Manual operation, door lock 39
Manual operation, exterior mirrors 59
Manual operation, fuel filler flap 186 Manual operation, Park Dis‐
tance Control PDC 134
Manual operation, rearview camera 137
Manual operation, Side View 139
Manual operation, Top View 140
Manual transmission 73
Marking on approved tires 198
Marking, run-flat tires 199
Master key, refer to Remote control 34
Maximum cooling 149
Maximum speed, display 86
Maximum speed, winter tires 199
Measure, units of 91
Medical kit 225
Memory, seat, mirror 57
Menu, EfficientDynamics 180
Menu in instrument clus‐ ter 87
Menus, operating, iDrive 18
Menus, refer to iDrive operat‐ ing concept 20
Messages, see Check Con‐ trol 79
Microfilter 148, 151
Minimum tread, tires 197
Mirror 58
Mirror memory 57
Mobile communication devi‐ ces in the vehicle 171
Mobility System 199
Modifications, technical, refer to Safety 7
Moisture in headlight 213
Monitor, refer to Control Dis‐ play 18
Mounting of child restraint systems 61
Multifunction steering wheel, buttons 14 N
Navigation, see user's manual for Navigation, Entertain‐
ment and Communication
Neck restraints, front, refer to Head restraints 55
Neck restraints, rear, refer to Head restraints 56
Neutral cleaner, see wheel cleaner 232
New wheels and tires 198
Nylon rope for tow-starting/ towing 228
O OBD Onboard Diagnosis 211
OBD, see OBD Onboard Di‐ agnosis 211
Obstacle marking, rearview camera 137
Octane rating, refer to Rec‐ ommended fuel grade 188
Odometer 83
Office, see user's manual for Navigation, Entertainment
and Communication
Oil 206
Oil, adding 207
Oil additives 208
Oil change 208
Oil change interval, service requirements 84
Oil filler neck 207
Oil types, alternative 208
Oil types, approved 208
Old batteries, disposal 222
On-board computer 87
Onboard monitor, refer to Control Display 18
Onboard vehicle tool kit 212
Opening/closing via door lock 39
Opening and closing 34 Seite 245Everything from A to ZReference245
Online Edition for Part no. 01 40 2 960 493 - II/15