2016 BMW 3 SERIES SPORTS WAGON rear seat
[x] Cancel search: rear seatPage 150 of 255
Climate controlVehicle features and options
This chapter describes all standard, country-
specific and optional features offered with the
series. It also describes features that are not
necessarily available in your car, e. g., due tothe selected options or country versions. This
also applies to safety-related functions and
systems. The respectively applicable country
provisions must be observed when using the
respective features and systems.
Automatic climate control
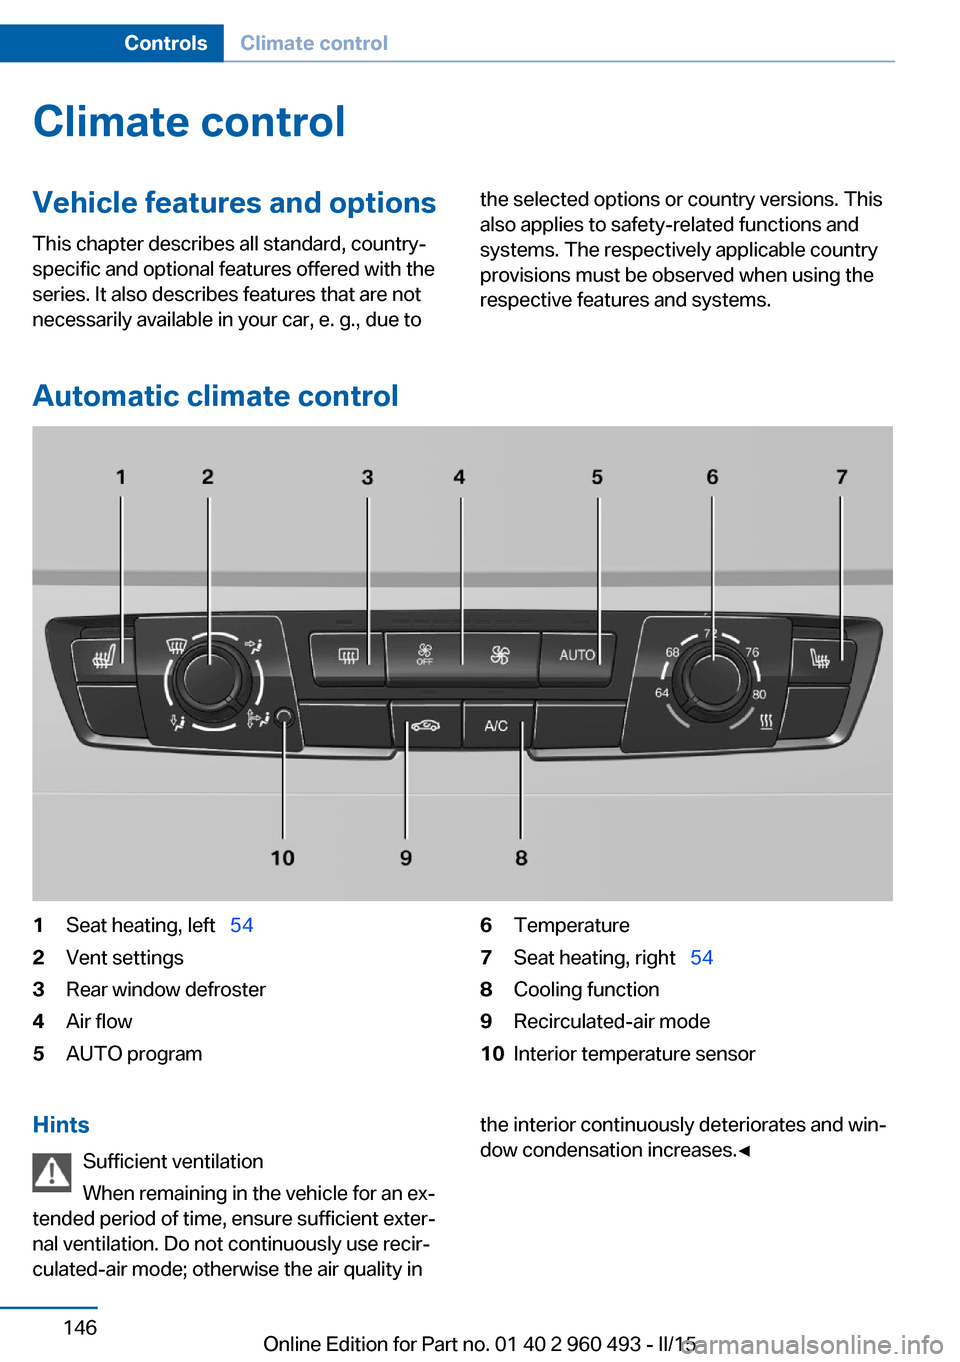
1Seat heating, left 542Vent settings3Rear window defroster4Air flow5AUTO program6Temperature7Seat heating, right 548Cooling function9Recirculated-air mode10Interior temperature sensorHints
Sufficient ventilation
When remaining in the vehicle for an ex‐
tended period of time, ensure sufficient exter‐
nal ventilation. Do not continuously use recir‐
culated-air mode; otherwise the air quality inthe interior continuously deteriorates and win‐
dow condensation increases.◀Seite 146ControlsClimate control146
Online Edition for Part no. 01 40 2 960 493 - II/15
Page 152 of 255
Press button repeatedly to select an
operating mode:▷LED off: outside air flows in continuously.▷LED on, recirculated-air mode: the supply
of outside air into the vehicle is perma‐
nently blocked.
Recirculated air mode switches off automati‐
cally at low external temperatures after a cer‐
tain amount of time in order to avoid window
fogging.
If the windows fog over, switch off recircu‐
lated-air mode and increase the air flow, if
needed.
Sufficient ventilation
When remaining in the vehicle for an ex‐
tended period of time, ensure sufficient exter‐
nal ventilation. Do not continuously use recir‐
culated-air mode; otherwise the air quality in
the interior continuously deteriorates and win‐
dow condensation increases.◀
Switching the system on/off
Switch off Press the left button for the minimum
speed.
Switching on
Press any button except▷Rear window defroster.▷Seat heating.
Microfilter
In external and recirculated air mode the mi‐
crofilter filters dust and pollen from the air.
This filter should be replaced during scheduled
maintenance, refer to page 210, of your vehi‐
cle.
Automatic climate control with enhanced features
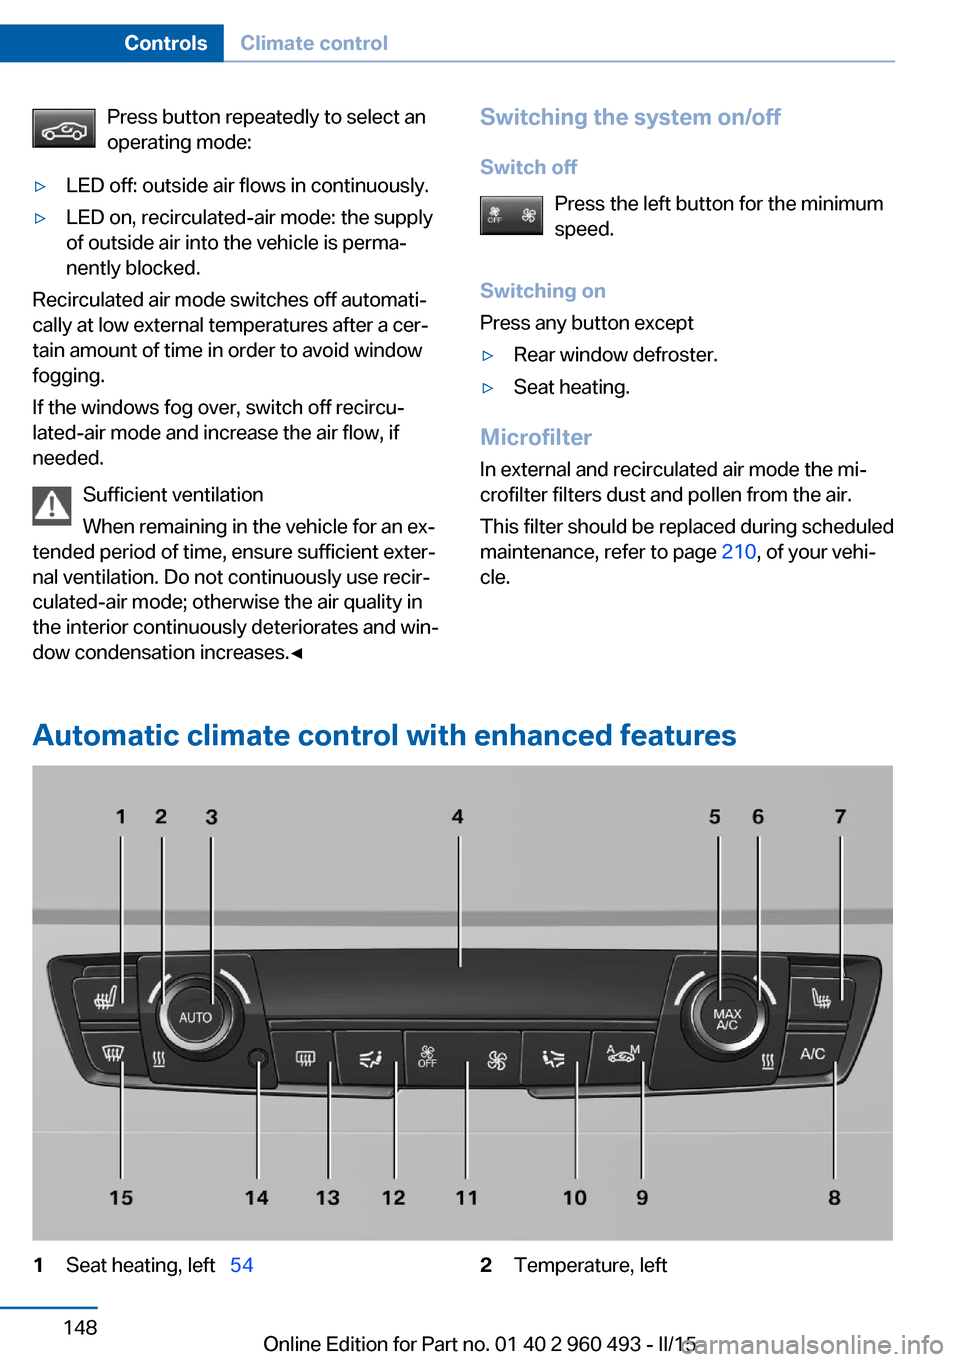
1Seat heating, left 542Temperature, leftSeite 148ControlsClimate control148
Online Edition for Part no. 01 40 2 960 493 - II/15
Page 153 of 255
3AUTO program4Display5Maximum cooling6Temperature, right7Seat heating, right 548Cooling function9Automatic recirculated-air control/recircu‐
lated-air mode10Air distribution, right11Air flow, AUTO intensity12Air distribution, left13Rear window defroster14Interior temperature sensor — always keep
clear15Defrosts windows and removes condensa‐
tionHints
Sufficient ventilation
When remaining in the vehicle for an ex‐
tended period of time, ensure sufficient exter‐
nal ventilation. Do not continuously use recir‐
culated-air mode; otherwise the air quality in
the interior continuously deteriorates and win‐
dow condensation increases.◀
Climate control functions in detail
Temperature Turn the ring to set the desired
temperature.
The automatic climate control reaches this
temperature as quickly as possible, if needed
by increasing the cooling or heating output,
and then keeps it constant.
Do not rapidly switch between different tem‐
perature settings. Otherwise, the automatic cli‐
mate control will not have sufficient time to ad‐
just the set temperature.
AUTO program Press button.
Air flow, air distribution and tempera‐
ture are controlled automatically.Depending on the selected temperature,
AUTO intensity program and outside influen‐
ces, the air is directed to the windshield, side
windows, upper body, and into the footwell.
The cooling function, refer to page 150, is
switched on automatically with the AUTO pro‐
gram.
At the same time, a condensation sensor con‐
trols the program so as to prevent window
condensation as much as possible.
Intensity of the AUTO program
With the AUTO program activated, the auto‐
matic intensity control can be changed.
Press the left or right side of the but‐
ton: decrease or increase the inten‐
sity.
The selected intensity is shown on the display
of the automatic climate control.
Maximum cooling Press button.
The system is set to the lowest tem‐
perature, optimum air flow and air circulation
mode.
Air flows out of the vents to the upper body re‐
gion. The vents need to be open for this.
The function is available above an external
temperature of approx. 32 ℉/0 ℃ and with the
engine running.
Adjust air flow with the program active.Seite 149Climate controlControls149
Online Edition for Part no. 01 40 2 960 493 - II/15
Page 155 of 255
Defrosts windows and removes
condensation
Press button.
Ice and condensation are quickly re‐
moved from the windshield and the front side
windows.
For this purpose, point the side vents onto the
side windows as needed.
Adjust air flow with the program active.
If the windows are fogged over, you can also
switch on the cooling function or press the AUTO button to utilize the condensation sen‐
sor.
Switching the system on/off Switch off Press the left button for the minimum
speed.
Switching on
Press any button except▷Rear window defroster.▷Seat heating.
Microfilter/activated-charcoal filter
In external and recirculated air mode the mi‐
crofilter/activated charcoal filter filters dust,
pollen, and gaseous pollutants out of the air.
This filter should be replaced during scheduled
maintenance, refer to page 210, of your vehi‐
cle.
Ventilation
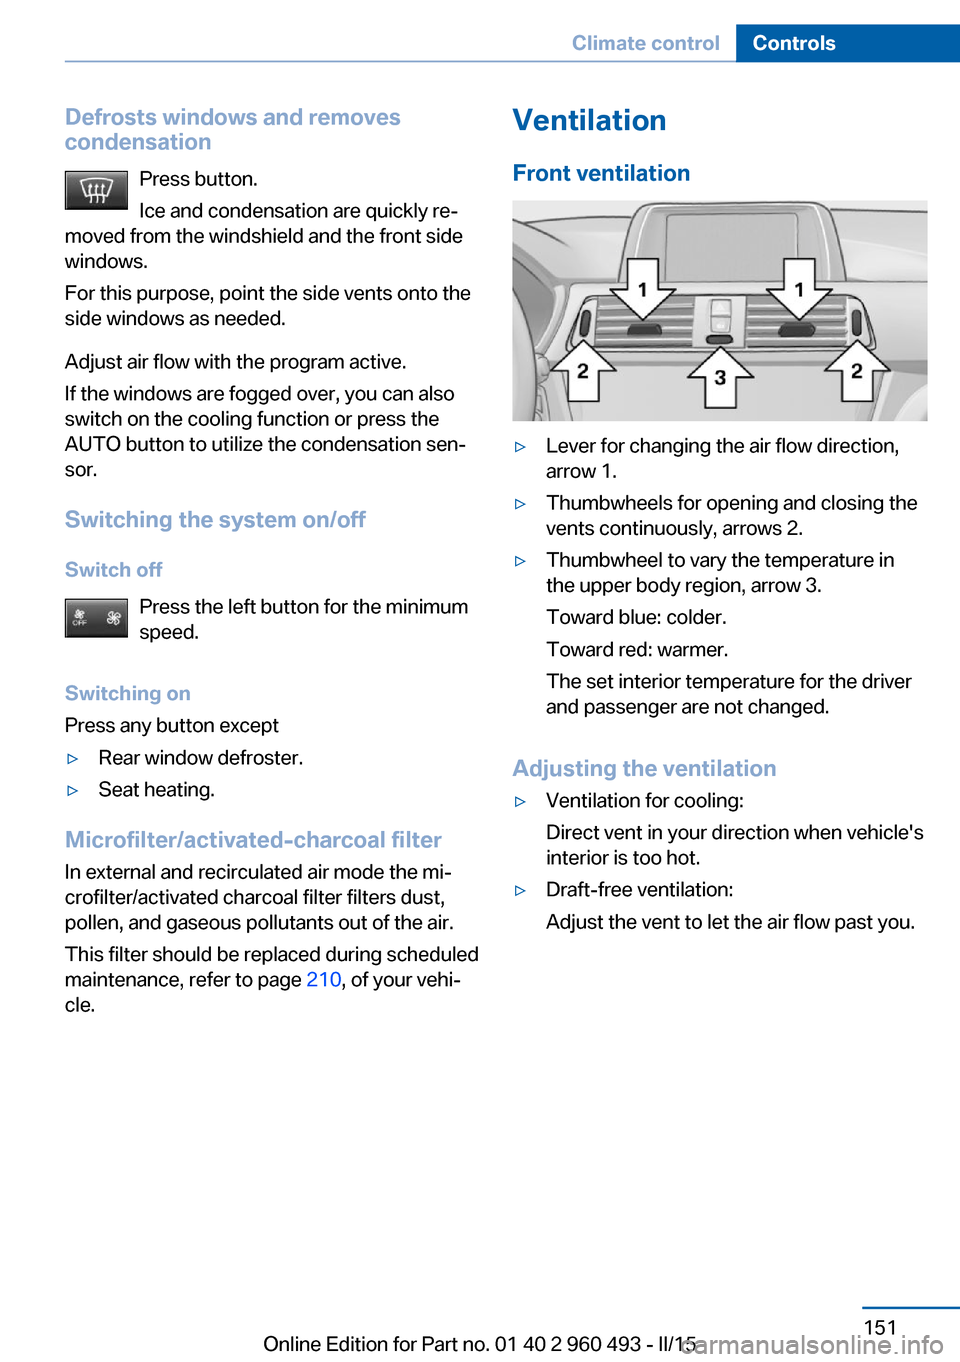
Front ventilation▷Lever for changing the air flow direction,
arrow 1.▷Thumbwheels for opening and closing the
vents continuously, arrows 2.▷Thumbwheel to vary the temperature in
the upper body region, arrow 3.
Toward blue: colder.
Toward red: warmer.
The set interior temperature for the driver
and passenger are not changed.
Adjusting the ventilation
▷Ventilation for cooling:
Direct vent in your direction when vehicle's
interior is too hot.▷Draft-free ventilation:
Adjust the vent to let the air flow past you.Seite 151Climate controlControls151
Online Edition for Part no. 01 40 2 960 493 - II/15
Page 164 of 255
Tilting
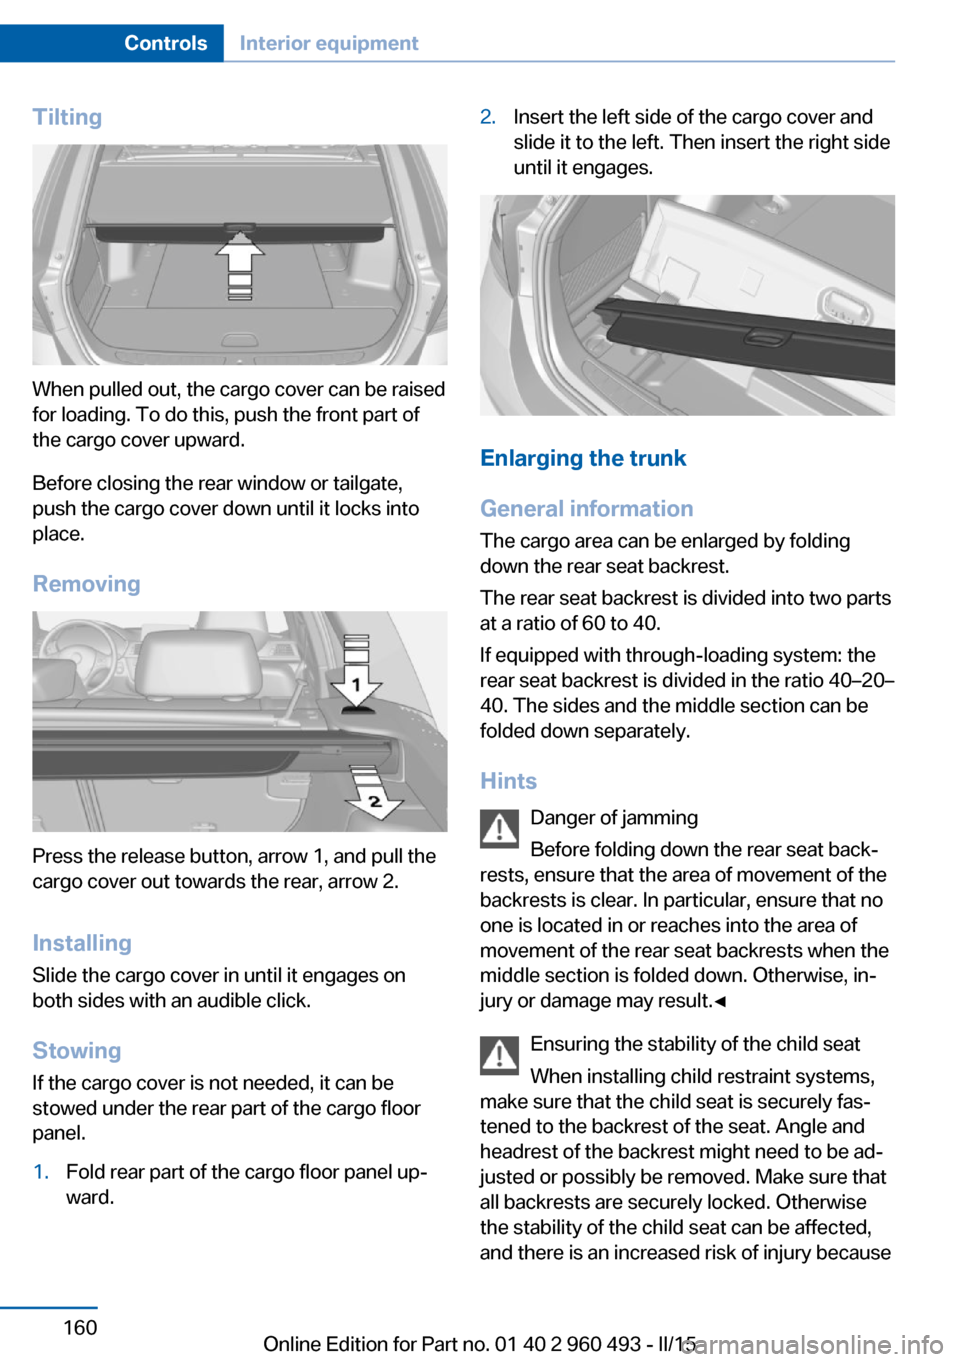
When pulled out, the cargo cover can be raised
for loading. To do this, push the front part of
the cargo cover upward.
Before closing the rear window or tailgate,
push the cargo cover down until it locks into
place.
Removing
Press the release button, arrow 1, and pull the
cargo cover out towards the rear, arrow 2.
Installing Slide the cargo cover in until it engages on
both sides with an audible click.
Stowing
If the cargo cover is not needed, it can be
stowed under the rear part of the cargo floor
panel.
1.Fold rear part of the cargo floor panel up‐
ward.2.Insert the left side of the cargo cover and
slide it to the left. Then insert the right side
until it engages.
Enlarging the trunk
General information
The cargo area can be enlarged by folding
down the rear seat backrest.
The rear seat backrest is divided into two parts
at a ratio of 60 to 40.
If equipped with through-loading system: the
rear seat backrest is divided in the ratio 40–20–
40. The sides and the middle section can be
folded down separately.
Hints Danger of jamming
Before folding down the rear seat back‐
rests, ensure that the area of movement of the
backrests is clear. In particular, ensure that no
one is located in or reaches into the area of
movement of the rear seat backrests when the
middle section is folded down. Otherwise, in‐
jury or damage may result.◀
Ensuring the stability of the child seat
When installing child restraint systems,
make sure that the child seat is securely fas‐
tened to the backrest of the seat. Angle and
headrest of the backrest might need to be ad‐
justed or possibly be removed. Make sure that
all backrests are securely locked. Otherwise
the stability of the child seat can be affected,
and there is an increased risk of injury because
Seite 160ControlsInterior equipment160
Online Edition for Part no. 01 40 2 960 493 - II/15
Page 165 of 255
of unexpected movement of the seat back‐
rest.◀
Ensure that the lock is securely engaged
When you fold back the backrest make
sure that it locks in place. When this happens
the red warning field on the seat disappears.
Otherwise transported cargo could shoot into
the car's interior during braking or evasive ma‐
neuvers and endanger occupants.◀
Using the middle safety belt
If the middle safety belt in the rear is
used, the larger side of the backrest must be
locked. Otherwise, the safety belt will not have
a restraining effect.◀
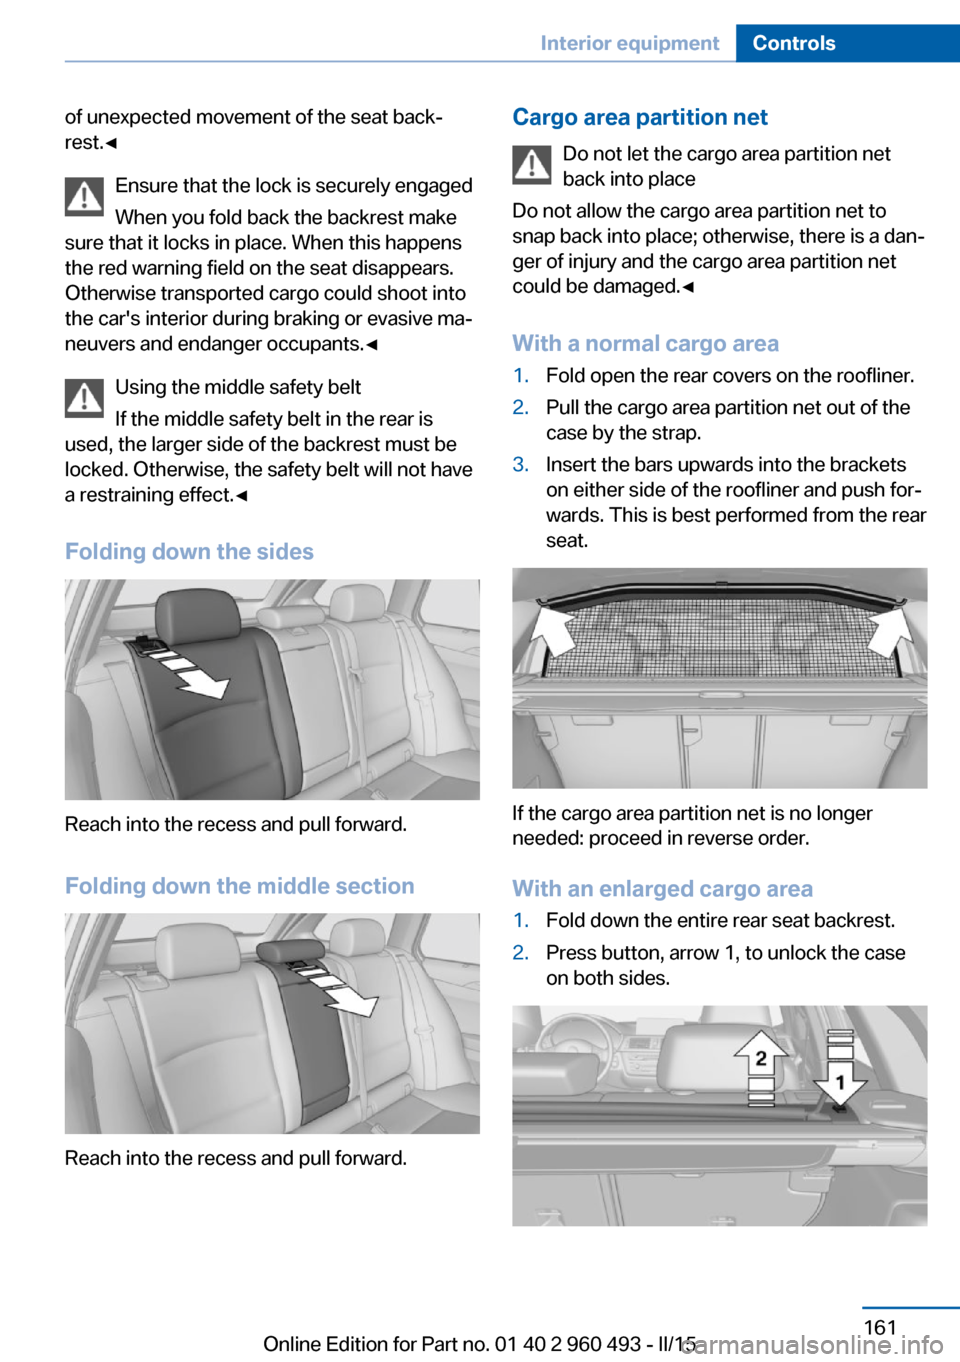
Folding down the sides
Reach into the recess and pull forward.
Folding down the middle section
Reach into the recess and pull forward.
Cargo area partition net Do not let the cargo area partition net
back into place
Do not allow the cargo area partition net to
snap back into place; otherwise, there is a dan‐
ger of injury and the cargo area partition net
could be damaged.◀
With a normal cargo area1.Fold open the rear covers on the roofliner.2.Pull the cargo area partition net out of the
case by the strap.3.Insert the bars upwards into the brackets
on either side of the roofliner and push for‐
wards. This is best performed from the rear
seat.
If the cargo area partition net is no longer
needed: proceed in reverse order.
With an enlarged cargo area
1.Fold down the entire rear seat backrest.2.Press button, arrow 1, to unlock the case
on both sides.Seite 161Interior equipmentControls161
Online Edition for Part no. 01 40 2 960 493 - II/15
Page 167 of 255
Storage compartmentsVehicle features and optionsThis chapter describes all standard, country-
specific and optional features offered with the
series. It also describes features that are not
necessarily available in your car, e. g., due to
the selected options or country versions. This
also applies to safety-related functions and
systems. The respectively applicable country
provisions must be observed when using the
respective features and systems.
Hints No loose objects in the car's interior
Do not stow any objects in the car's inte‐
rior without securing them; otherwise, they
may present a danger to occupants e.g., during
braking and evasive maneuvers.◀
Do not place anti-slip mats on the dash‐
board
Do not place anti-slip mats on the dashboard.
The mat materials could damage the dash‐
board.◀
Storage compartments The following storage compartments are avail‐
able in the vehicle interior:▷Glove compartment on the front passenger
side, refer to page 163.▷Glove compartment on the driver's side,
refer to page 164.▷Without Smoker's package: Front storage
compartment, in front of the cupholders,
refer to page 164.▷Storage compartment in the front center
armrest, refer to page 164.▷Compartments in the doors, refer to
page 164.▷Nets on the backrests of the front seats.▷Storage compartment in the rear center
console, refer to page 165.
Glove compartment
Front passenger side
Note Close the glove compartment again im‐
mediately
Close the glove compartment immediately af‐
ter use while driving; otherwise, injury may oc‐
cur during accidents.◀
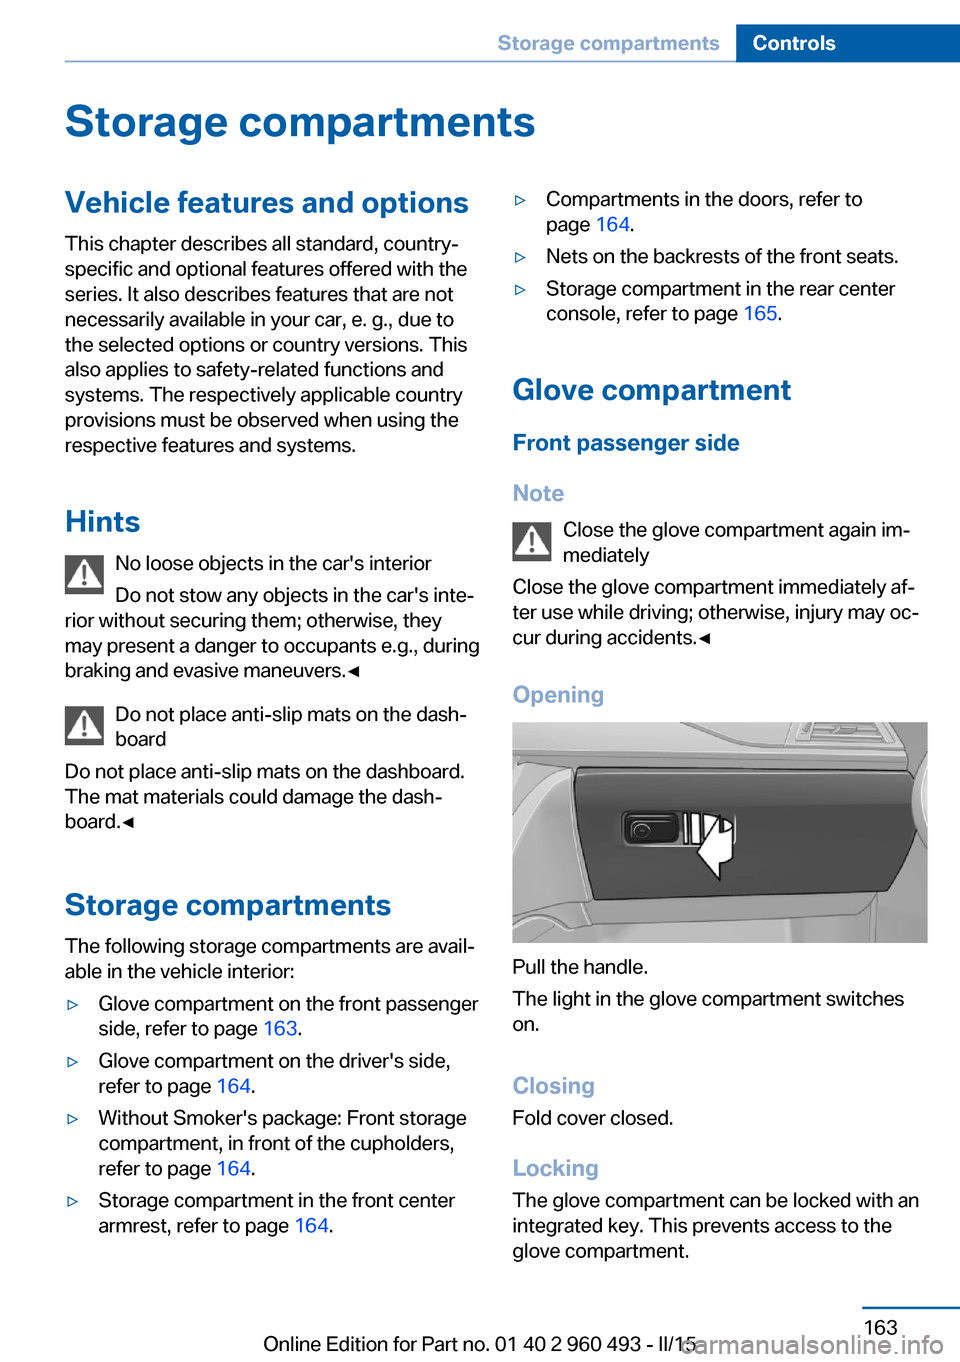
Opening
Pull the handle.
The light in the glove compartment switches
on.
ClosingFold cover closed.
Locking
The glove compartment can be locked with an
integrated key. This prevents access to the
glove compartment.
Seite 163Storage compartmentsControls163
Online Edition for Part no. 01 40 2 960 493 - II/15
Page 170 of 255
Multi-function hook
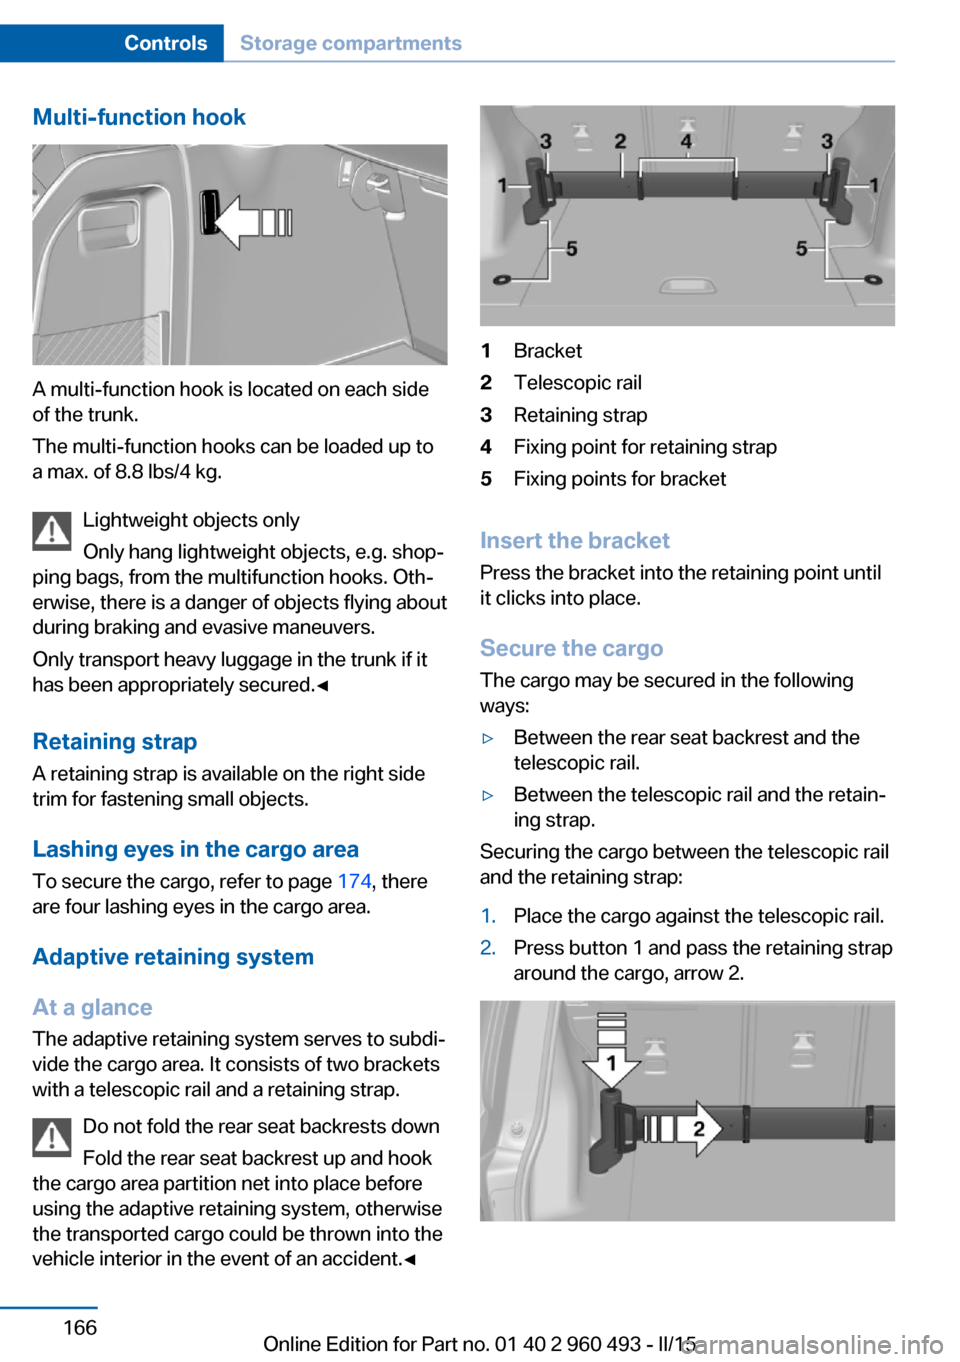
A multi-function hook is located on each side
of the trunk.
The multi-function hooks can be loaded up to
a max. of 8.8 lbs/4 kg.
Lightweight objects only
Only hang lightweight objects, e.g. shop‐
ping bags, from the multifunction hooks. Oth‐
erwise, there is a danger of objects flying about
during braking and evasive maneuvers.
Only transport heavy luggage in the trunk if it
has been appropriately secured.◀
Retaining strap A retaining strap is available on the right side
trim for fastening small objects.
Lashing eyes in the cargo area
To secure the cargo, refer to page 174, there
are four lashing eyes in the cargo area.
Adaptive retaining system
At a glance The adaptive retaining system serves to subdi‐
vide the cargo area. It consists of two brackets
with a telescopic rail and a retaining strap.
Do not fold the rear seat backrests down
Fold the rear seat backrest up and hook
the cargo area partition net into place before
using the adaptive retaining system, otherwise
the transported cargo could be thrown into the
vehicle interior in the event of an accident.◀
1Bracket2Telescopic rail3Retaining strap4Fixing point for retaining strap5Fixing points for bracket
Insert the bracket
Press the bracket into the retaining point until
it clicks into place.
Secure the cargo
The cargo may be secured in the following
ways:
▷Between the rear seat backrest and the
telescopic rail.▷Between the telescopic rail and the retain‐
ing strap.
Securing the cargo between the telescopic rail
and the retaining strap:
1.Place the cargo against the telescopic rail.2.Press button 1 and pass the retaining strap
around the cargo, arrow 2.Seite 166ControlsStorage compartments166
Online Edition for Part no. 01 40 2 960 493 - II/15