2016 AUDI Q5 254
[x] Cancel search: 254Page 5 of 300

.... N
co
er::
co
....
Driving safety . . . . . . . . . . . . . . . . . . . . 134
Basics . . . . . . . . . . . . . . . . . . . . . . . . . . . . . 134
Correct passenger seating positions . . . . . 135
Pedal area . . . . . . . . . . . . . . . . . . . . . . . . . . 138
Storing cargo correct ly . . . . . . . . . . . . . . . 139
Repo rt ing Safety Defects . . . . . . . . . . . . . . 14 1
Safety belts . . . . . . . . . . . . . . . . . . . . . . 143
Ge ne ral information . . . . . . . . . . . . . . . . . 143
Why use safety belts? . . . . . . . . . . . . . . . . 144
S afety belts . . . . . . . . . . . . . . . . . . . . . . . . 14 6
Bel t tensione rs . . . . . . . . . . . . . . . . . . . . . . 14 9
Airbag system .......... .... ... .. . 15 1
I mportant info rm ation . . . . . . . . . . . . . . . 151
Fr on t air bags . . . . . . . . . . . . . . . . . . . . . . . 155
M oni toring the A dvanced Airbag Sys tem . 16 1
Side airbags . . . . . . . . . . . . . . . . . . . . . . . . 165
Side curtain airbags . . . . . . . . . . . . . . . . . . 168
Child safety . . . . . . . . . . . . . . . . . . . . . . 171
Important information . . . . . . . . . . . . . . . 17 1
Ch ild seats . .. ............... .. .... . 17 6
Secur ing child seats . . . . . . . . . . . . . . . . . . 180
LATCH system (Lower anchorages and
tethers for children) . . . . . . . . . . . . . . . . . 183
Addit ional information 188
Driver messages . . . . . . . . . . . . . . . . . 189
Intelligent Technology . . . . . . . . . . 189
Not ice about data reco rded by the Event
D ata Recorde r and vehicle control
mod ules . . . . . . . . . . . . . . . . . . . . . . . . . . . 189
E lectronic Stabilization Con trol ( ESC) . . . . 190
Braking . . . . . . . . . . . . . . . . . . . . . . . . . . . . 192
Elect romechanica l power assist, Dynam ic
steering . . . . . . . . . . . . . . . . . . . . . . . . . . . 194
Driving w ith your quattro . . . . . . . . . . . . . 194
Energy management . . . . . . . . . . . . . . . . . 195
Driving and the environment . . . . 197
Breaking in . . . . . . . . . . . . . . . . . . . . . . . . . 197
Cata lytic converte r . . . . . . . . . . . . . . . . . . . 197
D iese l part icu late filter . . . . . . . . . . . . . . . 198
Avoid damagi ng the vehicle . . . . . . . . . . . 198
E conomical and environmentally-fr iendly
driving . . . . . . . . . . . . . . . . . . . . . . . . . . . . 198
Table of contents
Offroad driving . . . . . . . . . . . . . . . . . . .
201
Driving under diffic ult con ditions and off -
road . . . . . . . . . . . . . . . . . . . . . . . . . . . . . . 201
Trailer mode . . . . . . . . . . . . . . . . . . . . . 203
Driving with a trai ler . . . . . . . . . . . . . . . . . 203
Trailer mode notes . . . . . . . . . . . . . . . . . . . 205
Operating instructions . . . . . . . . . . . 207
Care and cleaning . . . . . . . . . . . . . . . . 207
Genera l information . . . . . . . . . . . . . . . . . 207
Car washes . . . . . . . . . . . . . . . . . . . . . . . . . 207
Cleaning and care informat ion . . . . . . . . . 208
Plac ing your vehicle out of serv ice . . . . . . 211
Fuel and Refueling ............... 212
Fuel ......... ...................... 212
Refue ling . . . . . . . . . . . . . . . . . . . . . . . . . . 214
Se lective cata lytic red uction (AdBlue) 217
Checking and Filling . . . . . . . . . . . . . 220
Hood . . . . . . . . . . . . . . . . . . . . . . . . . . . . . . 220
En gine compartment . . . . . . . . . . . . . . . . . 22 2
En gine oi l . . . . . . . . . . . . . . . . . . . . . . . . . . 2 22
Cooling sys tem . . . . . . . . . . . . . . . . . . . . . . 2 26
Brake fl uid . . . . . . . . . . . . . . . . . . . . . . . . . 228
Battery . . . . . . . . . . . . . . . . . . . . . . . . . . . . 229
Windsh ield/headlight washer container 233
Wheels .. .. .. .. .. ... .. ..... ... .. .. 234
Wheels and Tires . . . . . . . . . . . . . . . . . . . . 234
Tire p ressure mon itoring system
251
Do It Yourself . . . . . . . . . . . . . . . . . . . . 254
Emergency assistance . . . . . . . . . . . 254
Vehicle jack, vehicle tool kit and
collapsib le spare tire . . . . . . . . . . . . . . . . . 254
T ire mobility kit . . . . . . . . . . . . . . . . . . . . . 257
Replacing w heels . . . . . . . . . . . . . . . . . . . . 259
Fuses and bulbs . . . . . . . . . . . . . . . . . . 265
Fuses . . . . . . . . . . . . . . . . . . . . . . . . . . . . . . 265
B ulbs. . . . . . . . . . . . . . . . . . . . . . . . . . . . . . 268
Emergency situations . . . . . . . . . . . . 270
Genera l . . . . . . . . . . . . . . . . . . . . . . . . . . . . 270
Start ing by p ushi ng o r tow ing . . . . . . . . . . 270
Sta rt ing wi th ju mpe r cab les . . . . . . . . . . . 270
3
Page 106 of 300

Hybrid
@ Tips
The Energy flow display will not shown in the MMI display when the reverse gear is engag-
ed, due to safety reasons.
Consumption display
App lies to veh icles: w ith hybrid drive
Fig. 114 MMI disp lay : co nsum ption display
The consumption display shows the average en
ergy consumption and the recuperation quantity
in 5 minute intervals .
Calling up the consumption display
• Select : I MENU I function button> Hybrid control
button .
• Turn the control knob counter -clockwise.
Resetting the consumption display
• Select : I MENU I function button > Hybrid control
button.
• Turn the control knob to
Reset consumption
statistics.
The orange bars show the average consumption
and the green bars show the recuperation quanti
ty . Each bar represents a measured 5 minute in
terval. The display covers a
60 minute time peri
od .
The bar with the white border on the outer right shows the current average consumption or the
current recuperation quantity. After 5 minutes,
this bar travels a step to the left and a new bar
appears in the outer right.
The filled bars show the values for the current
drive cycle. Once the ignition is switched off and
on again, all of the previous bars are displayed as
104
not filled and new filled bars appear on the right.
This is so that the values from the previous trips
and the current trip can be compared visually .
Vehicle tool kit and tire repair set
Applies to vehicles: with hybrid drive
Fig. 115 Luggage compartmen t: v ehicle tool bag and tir e
repair set
The vehicle tool kit is found under a cover in the
cargo floor~
fig. 115 @. The tire repair set (Tire
Mobility System) is found in the storage com
partment in the right side trim panel @.
Additional information about the vehicle tool kit
may be found under~
page 254 and about the
tire repair set under
~page 257 .
@ Tips
The right storage compartment in the lug
gage compartment and its contents must al
ways be kept in the vehicle. The vehicle must
not be operated without the tire repair set .
Charging the batteries
Applies to vehicles: with hybrid drive
The vehicle is equipped with two 12 volt batteries
and a high voltage battery.
If the 12 volt batteries are dead , they may be
charged with a charger or the vehicle may be
jump started with assistance from another vehi
cle in the same way as a conventional vehicle.
The same applies to the high voltage battery if it
is discharged. However, in this case, the charging
process is accompanied with messages in the in
strument cluster display. The ignition must be
switched on and all unnecessary electric compo- nents must be turned off. ..,.
Page 176 of 300

Child safet y
Model Manufactured on or
after
Cosco Summit Deluxe September 25, 2007
High Back Booster
22-262
Cosco High Back Boos -
September 25, 200 7
ter 22-209
Evenflo Tribute V September 25, 2007
379xxxx
Evenflo Medallion 254 December 1, 1999
E venflo Generations September 25, 200 7
352xxxx
Graco ComfortSport September 25, 2007
Graco Toddler Safety Sep tember 25, 200 7
Seat Step 2
Graco P latinum Cargo September 25, 2007
,& WARNING
T o red uce the risk of serio us i njur y, m ake s ure
t ha t the
PASSENGER AIR BAG OFF lig ht
comes o n and stays on wheneve r a child re
straint is installed on the front passenger seat
and the ignition is sw itche d on.
- Take the ch ild rest raint off the front passen
ger seat and insta ll it p roperly at one of the
rear seat positions if the
PASSENGER AIR
BAG OFF
light does not stay on.
- Have the airbag system inspecte d by your
autho rized Aud i dealer immediately.
(D Tips
The ch ild seats listed in catego ries A to C have
been statica lly tested by Au di only for the Ad
vanced Airbag function.
Important safety instructions for using
child safety seats
Correct use of child safety seats substantially re
duces the risk of injury in on occident!
As the driver, you are respons ible for the safety
of everybody in the vehicle, especially chi ldren:
... Always use the r ight chi ld safety seat for each
c h ild and a lways use it properly ¢
page 176.
174 ...
Always carefully follow the chi ld safety seat
manufact urer 's instructions on how to route
the sa fety be lt properly thro ugh the ch ild safe
ty seat.
... When using the vehicle safety belt to install a
child safety seat, you must first act ivate the
convertib le lock ing retracto r o n the safety belt
to prevent the chi ld safety seat from moving
¢ page 180.
... Push the ch ild sa fety sea t down wi th yo ur fu ll
weigh t to get the safety belt rea lly tight so tha t
the seat cannot move forward or sideways
more than one inch (2 .5 cm).
... If a strap or tether is being used to tie the child
safety seat to the front passenge r seat, make
sure that it is not so tight t hat it causes the
weight -sensing mat to measure more weight
t han is actually o n the seat .
... Secu re unused safety belts on the rear s eat
¢ page 176.
Always remember : Even though your veh icle is
equipped wi th an Advanced Airbag system, all
c hi ld ren, especially those 12 yea rs and you nger,
s h ould always ride in th e back sea t proper ly re
strained for their age and s ize.
,& WARNING
-
Not usin g a child sa fe ty seat, us ing t he wrong
c h ild safety seat or imprope rly installing a
chi ld restraint inc reases t he risk of serious
personal injury and death.
- All vehicle occupants and es pecially children
m ust always be restra ined properly whenev
er riding in a vehicle.
- An unrestra ined o r imprope rly restrained
c h ild ca n be injured or killed by bei ng
t h rown ag ai nst the inside of the vehicle or
b y being ejected from it durin g a sudden
maneuver o r impact.
- An unrestra ine d or i mprope rly restrained
ch ild is at much g reater risk of injury or
death by being struck by an inflating air
bag .
- Commerc ia lly available child safety seats
are required to comply with U.S. Federal
Motor Vehicle Safety Standard (FMVSS) 213
(in Canada C MVSS 213). ...
Page 256 of 300
Emerg ency assis ta nce
Emergency assistance
Vehicle jack, vehicle tool kit and collapsible spare
tire
Onboard tool kit and vehicle jack
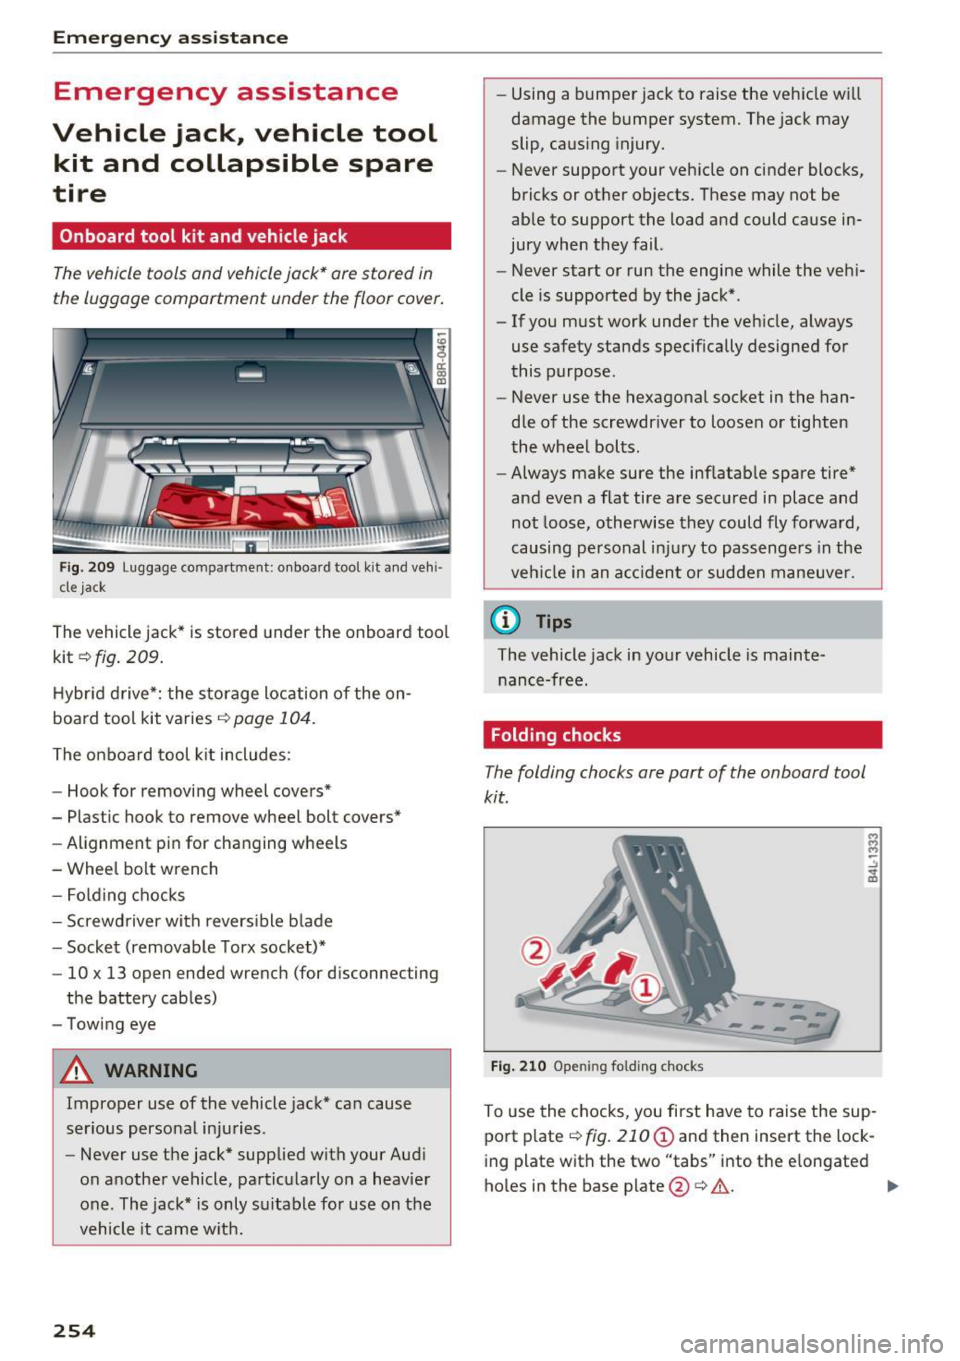
The vehicle tools and vehicle jock* ore stored in
the luggage comportment under the floor cover.
Fig. 209 Luggage compartment: on board tool kit and vehi
cle jack
The vehicle jack* is stored under the onboard tool
kit ¢ fig. 209.
Hybr id d rive*: the storage location of the on
board tool kit varies ¢ page 104.
The onboard tool k it includes:
- Hook for removing wheel covers*
- Plastic hook to
remove wheel bolt covers*
-Alignment pin for changing wheels
- Wheel bolt wrench
- Folding chocks
- Screwdriver with revers ible blade
- Socket (removable Torx socket)*
- 10 x 13 open ended wrench (for disconnecting
the battery cables)
- Towing eye
A WARNING
Improper use of the vehicle jack* can cause
ser ious personal injuries.
- Never use the jack* supplied with your Aud i
on another vehicle, particularly on a heavier
one. The jack* is only su itable for use on the
vehicle it came w ith.
254 -
Using a bumper jack to raise the vehicle will
damage the bumper system. The jack may
slip, caus ing injury.
- Never support your vehicle on cinder blocks,
bricks or other objects. These may not be
able to support the load and could cause in
jury when they fail.
- Never start or run the engine while the vehi
cle is supported by the jack* .
- If you must work under the vehicle, always
use safety stands specifically designed for
this purpose .
- Never use the hexagonal socket in the han
dle of the screwdr iver to loosen or tighten
the wheel bolts .
- Always make sure the inflatable spare tire*
and
even a flat tire are secu red in place and
not loose, otherwise they could fly forward,
causing personal inj ury to passenge rs in the
vehi cle in an a cc ident or sudden maneuve r.
@ Tips
The vehicle jack in your vehicle is mainte
nance-free.
Folding chocks
The folding chocks ore port of the on board tool
kit .
---
Fig . 210 Open ing fo lding chocks
To use the chocks, you fi rst have to raise the sup
port plate
¢ fig. 210 (D and then insert the lock
ing plate with the two "tabs" into the elongated
holes in the base plate
@ c> &.. .,,_
Page 261 of 300

,....,
N
co
er::
co
,....,
Special care is required if you are repairing
the tire on a steep incline.
@ Tips
- Do not operate the compressor for more
than 12 minutes continuously, otherwise it
can overheat. Once the compressor has
cooled, you can continue to use it.
- If sealant has spi lled out, let it dry and then
you can remove it by peeling it away like a
foil.
- Remember to obtain a new bott le of sealant
from your authorized Audi dealer after re
pair ing a tire. After this, the functionality of
the tire repair set is restored .
- Obey all laws.
Replacing wheels
Before changing a wheel
Observe the following precautions for your own
and your passenger's safety when changing a
wheel.
""After you experience a tire failure, pull the car
well away from moving traff ic and try to reach
level ground before you stop¢_& .
.. All passengers sho uld
leave the car and move
to a safe location (fo r instance, behind the
guardrai l) ¢ .&_ .
.. Engage the
par king b rake to prevent yo ur vehi
cle from roll ing unintentionally ¢&_ .
.. Move
selecto r le ver to po sitio n P ¢ &_ .
"" If you are towing a trailer: unh itch the trailer
from your veh icle.
"" Block the diagonally opposite wheel with the
folding chocks o r other objects .
""T ake the
jac k* and the inflatable spa re tir e*
out of the luggage compartment ¢ page 254 .
A WARNING
You or your passengers cou ld be inj ured while
changing a wheel if you do not follow these
safety precautions:
- If you have a flat tire, move a safe distance
off the road. Turn off the engine, turn the
Em ergenc y ass is tanc e
emergency flashers on and use other wa rn
ing dev ices to alert other motorists.
- Make sure that passengers wait in a safe
place away from the vehicle and well away
from the road and traff ic.
- To help prevent the veh icle from moving
suddenly and possib ly slipping off the jack*,
always fully set the parking brake and block
the wheel diagonally opposite the wheel be i n g changed with the fold ing c hocks or oth
er objects . When one front whee l is lifted
off the ground, placing the Automatic
Transmission in P (Park) w ill
not prevent the
veh icle from moving.
- Before you change a wheel, be sure the
gro und is leve l and firm.
If necessary, use a
sturdy board under the jack*.
- Always s tore the vehicle too l kit, the jack*
and the replaced tire in the lugg age com
partment
¢ page 139.
Changing a wheel
When you change a wheel, follow the sequence
described below s tep-by -step and in exactly that
order.
1. Remove the de corative wheel cover* . For
more detai ls see also¢
page 260, Decaro-
tive wheel covers
o r¢ page 260, Wheels
with wheel bolt cops .
2. Loosen the w
heel bolt s ¢ page 260.
3 . Locate the proper mounting point for the
jack* and align the jack* below that point
¢ page 261.
4. Li ft the car with the jack*¢ page 261 .
s. Remove the wheel with th e flat tire and then
insta ll the
inflatable spar e tir e *
¢ page 262.
6. Tighte n all whee l bolts lightly.
7 .
Lo wer the vehicle wi th the jack *.
8 . Use the whee
l bolt wrench and
firml y tighten
all wheel bo lts ¢
page 260 .
9. Replace the decorat ive wheel co ver* .
259
...
Page 274 of 300

Emergency situations
-When connecting jumper cables, make sure
that they cannot get caught in any moving
parts in the engine compartment.
- Do not bend over the batteries -danger of
chemical burns!
- The battery cell locking screws must be
tightened securely.
- Before you check anything in the engine
compartment, always read and heed all
WARNINGS
c> page 220.
(D Note
Improper hook-up of jumper cables can ruin
the generator .
- Always connect POSITIVE(+) to POSITIVE
(+), and NEGATIVE(-) to NEGATIVE(-)
ground post of the battery manager control
unit.
- Check that all screw p lugs on the battery
cells are screwed in firmly. If not, tighten
plugs prior to connect ing clamp on negative
battery terminal.
- Please note that the procedure for connect
i ng a jumper cable as described above ap
plies specifically to the case of your vehicle
being jump started . When you are giving a
ju mp start to another vehicle , do
not con
nect the negative (-) cable to the negative
(-) terminal on the discharged batte ry @
c> fig. 228. Instead, securely connect the
negative( -) cab le to either a solid metal
component that is firm ly bolted to the en
gine block or to the engine block itself. If
the battery that is being charged does not
vent to the outside, escap ing battery gas
could ignite and explode !
Towing with a tow truck
General hints
Your Audi requires special handling for towing.
The following information is to be used by com
mercial tow truck operators who know how to op
erate the ir equipment safely.
-Never tow your Audi, towing will cause dam
age to the engine and transmission.
272
-Never wrap the safety chains or winch cables
around the brake lines .
- To prevent unnecessary damage, your Audi
must be transported with a flat bed truck .
- To load the vehicle on to the flat bed, use the
towing loop found in the vehicle tools and at
tach to the front or rear anchorage
i:>pag e 272 and i:> page 273.
A WARNING
A vehicle being towed is not safe for passen
gers . Never allow anyone to ride in a vehicle
being towed, for any reason.
Front towing loop
Do not install the front towing loop until it is
needed.
Fig. 229 Front bumper : remov ing the cover cap
Fig. 230 Front bumper: s crew ing in t he towing loop
The towing loop fits into the threaded hole locat
ed on the right side o f the front bumper and cov
ered by a cover when not in use.
.,. Remove the towing loop from the vehicle tool
kit
c> page 254 .
.,. Carefully remove the cove r c> fig. 229.
.,. Screw the towing loop tightly into the threaded
hole as far as it will go
c> fig. 230. Ill>
Page 275 of 300

..... N
co ~ CX)
..... I.Cl U"I
..... I.Cl .....
When it is no longer needed, unscrew the towing
loop and put it back into the vehicle toolkit. Be
sure to have the towing loop stored in the vehicle
at all times.
When r e-installing the cover be sure to first in
sert the tabs on the cover into the retainers near
the radiator grille. Then install the other side of
the cover and push it into the retainers
¢fig. 229.
The appearance of the cover varies from the i llus
tration for some model vers ions.
.&_ WARNING
If the towing loop is not screwed in as far as it
will go, the thread can pull out when the vehi
cle is towed -potential risk of an accident.
(D Note
The cover is attached to the bumper with sev
eral hooks. Do not use excessive force when
removing the cover to avoid damag ing it.
Rear towing loop
On vehicles without a factory-installed trailer
hitch*, the threaded hole for the towing loop is
on the right side of the rear bumper.
Fig. 231 Rear bumper: Cover
Emergency situations
Fig. 232 Rear bumper: Screw ing in towing loop
Vehicles with a towing loop
.,. Remove the towing loop from the vehicle tool
kit
c;, page 254.
.,. Press the cover in by applying short stro ng
press ure to release it from the bumper
¢fig. 231 .
.,. Screw the towing loop tightly into the threaded
hole as far as it will go
c;, fig. 232.
Vehicles with a trailer hitch*
.,. Insta ll the trailer hitch.
.,. Atta ch the towing bar or the towing cable to
the trailer hitch.
Unscrew the towing loop again after use and in
stall the cover in the bumper . Ret urn the towing
loop to the vehicle toolkit. Be sure to have the
towing loop stored in the vehicle at all times.
A WARNING
-If the towing loop is not screwed in as far as
it will go, the thread can pull out when the
vehicle is towed - potential risk of an acci
dent.
- If your vehicle has a
trailer hitch* only use a
special towing bar to prevent damaging the
ball hitch. These tow ing bars have been spe
cially designed for trailer tow ing hitches.
- If your vehicle has a
trailer hitch* use only
special towing cables .
273
Page 291 of 300

.... N
co
er::
co
....
Folding chocks . . . . . . . . . . . . . . . . . . . . . . . 254
Folding the rear seat forward .... .. .. . 69, 70
F oo t pedals . . . . . . . . . . . . . . . . . . . . . . . . . . 138
For the sake of the environment Environme ntally-fr iendly driv ing . . . . . . . 198
Gasoline fumes and the environment. .. . 215
L ett ing t he engine warm up . . . . . . . . . 84, 87
Reduc ing engine noise by early upshifting . 11
Refueling . ... .... .. .... ... .. .. .... . 215
Saving fuel by ear ly upshifting . . . . . . . . . . 11
F ront ai rbags
D escr ip ti on . . . . . . . . . . . . . . . . . . . . . . . . . 155
H owt heywo rk ............... .. .... . 159
Frontal coll is ions and the laws of phys ics . . 144
F ront ashtray . . . . . . . . . . . . . . . . . . . . . . . . . 76
Fr on t seats
A dju sting 136
C hild restraints in the front seat . . . . . . . . 152
Fuel Addit ives. ................ ...... ... . 212
Bl ended gasoline .. .. .... ... .. .. .. .. . 212
Consumption . . . . . . . . . . . . . . . . . . . . . . . . 2 2
Fill ern eck .. .. ............... .. .. .. . 214
Fu el g auge . . . . . . . . . . . . . . . . . . . . . . . . . . 12
Gasoline additives . . . . . . . . . . . . . . . . . . . 214
Octane rat ing ... ... . .... ... .. .. .... . 212
Recommendat ion............. .. .... . 212
Refuelling .. .. .. ........... .. .. .... . 215
Reserve . . . . . . . . . . . . . . . . . . . . . . . . . . . . . 12
Savi ng fuel . . . . . . . . . . . . . . . . . . . . . . . . . 198
Tank capac ity . . . . . . . . . . . . . . . . . . . . . . . 277
Un loc king t he fue l filler flap by ha nd ... . 216
Fue l economy messages (effic iency p rogram) .25
F ue l filler f lap
Un loc king the fue l filler flap by ha nd ... . 2 16
Fue l supp ly too low . . . . . . . . . . . . . . . . . . . . 33
Fuses Assignment . . . . . . . . . . . . . . . . . . . . . . . . 266
Replac ing . . . . . . . . . . . . . . . . . . . . . . . . . . 265
G
Garage doo r opener (Home link) . . . . . . . . . . 48
Gas dis char ge la mps . . . . . . . . . . . . . . . . . . . 268
Index
Gauges
Engine coolant temperat ure . . . . . . . . . . . . 10
Fuel gauge . . . . . . . . . . . . . . . . . . . . . . . . . . 12
Tachometer . . . . . . . . . . . . . . . . . . . . . . . . . 11
Gener al illustr ation
Instr uments and contro ls . . . . . . . . . . . . . . . 8
Genera l ru les and driving t ips ........... 201
Befo re dr iv ing offroad . . . . . . . . . . . . . . . . 201
D riv ing off road . . . . . . . . . . . . . . . . . . . . . . 201
G lossary of t ire and loading terminology . . 236
G love compartment . . . . . . . . . . . . . . . . . . . . 78
Cooling box . . . . . . . . . . . . . . . . . . . . . . . . . 78
G low p lug sys tem
Indicator lig ht . . . . . . . . . . . . . . . . . . . . . . . 15
GPS controlled clock . . . . . . . . . . . . . . . . . . . . 12
Gradient ang le . .. ... .... . ..... ... .. . .
G ross Ve hicle Weight Rating (GVWR) ... . .
Ground clearance
H
Head lights 201
2
76
201
Adaptive light . . . . . . . . . . . . . . . . . . . . . . . . 54
Cleaning . . . . . . . . . . . . . . . . . . . . . . . . . . . 208
Fog lights . . . . . . . . . . . . . . . . . . . . . . . . . . . 53
Head light range cont rol defective . . . . . . . 34
Left hand d rive, right ha nd drive . . . . . . . . . 54
Rear fog lights . . . . . . . . . . . . . . . . . . . . . . . 53
T ravel mode . . . . . . . . . . . . . . . . . . . . . . . . . 54
Washer reservoi r . . . . . . . . . . . . . . . . . . . . 233
Washer sys tem . . . . . . . . . . . . . . . . . . . . . . 5 7
H ead restraints . . . . . . . . . . . . . . . . . . . . . . . 13 7
Adjust ing . . . . . . . . . . . . . . . . . . . . . . . . . . 137
F ront sea ts . . . . . . . . . . . . . . . . . . . . . . . . . . 67
Rear seats . . . . . . . . . . . . . . . . . . . . . . . . . . . 67
Heated (upholder . . . . . . . . . . . . . . . . . . . . . . . . . . . 75
E . . xtenor mirro rs . . . . . . . . . . . . . . . . . . . . . . 59
Rear w indow. . . . . . . . . . . . . . . . . . . . . . . . . 82
S eats . . . . . . . . . . . . . . . . . . . . . . . . . . . . . . . 82
Washer fluid nozz les . . . . . . . . . . . . . . . . . . 5 7
Heating . . . . . . . . . . . . . . . . . . . . . . . . . . . . . . 80
Heavy cloth ing and safety be lts . . . . . . . . . . 145
Hig h beam . . . . . . . . . . . . . . . . . . . . . . . . . . . . 55
War ning/ indica to r li gh ts . . . . . . . . . . . . . . . 1 7
High voltage warning label . . . . . . . . . . . . . 276
Hill descent assist . . . . . . . . . . . . . . . . . . . . . 192
289