2016 AUDI A6 cup
[x] Cancel search: cupPage 27 of 294

.... N
0 CJ '
-Short-term memory overview
- Long-term memory overview
The short-term memory collects driving informa
tion from the time the ignition is sw itched on un
til it is switched off. If you cont inue driv ing with
in two hours after switching the ignition off, the
new values are included when calculat ing the cur
rent trip information.
Unlike the short-term memory , the long-term
memory is not erased automat ically. Yo u can se
lect the time period for evaluat ing trip informa
tion you rself .
F or some vehicle functions , you can access the
trip informat ion from the temporary memory in
the line
(D .
Fuel consumption
The current fuel consumption can be displayed
using a bar ~
fig. 8. The average consumpt ion
(mpg) stored in the short-term memory is also
displayed . When the bar turns green, your veh icle
saves fuel by one of the following functions:
-Recuperation : When the vehicle is coasting or
driving downhill, electrical ene rgy can be stor
ed in the battery. The bar will move toward D.
-Cylinder on demand System*: when the de
ma nd for power is low and other conditions are
met, the engine automatically de activates fo ur
cylinders. The driver and passengers w ill not
even notice this. The cylinders switch on again
when more power is needed.
(D Tips
Fue l consumptions (average and current),
range and speed are displayed in metric units
on Canadian models.
Instruments and indicator lights
Efficiency program
Applies to vehicles: with efficiency program
Fig. 9 In st rum en t cluster : Ot her con sum ers
Fig. 10 Instrume nt cl uste r: economy tip
The efficiency program can help you to use less
fuel. It shows other consumers that are using
fuel and economy tips give advice on how to drive
efficiently . T he eff iciency program receives dis
tance and consumption data from the on-board
computer.
To display the efficiency program, open the
Vehi
cle functions
menu and select the Efficiency pro
gram
menu item.
Other consumers
The Energy usage view lists other equipment
that is currently affecting fuel consumption . The
display shows up to three other consumers @
~ fig. 9. The equipment using the most fuel is
listed first. If more than th ree items using fuel
are switched on, the eq uipment that is currently
using the most fuel is displayed .
A scale @also shows the current total consump-
tion of all other consumers. .,.
25
Page 42 of 294

Opening and closing
Power Windows
Controls
The driver can control all power windows.
Fig. 33 Section of the driver's door: controls
All power window switches are equipped with a
two-stage function :
Opening the windows
• Press the switch to the first stop and hold it un
til the window reaches the desired position.
• To open the w indow completely, press the
switch down to the
second level briefly.
Closing the windows
• Pull the switch to the first stop and hold it until
the window reaches the desired posit ion.
• To close the window completely, pull the
switch up to the
second level briefly.
Power window switches
@ Driver 's door
@ Passenger's door
© Left rear door
@ Right rear door
A WARNING
-Always take the vehicle key with you when
leaving the vehicle, even for a short period
of time. This applies particularly when chil
dren remain in the vehicle. Otherwise they
could start the engine or operate electrical
equipment such as power windows. The
power windows continue to function until
the driver's door or front passenger's door
has been opened .
40
"
-Pay carefu l attention when closing the win
dows. It could cause injury by pinch ing.
- When locking the vehicle from o utside, the
vehicle must be unoccupied since the win
dows can no longer be opened in an emer
gency.
{!) Tips
After turning the ignition off you can still
open and close the windows for approximate
ly 10 seconds . The power windows are not
switched off until the driver's door or front
passenger's door has been opened .
Convenience opening
All of the windows and the sunroof* can be
opened at once .
The settings in the Infotainment system specify
which windows will open.
Convenience opening
• Press and hold the~ button on the remote
control key until the windows reach their de
sired position and the sunroof * is tilted open.
Setting convenience opening in the
Infotainment system
• Select: the I CARI funct ion button > (Car)* Sys
tems
contro l button > Vehicle settings > Cen
tral locking
> Long-press to open windows.
To enable convenience opening of the windows
and the roof *, the
Front windows, Rear windows
and Roof functions must be switched On .
A WARNING
-
For security reasons, the windows and the
sunroof* can only be opened with the remote
control key at a maximum distance of approx
imately 6 feet (2 meters) from the vehicle.
Page 58 of 294

Seats and storage
Armrest
There is a storage compartment under the arm
rest.
Fig. 54 Cockp it: center armrest
Adjusting the armrest
• To adjust the angle, raise the armrest from the
start ing position detent by detent.
• To bring the armrest back into its original posi
tion, lift it above the top position and then fold
it back down.
Opening the storage compartment
• Press the button -arrow- upward.
Please note that the driver's arm movements
may be restricted with the armr est folded down.
For this reason, the armrest should not be folded
down when driving in city traffic.
Head restraints
Front head restraints
Ap plies to veh icles: w ith adjustable head restraints
Heod restraints that are adjusted according to
body size, along with the seat belt, offer effec
tive protection.
F ig. 55 Front seat: Adjust ing the head restraint
56
Adjust the head restraint so the upper edge is as
even as possible with the top of your head. If that
i s not possible, try to adjust the head restraint so
that it is as close to th is position as possible .
Move the head restraint so that it is as close to
the back of the head as possible .
• To move the head restra int up or forward, slide
it until it locks into place.
• To move the head restra int down or back, press
the s ide button -arrow -
c:> fig. 55 and slide the
head restraint until it locks into place .
Refer to
c:> page 128, Proper adjustment of head
restraints
for gu idelines o n how to ad just the
height of the front head restraints to suit the oc
cupant 's body size.
.&_ WARNING
-Driving without head restraints or with head
restraints that are not properly adjusted in
creases the risk of serious or fatal neck in
jury dramatically.
- Read and heed all WARNINGS
<=>page 128,
Proper adjustment of head restraints.
@ Tips
Correctly adjusted head restraints and safety
belts are an extremely effective combination
of safety features.
Page 59 of 294

.... N
0 CJ '
Rear head restraints
Fig. 56 Re ar seat s: Head restra int
•
Fig. 57 Rea r head restra ints: re lease
If there is a passenger on the rear center seating
position, slide the center head restraint upward
at least to the next notch
~ & in Proper adjust
ment of head restraints on page 129.
Adju sting the he ad re straints
• To move the head restraint up, hold it at the
sides with both hands and slide it upward until
you feel it lock into place.
• To move the head restraint down, press the
button -arrow- ¢
fig. 56 and slide the head re
straint downward.
Removing the head re straints
• Move the head restraint upward as far as it can
go .
• Press the release ¢
fig. 57 with the mechanical
key -=>
page 30 and the button -arrow- ¢ fig. 56.
Pull the head restrain t out of the backrest at
t h e same time¢&_ .
Installing th e head re st raints
• Slide the posts on the head restraint down into
the gu ides unti l you feel the posts lock into
pla ce.
Seats and storag e
• Press the button -arrow- -=> fig. 56 and slide the
head restraint all the way down . You shou ld not
be able to pull the head restraint out of the
backrest.
So that the driver can have a better view to the rear, the head restraints should be pushed down
completely when the rear seats are not occupied .
A WARNING
--On ly remove the rear seat head restraints
when necessary in order to install a child seat . Install the head restraint again imme
diately once the child seat is removed. D riv
ing without head restraints or with head re
s tra ints that are not prope rly adjusted in
creases the risk of serious or fat al neck in
jury dramat ica lly.
- Read and heed all WARN INGS
¢page 128 .
Memory function
Description
Applies to vehicles : with memory funct ion
Using the memory function, you can quickly and
easily store a personal seat profile for the driver
and front passenger and recall the sett ings . The
memory funct ion is co ntrol led using the remote
contro l key and the memory buttons i n the dr iv
er's/front passe nger's door* .
The driver's seat prof ile is stored again and as
s igned to the remote control key each t ime the
vehicle is locked. W hen you open the door, the
seat profile is automatically recalled. If two peo
ple use the vehicle , it is recommended that each
person always uses "their own" remote control
key.
T wo seat p rofiles can be stored using the memo
ry bu ttons in the driver 's/front passenger's
doo r*. Once they are stored, these seat prof iles
can be selected at any time .
T he following sett ings are stored :
57
Page 62 of 294

Sea ts and stor age
12 Volt sockets
Applies to veh icles: w ith 12-vo lt socke ts
F ig . 62 Luggage compartment s ide tr im pane l: Socket
F ig . 6 3 Rear center co nsole example: Sockets
• To reach the 12 Vo lt socket in the l uggage com-
partment, push the ne t down .
There are additional 12 Volt socket in the center
console under the center armrest* and in the rear
c:> fig. 63.
The 12-volt sockets can be used for electrical ac
cessories. T he power usage must not exceed
120 watts .
_& WARNING
The sockets and the electrical accesso ries con
nected to them operate only when the igni
t ion is switched on. Incorrect usage can lead
to serious injuries or burns. To reduce the risk
of injuries, never leave chi ldren unattended in
the vehicle with the veh icle key.
(D Note
- To reduce the risk of damage to the vehicle
electr ica l system, never attempt to charge
the ve hicle battery by connecting accesso
ries that provide power, such as solar pane ls
60
or battery chargers, to the 12 Volt sockets
or the cigarette lighter.
- T o reduce the risk of damage to the sockets,
only use plugs that fit correctly .
Storage
(upholder
Fig. 64 Cente r conso le : cu p holder
Fig. 65 Rear center armrest : cupholde r* exte nded
Front cupholder
• To open the cup ho lder, tap the cover ¢ fig. 64.
Rear cupholde r*
• To open the rear cupholder , press on the sym
bol
'i @ c:> fig . 65 .
• To adjust the arm @, sw ing it in the direction
of the arrow .
• Place the beverage in the holder and release
the arm. The arm swings back by itself and au
tomatically secures the beverage.
• To close the rear cupholder, press on the center
sect ion between the two arms and push the cu
pholder in the slot as far as it will go.
_& WARNING
Spilled ho t liquid can cause an accident and
personal injury .
Page 63 of 294
-Never carry any beverage containers with
hot liquids, such as hot coffee or hot tea, in
the vehicle while it is moving. In case of an
accident, sudden braking or other vehicle
movement , hot liquid could spill, causing
scalding burns. Spilled hot liquid can also
cause an accident and personal injury .
- Use only soft cups in the cupholder . Hard
cups and glasses can cause injury in an acci
dent.
- Never use the cupholder or adapter as an
ashtray -risk of fire.
(D Note
Only drink containers with lids should be car
ried in the cupholder . Liquid could spill out
and damage your vehicle's electronic equip
ment or stain the upholstery, etc.
Cooled glove compartment
Applies to vehicles : wit h cooled glove compartment
The cooled glove compartment only functions
when the AIC system is switched on .
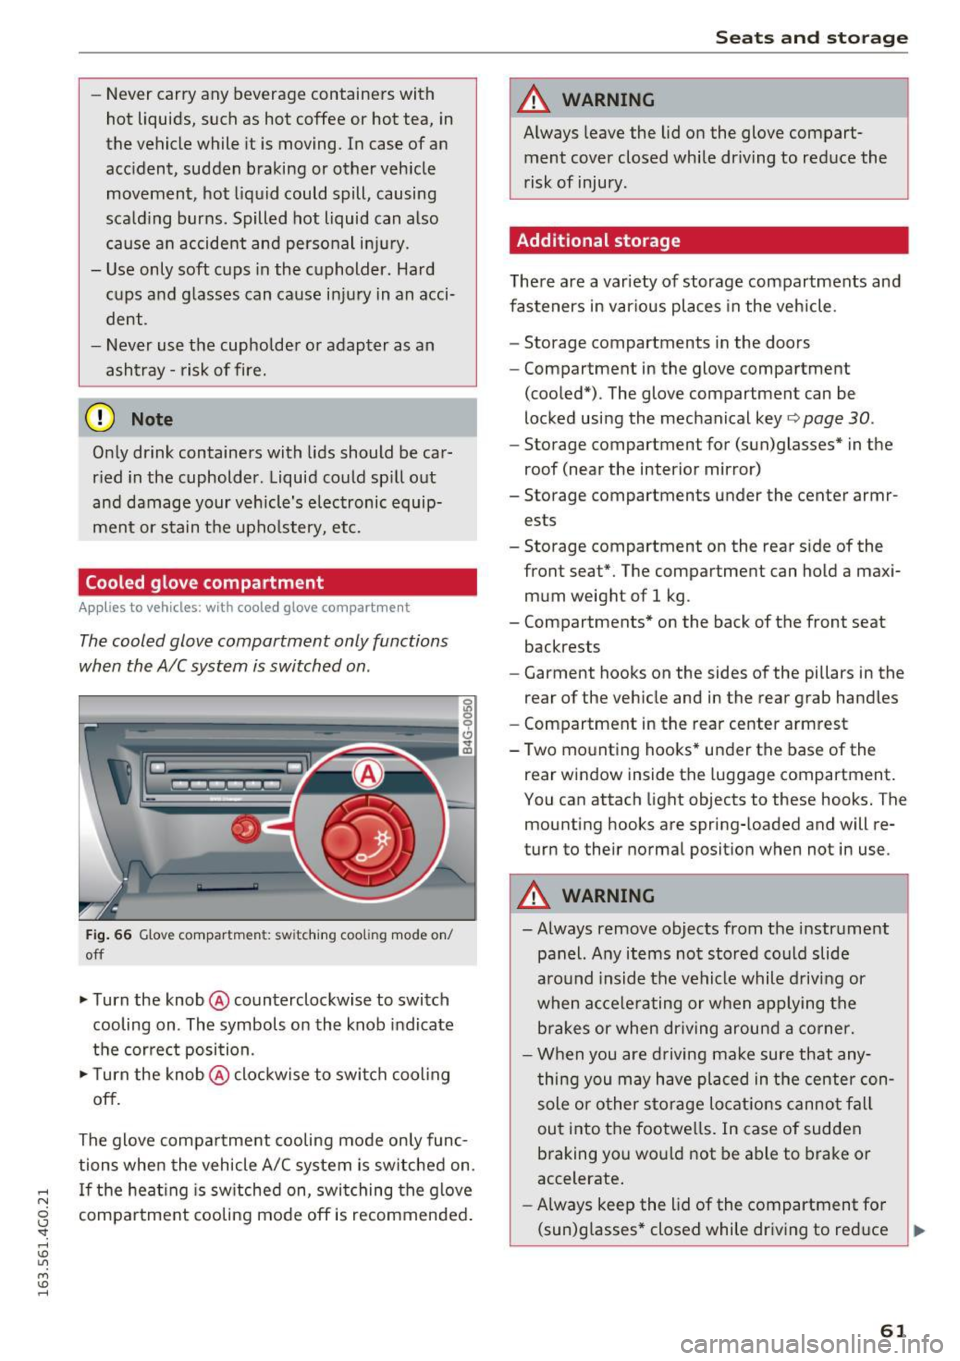
Fig. 66 Glove compartmen t: sw itching cooli ng mode on/
off
.. Turn the knob @counterclockwise to switch
cooling on . The symbols on the knob indicate
the correct position.
.,. Turn the knob @clockwise to switch cool ing
off.
The glove compartment cooling mode only func
tions when the vehicle A/C system is switched on .
..... If the heating is switched on, switching the glove
N
g compartment cooling mode off is recommended.
'
Seats and storage
A WARNING
-Always leave the lid on the glove compart-
ment cover closed while driving to reduce the
risk of injury.
Additional storage
There are a variety of storage compartments and
fasteners in various places in the vehicle.
- Storage compartments in the doors
- Compartment in the glove compartment
(cooled*) . The glove compartment can be
locked using the mechanical key ¢
page 30.
-Storage compartment for (sun)glasses* in the
roof (near the interior mirror)
- Storage compartments under the center armr ests
- Storage compartment on the rear side of the
front seat*. The compartment can hold a maxi
mum weight of 1 kg .
- Compartments* on the back of the front seat
backrests
- Garment hooks on the sides of the pillars in the
rear of the vehicle and in the rear grab handles
- Compartment in the rear center armrest
- Two mounting hooks* under the base of the rear window inside the luggage compartment.
You can attach light objects to these hooks. The
mounting hooks are spring-loaded and will re
turn to their normal position when not in use .
A WARNING
--Always remove objects from the instrument
panel. Any items not stored could slide
around inside the vehicle while driving or
when accelerating or when applying the
brakes or when driving around a corner.
- When you are driving make sure that any
thing you may have placed in the center con
sole or other storage locations cannot fall
out into the footwells. In case of sudden
braking you would not be able to brake or
accelerate.
- Always keep the lid of the compartment for
(sun)glasses* closed while dr iving to reduce ..,.
61
Page 66 of 294

Sea ts and stor age
Luggage compartment
Loading luggage compartment
Luggage items must be stowed securely.
Fig . 68 Place heavy objec ts as far forward as poss ib le .
~
-0
0 ... co
No te the following to preserve the vehicle 's good
handling characteristics .
• Distribute the load as evenly as possible.
• Place heavy objects as fa r fo rward as possib le
~ fig . 68.
• Secure luggage items with the cargo net * or
with non-elastic retaining straps to the tie
down rings *
<=> page 65.
A WARNING
- Loose objects in the luggage compartment
can slide about suddenly and alter the vehi
cle's handling characte ristics.
- Loose objects in the passenger compart
ment can fly forward during abrupt maneu
vers or acc idents and injure occupants.
- Always store objects in the luggage com
partment and use suitable straps, particu
larly with heavy objects .
- When you transport heavy objects, always
remember that a change in the center of
grav ity may result in a change in the veh i
cle's handling characte ris tics.
- Follow all warnings<=>
page 125, Driving
safety.
@ Tips
The tire pressure must be adjusted to the load - see the t ire pressure sticker located on the
driver's side B-pillar.
64
Enlarg ing cargo capacity of the vehicle
interior
The seat backs can be folded forward to enlarge
the cargo capacity.
Fig . 69 Re lease hand le on t he seatback
Fold ing th e seatback forward
• When you pull the re lease lever@<=> fig. 69 in
the direction of the arrow, the safety knob @
pops out far enough for the red marking on
knob to be visible.
• Fold the seatback forward.
Rai sing th e seatback
• Raise the seatback until it is securely latched
<=> .&,. . When you can no longer see the red mark
on the safety knob @, the seat is latched.
When the seatback is latched in its up right posi
tion, it can be locked and un locked with the me
chanical key~
page 30 next to the release hand le
© <=>fig. 69. This prevents any entry from the ve
hicle interior into the luggage compartment .
The luggage compartment can on ly enlarged
when the seatback is unlocked.
A WARNING
- The backrest must always be securely latch
ed so that the safety belt of the center seat
ing position can wo rk properly to help pro
tect the occupant.
- The backrest must be securely latched in po sition so that no items contained in the lug
gage compartment can s lide fo rwa rd upon
sudden b raking.
- Always check whether the latch is fully en-
gaged by p ulling the seatback fo rwa rd.
~
Page 127 of 294

Driving safety
Basics
Safe driving habits
Please remember -safety first!
This chapter contains important information,
tips, instructions and warnings that you need to
read and observe for your own safety, the safety
of your passengers and others . We have summar
ized here what you need to know about safety
belts, airbags, child restraints as well as child
safety. Your safety is for us
priority number 1. Al
ways observe the information and warnings in
this section - for your own safety as well as that
of your passengers.
The information in this section applies to all
model versions of your vehicle. Some of the fea
tures descr ibed in this sections may be standard
equipment on some models, or may be optional
equipment on others. If you are not sure, ask
your authorized Audi dealer.
A WARNING
- Always make sure that you follow the in
structions and heed the WARNINGS in this
Manual. It is in your interest and in the in
terest of your passengers .
-
-Always keep the complete Owner's Litera
ture in your Audi when you lend or sell your
vehicle so that this important information
will always be available to the driver and
passengers.
- Always keep the Owner's literature handy so
that you can find it easily if you have ques
tions.
Safety equipment
The safety features are part of the occupant re
straint system and work together to help reduce the risk of injury in a wide variety of accident sit
uations.
Your safety and the safety of your passengers
should not be left to chance. Advances in tech
nology have made a var iety of features available
to help reduce the risk of injury in an accident.
Driving safety
The following is a list of just a few of the safety
features in your Audi:
- sophisticated safety belts for driver and all pas-
senger seat ing pos itions,
- safety belt pretensioners,
- safety belt force limiters for the front seats,
- safety belt height adjustment systems for the
front seats,
- front airbags,
- knee airbags for the front seats*
- side airbags in the front seats and outer rear
seats*,
- side curtain airbags with ejection mitigation
features,
- special LATCH anchorages for child restraints,
- head restraints for each seat ing position,
- adjustab le steering column.
These individual safety features, can work to gether as a system to help protect you and your
passengers in a wide range of accidents . These
features cannot work as a system if they are not
always correctly adjusted and correctly used.
Safety is everybody's responsibility!
Important things to do before driving
Safety is everybody 's job! Vehicle and occupant
safety always depends on the informed and care
ful driver .
For your safety and the safety of your passen
gers,
before driving always:
.,. Make sure that all lights and signals are operat
ing correctly .
.,. Make sure that the tire pressure is correct.
.,. Make sure that all windows are clean and afford
good visibility to the outside .
.,. Secure all luggage and other items carefully
¢ page 64, ¢ page 61 .
.,. Make sure that nothing can interfere with the
pedals.
.,. Adjust front seat, head restraint and mirrors
correctly for your height .
.,. Instruct passengers to adjust the head re
straints according to their height.
125