2016 Alfa Romeo MiTo display
[x] Cancel search: displayPage 33 of 280

IMPORTANT The “Scheduled Servicing Plan” includes car maintenance
at fixed intervals (refer to the "Maintenance and care" chapter). This
is displayed automatically, with ignition key at MAR-ON, 2000 km (or
equivalent value in miles) before servicing or, where provided, 30
days before servicing. It is also displayed each time the key is turned to
MAR-ON or, for versions/markets, where provided, every 200 km
(or equivalent value in miles). Below this threshold servicing indications
are more frequent. The display will be in km or miles according to the
unit of measurement set. When the next scheduled service is
approaching, the word “Service” will appear on the display, followed
by the number of kilometres/miles or days (where provided) left,
when the key is turned to MAR-ON. Contact Alfa Romeo Authorised
Services where the "Scheduled Servicing Plan" operations will be
performed and the message will be reset.
When the service interval is reached and for about 1000 km/600 mi
or 30 days, a service due message is displayed.
Passenger airbag/side bag (front
passenger side airbag and side bag
for pelvis, chest and shoulder
protection - Side bag -
activation/deactivation)
This function is used to activate/deactivate the passenger side air bag.
Proceed as follows:
❒press the SET/
button and, after the message (Bag pass: Off)
(to deactivate) or (Bag pass: On) (to activate) is displayed by
pressing buttons "+" or "−", press the SET/
button again;
❒a confirmation request message will appear on the display;❒by pressing the "+" or "−" buttons select "Yes" (to confirm the
activation/deactivation) or "No" (to quit);
❒press the SET/
button briefly, a message confirming the
selection will be displayed and you will return to the menu screen or,
pressing the button for longer, you will return to the standard screen
without memorising.
Daytime running lights (DRL)
With this function is possible to turn the daytime running lights on and
off.
Proceed as follows to activate or deactivate this function:
❒press the SET/
button briefly to display a submenu;
❒press the SET/
button briefly to make the display flash "On" or
"Off" according to what was previously set;
❒press the "+" or "−" button to select;
❒press the SET/
button briefly to return to the submenu screen or
hold the button down to return to the main menu screen without
saving;
❒hold the SET/
button down again to return to the standard
screen or to the main menu according to where you are in the menu.
29
GETTING TO
KNOW YOUR CAR
SAFETY
STARTING AND
DRIVING
IN AN EMERGENCY
SERVICING AND
MAINTENANCE
TECHNICAL
SPECIFICATIONS
INDEX
Page 34 of 280

Courtesy lights (Activation/
deactivation of “Greeting lights”)
(for versions/markets, where provided)
With this function it is possible to turn on the side lights, the number
plate lights and the ceiling lights for approximately 25 seconds when
the doors or boot are opened using the remote control, with the
following exceptions:
❒interruption after 5 seconds from when the door closes
❒interruption after locking using the remote control
❒interruption after a lock or other action using the remote control
Proceed as follows to activate or deactivate this function:
❒press the SET/
button briefly to make the display flash "On" or
"Off" according to what was previously set;
❒press the "+" or "−" button to select;
❒briefly press the SET/
button to go back to the menu screen or
hold the button down to go back to the standard screen without
saving.
Menu exit
This is the last function that closes the cycle of settings listed in the
menu screen.
Pressing the SET/
button briefly will return the display to the
standard screen without saving.
Press the − button to return to the first menu option.
TRIP COMPUTER
GENERAL INFORMATION
The Trip computer is used to display information on car operation
when the key is turned to MAR.
This function allows you to define two separate trips called “Trip A”
and “Trip B” for monitoring the car's "complete journey" in a
reciprocally independent manner.
Both functions are resettable (reset - start of a new journey).
“Trip A” is used to display the figures relating to:
❒Range
❒Distance travelled
❒Average fuel consumption
❒Instant fuel consumption
❒Average speed
❒Trip time (driving time).
“Trip B” may be used to display the figures relating to:
❒Distance travelled B
❒Average consumption B
❒Average speed B
❒Trip time B (driving time).
The “Trip B” function may be disabled (see “Activating Trip B”).
“Range” and “Instant consumption" parameters cannot be reset.
30
GETTING TO
KNOW YOUR CAR
SAFETY
STARTING AND
DRIVING
IN AN EMERGENCY
SERVICING AND
MAINTENANCE
TECHNICAL
SPECIFICATIONS
INDEX
Page 35 of 280

VALUES DISPLAYED
Range
This indicates the indicative distance that may be travelled with the fuel
in the tank, assuming that driving conditions do not change.
The display will show the reading '-----' when the following events take
place:
❒range value lower than 50 km (or 30 mi)
❒car parked with engine running for a long period.
IMPORTANT The range can be affected by several factors: driving style
(see “Driving style” in the “Starting and driving” section), type of
route (motorway, towns and cities, mountain roads, etc.), conditions of
use (load, tyre pressures, etc.). Trip planning must therefore take the
above into account.
Distance covered
Shows the distance covered since the start of the new journey.
Average consumption
Shows the approximate average fuel consumption since the start of the
new journey.
Instantaneous consumption
This indicates the fuel consumption. The value is constantly updated.
The display will show “----”ifthecarisparked with the engine
running.Average speed
This shows the average car speed as a function of the overall time
elapsed since the start of the new journey.
Trip time
The time elapsed since the start of a new journey.
Indications on display
Each time a value is displayed, the following information is shown:
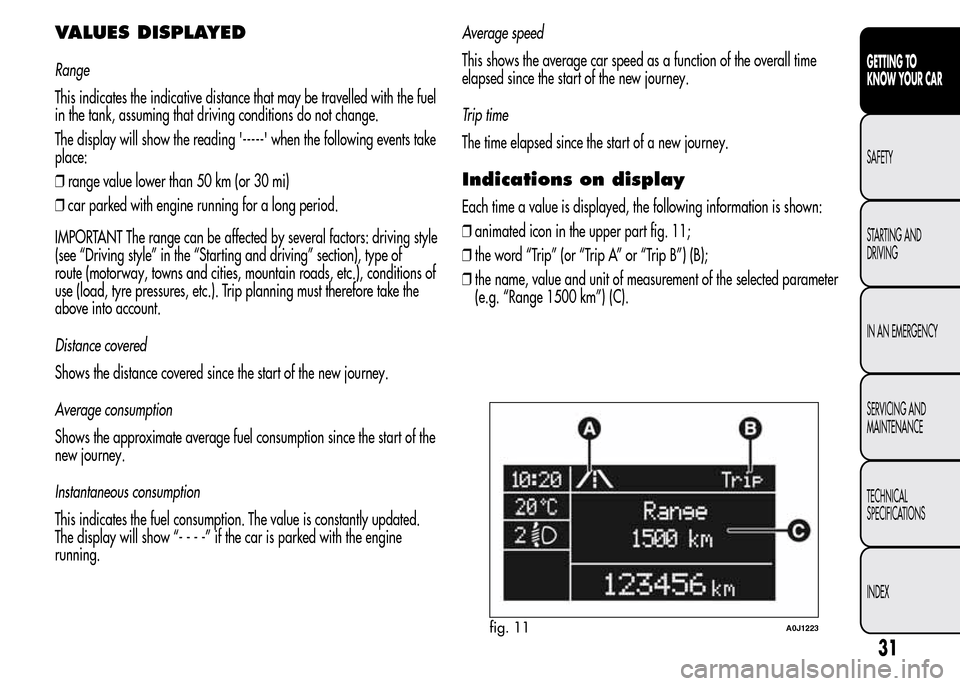
❒animated icon in the upper part fig. 11;
❒the word “Trip” (or “Trip A” or “Trip B”) (B);
❒the name, value and unit of measurement of the selected parameter
(e.g. “Range 1500 km”) (C).
fig. 11A0J1223
31
GETTING TO
KNOW YOUR CAR
SAFETY
STARTING AND
DRIVING
IN AN EMERGENCY
SERVICING AND
MAINTENANCE
TECHNICAL
SPECIFICATIONS
INDEX
Page 36 of 280

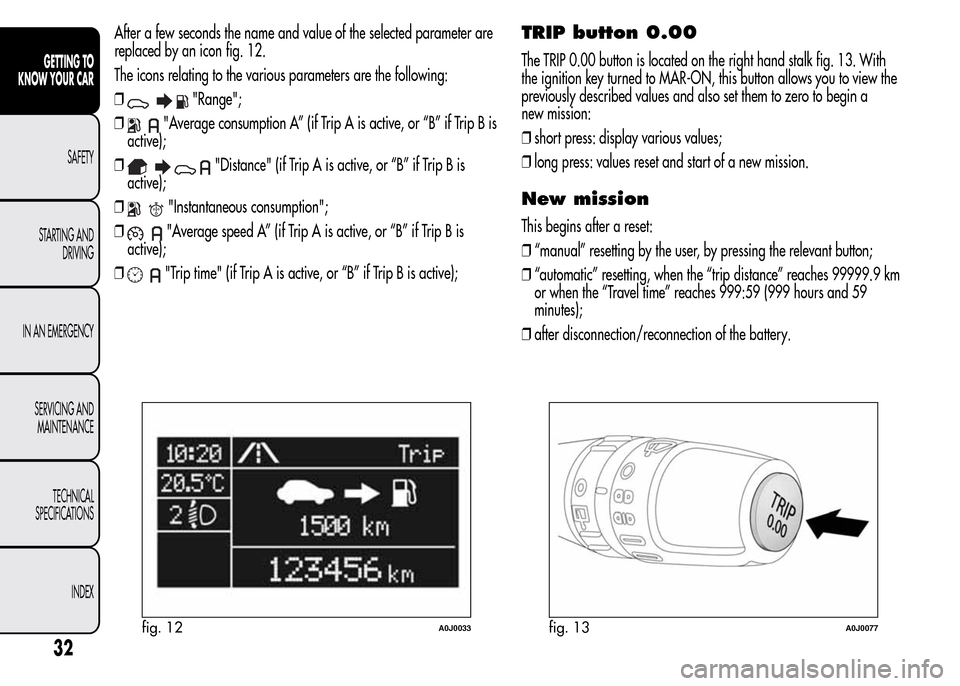
After a few seconds the name and value of the selected parameter are
replaced by an icon fig. 12.
The icons relating to the various parameters are the following:
❒
"Range";
❒
"Average consumption A” (if Trip A is active, or “B” if Trip B is
active);
❒
"Distance" (if Trip A is active, or “B” if Trip B is
active);
❒
"Instantaneous consumption";
❒
"Average speed A” (if Trip A is active, or “B” if Trip B is
active);
❒
"Trip time" (if Trip A is active, or “B” if Trip B is active);
TRIP button 0.00
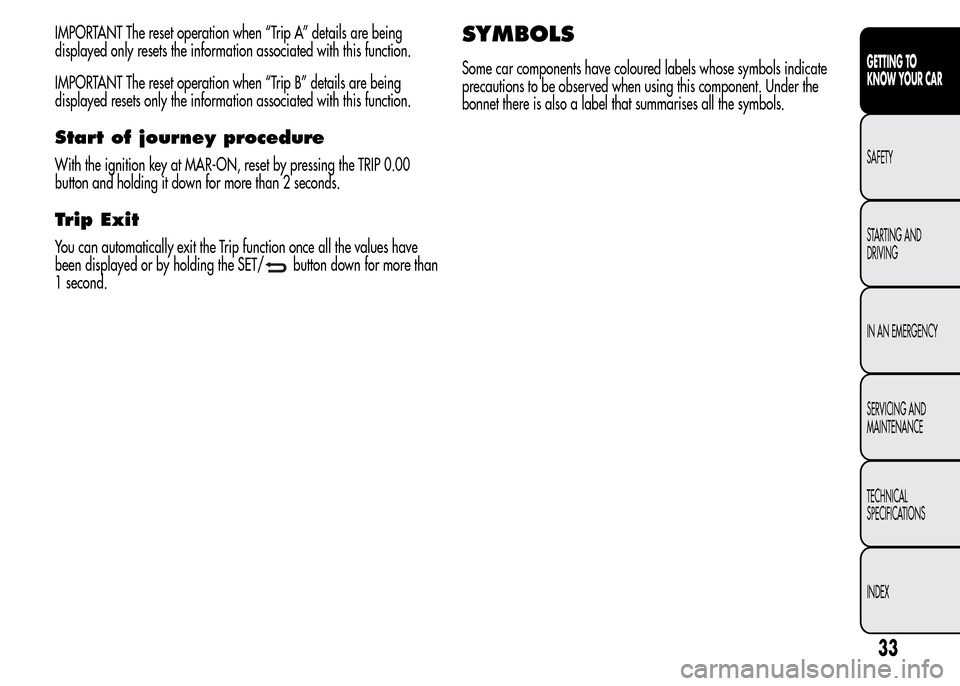
The TRIP 0.00 button is located on the right hand stalk fig. 13. With
the ignition key turned to MAR-ON, this button allows you to view the
previously described values and also set them to zero to begin a
new mission:
❒short press: display various values;
❒long press: values reset and start of a new mission.
New mission
This begins after a reset:
❒“manual” resetting by the user, by pressing the relevant button;
❒“automatic” resetting, when the “trip distance” reaches 99999.9 km
or when the “Travel time” reaches 999:59 (999 hours and 59
minutes);
❒after disconnection/reconnection of the battery.
fig. 12A0J0033fig. 13A0J0077
32
GETTING TO
KNOW YOUR CAR
SAFETY
STARTING AND
DRIVING
IN AN EMERGENCY
SERVICING AND
MAINTENANCE
TECHNICAL
SPECIFICATIONS
INDEX
Page 37 of 280

IMPORTANT The reset operation when “Trip A” details are being
displayed only resets the information associated with this function.
IMPORTANT The reset operation when “Trip B” details are being
displayed resets only the information associated with this function.
Start of journey procedure
With the ignition key at MAR-ON, reset by pressing the TRIP 0.00
button and holding it down for more than 2 seconds.
Trip Exit
You can automatically exit the Trip function once all the values have
been displayed or by holding the SET/
button down for more than
1 second.
SYMBOLS
Some car components have coloured labels whose symbols indicate
precautions to be observed when using this component. Under the
bonnet there is also a label that summarises all the symbols.
33
GETTING TO
KNOW YOUR CAR
SAFETY
STARTING AND
DRIVING
IN AN EMERGENCY
SERVICING AND
MAINTENANCE
TECHNICAL
SPECIFICATIONS
INDEX
Page 40 of 280

Press button B to open/close the metal insert.
Press button B fig. 16 only with the key away from your
body, especially your eyes and from objects which could
get damaged (e.g. your clothes). Do not leave the key
unattended to avoid the button being accidentally pressed while it is
being handled, e.g. by a child.
Unlocking the doors and the tailgate
Briefly press button
: for unlocking of doors and luggage
compartment, timed switching-on of internal roof lights and double
flashing of direction indicators (for versions/markets, where provided).
The doors are unlocked automatically if the fuel cut-off system
intervenes.
Once the doors are locked, if one or more doors or the boot are not
closed correctly, the LED and direction indicators start flashing quickly.
Locking the doors and the tailgate
Briefly press button
: for locking of doors and luggage
compartment, with switching-off of roof light and single flashing of
direction indicators (for versions/markets, where provided).
If one or more doors are open, the doors will not be locked. This is
indicated by a rapid flashing of the direction indicators (for
versions/markets, where provided). If the luggage compartment is
open, the doors will, however, be locked.
When a speed of over 20 km/h is reached, the doors are
automatically locked if this specific function has been set (only on
versions with multifunction reconfigurable display).When the doors are locked, LED A fig. 17 switches on for a few
seconds after which it starts to flash (deterrent function).
When the doors are locked from inside the car (by pressing the
button) the LED will remain on constantly.
Opening the luggage compartment
Press the
button to open the luggage compartment remotely. The
direction indicators will flash twice to indicate that the boot has been
opened.
REQUESTING ADDITIONAL REMOTE
CONTROLS
The system can recognise up to 8 remote controls. If you need to
request a new remote control, contact Alfa Romeo Authorized Services,
taking the CODE Card (for versions/markets, where provided), an
identity document and documents proving ownership of the car with
you.
fig. 17A0J0027
36
GETTING TO
KNOW YOUR CAR
SAFETY
STARTING AND
DRIVING
IN AN EMERGENCY
SERVICING AND
MAINTENANCE
TECHNICAL
SPECIFICATIONS
INDEX
Page 57 of 280

AUTOMATIC DUAL ZONE
CLIMATE CONTROL
(for versions/markets, where provided)
CONTROLS
A - driver/passenger side MONO function activation button
(alignment of set temperatures);
B - climate control compressor on/off button;
C - internal air recirculation on/off button;
D - display;
E - climate control off button;
F - MAX-DEF function activation button (rapid defrosting/demisting of
front windows);G - heated rear window on/off button;
H - AUTO function activation button (automatic operation) and
passenger side temperature adjustment knob;
I - passenger side air distribution selection button;
L - fan speed increase/decrease;
M - driver side air distribution selection button;
N - AUTO function (automatic operation) activation button and driver
side temperature adjustment knob.
fig. 34A0J0037
53
GETTING TO
KNOW YOUR CAR
SAFETY
STARTING AND
DRIVING
IN AN EMERGENCY
SERVICING AND
MAINTENANCE
TECHNICAL
SPECIFICATIONS
INDEX
Page 58 of 280

DESCRIPTION
The automatic dual zone climate control system regulates the air
temperatures/distribution in the passenger compartment in two areas:
driver side and passenger side.
The system keeps the passenger compartment comfort level constant
and compensates for any variations in external conditions, including
solar radiation detected by a specific sensor.
The automatically controlled parameters and functions are:
❒air temperature at the driver's/front passenger side vents;
❒air distribution at the driver's/front passenger side vents;
❒fan speed (continuous variation of the air flow);
❒compressor engagement (for cooling/dehumidifying the air);
❒air recirculation.
All these functions can be adjusted manually by operating the system
and selecting one or more functions and modifying their parameters.
Automatic control of the manually changed functions will be
suspended: the system will only override the settings for safety reasons.
Manual selections always have higher priority than automatic settings
and are stored until the AUTO button is pressed, except for cases in
which the system intervenes for safety reasons.
You can adjust one function manually without affecting the automatic
control of the others. The amount of air introduced into the passenger
compartment is not affected by vehicle speed; it is electronically
controlled by a fan.The air temperature is always automatically controlled according to the
temperature set on the display (except for when the system is off or in
certain conditions when the compressor is not running).
The system allows the following to be set or adjusted manually:
❒driver's/passenger side air temperature;
❒fan speed (continuous variation);
❒air distribution to 7 positions (driver/passenger);
❒compressor enabling;
❒rapid defrosting/demisting function;
❒air recirculation;
❒heated rear window;
❒system deactivation.
SWITCHING ON THE CLIMATE
CONTROL SYSTEM
The climate control system can be switched on in different ways: we
recommend pressing one of the AUTO buttons and turning the knobs
to set the desired temperatures.
It is possible to select different temperatures for the driver and
passenger, with a maximum difference of 7°C.
In this way the system operates completely automatically to adjust the
temperature, quantity and distribution of the air introduced into the
passenger compartment. It also manages the air recirculation system
and the activation of the air conditioning compressor.
54
GETTING TO
KNOW YOUR CAR
SAFETY
STARTING AND
DRIVING
IN AN EMERGENCY
SERVICING AND
MAINTENANCE
TECHNICAL
SPECIFICATIONS
INDEX