2016 Alfa Romeo MiTo dashboard
[x] Cancel search: dashboardPage 150 of 280

REFITTING THE WHEEL
Following the procedure described previously, raise the car and
remove the small spare wheel.
Proceed as follows:
❒make sure the contact surfaces between standard wheel and hub are
clean so that the fastening bolts will not come loose;
❒for versions with steel rims: fix the hub cap on the rim,
aligning the crescent hole with the bolt you have fitted, then insert
the other 4 bolts;
❒tighten the retaining bolts using wrench A fig. 120;
❒lower the car and remove the jack;
❒use wrench A fig. 120 to fully tighten the bolts, following the
sequence illustrated in
❒for versions with alloy rims with hub cap: align the pin on
the cap with the housing on the rim.
At the end of operation
❒stow the space-saver spare wheel in the compartment provided in
the boot;
❒insert the jack and the other tools in the container;
❒arrange the container and tools on the space-saver wheel;
❒correctly reposition the boot mat.
"Fix&Go Automatic" kit
This is located in the luggage compartment.
The kit container also contains a screwdriver and the tow hook.
The kit also contains:
❒a bottle fig. 127 containing sealer and fitted with: filling tube B and
adhesive label C with the wording “max. 80 km/h” to be placed in
a clearly visible position (e.g. on the dashboard) after repairing
the tyre;
❒a compressor D complete with pressure gauge and connectors;
❒an information leaflet fig. 128, providing instructions for using the
kit correctly. This booklet should be given to the persons charged
with handling the tyre treated with this kit;
❒a pair of gloves located in the side compartment of the compressor;
❒adapters for inflating different elements.
IMPORTANT The sealing liquid is suitable for use at temperatures in the
range from –20°C to +50°C. The sealant has an expiry date.
fig. 127A0J0112
146
GETTING TO KNOW
YOUR CAR
SAFETY
STARTING AND
DRIVING
IN AN
EMERGENCY
SERVICING AND
MAINTENANCE
TECHNICAL
SPECIFICATIONS
INDEX
Page 166 of 280

FUSE LOCATION
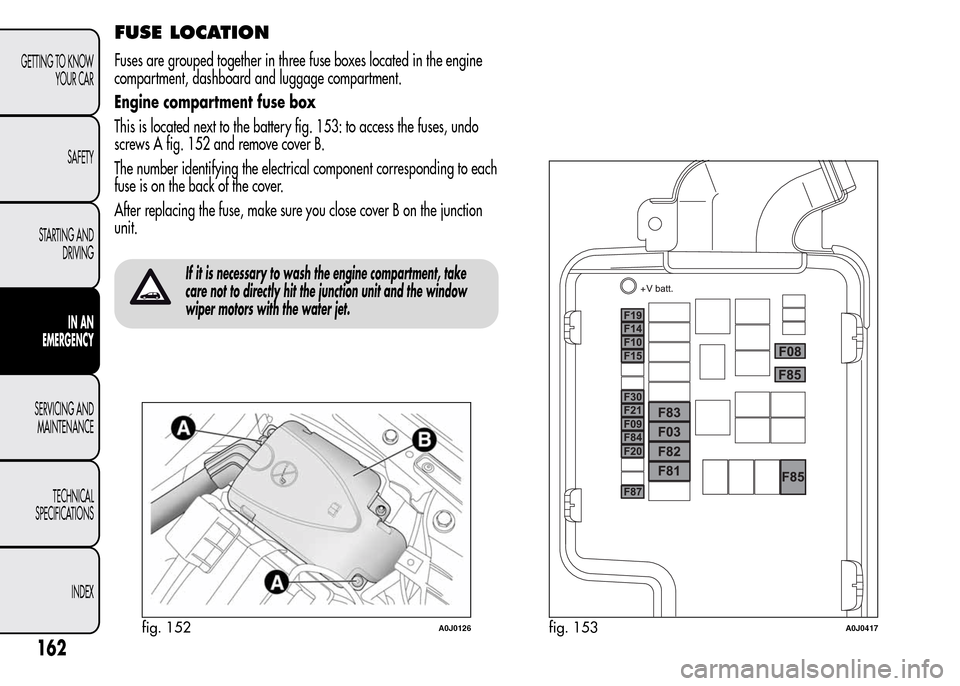
Fuses are grouped together in three fuse boxes located in the engine
compartment, dashboard and luggage compartment.
Engine compartment fuse box
This is located next to the battery fig. 153: to access the fuses, undo
screws A fig. 152 and remove cover B.
The number identifying the electrical component corresponding to each
fuse is on the back of the cover.
After replacing the fuse, make sure you close cover B on the junction
unit.
If it is necessary to wash the engine compartment, take
care not to directly hit the junction unit and the window
wiper motors with the water jet.
fig. 152A0J0126fig. 153A0J0417
162
GETTING TO KNOW
YOUR CAR
SAFETY
STARTING AND
DRIVING
IN AN
EMERGENCY
SERVICING AND
MAINTENANCE
TECHNICAL
SPECIFICATIONS
INDEX
Page 167 of 280

Dashboard fuse box
To access the fuses fig. 155, lower lid A fig. 154, grip cover B with one
hand in the area shown in the figure and remove it in the direction
shown by the arrow, in order to release first the inner retainers C and
then the tabs D.
fig. 154A0J0334fig. 155A0J0205
163
GETTING TO KNOW
YOUR CAR
SAFETY
STARTING AND
DRIVING
IN AN
EMERGENCY
SERVICING AND
MAINTENANCE
TECHNICAL
SPECIFICATIONS
INDEX
Page 199 of 280

LEATHER SEATS
(for versions/markets, where provided)
Remove the dry dirt with a buckskin or slightly damp cloth, without
exercising too much pressure. Remove liquid or oil stains using a dry
absorbent cloth, without rubbing. Then clean with a soft cloth or
buckskin cloth dampened with water and neutral soap. If the stain
persists, use specific products and observe the instructions carefully.
IMPORTANT Never use alcohol. Make sure that the cleaning products
used contain no alcohol or alcohol derivatives, even in small quantities.
PLASTIC AND COATED PARTS
Clean interior plastic parts with a damp cloth (if possible made from
microfibre), and a solution of water and neutral, non-abrasive
detergent. To clean oily or persistent stains, use specific products free
from solvents and designed to maintain the original appearance
and colour of the components.Remove any dust using a microfibre cloth, if necessary moistened with
water. The use of paper tissues is not recommended as these may
leave residues.
Never use alcohol, petrols and derivatives to clean the
dashboard and instrument panel lens.
LEATHER PARTS
(for versions/markets, where provided)
Use only water and neutral soap to clean these parts. Never use
alcohol or alcohol-based products. Before using a specific product for
cleaning interiors, make sure that it does not contain alcohol and/or
alcohol based substances.
195
GETTING TO KNOW
YOUR CAR
SAFETY
STARTING AND
DRIVING
IN AN EMERGENCY
SERVICING AND
MAINTENANCE
TECHNICAL
SPECIFICATIONS
INDEX
Page 235 of 280

DASHBOARD
The presence and position of controls, instruments and gauges may vary according to different versions.
1. Air vent for side windows – 2. Adjustable air vent – 3. Passenger front air bag – 4. Sound system (for versions/markets, where provided) – 5.
Adjustable air vents – 6. Hazard warning lights, door lock/unlock button – 7. Exterior lighting control lever – 8. Instrument panel – 9. Windscreen
wiper/rearscreen wiper/trip computer control lever – 10. Control panel – 11. Fuse box access flap – 12. Ignition device – 13. Driver front air bag –
14. Driver front knee air bag (for versions/markets, where provided) – 15. Cruise Control (for versions/markets, where provided) – 16. “Alfa DNA”
system – 17. Gear lever – 18. Heating/ventilation/climate control system controls – 19. Glove compartment
fig. 1A0J0393
231
RIGHT HAND DRIVE VERSIONS
Page 243 of 280

INTRODUCTION
The radio has been designed according to the passenger
compartment's specific characteristics and with a personalised
design that complements the style of the dashboard.
The instructions for use are given below. We recommend that you
read them carefully.
ADVICE
Road safety
Familiarise yourself with the various car radio functions (e.g.
storing radio stations), before starting to drive.
Reception conditions
Reception conditions change constantly while driving. Reception
may be interfered with by the presence of mountains, buildings or
bridges, or when you are far away from the broadcaster.
NoteThe volume may be increased when receiving traffic alerts
and news.
If the volume is too loud this could be
dangerous for the driver and for passengers
when driving in traffic. Always adjust the
volume so that you can still hear background noises.
Maintenance and care
Only clean the cover with a soft, anti-static cloth. Cleaning and
polishing products may damage the surface.
CD
Dirt, scratches or any distortions on CDs may cause skipping
during playback and poor sound quality. Follow these tips for
optimum playback conditions:
❒only use CDs with the following mark:
❒clean every CD thoroughly removing any fingerprints or dust
using a soft cloth. Hold CDs by the circumference and clean
them from the centre towards the edge;
❒never use chemical products (e.g. antistatic or thinner spray
cans) for cleaning as they could damage the surface of the CDs;
❒after listening to them place CDs back in their cases to avoid
them being damaged;
❒do not expose CDs to direct sunlight, high temperatures or
moisture for long periods;
❒do not stick labels on the surface of the CD and do not write on
the recorded surface using pens or pencils;
239
SOUND-SYSTEM
Page 273 of 280

INDEX
ABS system ........................................ 88
– Mechanical Brake Assist................... 88
– System intervention.......................... 88
Additional heater ................................. 59
Air cleaner .......................................... 186
Alarm ................................................. 40
“Alfa DNA” system ............................. 91
– Driving modes................................. 92
– Engagement/disengagement of
"All Weather" mode ........................ 94
– Engagement/disengagement of
"Dynamic" mode............................. 93
– "Natural" Mode .............................. 92
Alfa Romeo Code system .................... 34
Ashtray ............................................... 73
ASR system (AntiSlip Regulation) ........... 90
Automatic dual zone climate control ...... 53
Battery .............................................. 186
– advice for extending lifetime............. 186
– replacement .................................... 186
Battery (recharging).............................. 168
Bodywork
– maintenance ................................... 193– protection against atmospheric
agents ............................................ 192
– warranty......................................... 193
Bonnet................................................. 84
– Closing ........................................... 84
– Opening ......................................... 84
Brake Assist ......................................... 90
Brakes ................................................. 207
– brake fluid level............................... 185
bulb replacement .......................... 156-157
– interior lights................................... 158
Bulb replacement
– exterior lights .................................. 154
Bulbs
– types of bulbs.................................. 152
Carrying children safely ...................... 114
CBC (Cornering Brake Control) system ... 90
Central locking..................................... 70
Changing a bulb .................................. 151
– General instructions ......................... 151
Changing a wheel ................................ 140
Checking levels .................................... 178
Cigar lighter ........................................ 72
Cleaning and maintenance
– bodywork ....................................... 192– car interior...................................... 194
– front headlights ............................... 194
– leather parts ................................... 195
– leather seats.................................... 195
– plastic and coated parts ................... 195
– seats and fabric parts ...................... 194
Climate control/heating system ............. 50
Climatic comfort ................................... 49
– Diffusers ......................................... 49
Clutch ................................................. 206
CO2 emissions..................................... 229
Code Card........................................... 35
Control buttons..................................... 22
Control panel and instruments ............... 4
– Multifunction display........................ 4
– Reconfigurable multifunction
display ........................................... 5
Controls............................................... 69
Courtesy light
– bulb replacement............................. 159
Cruise Control ...................................... 65
Dashboard ........................................ 3
Daytime running lights (DRL) ................. 59
Diesel filter .......................................... 186
Diesel particulate filter (DPF) ................. 108
269
GETTING TO KNOW
YOUR CAR
SAFETY
STARTING AND
DRIVING
IN AN EMERGENCY
SERVICING AND
MAINTENANCE
TECHNICAL
SPECIFICATIONS
INDEX