Page 93 of 445
92
uuIndicators uMulti-Information Display Warn ing and Information Messages
Instrument Panel
MessageConditionExplanation
●Appears if the temperature inside the camera is too
high.
●The LKAS and ACC have been automatically canceled.
●Use the climate control system to cool down the
camera.
●Goes off - The camera has been cooled down. Pressing
the LKAS button and MAIN button can resume the
system.
2 Front Sensor Camera* P. 282
2 Adaptive Cruise Control (ACC)* P. 284
2 Lane Keeping Assist System (LKAS)* P. 297
●Appears when the area around the camera is blocked by
dirt, mud, etc. Stop your ve hicle in a safe place, and
wipe it off with a soft cloth.
●May appear when driving in bad weather (rain, snow,
fog, etc.).
●Have your vehicle checked by a dealer if the indicator
and message come back on after you cleaned the area
around the camera.
Models with LKAS
* Not available on all models
Page 95 of 445
94
uuGauges and Multi-Information Display uMulti-Information Display
Instrument Panel
Multi-Information Display
The multi-information display shows the od ometer, trip meter, outside temperature
indicator, and other gauges. It also disp lays important messages such as warnings
and other helpful information.
■Main displays
Press the / (information) button or the SEL/RESET button to change the display.
■Switching the Display
Models without fu ll color display
Tire Pressure for Each Tire
Black Screen
Engine Oil Life
Vehicle Settings
Average SpeedRange
Elapsed Time
Average Fuel Economy/
Instant Fuel Economy
/ Button
SEL/RESET
Button
Page 155 of 445

154
uuOperating the Switches Around the Steering Wheel uBrightness Control
Controls
Brightness Control
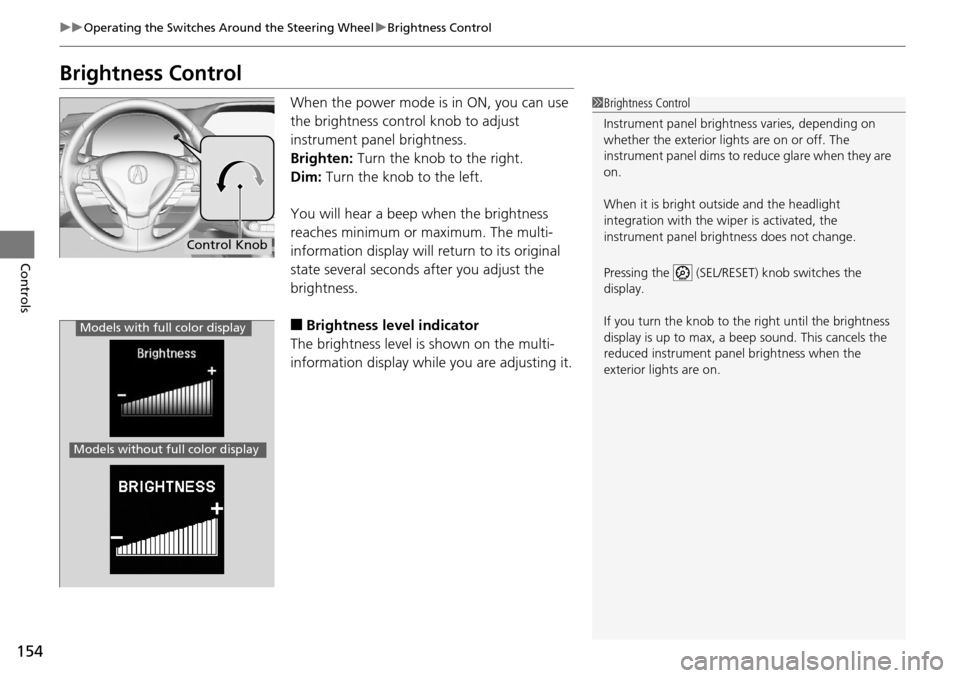
When the power mode is in ON, you can use
the brightness control knob to adjust
instrument panel brightness.
Brighten: Turn the knob to the right.
Dim: Turn the knob to the left.
You will hear a beep when the brightness
reaches minimum or maximum. The multi-
information display will return to its original
state several seconds after you adjust the
brightness.
■Brightness level indicator
The brightness level is shown on the multi-
information display while you are adjusting it.
1 Brightness Control
Instrument panel brightne ss varies, depending on
whether the exterior lights are on or off. The
instrument panel dims to reduce glare when they are
on.
When it is bright out side and the headlight
integration with the wi per is activated, the
instrument panel bri ghtness does not change.
Pressing the (SEL/RESET) knob switches the
display.
If you turn the knob to the right until the brightness
display is up to max, a beep sound. This cancels the
reduced instrument panel brightness when the
exterior lights are on.
Control Knob
Models with full color display
Models without fu ll color display
Page 158 of 445

157
uuOperating the Switches Around the Steering Wheel uDriving Position Memory System
Controls
1. Set the power mode to ON. Adjust the
driver’s seat and the door mirrors to the
desired position.
2. Press the SET button.
u You will hear a beep, and the memory
button indicator light will blink.
3. Press and hold memory button
(1 or (2
within five seconds of pressing the SET
button.
u Once the seat and the door mirrors
position has been memorized, the
indicator light on the button you pressed
stays on.
1. Move the shift lever to
(P.
2. Apply the parking brake.
3. Press a memory button (
(1 or (2).
u You will hear a beep, and the indicator
light will blink.
The seat and the door mirrors will
automatically move to the memorized
positions. When they have finished moving,
you will hear a beep, and the indicator light
stays on.
■Storing a Position in Memory1 Storing a Position in Memory
After you press the SET button, the storing operation
will be canceled when:
•You do not press the memory button within five
seconds.
•You readjust the seat position before the double-
beep.
•You readjust the door mirrors.•You set the power mode to any position except
ON.
Memory
Button 1
Memory
Button 2
SET Button
■Recalling the Stored Position1 Recalling the Stored Position
The seat and the door mirror s will stop moving if you:
•Press the SET button, or a memory button ((1 or (2).
•Adjust the seat position.
•Adjust the door mirrors.•Shift into any position except (P.
Memory
Button 1
Memory
Button 2
SET Button
Page 211 of 445

210
uuAudio System Basic Operation*uPlaying a USB Flash Drive
Features
Playing a USB Flash Drive
Your audio system reads and plays sound files on a USB flash drive in either MP3,
WMA or AAC*1 format.
Connect your USB flash drive to the USB port, then press the AUX button.
2USB Port P. 187
*1:Only AAC format files recorded with iTunes are playable on this unit.
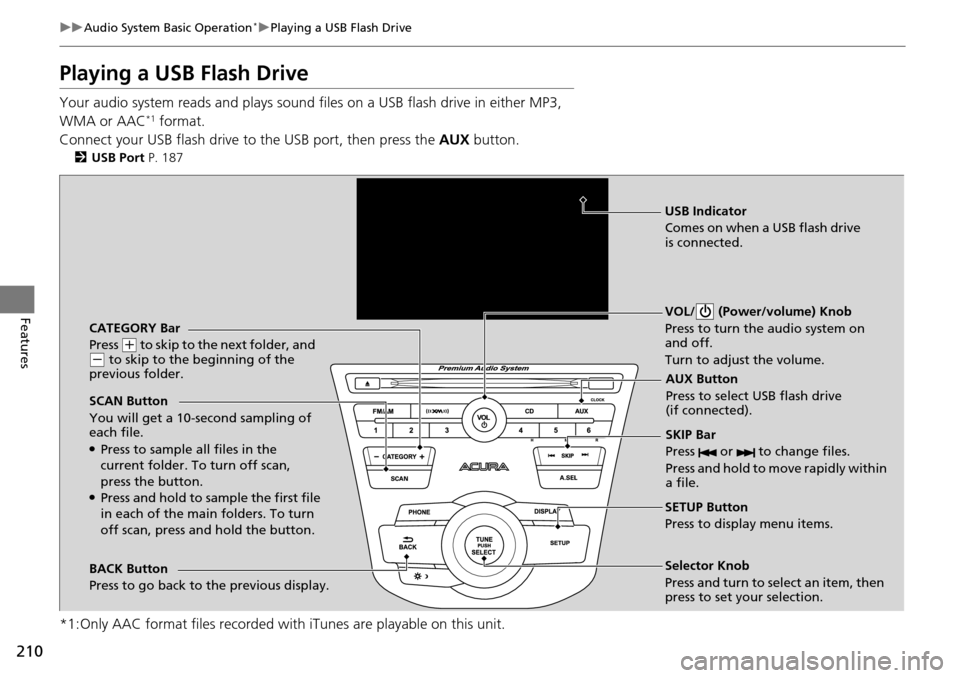
CATEGORY Bar
Press
(+ to skip to the next folder, and (- to skip to the beginning of the
previous folder.
SCAN Button
You will get a 10-second sampling of
each file.
●Press to sample all files in the
current folder. To turn off scan,
press the button.
●Press and hold to sample the first file
in each of the main folders. To turn
off scan, press and hold the button. VOL/ (Power/volume) Knob
Press to turn the audio system on
and off.
Turn to adjust the volume.
SKIP Bar
Press or to change files.
Press and hold to move rapidly within
a file.
SETUP Button
Press to display menu items.
Selector Knob
Press and turn to select an item, then
press to set your selection.
AUX Button
Press to select USB flash drive
(if connected).
USB Indicator
Comes on when a USB flash drive
is connected.
BACK Button
Press to go back to the previous display.
Page 223 of 445

222
Features
HomeLink® Universal Transceiver
The HomeLink ® Universal Transceiver can be pr ogrammed to operate up to three
remote controlled devices around your home, such as garage doors, lighting, or
home security systems.
Refer to the safety information that came wi th your garage door opener to test that
the safety features are functioning properly. If you do not have the safety
information, contact the manufacturer.
Before programming HomeLink, make sure that people and objects are out of the
way of the garage or gate to prevent potential injury or damage.
When programming a garage door opener, park just outside the garage door’s
path.
Training HomeLink
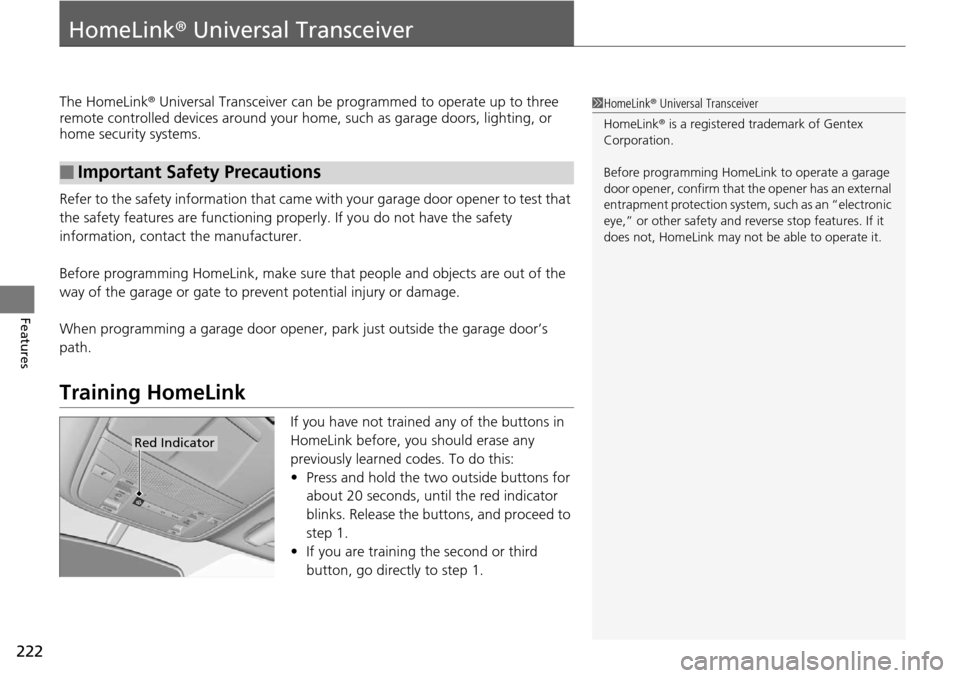
If you have not trained any of the buttons in
HomeLink before, you should erase any
previously learned codes. To do this:
• Press and hold the two outside buttons for
about 20 seconds, until the red indicator
blinks. Release the bu ttons, and proceed to
step 1.
• If you are training the second or third
button, go directly to step 1.
■Important Safety Precautions
1HomeLink ® Universal Transceiver
HomeLink® is a registered tra demark of Gentex
Corporation.
Before programming HomeLi nk to operate a garage
door opener, confirm that the opener has an external
entrapment protection system, such as an “electronic
eye,” or other safety and reverse stop features. If it
does not, HomeLink may not be able to operate it.
Red Indicator
Page 278 of 445

277
uuWhen Driving uShifting
Continued
Driving
Use the paddle shifters to change between 1st and 6th gears without removing your
hands from the steering wheel. The transmiss ion will switch to the sequential shift
mode.
■When the shift lever is in (D:
The vehicle will go into the sequential shi ft mode momentarily, and the gear position
indicator will come on.
Once you start traveling at a constant speed, the sequential shift mode will
automatically switch off, and the g ear position indicator will go off.
Hold the
(+ paddle shifter for two seconds to return to normal drive.
■When the shift lever is in (S:
The vehicle will go into the se quential shift mode, and the M (sequential shift mode)
indicator and gear position indicator will come on. At speeds of 6 mph (10 km/h) or
less, the vehicle automatically shifts down in to 1st gear. It will not automatically shift
up, even if vehicle speed increases.
You can only pull away in 1st or 2nd gear.
When switching out of the sequential shift mode, move the shift lever from
(S to
(D. When the sequential shift mode is canceled, the M indicator and gear position
indicator go off.
■Sequential Shift Mode
Page 292 of 445

Continued291
uuWhen Driving uAdaptive Cruise Control (ACC)*
Driving
To cancel ACC, do any of the following:
• Press the CANCEL button.
• Press the MAIN button.
• Depress the brake pedal.
■Automatic ca ncellation
The beeper sounds and a message appears on the multi-information display when
ACC is automatically canceled. Any of these conditions may cause the ACC
cancellation:
• Your vehicle speed slows down to 22 mph (35 km/h) and below.
• Bad weather (rain, fog, snow, etc.).
• When the radar sensor in the front grille gets dirty.
• The vehicle ahead of yo u cannot be detected.
• An abnormal tire condition is de tected, or the tires are skidding.
• Driving on a mountainous road, or driving off road for extended periods.
• Abrupt steering wheel movement.
• When the ABS, VSA ® or CMBS
TM is activated.
• When the ABS or VSA ® indicator comes on.
■To Cancel1To Cancel
Resuming the prior set speed: After you have
canceled adaptive cruise c ontrol, you can resume the
prior set speed while it is still displayed. Press the
RES/ACCEL button when driving at a speed of at
least 25 mph (40 km/h) or more.
You cannot set or resume in the following situations:
•When vehicle speed is less than 25 mph (40 km/h)•When the MAIN button is turned off
1 Automatic cancellation
ACC Off comes on for about three seconds when
ACC has been automatically canceled.
Even though ACC has been automatically canceled,
you can still resume the prior set speed. Wait until the
condition that caused ACC to cancel improves, then
press the DECEL/SET button.