2016 Acura MDX warning light
[x] Cancel search: warning lightPage 58 of 84

108 || 109 DRIVING DRIVING
TABLE OF
CONTENTS
INDEX
VISUAL INDEX
VOICE COMMAND
INDEX
SAFETY
INFORMATION
CLIENT
INFORMATION
INSTRUMENT
PANEL
SPECIFICATIONS
VEHICLE
CONTROLS
MAINTENANCE
AUDIO AND
CONNECTIVITY
HANDLING THE
UNEXPECTED
BLUETOOTH®
HANDSFREELINK®
DRIVING
ACURALINK®
NAVIGATION
Blind Spot Information ( BSI)*
Alerts you to a detected vehicle in your left or right blind spot while driving 20 mph
(32 km/h) or higher.
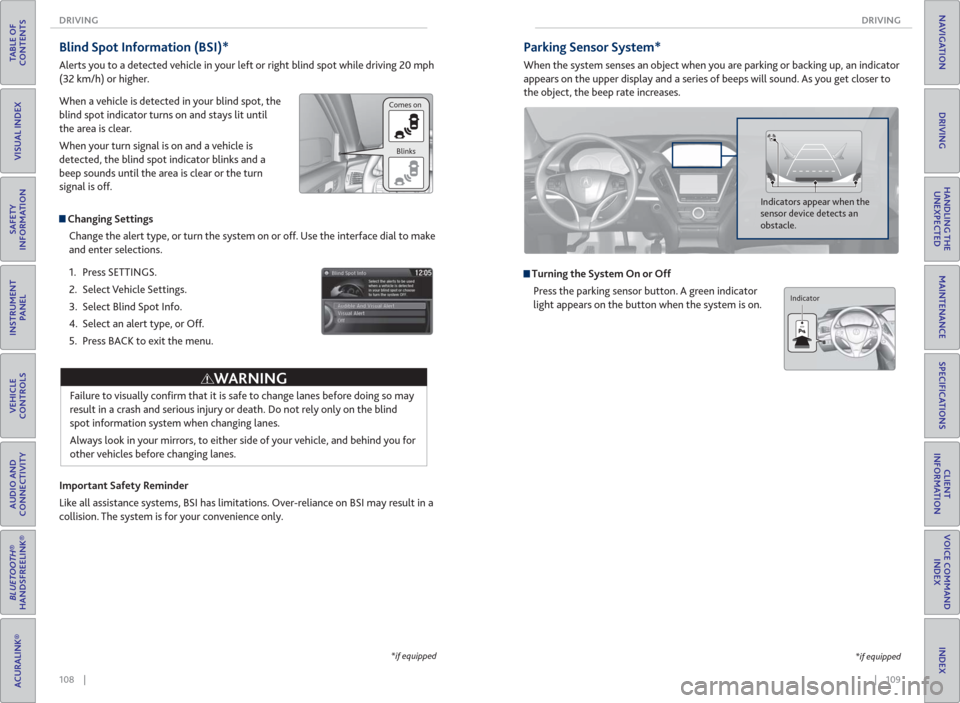
When a vehicle is detected in your blind spot, the
blind spot indicator turns on and stays lit until
the area is clear.
When your turn signal is on and a vehicle is
detected, the blind spot indicator blinks and a
beep sounds until the area is clear or the turn
signal is off.
Changing Settings
Change the alert type, or turn the system on or off. Use the interface dial to make
and enter selections.
1. Press SETTINGS.
2. Select Vehicle Settings.
3. Select Blind Spot Info.
4. Select an alert type, or Off.
5. Press BACK to exit the menu.
Important Safety Reminder
Like all assistance systems, BSI has limitations. Over-reliance on BSI may result in a
collision. The system is for your convenience only.
Failure to visually confi rm that it is safe to change lanes before doing so may
result in a crash and serious injury or death. Do not rely only on the blind
spot information system when changing lanes.
Always look in your mirrors, to either side of your vehicle, and behind you for
other vehicles before changing lanes.
WARNING
*if equipped
Comes on
Blinks
Parking Sensor System*
When the system senses an object when you are parking or backing up, an indicator
appears on the upper display and a series of beeps will sound. As you get closer to
the object, the beep rate increases.
Turning the System On or Off
Press the parking sensor button. A green indicator
light appears on the button when the system is on.
Indicators appear when the
sensor device detects an
obstacle.
*if equipped
Indicator
Page 61 of 84

114 || 115 HANDLING THE UNEXPECTED DRIVING
TABLE OF
CONTENTS
INDEX
VISUAL INDEX
VOICE COMMAND
INDEX
SAFETY
INFORMATION
CLIENT
INFORMATION
INSTRUMENT
PANEL
SPECIFICATIONS
VEHICLE
CONTROLS
MAINTENANCE
AUDIO AND
CONNECTIVITY
HANDLING THE
UNEXPECTED
BLUETOOTH®
HANDSFREELINK®
DRIVING
ACURALINK®
NAVIGATION
How to Refuel
1. The fuel fi ll door is located at the left rear of the
vehicle. Park next to the service pump that is
most accessible.
2. Turn off the engine.
3. Press the fuel fi ll door release on the inside of
the driver’s door. The fuel fi ll door opens.
4. Turn the fuel fi ll cap slowly to open. Place the
fuel fi ll cap in the holder.
5. Insert the fi ller nozzle fully. When the tank is full,
the fuel nozzle clicks off automatically.
6. Replace the fuel fi ll cap. Tighten it until you hear
at least one click. Close the fuel fi ll door.
Refueling
Use the proper fuel and refueling procedure to ensure the best performance and
safety of your vehicle.
Fuel Information
Use of unleaded premium gasoline of 91 octane or higher is recommended.
• Acura recommends TOP TIER Detergent Gasoline where available.
• Do NOT use gasoline containing more than 15% ethanol.
• Do NOT use gasoline containing methanol.
• Do NOT use gasoline containing MMT.
We recommend quality gasoline containing detergent additives that help
prevent fuel system and engine deposits. In addition, in order to maintain good
performance, fuel economy, and emissions control, we strongly recommend the
use of gasoline that does NOT contain harmful manganese-based fuel additives
such as MMT, if such gasoline is available.
Gasoline is highly fl ammable and explosive. You can be burned or seriously
injured when handling fuel.
• Stop the engine, and keep heat, sparks, and fl ame away.
• Handle fuel only outdoors.
• Wipe up spills immediately.
WARNING
NOTICE
Holder
Jump Starting
Turn off the power to electric devices, such as audio and lights. Turn off the engine,
then open the hood (see page 133).
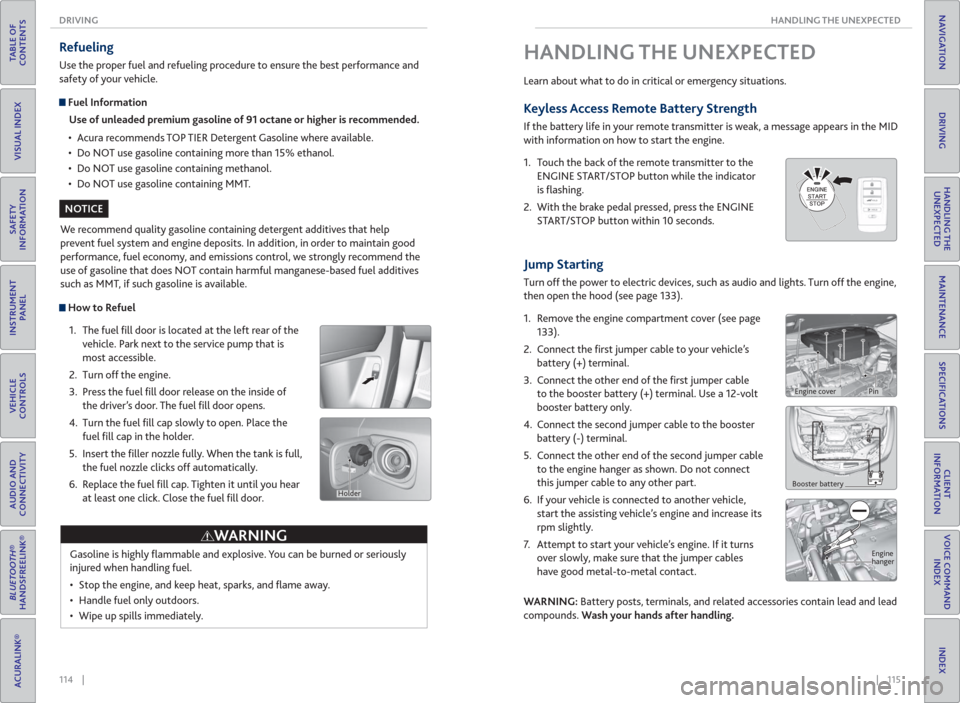
1. Remove the engine compartment cover (see page
133).
2. Connect the fi rst jumper cable to your vehicle’s
battery (+) terminal.
3. Connect the other end of the fi rst jumper cable
to the booster battery (+) terminal. Use a 12-volt
booster battery only.
4. Connect the second jumper cable to the booster
battery (-) terminal.
5. Connect the other end of the second jumper cable
to the engine hanger as shown. Do not connect
this jumper cable to any other part.
6. If your vehicle is connected to another vehicle,
start the assisting vehicle’s engine and increase its
rpm slightly.
7. Attempt to start your vehicle’s engine. If it turns
over slowly, make sure that the jumper cables
have good metal-to-metal contact.
WARNING: Battery posts, terminals, and related accessories contain lead and lead
compounds. Wash your hands after handling.
HANDLING THE UNEXPECTED
Learn about what to do in critical or emergency situations.
Keyless Access Remote Battery Strength
If the battery life in your remote transmitter is weak, a message appears in the MID
with information on how to start the engine.
1. Touch the back of the remote transmitter to the
ENGINE START/STOP button while the indicator
is fl ashing.
2. With the brake pedal pressed, press the ENGINE
START/STOP button within 10 seconds.
Booster battery
Engine
hanger
Engine coverPin
Page 62 of 84

116 || 117 HANDLING THE UNEXPECTED HANDLING THE UNEXPECTED
TABLE OF
CONTENTS
INDEX
VISUAL INDEX
VOICE COMMAND
INDEX
SAFETY
INFORMATION
CLIENT
INFORMATION
INSTRUMENT
PANEL
SPECIFICATIONS
VEHICLE
CONTROLS
MAINTENANCE
AUDIO AND
CONNECTIVITY
HANDLING THE
UNEXPECTED
BLUETOOTH®
HANDSFREELINK®
DRIVING
ACURALINK®
NAVIGATION
A battery can explode if you do not follow the correct procedure, seriously
injuring anyone nearby.
Keep all sparks, open fl ames, and smoking materials away from the battery.
After the Engine Starts
Once your vehicle’s engine has started, remove the jumper cables in the following
order:
1. Disconnect the jumper cable from your vehicle’s ground.
2. Disconnect the other end of the jumper cable from the booster battery (-)
terminal.
3. Disconnect the jumper cable from your vehicle’s battery (+) terminal.
4. Disconnect the other end of the jumper cable from the booster battery (+)
terminal.
5. Have your vehicle inspected by a nearby service station or a dealer.
WARNING
Emergency Engine Stop
The ENGINE START/STOP button may be used to stop the engine due to an
emergency situation even while driving. If you must stop the engine, choose one of
the following operations:
• Press and hold the ENGINE START/STOP button
for two seconds, OR
• Firmly press the ENGINE START/STOP button two
times.
The steering wheel will not lock. The power mode changes to ACCESSORY (unless
the gear is in Park, in which case the power mode changes to VEHICLE OFF).
Because turning off the engine also disables the power assist the engine provides to
the steering and braking systems, it will require signifi cantly more physical effort
and time to steer and slow the vehicle. Downshift gears and use both feet on the
brake pedal, if necessary, to slow the vehicle and stop immediately in a safe place.
Do not press the button while driving unless it is absolutely necessary for the
engine to be switched off.
NOTICE
Overheating
If the temperature gauge needle is at the H mark, the engine suddenly loses power,
or steam or spray comes out from under the hood, your engine is overheating.
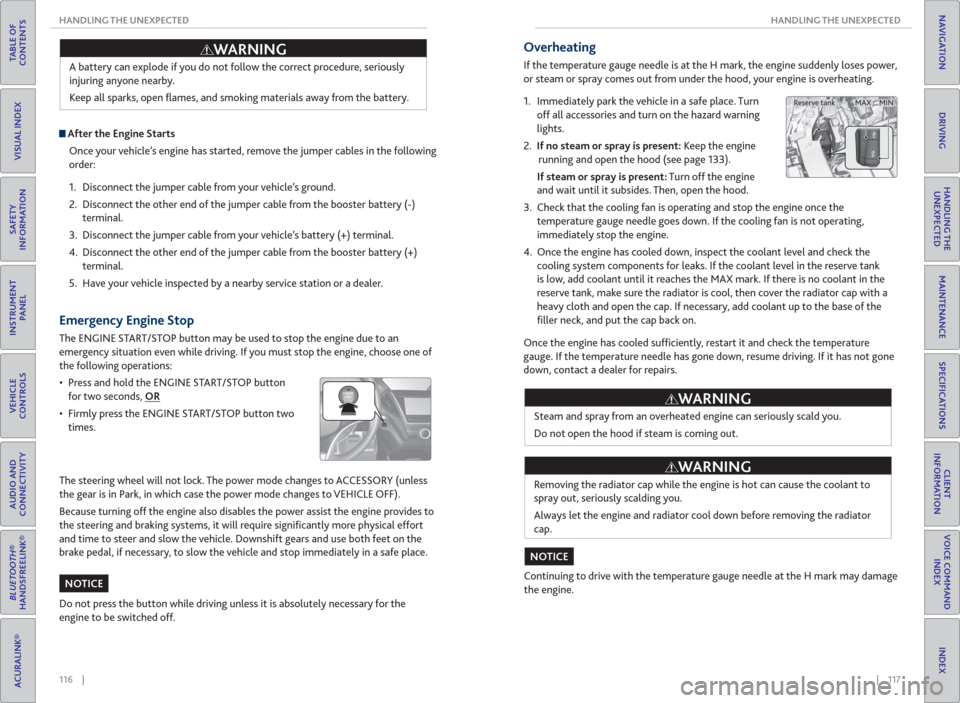
1. Immediately park the vehicle in a safe place. Turn
off all accessories and turn on the hazard warning
lights.
2. If no steam or spray is present: Keep the engine
running and open the hood (see page 133).
If steam or spray is present: Turn off the engine
and wait until it subsides. Then, open the hood.
3. Check that the cooling fan is operating and stop the engine once the
temperature gauge needle goes down. If the cooling fan is not operating,
immediately stop the engine.
4. Once the engine has cooled down, inspect the coolant level and check the
cooling system components for leaks. If the coolant level in the reserve tank
is low, add coolant until it reaches the MAX mark. If there is no coolant in the
reserve tank, make sure the radiator is cool, then cover the radiator cap with a
heavy cloth and open the cap. If necessary, add coolant up to the base of the
fi ller neck, and put the cap back on.
Once the engine has cooled suffi ciently, restart it and check the temperature
gauge. If the temperature needle has gone down, resume driving. If it has not gone
down, contact a dealer for repairs.
Steam and spray from an overheated engine can seriously scald you.
Do not open the hood if steam is coming out.
Removing the radiator cap while the engine is hot can cause the coolant to
spray out, seriously scalding you.
Always let the engine and radiator cool down before removing the radiator
cap.
Continuing to drive with the temperature gauge needle at the H mark may damage
the engine.
WARNING
WARNING
NOTICE
MAX MIN Reserve tank
Page 64 of 84

120 || 121 HANDLING THE UNEXPECTED HANDLING THE UNEXPECTED
TABLE OF
CONTENTS
INDEX
VISUAL INDEX
VOICE COMMAND
INDEX
SAFETY
INFORMATION
CLIENT
INFORMATION
INSTRUMENT
PANEL
SPECIFICATIONS
VEHICLE
CONTROLS
MAINTENANCE
AUDIO AND
CONNECTIVITY
HANDLING THE
UNEXPECTED
BLUETOOTH®
HANDSFREELINK®
DRIVING
ACURALINK®
NAVIGATION
Changing a Flat Tire
If a tire goes fl at while driving, grasp the steering wheel fi rmly, and brake gradually
to reduce speed. Stop in a safe place. Replace the fl at tire with a compact spare
tire.* Go to a dealer as soon as possible to have the full-size tire repaired or
replaced.
Before Changing the Tire
1. Park the vehicle on fi rm, level, non-slippery surface.
2. Change the gear to Park (P), and apply the parking brake.
3. Turn on the hazard warning lights and turn the vehicle off.
Getting Ready to Change the Tire
1. Open the tailgate. Turn on the cargo lights
located on the inside of the tailgate, if necessary
(see page 36). Push the rear edge of the
handle on the fl oor lid and open the lid.
2. Take out the cargo fl oor box.
3. Take the jack, wheel nut wrench, and jack handle
bar out of the tool case.
4. Remove the cover on the cargo area lining to
access the shaft for the spare tire hoist.
Cargo fl oor box
*if equipped
Handle
Tool case
Cover
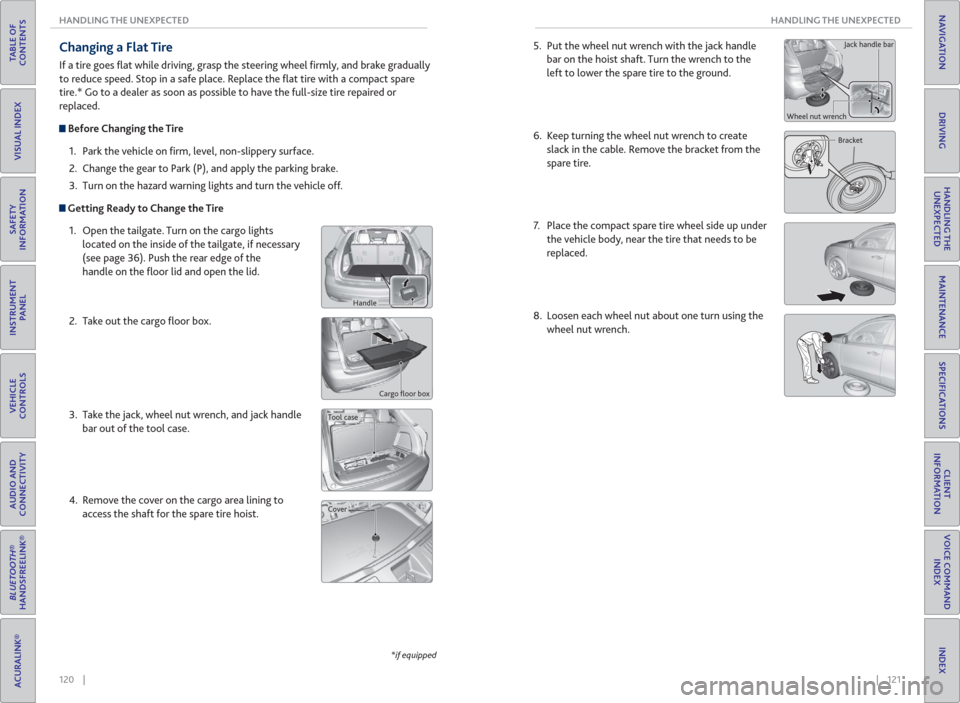
5. Put the wheel nut wrench with the jack handle
bar on the hoist shaft. Turn the wrench to the
left to lower the spare tire to the ground.
6. Keep turning the wheel nut wrench to create
slack in the cable. Remove the bracket from the
spare tire.
7. Place the compact spare tire wheel side up under
the vehicle body, near the tire that needs to be
replaced.
8. Loosen each wheel nut about one turn using the
wheel nut wrench.
Bracket Wheel nut wrenchJack handle bar
Page 65 of 84

122 || 123 HANDLING THE UNEXPECTED HANDLING THE UNEXPECTED
TABLE OF
CONTENTS
INDEX
VISUAL INDEX
VOICE COMMAND
INDEX
SAFETY
INFORMATION
CLIENT
INFORMATION
INSTRUMENT
PANEL
SPECIFICATIONS
VEHICLE
CONTROLS
MAINTENANCE
AUDIO AND
CONNECTIVITY
HANDLING THE
UNEXPECTED
BLUETOOTH®
HANDSFREELINK®
DRIVING
ACURALINK®
NAVIGATION
Setting Up the Jack
1. Place the jack under the jacking point closest to
the tire to be changed.
2. Turn the end bracket clockwise (as shown in
the image) until the top of the jack contacts the
jacking point. Make sure that the jacking point
tab is resting in the jack notch.
3. Raise the vehicle, using the jack handle bar and
the jack handle, until the tire is off the ground.
The following instructions must be followed to use the jack safely:
• Do not use the jack with people or luggage in the vehicle.
• Use the jack provided in your vehicle. Other jacks may not support the weight
(“load”) or fi t the jacking point.
• Do not use while the engine is running.
• Use only where the ground is fi rm and level.
• Use only at the jacking points.
• Do not get in the vehicle while using the jack.
• Do not put anything on top of or underneath the jack.
The vehicle can easily roll off the jack, seriously injuring anyone underneath.
Follow the directions for changing a tire exactly, and never get under the
vehicle when it is supported only by the jack.
Jack handle
bar
Wheel nut wrench
as jack handle
Do not use the jack if it doesn’t work properly. Call your dealer or a professional
towing service.
WARNING
NOTICE
Replacing the Flat Tire
1. Remove the wheel nuts and fl at tire.
2. Mount the compact spare tire. Replace the wheel
nuts, and lightly tighten them.
3. Lower the vehicle and remove the jack. Tighten
the wheel nuts in the order indicated in the
image. Go around, tightening the nuts, two to
three times in this order. Do not over tighten the
wheel nuts.
If you drive with the spare tire installed, the low tire pressure/TPMS indicator
appears. The indicator stays on until a regular tire is installed.
Storing the Flat Tire
1. Remove the center cap and place the fl at tire
face up under the hoist.
2. Insert the hoist bracket into the center hole of
the fl at tire.
3. Turn the wheel nut wrench with the jack handle
bar clockwise until the fl at tire rests against the
underbody of the vehicle and you hear the hoist
click.
4. Securely store the jack and wheel nut wrench
back in the tool case. Store the case in the cargo
area.
Loose items can fl y around the interior in a crash and can seriously injure the
occupants.
Store the wheel, jack, and tools securely before driving.
Jack handle bar
Wheel nut wrench
WARNING
Center cap
Page 66 of 84

124 || 125 HANDLING THE UNEXPECTED HANDLING THE UNEXPECTED
TABLE OF
CONTENTS
INDEX
VISUAL INDEX
VOICE COMMAND
INDEX
SAFETY
INFORMATION
CLIENT
INFORMATION
INSTRUMENT
PANEL
SPECIFICATIONS
VEHICLE
CONTROLS
MAINTENANCE
AUDIO AND
CONNECTIVITY
HANDLING THE
UNEXPECTED
BLUETOOTH®
HANDSFREELINK®
DRIVING
ACURALINK®
NAVIGATION
Tire Repair Kit*
If a tire has a small puncture, you can use the tire repair kit to temporarily repair it.
The puncture must be smaller than 3/16-inch (4 mm) and not in the tire sidewall.
Go to a dealer to have the full-size tire permanently repaired or replaced.
Before Repairing the Tire
1. Park the vehicle on fi rm, level, non-slippery surface.
2. Change the gear to Park (P), and apply the parking brake.
3. Turn on the hazard warning lights and turn the vehicle off.
Getting Ready to Repair the Tire
1. Pull the handle on the cargo area fl oor lid and
open the lid.
2. Remove the cargo fl oor box.
3. Remove the kit from the case.
4. Place the kit face up on fl at ground near the
punctured tire and away from traffi c. Do not
place the kit on its side.
5. Follow the instructions in the kit to repair the
tire.
Do not use an unapproved puncture-repairing agent on a fl at tire, as it can damage
the tire pressure sensor.
Tire repair kit
Case
*if equipped
NOTICE
Fuse Locations
If any electrical devices are not working, turn off the vehicle and check to see if any
applicable fuse is blown. Fuse locations are shown on the fuse box cover. Locate the
fuse by the fuse number and box cover number.
Driver’s Side Interior Fuse Boxes
Type A
Located under the dashboard.
Fuse box
Fuse label
Circuit ProtectedAmps1AS Door Lock10 A2RR AS Door Lock7.5 A3DR Door Lock7.5 A4FR AS Door Unlock10 A5RR AS Door Unlock7.5 A6DR Door Unlock7.5 A7D/L Main20 A8−−9ETS TELE20 A
10 IG1 RR 15 A
11Meter*
Shifter*7.5 A
12 IG1 FR 20 A
13ACC7.5 A
14 − −15DR P/Seat (SLI)20 A
16 S/R 20 A
17RR DR P/W20 A
18 Smart 10 A
19FR DR P/W20 A
20 − −
21Fuel Pump20 A
22 IG1 AS 15 A
23ABS/VSA*
Smart*7.5 A
24 ACG AS 7.5 A
25STRLD*7.5 A
26 IG2 HAC 7.5 A
27DRL(7.5 A)
28 ACC Key Lock 7.5 A
29DR P/Seat (LUM)7.5 A
30 INT Lights 7.5 A
31ETS TILT20 A
32 DR P/Seat (REC) 20 A
33−−34−−
Circuit ProtectedAmps
Page 83 of 84

158 || 159 INDEX INDEX
TABLE OF
CONTENTS
INDEX
VISUAL INDEX
VOICE COMMAND
INDEX
SAFETY
INFORMATION
CLIENT
INFORMATION
INSTRUMENT
PANEL
SPECIFICATIONS
VEHICLE
CONTROLS
MAINTENANCE
AUDIO AND
CONNECTIVITY
HANDLING THE
UNEXPECTED
BLUETOOTH®
HANDSFREELINK®
DRIVING
ACURALINK®
NAVIGATION
Contact Us .................................................... 149
Cross Traffi c Monitor .....................................111
Cruise Control .......................................... 27, 99
Customized Features...................................... 51
Dashboard and Ceiling Controls .................... 2
Destination ..................................................... 80
Detour ........................................................... 83
Dialing a Number............................................70
Door Mirrors ................................................... 42
Door Operation ........................................30, 32
DOT Tire Quality Grading .......................... 144
Driver’s Knee Airbag ......................................... 9
Driving ........................................................... 84
Adaptive Cruise Control (ACC) with Low
Speed Follow ................................. 100
Auto Idle Stop............................................. 96
Blind Spot Information (BSI) ................. 108
Braking ......................................................... 98
Collision Mitigation Braking System™
(CMBS™) ....................................... 103
Cruise Control ............................................ 99
ENGINE START/STOP button .................. 93
Forward Collision Warning (FCW) with
Pedestrian Detection ....................102
Integrated Dynamics System (IDS) ......... 97
Lane Departure Warning (LDW) .............105
Lane Keeping Assist System (LKAS) ...... 106
Maximum Load Limit ................................ 86
Multi-View Rear Camera ......................... 110
Paddle shifters .............................................95
Parking Sensor System ............................ 109
Refueling ..................................................... 114
Remote Engine Start ..................................92
Road Departure Mitigation (RDM) ........107
Sequential Mode .........................................95
Shifting ........................................................ 94
Starting the Engine .................................... 93
Surround View Camera ............................ 112
Towing a Trailer .......................................... 88
Driving Position Memory System ............... 43
DVD ........................................................... 63
Electric Power Steering ..................................25
Electronic Gear Selector ............................... 94
Electronic Stability Control ........................... 97
E-Mail ............................................................73
Emergency Assistance.................................... 76
Emergency Engine Stop ............................... 116
Emergency Towing ........................................129
Engine and Fuel .............................................147
Engine Compartment Cover .......................133
Engine Coolant ..............................................136
ENGINE HOLD button ...................................92
Engine Oil ...................................................... 134
ENGINE START/STOP button ...................... 93
Entering a Destination .................................. 80Exterior lights ............................................27, 35
Fastening a Seat Belt ........................................ 7
Find Nearest Place .......................................... 81
Find Place Commands ..................................152
Flat Tire ..........................................................120
Floor Mats ........................................................ 41
Fluids ..........................................................147
FM/AM Radio ...................................................55
FM/AM Radio Commands ...........................153
Fog lights .......................................................... 27
Foot Brake ....................................................... 98
Forward Collision Warning (FCW) with
Pedestrian Detection ....... 25, 27, 102
Frequently Asked Questions ...................... 148
Front Airbags (SRS) ........................................... 9
Front Door Inner Handle ...............................32
Fuel Information .................................... 96, 114
Fuse Locations ...............................................125
Garage Opener ............................................... 46
Handling Information ...................................... 3
Hang-Up/Back button ...................................67
Hard Disc Drive (HDD) Audio ...................... 58
Hard Disc Drive (HDD) Commands ...........154
HDMI ........................................................... 64
Headlight Washers .........................................35
Headlight-Wiper Integration ........................ 37
Headphones .................................................... 64
Head Restraints .............................................. 40
Heated Steering Wheel ................................ 49
Heated Windshield Button .......................... 49
High beams ...................................................... 27
Home Address ................................................ 80
HomeLink® Garage Opener ......................... 46
Hood ..........................................................133
IDS ............................................................ 97
Immobilizer ......................................................26
INFO button ....................................................78
Instrument Panel ............................................24
Condition Indicators ...................................26
Malfunction Indicators ..............................24
Multi-Information Display ....................... 28
On/Off Indicators ....................................... 27
Integrated Dynamics System (IDS) ............. 97
Interface dial ....................................... 54, 67, 78
Interface Dial Feedback .................................79
Interior Lights ................................................. 36
Intermittent Wipers ....................................... 37
iPod® ............................................................59
iPod® Commands .........................................154
Jump Starting ................................................ 115
Keyless Access System ............................25, 30
Lane Departure Warning (LDW) ......... 25, 105
Lane Keeping Assist System (LKAS).... 25, 106
Lap/Shoulder Seat Belts .................................. 5
LATCH-Compatible Child Seat ..................... 18Light Bulbs......................................................147
Lights ......................................................27, 35
LINK button ..................................................... 76
Lock Tab ............................................................32
Low fuel ............................................................26
Low oil pressure ..............................................24
Low tire pressure .............................................26
Maintenance ................................................. 130
Battery ........................................................ 137
Engine Coolant ..........................................136
Engine Oil .................................................. 134
Maintenance Minder™ ............................ 131
Opening the Hood ....................................133
Service Codes.............................................132
Under the Hood ........................................133
Window Washer Fluid .............................. 137
Wiper Blades ............................................. 138
Making a Call ...................................................70
Malfunction indicator lamp ..........................24
Malfunction Indicators ..................................24
Map Display Commands ............................. 151
Map Legend ..................................................... 82
Master Door Lock Switch ..............................32
Maximum Load Limit .................................... 86
MENU button ..................................... 54, 67, 78
Mirrors ........................................................... 42
Moonroof ........................................................ 34
Multi-Information Display ........................... 28
Multi-View Rear Camera ............................. 110
Navigation ....................................................... 77
AcuraLink Real-Time Traffi c™ .................. 83
Detour .......................................................... 83
Display and Controls ..................................78
Entering a Destination .............................. 80
Find Nearest Place ...................................... 81
Home Address ............................................ 80
Interface Dial Feedback .............................79
Map Legend ................................................. 82
Place Category ............................................ 81
Routing ........................................................ 82
Shortcuts ...................................................... 81
Steering Wheel Controls ........................... 77
Street Address ............................................ 80
System Guidance Volume .........................79
Talk Button Tips........................................... 77
Turn-by-Turn Directions ........................... 82
Voice Prompt ...............................................79
Navigation Commands ................................ 151
On-Demand Multi-Use Display (ODMD) ... 54
One-Touch Turn Signal ................................. 36
On/Off Indicators ........................................... 27
Opening the Hood ........................................133
Operator Assistance ....................................... 76
Overheating ................................................... 117
Paddle shifters .................................................95Pairing a Phone ............................................... 69
Pandora® .......................................................... 61
Pandora® Commands ..................................154
Parking brake ............................................26, 98
Parking Sensor System ................................ 109
Passenger Airbag Off Indicator .................... 12
Phone ........................................................... 69
Phonebook ....................................................... 71
PHONE button ................................................67
Phone Commands ........................................155
Pick-Up button ................................................67
Place Category ................................................ 81
Power Door Mirrors ....................................... 42
Power Mode .................................................... 93
Power Moonroof ............................................ 34
Power Tailgate ................................................. 31
Power Windows ............................................. 33
Rain-Sensing Wipers ..................................... 38
Readiness Codes........................................... 146
Rear Camera .................................................. 110
Rear Climate Control .................................... 48
Rear Cross Traffi c Monitor ............................111
Rear Entertainment System ......................... 63
Rear Seats ........................................................ 44
Rearview Mirror .............................................. 42
Rear Wiper ....................................................... 38
Refueling......................................................... 114
Remote Battery Strength ............................ 115
Remote Control ...............................................65
Remote Engine Start ......................................92
Remote Transmitter .......................................29
Reporting Safety Defects ..............................23
Reverse Tilt Door Mirrors ............................. 42
Road Departure Mitigation (RDM) ..... 25, 107
Roadside Assistance .....................................150
Route Commands ......................................... 151
Routing ........................................................... 82
Safety Information ........................................... 3
Child Safety.................................................. 15
Important Handling Information ............... 3
Reporting Safety Defects ..........................23
Safety Label Locations ...............................22
Safety Messages............................................4
Seat Belts ........................................................... 5
Adjusting the Shoulder Anchor .................. 7
Fastening a Seat Belt .................................... 7
Lap/Shoulder Seat Belts .............................. 5
Seat Belt Inspection ..................................... 6
Seat belt reminder ......................................26
Seat Belt with Detachable Anchor ............8
Seat Heaters and Ventilation ...................... 50
Seats ........................................................... 39
Second-Row Seats .................................. 44, 45
Selector wheel ................................... 28, 53, 67
Sequential Mode .............................................95